9-80 Upgrading Your Server
3.5-inch Disk Model
1.
See page 9-4 to prepare.
2.
Pull out the server from the rack (as described on page 9-4).
3.
Remove the top cover (as described on page 9-24).
4.
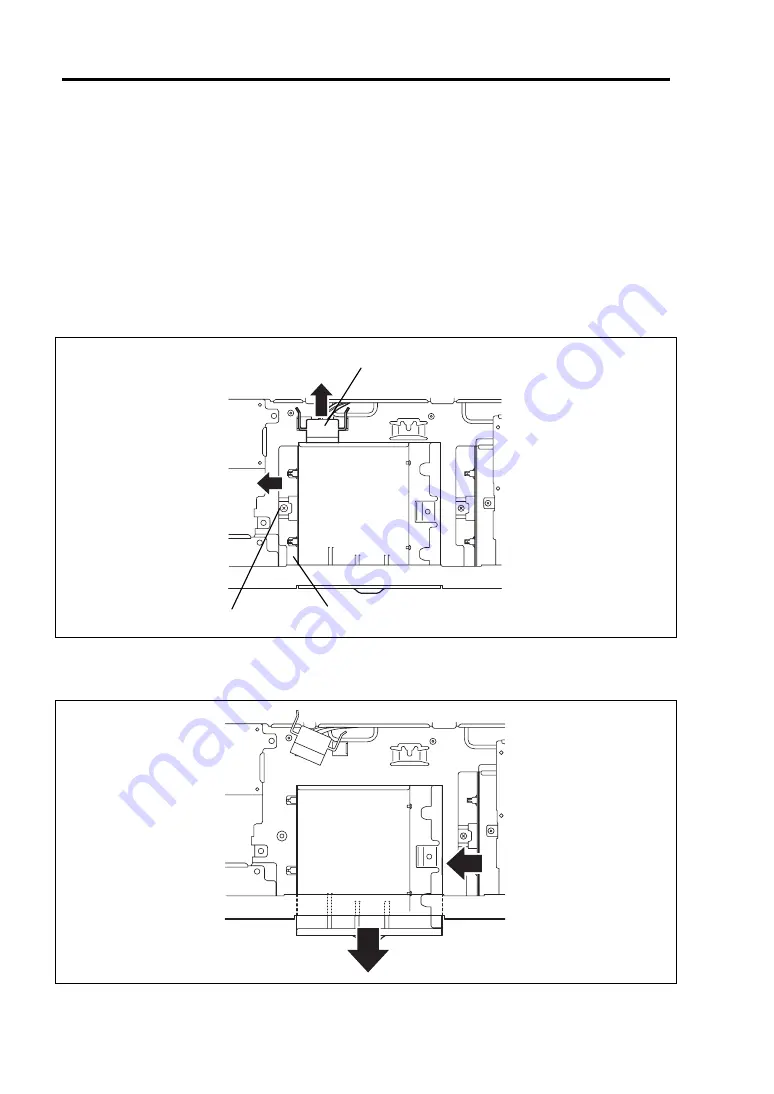
Remove the cable while holding both ends of cable fixing bracket.
5.
Remove the screw from the optical disk drive bracket, and then remove the optical disk
drive bracket.
Move the bracket to the left, viewed from the front of server.
6.
Remove the optical disk drive by sliding it to the direction shown by the arrow mark in
the figure below.
Cable fixing bracket
Optical disk drive bracket
Screw
<1>
<2>
Содержание NEC Express5800 Series
Страница 20: ...Notes on Using Your Server 1 3 3 5 inch disk model ...
Страница 87: ...3 24 Setting Up Your Server This page is intentionally left blank ...
Страница 264: ...6 10 Installing and Using Utilities 4 Click Parameter File Creator Parameter File Creator will appear ...
Страница 268: ...6 14 Installing and Using Utilities Windows Server 2003 ...
Страница 296: ...7 14 Maintenance This page is intentionally left blank ...
Страница 350: ...8 54 Troubleshooting When you use a remote console 6 Each tool is selected and it starts ...
Страница 438: ...9 82 Upgrading Your Server This page is intentionally left blank ...
Страница 450: ...C 2 IRQ This page is intentionally left blank ...
Страница 474: ...D 24 Installing Windows Server 2008 R2 4 Activate Windows The Windows activation is complete ...
Страница 504: ...E 28 Installing Windows Server 2008 4 Activate Windows The Windows activation is complete ...
Страница 564: ......
Страница 566: ...H 2 Using a Client Computer Which Has a CD Drive This page is intentionally left blank ...
Страница 576: ...I 10 Accessing Power and Performance Data This page is intentionally left blank ...
Страница 580: ...J 4 Product Configuration Record Table This page is intentionally left blank ...


