E – 15
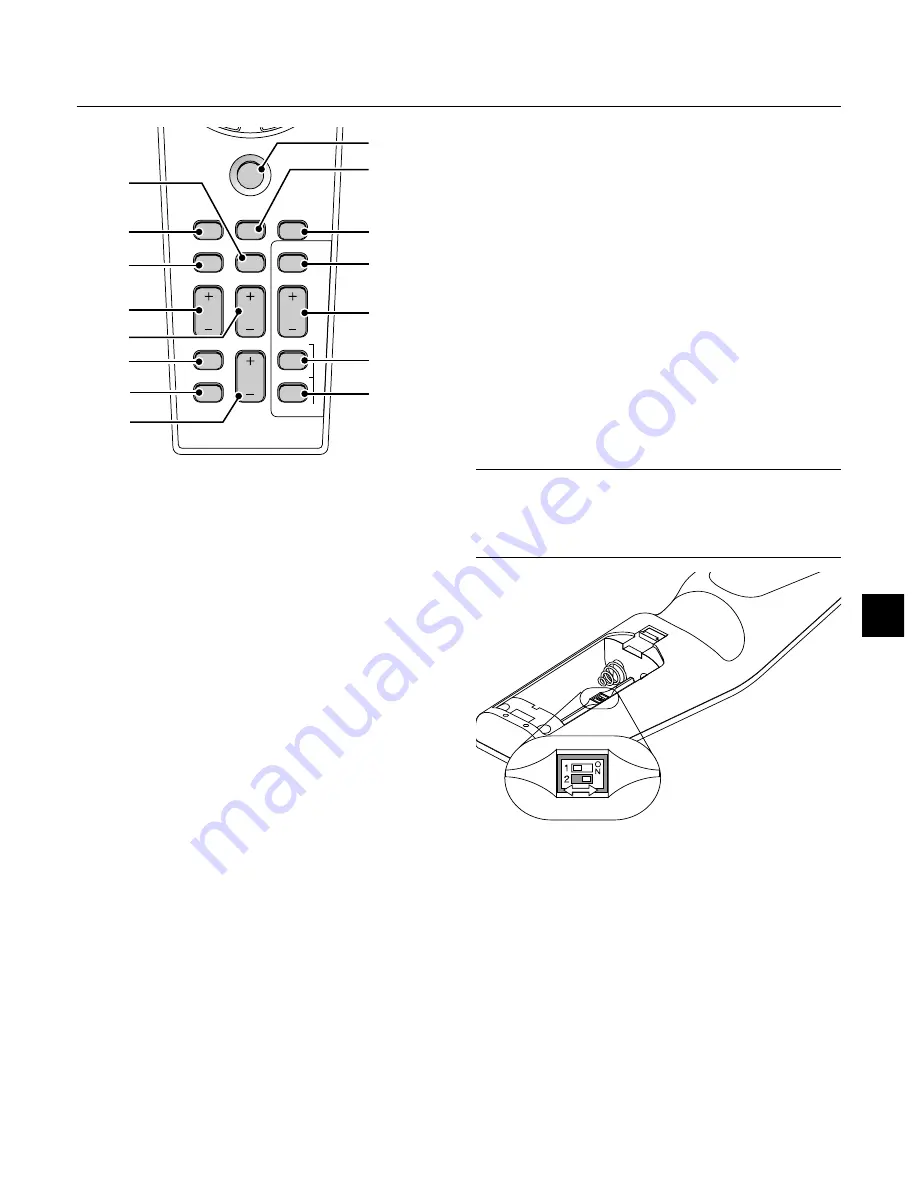
PJ
FOCUS
ZOOM
VOLUME
SHIFT
HELP
POINTER
KEYSTONE MAGNIFY
FREEZE
PIC-MUTE
PC CARD
SLIDE
FOLDER
SLIDE
LIST
17
19
20
28
29
30
31
22
18
21
23
24
25
26
27
17. PJ Button
Press this button to switch the Select, Cancel, and Enter buttons be-
tween the Projector mode (lit red) and the Computer mode. Press this
button or any one of the Power ON/OFF, Menu, Focus, Zoom, Shift,
Help, Pointer, Magnify, PC Card, Folder List or Slide List buttons to
switch to the Projector mode and the PJ button lights red. To switch
back to the Computer mode, press the PJ button again.
18. FOCUS Button
Press this button to display the Focus adjustment window. Use the
or - button to obtain the best focus.
19. ZOOM Button
Press this button to display the Zoom adjustment window. Use the Select
+ or - button to zoom in or out.
20. SHIFT Button
Press this button to display the Shift adjustment window. Use the Se-
lect
,
,
▲
, or
▼
button to shift the lens horizontally, vertically or
diagonally.
21. HELP Button
Provides information about operation and adjustment procedures or
the set information for the current menu or adjustment during menu
operation.
22. POINTER Button
Press this button to display one of the eight pointers; press again to
hide the pointer. You can move your pointer icon to the area you want
on the screen using the Select button.
23. KEYSTONE (+) (–) Button
Press the (+) or (–) button to correct the keystone (trapezoidal) distor-
tion, and make the image square.
24. MAGNIFY (+) (–) Button
Use this button to adjust the image size up to 400%.
When the pointer is displayed, the image is magnified about the center
of the pointer. When the pointer is not displayed, the image is magni-
fied about the center of the screen.
When the image is magnified, the pointer is changed to the magnifying
icon.
25. FREEZE Button
This button will freeze a picture. Press again to resume motion.
26. PICTURE MUTE Button
This button turns off the image and sound for a short period of time.
Press again to restore the image and sound.
NOTE: When the menu is displayed, a press of this button mutes an
image and sound without turning off the menu.
27. VOLUME (+) (–) Button
Press (+) to increase the volume and (–) to decrease it.
28. PC CARD Button
Press this button to select the PC Card Viewer source.
29. SLIDE (+) (–) Button
Press (+) to select the next folder or slide and (–) to select the previous
folder or slide.
30. FOLDER LIST Button
Press this button to select PC Card Viewer source to display a list of
folders included in a PC card.
31. SLIDE LIST Button
Press this button to select PC Card Viewer source to display a list of
slides included in a PC card.
*NOTE:
The default is the Computer mode, which allows you to use the Select,
Cancel, and Enter buttons as your computer mouse. When the POWER ON/
OFF, MENU, FOCUS, ZOOM, SHIFT, HELP, POINTER, MAGNIFY, PC CARD,
FOLDER LIST, or SLIDE LIST button is pressed, the PJ button lights red to
indicate that you are in the Projector mode. If no buttons are pressed within 10
seconds, the light goes out and the Projector mode is canceled.
ON
OFF
Setting the function switch
There are two switches on the bottom of the battery case: an appli-
cable projector selector switch (1) and laser enable/disable switch (2).
Check the projector being used and decide whether to enable or dis-
able laser, then set these switches as necessary using the tip of a thin
ball-point pen.
On this model, an applicable projector selector switch (1) is not used.
Switch (2)
On: Enabled (the laser lights when the LASER button is pressed) [Fac-
tory default]
Off: Disabled (the laser does not light even when the LASER button is
pressed)
Disable the laser when using in an environment in which the unit is
accessible to children.
Содержание GT950 - MultiSync XGA LCD Projector
Страница 6: ......


