background image

Field Service Guidelines  4-13

At this point the following components maybe removed from the unit independently.

„

Sound Board

„

VersaGlide

„

LED Status Board

„

IR board

The Sound Board must be removed to disassemble the computer further (i.e. CD-ROM
Reader, Bridge Battery, FDD/HDD Connector Board, Diskette Drive, Power Board and
Main Board).

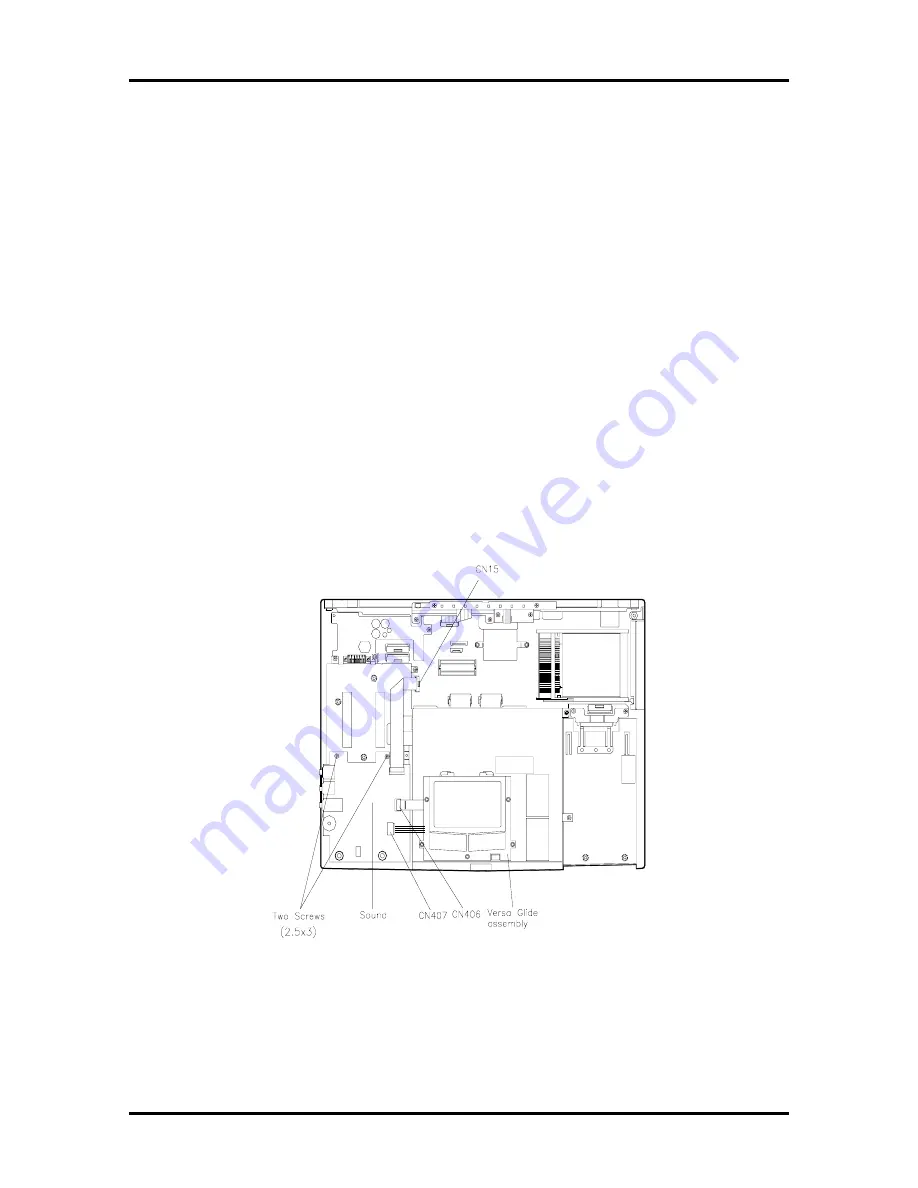
VersaGlide Assembly

Remove the, VersaGlide, as follows

1. 

Remove the prior assembly as previously described.

2. 

Locate the cables that are attached to the sound board at connector CN407 and
CN406 disconnect both cables.


Figure 4-10 Disconnecting the VersaGlide Cables


Содержание 2600

Страница 1: ...NEC Versa 2600 Series Service Guide Art Copy Version ...

Страница 2: ...the Warranty Statement accompanying each product However actual performance of each such product is dependent upon factors such as system configuration customer data and operator control Since implementation by customers of each product may vary the suitability of specific product configurations and applications must be determined by the customer and is not warranted by NECCSD To allow for design ...

Страница 3: ...rd Slots 1 7 Kensington Lock 1 7 Hardware Overview Left Side 1 7 Hardware Overview Rear 1 8 Infrared Port 1 8 Keyboard Mouse Port 1 8 Expansion Port 1 8 Monitor Video Port 1 8 Parallel Port LPT1 1 8 Serial Port COM1 1 9 AC DC Power Port 1 9 Hardware Overview Internal Components 1 9 Battery Pack 1 9 Hard Disk Drive 1 10 Diskette Drive 1 10 10x CD ROM Reader 1 10 CPU Board 1 11 Sound Board 1 12 I O ...

Страница 4: ...anagement 1 21 Plug and Play 1 21 Specifications 1 22 Section 2 Setup and Operation Unpacking the System 2 1 Hardware Setup 2 1 Cable Connections 2 3 Power Sources 2 4 Using the AC Adapter 2 4 Using the Main Battery Pack 2 5 Installing the Battery Pack 2 5 How to Recharge the Battery Pack 2 6 Battery Handling 2 6 Replacing the Battery Pack 2 7 Battery Life 2 8 Extending Battery Life 2 8 Battery Ch...

Страница 5: ...r Management Settings 2 26 Using Fn F3 2 26 Section 3 Troubleshooting Quick Troubleshooting 3 1 Helpful Questions 3 4 Section 4 Field Service Guidelines Preventive Maintenance 4 1 Cleaning the Notebook Exterior 4 2 Cleaning the Notebook Interior 4 2 Protecting the Disk Drives 4 2 Handling the Battery Packs 4 3 Maintaining the LCD Quality 4 3 Disassembly and Reassembly 4 4 Required Tools and Equipm...

Страница 6: ... Appendix A Connector Locations and Pin Assignments Appendix B Video Modes List of Figures 1 1 NEC Versa 2600 Series Notebook 1 1 1 2 Front View 1 3 1 3 Keyboard Layout 1 5 1 4 VersaGlide Location 1 6 1 5 Right Side Features 1 6 1 6 Left Side Features 1 7 1 7 Rear Features 1 8 1 8 CPU Board Layout 1 11 1 9 Sound Board Layout 1 12 1 10 I O Board 1 13 2 1 AC Adapter 2 1 2 2 Powering On the System 2 ...

Страница 7: ...Screws 4 15 4 13 Removing the Bridge Battery and Diskette and Hard Drive Connector Board 4 17 4 14 NEC Versa 2600 Series Illustrated Parts Breakdown 4 19 A 1 CPU Board Layout A 1 A 2 Main Board Layout A 2 A 3 Sound Board Layout A 3 List of Tables 1 1 Model Configurations NEC Versa 2600 Series 1 2 1 2 Memory Map 1 14 1 3 NEC Versa 2600 Series Chip Types and Technologies 1 16 1 4 Interrupt Controlle...

Страница 8: ...ectors A 2 A 3 Sound Board Connectors A 3 A 4 Keyboard Mouse Connectors A 3 A 5 Serial Port Connector Pin Assignments A 4 A 6 CRT Connector Pin Assignments A 4 A 7 Parallel Printer Pin Assignments A 5 A 8 Power Connector A 5 A 9 Hard Disk Drive Connector A 6 B 1 LCD Display Mode Setting 800x600 TFT Color LCD and Simultaneous CRT Display B 1 B 2 CRT Display Mode CRT Only B 3 B 3 Panning Video Mode ...

Страница 9: ... computer dimensions weight envi ronment safety compliance power consumption and system memory specifications Section 2 Setup and Operation takes the authorized service technician or dealer from unpacking to setup and operation The section includes a description of operating controls setting parameters and accessing the NECCSD bulletin board system BBS Section 3 Troubleshooting lists troubleshooti...

Страница 10: ...ersa 2655CD NEC Versa 2650CDT NEC Versa 2655CDT NOTE This service manual covers the NEC Versa 2630CD 2635CD 2650CD 2655CD 2650CDT and 2655CDT models only All fig ures in this manual reflect these models Figure Section 1 1 NEC Versa 2600 Series Notebook This section of the manual provides system configuration information including an over view of hardware and interface components See the following ...

Страница 11: ... DSTN 3 Thin Film Transistor TFT HARDWARE OVERVIEW FRONT Take a moment to become familiar with the location and function of controls located on the front of the system Liquid Crystal Display LCD The LCD operates with the Chips Technologies 65550B VGA controller The controller supports Super VGA uses a 64 bit accelerator with a Peripheral Component Interconnect PCI interface The LCD also supports V...

Страница 12: ...ght ness Figure Section 1 2 Front View Another video feature includes a CRT port on the system s rear panel that allows the user to connect an optional monochrome or color external display to the system The computer can support the LCD and external display simultaneously CD ROM Reader Diskette Drive Battery Bay Power Button LCD Panel Status LEDs LCD Slide Bar VersaGlide Speaker Speaker Microphone ...

Страница 13: ...omponents Status LEDs have the following meanings and light under the conditions noted Status LED icons Power Lets you know that power to the system is turned on This LED is posi tioned so that you see the power state whether the LCD panel is opened or closed lights green when the system is powered on lights amber when battery power is below 10 flashes amber when battery power is below 5 CAUTION B...

Страница 14: ...ion 1 3 Keyboard Layout NEC VersaGlide The NEC VersaGlide is a built in mechanism that functions as the system s mouse It con trols the on screen pointer cursor To use the VersaGlide move your finger across the NEC VersaGlide pad and the cursor follows The buttons below the NEC VersaGlide al low the user to select or deselect menu items Tap and double tap are supported on the VersaGlide pad The PS...

Страница 15: ...te drive come installed in the NEC Versa 2600 Series on the front of the computer HARDWARE OVERVIEW RIGHT SIDE Review the following section for a description of the hardware on the right side of the NEC Versa Figure Section 1 5 Right Side Features VersaGlide Right Selection Button Left Selection Button PC Card Slots Kensington Lock Port ...

Страница 16: ...Lock The Kensington Lock Port gives the user the option to add an optional Kensington Lock HARDWARE OVERVIEW LEFT SIDE Review the following section for a description of the hardware on the left side of the NEC Versa Figure Section 1 6 Left Side Features Line In Use a cable to connect to the Line Out port on the other audio system to record or play Microphone MIC Connects an external microphone for...

Страница 17: ...ort provides a connection for NEC Versa options including the NEC Versa Port Rep licator 2600 Monitor Video Port Use this 15 pin port to attach an external monitor to your NEC Versa You can run the LCD display and the external monitor simultaneously or run either alone Parallel Port LPT1 The 25 pin printer port provides a parallel interface to which you can connect a parallel printer or pocket net...

Страница 18: ...RNAL COMPONENTS Review the following sections for a description of the system s internal hardware Battery Pack The system uses a rechargeable lithium ion Li Ion battery or rechargeable nickel metal hydride NiMH as its transient power source The battery pack installs in the compartment next to the CD ROM reader on the front of the NEC Versa The Li Ion battery stores 14 4 volts with a 2700 mAh capac...

Страница 19: ...minute 4009 Data transfer rate 16 6 MB sec Media data rates 39 6 61 8 Μbit sec Diskette Drive The 3 5 inch 1 44 MB diskette drive is located in the front right of the system 10X CD ROM Reader A 10X CD ROM reader ships with all NEC Versa 2600 Series models This ten speed CD ROM reader features the latest in CD ROM technology It is located in the front center of the system The CD ROM reader operates...

Страница 20: ...haped board situated under the keyboard The NEC Versa 2630CD and 2635CD models ship with Intel s P54CSLM 133 MHz with 66 MHz bus speed Modes 2650CD 2655CD 2650CDT and 2655CDT ship with P55CLM 150 MHz MMX with 60 MHz bus speed Figure Section 1 8 CPU Board Layout ...

Страница 21: ...e sound board provides the NEC Versa system with its audio capabilities via line in and headphone microphone jacks It is situated on top of the I O board The sound board inte grates the following features Figure Section 1 9 Sound Board Layout ...

Страница 22: ...3 6 Volts 60 mAh capacity is attached to CN23 on the underside of the Main board It provides battery backup and prevents data loss in the system s comple mentary metal oxide semiconductor CMOS RAM This memory area contains information on the system s configuration like date time drives and memory The bridge battery also provides power for main battery swapping while in suspend mode The bridge batt...

Страница 23: ...ium P55C 150MMX L2 256 KB PipeLineBurst SRAM Memory Map The system supports system and video shadowing both controlled through complementary metal oxide semiconductor CMOS The system supports BIOS as a cacheable area with write protection Table Section 1 2 lists the system memory map Table Section 1 2 Memory Map Memory Space Size Function 0000000h 0009FFFFh 640 KB DOS Applications Optional Memory ...

Страница 24: ...p with a 25 pin D subconnector The port is located on the system s rear panel The modes of operation available for a PC87336VJG chip are compatibility mode nibble mode byte mode Extended Capabilities Port ECP Enhanced Parallel Port EPP The user selects between three parallel interface modes using Auto Setup These include unidirectional bi directional or enhanced Unidirectional mode sends data outp...

Страница 25: ...roller 208 pin TQFP 82C556M Opti Viper N Data Path Controller 176 pin TQFP 82C558E Opti Viper N PCI IDE ISA Xcelerator 208 pin TQFP PC87336VJG National Semiconductor Diskette Controller IDE Parallel Interface 100 pin QFP H8 3434 Hitachi Keyboard Controller 100 pin TQFP C T 65550B Chips Technologies VGA Controller 208 pin FQFP OZ6730D O2 Micro PC Card Controller 208 pin PQFP ESS1688 ESS Sound Contr...

Страница 26: ...is copied into RAM shadowing for optimum performance The ROM BIOS contains both the system and video BIOS The system BIOS is located in the upper portion of the device video BIOS is located in the lower portion System BIOS is located between F000h FFFFh The BIOS often changes after the product release to provide enhanced features or bug fixes To acquire the latest BIOS release the ROM is flashed e...

Страница 27: ...lly received by sending a response to the controller for each byte of data received PC Card Controller The O2 Micro OZ6730D controller with the PCI bus PC CardBus socket and configuration registers to provide compliant with PCI 2 1 and 1995 PC card standards PC Card slots with hot insertion and removal independent Read and Write buffers for each direction Sound Integrated Circuit The ESS1688 chip ...

Страница 28: ...e Section 1 4 Interrupt Controllers Controller Master Slave Priority Name Device Master 1 IRQ00 System Timer Master 2 IRQ01 Keyboard Master 3 10 IRQ02 Second Interrupt Controller Slave 4 IRQ03 PCMCIA Modem Card default Slave 5 IRQ04 COM1 Internal serial port Slave 6 IRQ05 Sound Chip MIDI default Slave 7 IRQ06 Floppy Disk Drive Controller Slave 8 IRQ07 LPT1 Default internal printer port Slave 9 IRQ...

Страница 29: ...e them manually with the keyboard or a button It is wise to keep Power Management features enabled even when using AC power The system arrives set up with many power saving features already enabled See the fol lowing table Table Section 1 6 Automatic Power Saving Features Device Default Timeout Comment Video 2 minutes Video turns off after there is no keyboard or VersaGlide input for the specified...

Страница 30: ...e of four power management settings for local devices These include Maximum Battery Life Good Battery Life Good Performance and Maximum Performance The power management levels are also available during AC operation The NEC Versa computer ships with Longest Battery Life as the default power management setting See Section 2 for specific procedures on using Auto Setup to select the power man agement ...

Страница 31: ...ch x 0 75 inch high slot front access for standard hard disk drive Two memory connectors for optional memory DIMM s located on the bottom of system Power 100 to 240 Vac at 50 or 60 Hz Output Voltage 15 V DC 1 8 A and 18V 1A Battery Pack Li Ion NiMH Weight 88 lb 400 Kg Voltage 14 4 V Capacity 2700 mAH Battery Life Approximately 1hr 40min to 3 hours depending on model and power management settings R...

Страница 32: ...4 bit Peripheral Component Interconnect PCI bus architecture and built in numeric coprocessor Clock Speed 133 Mhz or 150 MHz CPU Bus Speed 66 6 Mhz 133 MHz 60 Mhz 150 MHz Flash ROM 256 KB E28F002BC T1200 Connector Support Serial 1 port 9 pin D sub Infrared 1 on rear of system IrDA 1 compatible VGA 1 port 15 pin high density D sub External Keyboard External Mouse 1 port PS 2 6 pin MiniDin input fac...

Страница 33: ...olors NEC Versa 2530CD 2635CD 2650CD and 2655CD models 12 1 inch DSTN color LCD 800 x 600 pixels 0 3 mm dot pitch 64 000 colors Internal Device Support Diskette Drive 3 1 2 inch 1 44 MB thin height Hard Disk Drives IDE interface built in 2 1 2 inch x 1 inch high thin height System ships with the 1 44 GB hard disk drive 10x CD ROM Reader Ten speed CD ROM reader External Device Support CRT Displays ...

Страница 34: ...Player Win 95 Only Xing MPEG Player Windows for Workgroups Only Microsoft Works Windows 95 Only models Microsoft Money Windows 95 Only models Return of Arcade Windows 95 Only models Microsoft Sampler Windows 95 Only models Microsoft Internet Explorer Separate CD MPEG Movie Models 2655CD and 2655CDT only Recommended Environment Temperature Operating Storage Transportation 41 to 104 F 5 to 35 C 20 t...

Страница 35: ...on Operation 5 to 150Hz 0 25G XYZ 3 Directions Drop Testing Packed Height 90cm 10 15Kg 1 cornor 3 edges 6 faces Administrative Compliance U S FCC UL Canada CSA DOC Germany VDE TUV CE Australia AS for AC adapter only Other Compliance PC95 Compliance Energy Star VESA PnP VESA PnP ISA Windows 95 Logo ...

Страница 36: ...e the shipping carton on a sturdy surface and carefully unpack the system The carton contents include the system AC adapter AC power cord battery soft ware CDs and user documentation HARDWARE SETUP When connecting power and signal cables do the following NOTE Always plug the AC adapter cord into an easily accessible outlet 1 The power switch turns the system on or off Press to turn it on press aga...

Страница 37: ...ith a permanently attached NEMA type 5 15P plug at one end and a per manently attached connector body on the other Cord length may not ex ceed 15 feet Outside the U S and Canada the cord must be rated for at least 250VAC at 10 amps and must indicate international safety agency approval The plug must be a type appropriate for the country where it is used Obtain replacement cords at an authorized se...

Страница 38: ...ions I O Connector Function IR Port The infrared port allows the transfer of files between the NEC Versa and an IR equipped computer or printing to an IR equipped printer without using cables Keyboard Mouse Port Connects to a PS 2 style mouse or a 101 key external PS 2 style keyboard Expansion Connector Provides a 200 pin connector to attach the optional NEC Port Replicator 2600 Monitor Port Conne...

Страница 39: ... the battery pack Use the AC adapter when ever a wall outlet is nearby WARNING Do not attempt to disassemble the AC adapter The AC adapter has no user replaceable or serv iceable parts inside Dangerous voltage in the AC adapter can cause serious personal injury or death The AC adapter is intended for use with a computer Both must meet EN60950 standards Keep the adapter connected whenever possible ...

Страница 40: ... much battery power you have available Windows 95 Battery Gauge which lets you quickly identify how much battery power you have available When remaining battery power falls to 10 the system emits a single beep when battery power falls to 5 the system beeps once every 60 seconds Installing the Battery Pack Install the battery pack in your system as follows For information about replacing a battery ...

Страница 41: ...tructions 3 Press the Power switch to resume your system WARNING To prevent accidental battery ignition or explosion adhere to the following Keep the battery away from extreme heat Keep metal objects away from the battery terminals to prevent a short circuit Make sure the battery is properly installed in the battery bay Read the precautions printed on the battery Battery Handling Review the follow...

Страница 42: ... Replace the battery pack installed in your NEC Versa 2600 system as follows 1 Save your files exit Windows and turn off system power 2 Close the LCD and turn the system over 3 Press the battery release latch and slide the battery out of the system as shown in the following figure 4 Insert the new battery into the bay pressing it firmly until the release latch clicks Battery Pack Battery Release L...

Страница 43: ...agement These estimates are made under the following conditions When the battery is new and fully charged When no external peripherals are connected to the NEC Versa Your actual operation time on a single battery charge may vary significantly depending on the intensity of system usage Extending Battery Life While on the road it is important to be aware of the simple things you can do to extend the...

Страница 44: ... Replace only with the same or equivalent type recommended by the manufacturer Discard used batteries according to the manufacturer s instructions Keep the battery away from heat sources including direct sunlight open fires microwave ovens and high voltage containers Temperatures over 60ºC 140ºF may cause damage Do not drop or impact the battery Do not disassemble the battery Do not solder the bat...

Страница 45: ...de or lithium Ion battery is the main power source in your NEC Versa 2600 computer Appendix B lists NiMH and Li Ion battery specifications In addition to this battery a bridge battery provide power for system backup Extending Battery Life While on the road it is important to be aware of the simple things you can do to extend the life of the system s main battery One way is to keep the LCD backligh...

Страница 46: ...n to remove the hard disk drive installed in the system Kensington Lock Enables the user to add an optional Kensington Lock to prevent unauthorized use of the computer Volume Control Controls the speaker or headphone volume Headphones Connects external headphones or speakers to the NEC Versa Plugging in headphones disables the built in system speakers Microphone In Connect to an external microphon...

Страница 47: ...er the LCD panel is opened or closed lights green when the system is powered on lights amber when battery power is below 10 flashes amber when battery power is below 5 CAUTION Be sure to save your data immediately when the Power LED turns to yellow flashes yellow or the system beeps Failure to do so may result in data loss Hard Disk Drive Lights when the NEC Versa 2600 writes data to or retrieves ...

Страница 48: ...e Table 2 for a list of ROM based hot keys ROM based hot keys change system parameters temporarily Hot Key functions operate until the system is turned off or reset Table 2 3 Fn Key Operations Key Function Fn Esc Setup During boot up opens the system s Setup program where you can set view or change system parameters Fn F1 Darkens the LCD brightness Fn F2 Brightens the LCD brightness setting Fn F3 ...

Страница 49: ...m configuration for any discrepancies If the message is an Invalid Configuration message press Fn Esc to enter the Setup util ity The system collects Setup data and lists the changes detected in the current parameter settings While in Setup follow the on screen instructions to review the settings and make any necessary corrections If no error messages appear but the system still malfunctions check...

Страница 50: ...repair No boot device available Go into the SCU and check the hard disk type defined Unless you had a different hard disk installed the setting should be Auto Correct the setting Invalid configuration information run SCU Start the SCU check the system parameters set and correct them Exit and save the parameters set Connect the AC adapter to charge the internal backup battery Restart the SCU and se...

Страница 51: ...board might need repair Keyboard controller failure The keyboard might need repair Keyboard stuck key failure A key is jammed Remove any obstructions If the error message remains the keyboard might need professional cleaning or repair NOTE If a display related error occurs it is in dicated by beeps Display related errors usually require a system board replacement SETUP UTILITY The NEC Versa 2600 S...

Страница 52: ...tup The following sections describe how to use Setup including these topics The Setup Screen Using keys Checking and setting system parameters The Setup Screen The Setup screen looks similar to the one following and has five separate areas Startup SystemSoft SCU Nov 18 1996 12 25 23 pm Components Security Key Power Miscellaneous Exit Press Alt key to activate menus and cursor keys to navigate Spac...

Страница 53: ... their functions Table 2 5 Setup Key Functions Key What It Does Alt Activates the menu bar by highlighting Startup Scrolls left or right along the menu bar and highlights the current menu selection Enter or Spacebar Opens the currently highlighted menu or parameter item After highlighting a selection with the arrows use the Spacebar to select a highlighted parameter setting Use the Spacebar or Ent...

Страница 54: ... Alternate Settings Startup Date and Time Boot Device Boot Display Power Switch DAY MO YR HR MIN SEC Floppy Disk A Hard Disk C LCD ON OFF Hard Disk C CRT LCD and CRT Suspend Resume Components Serial IR Ports Serial Ports IR Ports COM1 3F8h IRQ4 COM2 2F8h IRQ3 COM2 2F8h IRQ3 COM3 3E8h IRQ4 COM4 2E8h IRQ3 DISABLED COM1 3F8h IRQ4 COM3 3E8h IRQ4 COM4 2E8h IRQ3 DISABLED Parallel Port LPT1 378h LPT2 278...

Страница 55: ...out CPU Throttle Standby Timeout Suspend Timeout Brightness Lid Close Enabled 2 Min 15 Seconds Good Performance 2 Min 12 Minutes Medium Suspend 1 2 3 4 6 8 10 Min Always On 15 30 45 Sec 1 2 3 4 Min Always ON Maximum Power Savings Good Power Savings Maximum Performance Always On 1 2 3 4 6 8 10 Min 2 4 6 8 12 16 20 Min Low High Standby Backlight off User Setting AC Video Timeout Disk Timeout CPU Thr...

Страница 56: ...ameter setting changes Default Settings To restore the default Setup settings then Exit Version Info Displays information about Setup and BIOS As a new user it is important to check and perhaps change the following parameter set tings Startup Menu Date and Time Set the System Date and Time to the current date and time Use numerical input remember that the hour setting begins at 0 and ends at 23 Th...

Страница 57: ...ore means the speakers are disabled Security Your NEC Versa 2600 supports a password for system security Using the Security screen you can require that a password be entered at each startup or boot You are not prompted to enter a password until you set an initial password Your system is not protected until you set a password Once you set a password you must enter it before your system will boot up...

Страница 58: ...The default is 500 milliseconds ms Typematic Rate Sets the number of characters that appear on screen if a key remains pressed for a second The default is 10 characters per second cps Power The Power drop down menu lets you balance system performance and energy conservation for both battery and AC operation using the following parameters NOTE Some operating systems such as Win dows for Workgroups ...

Страница 59: ...etting AC Lets you set performance and power saving parameters for AC operation Default settings are for maximum system performance PCMCIA Power Permits PC Card socket power to remain on while the system is in Suspend Mode see Using Power Management Miscellaneous Use this drop down menu to set the following parameters Low battery beep default This parameter lets you know when battery power is low ...

Страница 60: ...against data loss due to low battery power You can set some features to function automatically or activate them manually with the keyboard or a button Power Saving Modes The NEC Versa 2600 has three different power consumption states These include Active Mode All components are turned on and active NOTE Even in Active Mode you can specify timeouts for the LCD panel hard disk drive and CPU See Powe...

Страница 61: ...tures DEVICE DEFAULT TIMEOUT COMMENT Video Timeout 2 minutes Shuts off video screen after the timeout specified elapses Hard Disk Timeout 15 Seconds Stops the hard disk motor when the hard disk is not accessed for the specified timeout CPU Throttle Good Performance CPU clocks down to slower speeds Standby Timeout 2 minutes Specifies when the system enters Standby mode after total system inactivity...

Страница 62: ...Also check that the AC adapter is plugged into a properly grounded AC power outlet If using the battery as the main power source check if the battery pack is the right type is charged and is inserted correctly Check the powerboard of the system Is it inserted into the main board connector properly Otherwise replace the powerboard Data on the LCD is unreadable Adjust the brightness control on the r...

Страница 63: ...oard I O processing malfunctions Check the connections of all internal devices Replace the main board Diskette drive does not work Check that the diskette drive cable is connected properly See diskette type is correct and not faulty Replace the diskette drive Replace the main board Hard disk drive malfunction Check if hard disk drive is set properly on CMOS Check if disk drive is good Replace the ...

Страница 64: ...ersaGlide cable inside the system is inserted properly Remove the VersaGlide and clean it Check the keyboard controller chip for any cold or loose solder Replace the main board Serial device does not work Check that the serial device driver is installed properly Check that the serial device is connected properly Replace the serial device Check the I O controller chip on the main board for any cold...

Страница 65: ...urned on and the Power LED activated Are the LCD display controls set to the minimum level Is the LCD display switched to the external monitor Are all cables and devices connected properly and securely Are all needed device drivers installed properly Have you checked the AUTOEXEC BAT and CONFIG SYS files for errors Is Suspend mode activated Press any key or press the Power switch to return the sys...

Страница 66: ...Assembly identifies all field replaceable parts with the re mainder of the section containing the removal and replacement procedures for the field replaceable parts Illustrated Parts Breakdown contains an exploded view diagram and a listing of field replaceable parts with part numbers Service and Product Information lists NEC service and information telephone numbers PREVENTIVE MAINTENANCE Prevent...

Страница 67: ...inside of the notebook remove dust and other foreign particles from inside the system unit as follows 1 Remove the top cover and keyboard using the disassembly procedures discussed later in this section 2 Dust or vacuum with a rubber tipped nozzle the inside of the system particularly the motherboard surface Use care to avoid damaging or dislodging any components or cables 3 Inspect all cables con...

Страница 68: ...e the follow ing precautions when handling the battery packs Do not drop the battery packs or subject them to excessive shock and vibration Do not expose the battery packs to direct sunlight moisture chemical com pounds or extreme heat Do not disassemble the battery packs Do not use the battery packs to power other devices Do not short the battery leads or connect the battery with reversed polarit...

Страница 69: ...See Page 1 Battery Pack 4 5 2 Hard Disk Drive 4 6 3 Keyboard 4 7 4 Heat Shield and CPU Board 4 9 5 LCD and Top Cover 4 11 6 VersaGlide Assembly 4 13 7 Sound Board 4 14 8 LED Status Board and IR Board 4 15 9 10X CD ROM Reader and Heat Shield 4 15 10 Bridge Battery and FDD HDD Connector Board 4 16 11 Diskette Drive 4 17 12 Power Board 4 18 13 Main Board 4 18 When disassembling the system unit follow...

Страница 70: ...driver Small Hex bolt screwdriver Small utility knife Rubber finger tip Right angled dentist style probe Battery Pack Remove the battery pack installed in the NEC Versa 2600 system as follows 1 Make sure the power is off 2 Close the LCD and turn the system over 3 Press the battery release latch and slide the battery out of the system Battery Pack Battery Release Latch Figure 4 1 Releasing the Batt...

Страница 71: ...powered off while the hard drive is being removed and installed 1 Pull down the hard drive latch located on the right front of the computer Pull Down Hard Drive Latch Figure 4 2 Removing the Hard Disk Drive Step 1 2 Pull the hard drive latch forward as shown next Pull Out Hard Drive Latch Figure 4 3 Removing the Hard Disk Drive Step 2 3 Continue pulling on the latch until you remove the hard drive...

Страница 72: ...ollowing keys to re lease the four locking tabs that secure the keyboard Fn and Ctrl Alt and Space Bar Space Bar and Alt Ctrl and the key to the right that contains the Tilde 2 Use the same screwdriver to gently lift the front edge of the keyboard up and to wards the LCD screen 3 Disconnect the two Keyboard cables from Connectors CN10 and CN11 on the Main board 4 Remove the Keyboard from the syste...

Страница 73: ...4 8 Field Service Guidelines Figure 4 5 Removing the Keyboard ...

Страница 74: ... Heat Sink Shield Subassembly NOTE When disassembling the laptop keep screws and stand offs with their proper subassemblies to insure proper reassembly 1 Remove the following items three screws securing the heat sink and heat shield one screw securing the LCD ribbon cables to the heat shield LCD ribbon cables disconnect from connectors CN5 and CN6 on the main board ...

Страница 75: ... corner in a clockwise direction while lifting up on the heat shield subassembly and at the same time gently apply a slight outward press to the plastic forward of the inboard right latch cover 3 Now lift the front edge of the CPU board gently until the CPU board separates the connectors on the main board Figure 4 7 Removing the CPU Board ...

Страница 76: ... gripping ease and slide the plates from the laptop NOTE During reassembly there is a left and a right front plate Remove two screws from each bay NOTE During reassembly the screw under the left plate are 2 5 x 6 and 2 5 x 3 5 under the right plate Figure 4 8 Removing the LCD Assembly Step 1 2 Remove two each Left and Right Hinge covers by inserting a ceramic tip screw driver or fingernail in the ...

Страница 77: ...ands to carefully partially separate do not try to totally separate at this time the LCD and top cover from the bottom base assembly Figure 4 9 Removing the LCD Assembly Step 2 6 Disconnect the Speaker Assembly cable from connector CN403 7 Disconnect the two LCD cables 8 It is now OK to totally separate the LCD and cover from the chassis assembly NOTE If you choose to close the LCD screen at this ...

Страница 78: ...o disassemble the computer further i e CD ROM Reader Bridge Battery FDD HDD Connector Board Diskette Drive Power Board and Main Board VersaGlide Assembly Remove the VersaGlide as follows 1 Remove the prior assembly as previously described 2 Locate the cables that are attached to the sound board at connector CN407 and CN406 disconnect both cables Figure 4 10 Disconnecting the VersaGlide Cables ...

Страница 79: ...les are connected to CN406 and CN407 disconnect at this time Remove the two screws at the back edge of the sound board Lift the Sound Board to remove LED Status Board and IR Board Remove the LED Statue Board and IR Board as follows Disconnect cable at CN20 on the Main Board Each of these boards are attached by two screws remove screws lift off the LED status board for the IR board gently spread th...

Страница 80: ...es 4 15 2 Disconnect the following cables at connectors CN15 CN25 and CN26 Figure 4 11 Removing the CD ROM Reader 2 Remove six screws securing the CD ROM and heat shield Figure 4 12 Removing the CD ROM Reader Assembly Screws ...

Страница 81: ...kette and Hard Drive Connector Board Remove the Bridge Battery or Connector Board as follows 1 Remove the following as previously described Keyboard Heat Sink LCD Assembly CD ROM Reader and Heat Shield 2 Remove the Bridge Battery as follows Remove the four screw at the front of the black insulator sheet Lift the black insulator sheet up at the left front corner and at the same time slide the insul...

Страница 82: ...skette Drive Remove the Diskette Drive as follows Remove the two stand offs Disconnect the ribbon cable at connector CN19 on the Main Board Remove four screws two from each side of the battery bay housing and diskette assembly Remove and save the tape die cut that covers the bottom jointing edge of the hard drive bay and the chassis assembly Lift the Diskette Drive out of the chassis assembly Remo...

Страница 83: ...y process When reassembling use only the proper screws and stand offs in their appropriate locations Make sure that all connectors are properly connected and don t over tighten when replacing screws ILLUSTRATED PARTS BREAKDOWN The next section contains the NEC part numbers and illustrated parts breakdown IPB fig ure for the NEC Versa Figure 4 14 shows the system exploded view diagram or IPB Ta ble...

Страница 84: ...e Guidelines 4 19 Figure 4 14 NEC Versa 2600 Series Illustrated Parts Breakdown Models 2630CD PC 6600 41703 2635CD PC 6610 41703 2650CD PC 6620 41803 2655CD PC 6630 41803 2650CDT PC 6620 91803 2655CDT PC 6630 91803 ...

Страница 85: ...3512270 3RE0B13512870 8 LCD Hinge Covers Left 2 per unit 3RE2234503920 9 LCD Hinge Covers right 2 per unit 3RE2234503930 10 VersaGlide Assembly 3RE0B13512300 11 Logo NEC 136 600325 A 12 LCD Assembly 12 1 DSTN 12 1 TFT 3RE0194500990 3RE0194501010 13 Intel Inside Sticker 158 030621 001 14 Logo Badge Versa 2630CD 2635CD 2650CD 2650CDT 2655CD 2655CDT 158 032200 009 158 032200 010 158 032200 011 158 03...

Страница 86: ...rive 1GB 1 44GB 158 057303 000 808 874011 512A 29 33 6 U S Robotics Modem 158 057200 007 30 Assembly Status and Charger 3RE0B13513000 31 IRDA Assembly 3RE0B13512280 32 Lid SIMM 3RE2129500812 33 Shipping Carton Brown Box 158 041020 000 34 Shipping Carton Litho 158 041032 000 35 NEC Versa 2600 User s Guide 819 200227 000 36 NEC Versa 2600 Series Service and Reference Manual Models 2630CD 2635CD 2650...

Страница 87: ...ends the latest information about NEC products to the fax machine 24 hours a day In the U S and Canada call 1 888 329 0088 Outside U S 1 978 635 6090 TECHNICAL SUPPORT NECCSD Customer Service Response Center provides an E mail service for Internet users Technical questions regarding NEC products can be sent over the Internet system to the Center The Internet address is as follows tech support necc...

Страница 88: ...s 5800 Server System technical support infor mation Catalog 6 NEC Ready Systems technical support information Catalog 7 Powermate Systems technical support information Catalog 8 NEC Portable System including Versa Notebooks and MobilePro Handheld Personal computers technical support information ORDERING INFORMATION FROM FAXFLASH Order information from FaxFlash as follows 1 Check that the fax machi...

Страница 89: ...r 011 your country code area code or city code then your fax number The information requested will be sent automatically to your fax machine If FaxFlash at tempts to send the second order before the first order is completed the order could be can celed After three tries FaxFlash assumes that the line is busy ...

Страница 90: ...signments Figure A 1 and Table A 1 show CPU board connectors The remaining tables provide pin assignments for additional system connectors Figure A 1 CPU Board Layout Table A 1 CPU Board Connector Connector Description CN1 Main Board Connector ...

Страница 91: ...onnector CN7 Monitor Connector CN8 PC Card Connector CN10 Keyboard Connector CN11 Keyboard Connector CN12 Parallel Connector CN13 Serial Connector CN18 HDD Connector CN19 FDD Connector CN20 LED Status Board Connector CN21 Keyboard Mouse Connectors CN22 Expansion Connector CN24 DC to DC Converter Board Connector CN25 CD ROM Connector CN26 CD ROM Connector ...

Страница 92: ...r Description CN409 Line In Connector CN402 Microphone Connector CN401 Headphone Connector CN405 Main Board Connector CN406 VersaGlide Connector CN407 VersaGlide Connector CN403 Speaker Connector Table A 4 Keyboard Mouse Connectors Pin Signal 1 Keyboard Data 2 Mouse Data 3 Ground 4 5V 5 Keyboard Clock 6 Mouse Clock ...

Страница 93: ... Transmit Data 4 Data Terminal Ready 5 Ground 6 Data Set Ready 7 Request to Send 8 Clear to Send 9 Ring Indicator Table A 6 CRT Connector Pin Assignments Pin Signal 1 Red 2 Green 3 Blue 4 OPT1 5 Ground 6 Ground 7 Ground 8 Ground 9 5V PnP VESA Vcc 10 Ground 11 OPT2 12 PnP VESA Data 13 Horizontal Sync 14 Vertical Sync 15 PnP VESA Clock ...

Страница 94: ...Signal 1 Strobe 2 Data Bit 0 3 Data Bit 1 4 Data Bit 2 5 Data Bit 3 6 Data Bit 4 7 Data Bit 5 8 Data Bit 6 9 Data Bit 7 10 Acknowledge 11 Busy 12 PE 13 Select 14 Auto Feed XT 15 Error 16 Initialize 17 Select In 18 25 Ground Table A 8 Power Connector Pin Signal 1 Ground 2 DCSYS 3 DCCHG 4 Type ...

Страница 95: ...Chip Select 0 4 5 5 Chip Select 1 6 5V 7 Address 0 8 5V 9 Address 2 10 5V 11 Address 1 12 5V 13 Diagnostic 14 Not Used 15 IRQ 16 Not Used 17 Not Used 18 IO Channel Ready 19 MS Select 20 IO Write 21 I O Read 22 Not Used 23 Data 0 24 Data1 25 Data15 26 Data14 27 Data2 28 Data13 29 Data3 30 Not Used 31 Data12 32 Ground ...

Страница 96: ...gnments A 7 Table A 9 Hard Disk Drive Connector Pin Signal 33 Data4 34 Ground 35 Data4 36 Ground 37 Data5 38 Ground 39 Data10 40 Ground 41 Data6 42 Ground 43 Data9 44 Ground 45 Data7 46 Not Used 47 Ground 48 Ground 49 RESET 50 Ground ...

Страница 97: ... guidelines 4 4 Diskette drive 1 6 1 10 Display 1 24 E Entering setup 2 17 Expansion port 1 8 Extending battery life 2 8 F Field replaceable parts list 4 18 Flash ROM 1 17 Function keys 2 13 H Handling battery packs 4 3 Hard disk drive 1 10 specifications 1 10 Hard disk drive connector pin assignments A 7 Hardware failures 2 15 Hardware Overview VersaBay II 1 6 Headphones 1 7 I I O board 1 13 I O ...

Страница 98: ... 4 2 12 Power Management Active mode 2 25 default settings 2 26 How to use 2 25 power saving modes 2 25 Standby mode 2 25 Suspend mode 2 25 Power management modes active 1 21 local standby 1 21 suspend 1 21 Power management overview 1 20 Power sources 2 4 Power switch 2 11 Power on self test POST 2 14 Product information 4 23 Q Quick troubleshooting 3 1 R Replacing the battery pack 2 7 4 5 ROM BIO...

Страница 99: ...tem setup 2 1 System specifications 1 22 System status icons 2 12 System video 1 15 T Technical support 4 22 Troubleshooting helpful questions 3 4 U Unpacking 2 1 Updating the BIOS 2 13 V VersaGlide 1 5 VGA controller 1 17 Video mode CRT only 1 15 Video RAM 1 15 Volume control 1 7 Y Y cable adapter 1 8 ...

Страница 100: ...manufacturer s instructions ATTENTION Il y a danger d explosion s il y a replacement incorrect de la batterie Remplacer uniquement avec une bat terie du même type ou d un type recommandé par le constructeur Mettre au rébut les batteries usagées conformément aux instructions du fabricant BATTERY DISPOSAL The bridge battery is made of nickel metal hydride NiMH The main battery and CMOS battery are m...

Страница 101: ...e the receiving antenna Increase the separation between the equipment and receiver Connect the equipment to an outlet on a circuit different from the one to which the receiver is connected To meet FCC standards shielded cables and power cords are required to connect this device to a personal computer or other Class B certified device Canadian Department of Communications Compliance Statement This ...

Отзывы: