7
Input Menu
Press the
INPUT
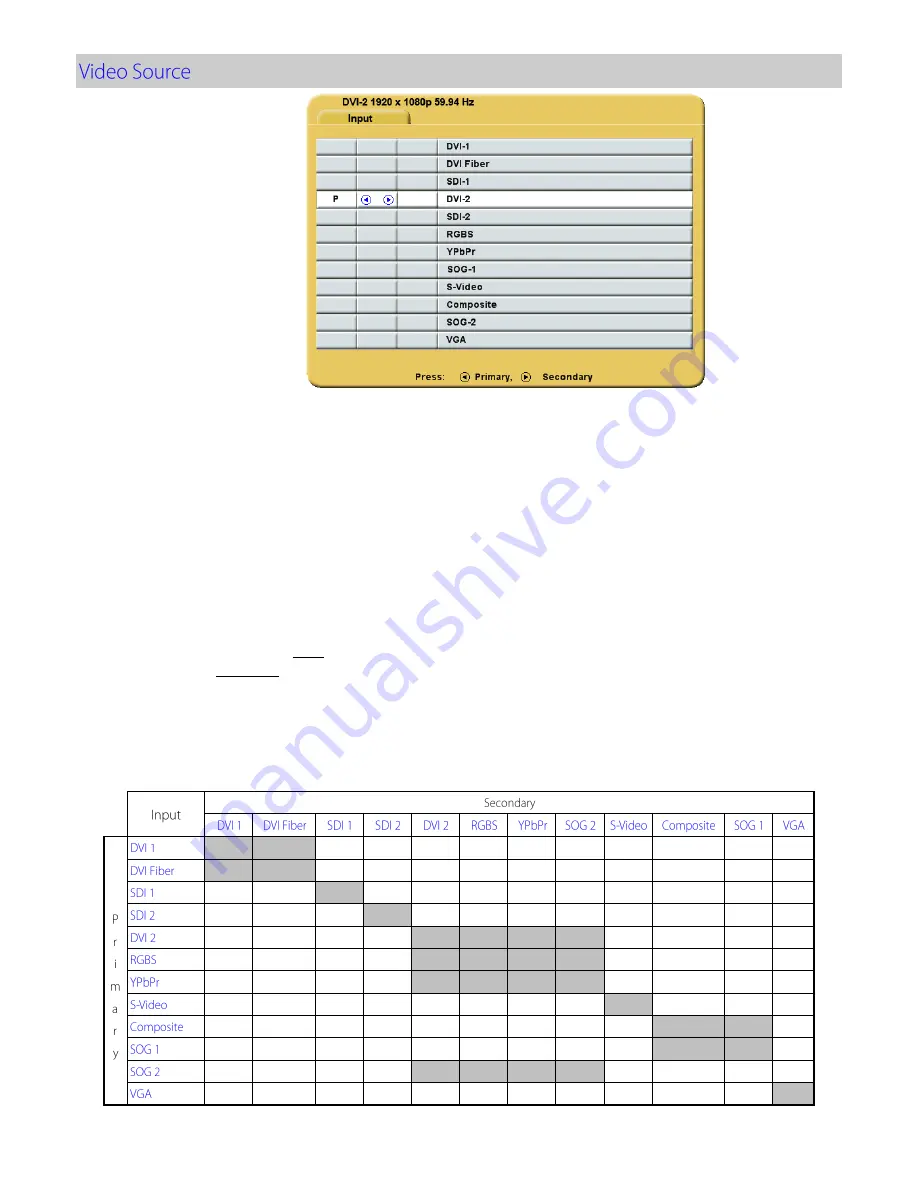
button twice to open the input menu. The Input menu shows a:
P
for primary input in the
left most column and an:
S
for secondary
input in the column to the right of the cursor. Press the
SCROLL
button to highlight the desired input. Finally, press
◄
button to make it the primary input or press
►
to
make it the secondary input. The secondary input may be cleared by highlighting it using the
SCROLL
button and pressing the
►
button. Selecting a secondary input is optional.
Note:
Grayed out inputs are
not accessible.
The Input menu will automatically turn off 30 seconds after the most recent button press. It may also be
turned off by pressing the Input button.
The table below shows which inputs may be secondary when a given input is primary. Inputs marked with
a
√
in the secondary column may be designated as the secondary input. Inputs marked with an
X
in the
secondary column may not be designated as the secondary input. The gray cells denote those inputs that
share a common connector or common electronics and thus may not used simultaneously.
DVI 2, RGBS
,
YPbPr
and
SOG 2
share the same input. Thus if one is selected as the primary input, the
others may not be selected as secondary. The same is true for
Composite,
SOG 1
and
VGA
.
√
√
√
√
√
√
√
√
√
√
√
√
√
√
√
√
√
√
√
√
√
√
√
√
√
√
√
√
√
√
√
√
√
√
√
√
√
√
√
√
√
√
√
√
√
√
√
√
√
√
√
√
√
√
√
√
√
√
√
√
√
√
√
√
√
√
√
√
√
√
√
√
√
√
X
√
√
√
√
√
√
√
√
√
√
X
√
√
√
√
√
√
√
√
√
√
X
√
√
√
√
√
√
√
√
√
√
√
√
√
√
√
√
√
√
X
Содержание Radiance G3
Страница 1: ...Radiance G3 26 USER MANUAL ENGLISH ...
Страница 2: ......
Страница 4: ......
Страница 8: ......
Страница 25: ...17 ...
Страница 29: ...21 ...
Страница 32: ...24 ...
Страница 33: ...25 ...
Страница 34: ...26 0 01 0 12 0 12 0 23 0 1 0 38 0 38 0 73 1 1 2 1 2 2 3 10 3 8 3 8 7 3 100 12 12 23 ...
Страница 35: ......


