background image

EN

W415-1426 / D / 05.22.19

7


general information

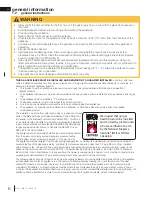
1.4 

rating plate information

This illustration is for reference only.  Refer to the rating plate on the appliance for accurate information.

Certified to Canadian and American National Standards: 

CSA 2.22-2016 / ANSI Z21.50-2016 for Vented Decorative Gas Appliances

Certifié selon les normes Nationales Canadiennes et Américaines: 

CSA 2.22-2016 / ANSI Z21.50-2016 pour les Appareils à gaz décoratif à évacuation

Direct vent, vented gas fireplace. Approved for bedroom, bathroom and bed-sitting room installation. Suitable for mobile home installation, if installed in accordance with the current 
standard CAN / CSA Z240MH Series gas equipped mobile homes in Canada, or, in the United States, the 

Manufactured Home Construction and Safety Standard, Title 24 CFR, Part 

3280

. When this US Standard is not applicable, use the 

Standard for Fire Safety Criteria for Manufactured Home Installations, Sites and Communities

, ANSI / NFPA 501A. This appliance 

must be installed in accordance with local codes, if any; if none, follow the current ANSI Z223.1 or CSA B149. 

For use with barrier W565-0195. Follow installation instructions.

Foyer à gaz ventilé. Homologué pour installation dans une chambre à coucher, une salle de bain et un studio. Approprié pour installation dans une maison mobile si son installation 
conforme aux exigences de la norme CAN / CSA Z240MH Séries de maisons mobile équipées au gaz en vigueur au Canada, ou, aux États-Unis selon la norme 

24 CFR, Part 3280, 

Manufactured Home Construction and Safety Standard

. Dans le cas ou cette norme d’États-Unis n’est pas pertinentes, utiliser la norme 

NFPA 501A, Fire Safety Criteria for Manufactured 

Home Installations, Sites and Communities

. Installer l’appareil selon les codes ou règlements locaux ou, en l’absence de tels règlements, selon les codes d’installation ANSI Z223.1 ou 

CSA B149 en vigueur. 

Utilisez uniquement avec l’écran W565-0195. Suivre les instructions d’installation.


9700539 (WSL) 

4001658 (NAC) 

4001657 (NGZ) 

4001659 (WUSA)

WOLF STEEL LTD. 

24 Napoleon Road, Barrie, ON, L4M 0G8 Canada

Manifold Pressure: 

3.5” w.c. (NG)

Minimum Supply Pressure: 

4.5” w.c. (NG)

Maximum Supply Pressure: 

7”** w.c. (NG)

Pression au Collecteur: 

3,5” d’une colonne d’eau (GN)

Pression d’Alimentation Min.: 
Pression d’Alimentation Max.: 

**Maximum inlet pressure not to exceed 13”.

Manifold Pressure: 

10” w.c. (P)

Minimum Supply Pressure: 

11” w.c. (P)

Maximum Supply Pressure: 

13” w.c. (P)

Pression au Collecteur: 

10” d’une colonne d’eau (P)

Pression d’Alimentation Min.: 

11” d’une colonne d’eau (P)

Pression d’Alimentation Max.: 

13” d’une colonne d’eau (P)

**Pression d’alimentation maximale ne devait pas dépasser 13”.

Minimum clearance to combustible materials: / Dégagements minimaux des matériaux combustibles:  

Minimum and maximum horizontal vent lengths are 25” and 20’ 
respectively. 
Les longeurs horizontales minimale et maximale sont 25 pounces 
et 20 pieds respectivement.
This appliance must be installed using an adapter kit GS-150KT.
Cet appareil doit être installé en utilisant un ensemble adaptateur 
GS-150KT.

Insert test-
ing agency 

logo

Serial Number / N° de Série: 

W385-1998 / C

GDS28

WARNING

Do not add any material to the appliance which will come in contact with the 

flames, other than that supplied by the manufacturer with the appliance.

AVERTISSEMENT

:  

N’ajoutez pas à cet appareil aucun matériau devant entretien 

contact avec les flammes autre que celui qui est fourni avec cet appareil par le fabricant.
The appliance must be vented using the appropriate Napoleon vent kits. See installation 
manual for venting specifications. Proper reinstallation and resealing is necessary after servicing 
the vent-air intake system.
L’appareil doit être ventilé à l’aide de l’ensemble d’évacuation propre à Napoleon. Référez au 
manuel d’installation pour les spécifications d’évacuation. Il est nécessaire de bien réinstaller et 
resceller l’évacuation après avoir executer l’entretien du système de prise d’air.
Electrical rating: 115V, 60HZ. Less than 12 amperes.
Spécifications électriques: 115V, 60HZ. Moins de 12 ampère.

VENTED DECORATIVE GAS APPLIANCE: NOT A SOURCE OF 
HEAT, NOT INTENDED FOR USE AS A HEATING APPLIANCE, 
NOT FOR USE WITH SOLID FUEL.
APPAREIL À GAZ DÉCORATIF À ÉVACUATION: N’EST PAS 
UNE SOURCE DE CHALEUR; N’EST PAS DESTINÉ À ÈTRE 
UTILISÉ COMME UN APPAREIL DE CHAUFFAGE; NE 
CONVIENT PAS AUX COMBUSTIBLES SOLIDES.

FOR USE WITH GLASS DOORS CERTIFIED WITH THIS APPLIANCE ONLY.
POUR UTILISATION UNIQUEMENT AVEC LES PORTES EN VERRE 
CERTIFIÉES AVEC L’APPAREIL.

Refer to the Intertek Directory of Building Products (https://bpdirectory.intertek.com) for 
detailed information.

A

7"

B

2"

C

1"

20” to ceiling from stove top.
20” entre le dessus de l’appareil et le plafond.


  GDS28-N  

  CDVS280-N 


GDS28-P   

CDVS280-P

DIRECT VENT MODEL / MODÈLE D’ÉVENT DIRECT 

Altitude / Élévation

Input / Alimentaion*

Reduce Input / Alimentation Reduite

Output (Model GDS28) / Rendement

Output (Model GS28) / Rendement

P4


GS28-N 


CS280-N 

  GS28-P 

 CS280-P

“B” VENT MODEL / MODÈLE D’ÉVENT « B »  

D

17 1/2"

E

6 1/4"

F

9 1/2"

0-4,500ft (0-1370m)
30,000 BTU/hr
18,000 BTU/hr
25,500 BTU/hr
24,600 BTU/hr
63.6%

0-4,500ft (0-1370m)

26,000 BTU/hr
15,000 BTU/hr
22,360 BTU/hr
21,600 BTU/hr

63.2%

* Altitude downrating conditions apply to Canada only. 
* Les conditions de baissé d’évaluation selon l’altitude s’appliquent 
au Canada seulement.

SAMPLE

SAMPLE

appliance

uctions.

e si son installation

 son

orme

me 

24 CFR, Part 3280,

24 CFR,

A, Fire Safety Criteria for Manufactured 

ty Criteria fo

lon les codes d’installation ANSI Z223.1 ou

es codes d’installation ANS

WOLF 

G)

re: 

4.5” w.c. (NG)

Pressure:

7”** w.c. (NG)

Collecteur: 

Collecteur: 

3,5” d’une colonne d’eau (GN)

3,5” d’une colonne d’eau (GN)

on d’Alimentation Min.: 

n d’Alimentation Min

Pression d’Alimentation Max.: 

sion d’Alimentation Max.

**Maximum inlet pressure not to exceed 13”.

Maximum inlet pressure not to e

Manifold Pressure: 

Manifold Pressure: 

10” w.c. (P)

10” w.c

Minimum Supply Pressure: 

Minimum Supply Pressure: 

11” w.c. (P)

11” w.c. 

Maximum Supply Pressure: 

Maximum Supply Pre

13” w.c. (P)

13” w.c. (P

Pression au Collecteur: 

ssion au Collecteur: 

10” d’une colonne d’eau (P)

10” d’une colonne d’eau (P

Pression d’Alimentation Min.: 

Pression d’Alimentation Min.: 

11” d’une colonne d’eau (

11” d’une colonne d’ea

Pression d’Alimentation Max.:

Pression d’Alimentation Max.: 

13” d’une colonne 

13” d’une

**Pression d’alimentation maximale ne devait pa

**Pression d’alimentation maximale ne devait 

Minimum clearance to combustible materials: / Dégagements minimaux des matériaux com

Minimum clearance to combustible materials: / Dégagements minimaux des matériaux co

Minimum and maximum horizon

mum and maximum horiz

respectively. 

ctively. 

Les longeurs horiz

eurs ho

et 20 pieds
This 

LE

LE

LE

E

E

E

E

E

E

LE

LE

E

E

LE

E

E

E

E

E

E

E

E

E

E

E

VENTED DECORATIVE GAS APPLIANCE: NOT A SOURCE OF 

VENTED DECORATIVE GAS APPLIANCE: NOT A SOURCE OF 
HEAT, NOT INTENDED FOR USE AS A HEATING APPLIANCE

HEAT, NOT INTENDED FOR USE AS A HEATING APPLIANC
NOT FOR USE WITH SOLID FUEL.

NOT FOR USE WITH SOLID 
APPAREIL À GAZ DÉCORATIF À ÉVACUATION: 

APPAREIL À GAZ DÉCORATIF À ÉVACUATION
UNE SOURCE DE CHALEUR; N’EST PAS 

UNE SOURCE DE CHALEUR; N’EST PAS
UTILISÉ COMME UN APPAREIL D

UTILISÉ COMME UN APPAREIL 
CONVIENT PAS AUX CO

CONV

FOR USE WITH GLAS

FOR USE
POUR UTILISA

OUR UT

CERTIFIÉ

ERTIF

S

A

A

7"

B

B

2"

C

C

1"

1"

20” to ceiling from stove

20” to ceiling from st
20” entre le dess

20” entre le dess

S280-P

80-P

n

mentaion*

aion*

t / Alimentation Reduite

tion Reduite

t (Model GDS28) / Rendement

Rendement

Output (Model GS28) / Rendement

utput (Model GS28) / Rendement

P4


CS280-P

CS280-P

M

SA

S

SA

S

S

SA

SA

SA

SA

A

A

A

A

A

A

A

A

A

D

D

17 1/2"

17 1

E

E

6 1/4

6 1

F

F

0-4,500ft (0-1370m)

0-4,500ft (0-1370m)

26,000 BTU/hr

26,000 BTU/hr
15,000 BTU/hr

15,000 BTU/hr
22,360 BTU/hr

22,360 B
21,600 BTU/hr

21,600 BT

63.2%

63

note:

The rating plate must remain with the appliance at all times. It must not be removed.

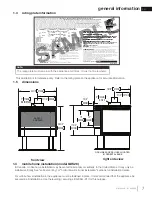
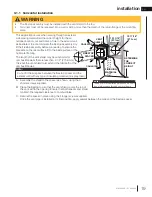
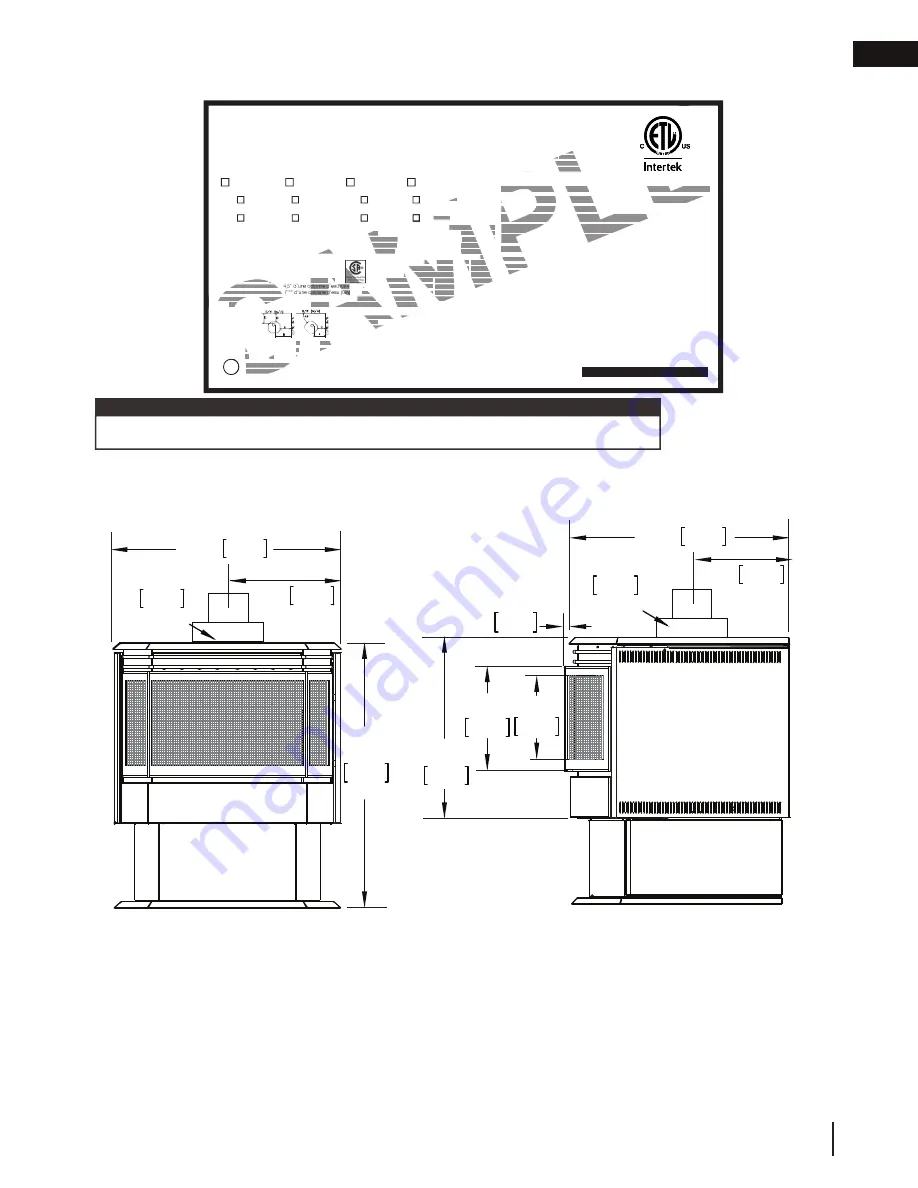
1.5 dimensions

GAS LINE ACCESS HOLE LOCATED 

IN PEDESTAL BASE

26 3/4"

680mm

22 1/2" 572mm

11 1/4" 286mm

7" 178mm

Ø AIR INTAKE

10"

254mm

12"

305mm

17 3/4"

451mm

18 1/2" 470mm

5 1/2" 127mm

4" 102mm

Ø FLUE

SAFETY

BARRIER

1 3/4"

44mm

front view

right side view

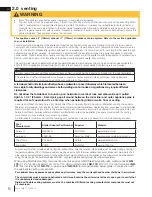
1.3 

mobile home installation (model GDS28)

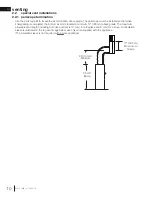
In Canada, mobile home installation may be vented horizontally or vertically. In the United States, it may only be 
installed vertically. See "vertical venting" or "horizontal air terminal installation" sections for installation details.

For mobile home installations, the appliance must be fastened in place. It is recommended that the appliance be 
secured in all installations. Use the levelling / securing kit (GDSLL-KT) for this purpose.

Содержание Haliburton GDS28N

Страница 1: ...ly call your gas supplier from a neighbour s phone Follow the gas supplier s instructions If you cannot reach your gas supplier call the re department Installation and service must be performed by a q...

Страница 2: ...burns A physical barrier is recommended if there are at risk individuals in the house To restrict access to an appliance or stove install an adjustable safety gate to keep toddlers young children and...

Страница 3: ...anemia those under the in uence of alcohol those at high altitudes are more affected by carbon monoxide than others Failure to keep the primary air opening s of the burner s clean may result in sooti...

Страница 4: ...xisting chimney 17 installation 18 minimum clearances to combustibles 18 wall and ceiling protection 19 horizontal installation 19 vertical installation 20 horizontal air terrminal installation model...

Страница 5: ...stalled in an aftermarket permanently located manufactured mobile home where not prohibited by local codes This appliance is only for use with the type of gas indicated on the rating plate This applia...

Страница 6: ...throom unless the unit is a direct vent sealed combustion product The installation must conform with local codes or in absence of local codes the National Gas and Propane Installation Code CSA B149 1...

Страница 7: ...AREIL GAZ D CORATIF VACUATION N EST PAS UNE SOURCE DE CHALEUR N EST PAS DESTIN TRE UTILIS COMME UN APPAREIL DE CHAUFFAGE NE CONVIENT PAS AUX COMBUSTIBLES SOLIDES FOR USE WITH GLASS DOORS CERTIFIED WIT...

Страница 8: ...GD 110 8 12 to 12 12 roof terminal kit GD 111 at roof terminal kit GD 112 or periscope kit GD 180 for wall penetration below grade in conjunction with the appropriate venting components A terminal sha...

Страница 9: ...ner start up and or carboning Use an adjustable pipe as the nal length of rigid piping to the stove for ease of installation These vent kits allow for either horizontal or vertical venting of the appl...

Страница 10: ...12 305mm above grade The maximum allowable vent length including both rise and run is 10 3m for a replace and 8 2m for a stove An insulation sleeve is illustrated in the top vent image below use only...

Страница 11: ...N 16 40 6cm 16 40 6cm Clearance above the roof O 2 0 6m 2 0 6m Clearance from an adjacent wall including neighbouring buildings P 8 2 4m 8 2 4m Roof must be non combustible without openings Q 3 0 9m 3...

Страница 12: ...m of 40 feet 12 2m Horizontal run vertical rise to maximum of 40 feet 12 2m Vertical Termination For the following symbols used in the venting calculations and examples are greater than equal to or gr...

Страница 13: ...0 9m V2 8 FT 2 4m VT V1 V2 3 FT 0 9m 8 FT 2 4m 11 FT 3 4m H1 2 5 FT 0 8m H2 2 FT 0 6m HR H1 H2 2 5 FT 0 8m 2 FT 0 6m 4 5 FT 1 4m HO 03 three 90 elbows 90 03 270 90 5 4 FT 1 7m HT HR HO 4 5 FT 1 4m 5...

Страница 14: ...8m 16 7FT 5 1m Formula 1 HT 4 2 VT 4 2 VT 4 2FT 1 3m x 6FT 1 8m 25 2 FT 7 7m Formula 2 HT VT 24 75 FT 7 5m 16 7 FT 5 1m 24 75 7 5m Since both formulas are met this vent configuration is acceptable 90...

Страница 15: ...ple V1 5 FT 1 5m V2 6 FT 1 8m V3 10 FT 3 1m VT V1 V2 V3 5FT 1 5m 6FT 1 8m 10FT 3 1m 21FT 6 4m H1 8 FT 2 4m H2 2 5 FT 0 8m HR H1 H2 8FT 2 4m 2 5FT 0 8m 10 5 FT 3 2m HO 03 four 90 elbows 90 03 360 90 8...

Страница 16: ...HR H1 H2 6FT 1 8m 2FT 0 6m 8 FT 2 4m HO 03 four 90 elbows 90 03 360 90 8 1 FT 2 5m HT HR HO 8FT 2 4m 8 1FT 2 5m 16 1FT 4 9m HT VT 16 1FT 4 9m 4 5FT 1 4m 20 6 FT 6 3m Formula 1 HT 3VT 3VT 3FT 0 9m x 4...

Страница 17: ...take ex liner and the exhaust collar must be connected to the exhaust exible liner Both Simpson Duravent and Selkirk co linear to co axial adaptors have been approved on this appliance Follow vent man...

Страница 18: ...f the appliance follow the venting instructions exactly The appliance exhaust ue collar must be sealed using Mill Pac All exhaust and intake vent pipe joints must be sealed using red RTV high temp sil...

Страница 19: ...e restop top so that the vent shield covers the top of the vent within the opening Ensure that both spacer and shield maintain the required clearance to combustibles C Secure the spacer in place using...

Страница 20: ...ield and tighten This will prevent any materials such as insulation from lling up the 1 25mm air space around the pipe Caulking Vent Pipe Shield Vent Pipe Shield Vent Pipe Collar Firestop underside of...

Страница 21: ...ng over the air terminal connector leaving a min 3 4 19mm of the air terminal connector showing above the top of the ashing Slide the ashing underneath the sides and upper edge of the shingles Ensure...

Страница 22: ...ith the appliance vent connection Ensure that the sealant is not visible on the exterior pipes once installation is completed An optional decorative black band may be available with this appliance In...

Страница 23: ...rom the cover plate and insert the protective bushing Pull both spill switch wires through the bushing taking up any slack Replace the cover plate Connect one wire end to the terminal block and the ot...

Страница 24: ...the chimney extends more than 5ft 1 5m above the roof it must be secured using a roof brace or guide wires A raincap must be installed to avoid internal damage and corrosion 3 FT 1m MIN 3 FT 1m MIN 1...

Страница 25: ...ance is equipped with a manual shut off valve to turn off the gas supply to the appliance Connect the gas supply in accordance to local codes In the absence of local codes install to the current CAN C...

Страница 26: ...lam or scratch Do not operate appliance with glass removed cracked or scratched Facing and or nishing material must never overhang into the appliance opening The glass door assembly is a safety device...

Страница 27: ...ame Snap the rear handle hook to lock the latch closed To open the door repeat in reverse order HINGE PIN BUSHING CATCH SLOT DOOR LATCH WARNING Glass may be hot Do not touch glass until cooled If equi...

Страница 28: ...uring process 1 3 4 Fig 1 WARNING Failure to position the logs in accordance with these diagrams or failure to use only logs speci cally approved with this appliance may result in property damage or p...

Страница 29: ...incorrect ame pattern carbon deposits and delayed ignition PHAZER logs glow when exposed to direct ame Use only certi ed glowing embers and PHAZER logs available from your local authorized dealer dist...

Страница 30: ...st fans in the home turn appliance blower off if equipped B Set controls to high and light the appliance C Wait 5 minutes Light a match and extend it 1 25mm into the hole located above the spill switc...

Страница 31: ...y gas control which has been under water WHAT TO DO IF YOU SMELL GAS Turn off all gas to the appliance Open windows Do not try to light any appliance Do not touch any electric switch do not use any ph...

Страница 32: ...s Scotch Brite can be used to remove the paint from the pilot hood electrode and ame sensor INSERT PILOT ASSEMBLY Maximum inlet pressure not to exceed 13 Pressure Natural Gas inches Natural Gas millib...

Страница 33: ...f your appliance is equipped with a safety barrier cleaning may be necessary due to excessive lint dust from carpeting pets etc simply vacuum using the brush attachment 6 If your appliance is equipped...

Страница 34: ...d be performed by a quali ed service technician The rebox becomes very hot during operation Let the appliance cool completely or wear heat resistant gloves before conducting service Never vacuum hot e...

Страница 35: ...re neither pinched nor interfere with the blower operation Re secure the air intake manifolds INSTALLATION THROUGH THE FIREBOX REPLACEMENT BLOWER ACCESS GASKET IS REQUIRED Turn off the electrical powe...

Страница 36: ...replacement parts a photocopy of the original invoice will be required to honour the claim When ordering replacement parts always give the following information Model Serial Number of appliance Insta...

Страница 37: ...1 5 7 9 10 6 12 13 14 15 19 17 19 19 20 21 8 11 16 4 12 13 11 10 4 5 6 7 8 9 Yes 19 19 19 18 19 19 22 23 19 24 W475 0779 SER Control panel Glowing embers GL 620 W361 0016 Yes Yes W390 0001 Door latch...

Страница 38: ...NG W100 0056 Main burner assembly W680 0008 Thermocouple Stocked Stocked Yes W010 0633 Pilot assembly NG w ignitor W290 0029 Pilot gasket W725 0042 Valve NG Yes Yes 14 14 14 14 14 14 14 14 14 12 13 14...

Страница 39: ...fety barrier assembly 1 Stocked 23 23 23 5 23 4 23 3 23 1 7 6 23 2 23 8 AR28SS W660 0081 Wall mounted thermostat F45 F60 Hand held remote control 6 3 3 GS328SSB Satin chrome plated door GS328KSB Metal...

Страница 40: ...should read as described on the chart below Check that main burner is operating on HI AFTER TAKING PRESSURE READINGS BE SURE TO TURN SCREWS CLOCKWISE FIRMLY TO RESEAL DO NOT OVER TORQUE Leak test wit...

Страница 41: ...head to improve the ame pattern around the thermocouple Thermocouple shorting faulty Loosen and tighten thermocouple Clean thermocouple and valve connection Replace thermocouple Replace valve Faulty...

Страница 42: ...ng or faulty Loosen and tighten thermocouple Clean thermocouple and valve connection Replace thermocouple Main burner goes out pilot stays on Venting is spilling Test with spill switch bypassed Check...

Страница 43: ...caused by mechanical systems such as exhaust fans furnaces clothes dryers etc Any damages to the appliance combustion chamber heat exchanger plated trim or other components due to water weather damage...

Страница 44: ...NA A A A A A A A AP P P P P P P P PO O O O O O OL L L L L L L LE E E E E EO O O O O ON N N N C C C CE E EL L LE E EB BR RA AT TI IN NG G O OV VE ER R 4 40 0 Y YE EA AR RS S A A A O O O O O OF F F F F...

Страница 45: ...sseur Cet appareil peut tre install dans une maison pr fabriqu e mobile d j install e demeure si les r glements locaux le permettent Cet appareil doit tre utilis uniquement avec le type de gaz indiqu...

Страница 46: ...aux br lures accidentelles Une barri re de protection est recommand e si des individus risque se trouvent dans la maison A n de restreindre l acc s l appareil installez une barri re de protection ajus...

Страница 47: ...eut entra ner la formation de suies et dommages la propri t Comme dans le cas de tout appareil combustion il est recommand de faire inspecter et entretenir votre appareil r guli rement De m me install...

Страница 48: ...our le tirage naturel 66 3 3 1 installation de la chemin e 66 3 3 2 installation de l vent de type B 67 3 3 3 vent de type naturel 67 3 3 4 air comburant 67 3 3 5 ajout de sections d vents 68 4 0 bran...

Страница 49: ...les de chauffage et de refroidissement sont tout fait normaux et il faut s y attendre Cet appareil peut tre plac dans une maison mobile install e de fa on permanente sauf si les codes locaux l interdi...

Страница 50: ...ation il doit tre connect une r ceptacle correctement mise la terre La che de mise la terre ne doit pas tre retir du cordon d alimentation Ce qui suit ne s applique pas aux foyers encastr s tant que l...

Страница 51: ...lation manual for venting speci cations Proper reinstallation and resealing is necessary after servicing the vent air intake system L appareil doit tre ventil l aide de l ensemble d vacuation propre N...

Страница 52: ...tallez le selon les instructions fournies dans l installation initiale Cet appareil doit tre install de mani re ce que le conduit d vacuation et de prise d air se prolongent sur toute la longueur de l...

Страница 53: ...Lorsque vous utilisez des composants exibles le nombre maximal de raccordements est de deux horizontalement ou trois verticalement excluant les raccordements l appareil et la section de terminaison Lo...

Страница 54: ...2m pour une po le Un manchon isolant est illustr dans l illustration ci dessous de l vacuation sur le sessus utiliser seulement lorsqu ils sont fournis avec l appareil Un manchon isolant n est pas re...

Страница 55: ...acents incluant les maisons voisines P 8 2 4m 8 2 4m Le toit doit tre incombustible et sans ouvertures Q 3 0 9m 3 0 9m Voir le tableau pour les dimensions d un mur plus large R 6 1 8m 6 1 8m Voir la t...

Страница 56: ...urse horizontale la course verticale jusqu un maximum de 40 12 2m Terminaison verticale Les symboles suivants sont utilis s dans le calcul et les exemples d vacuation plus grand que plus grand ou gal...

Страница 57: ...HO 4 5 PI 1 4m 5 4 PI 1 7m 9 9 PI 3m HT VT 9 9 PI 3m 11 PI 3 4m 20 9 PI 6 4m Formule 1 HT VT 9 9 PI 3m 11 PI 3 4m Formule 2 HT VT 40 PI 12 2m 20 9 PI 6 4m 40 PI 12 2m Puisque les deux formules sont r...

Страница 58: ...I 3 3m 6PI 1 8m 16 7PI 5 1m Formule 1 HT 4 2 VT 4 2 VT 4 2PI 1 3m x 6PI 1 8m 25 2PI 7 7m 10 7PI 3 3m 25 2 PI 7 7m Formule 2 HT VT 24 75 PI 16 7PI 5 1m 24 75 7 5m Puisque les deux formules sont respect...

Страница 59: ...HT VT 40 pieds 12 2m Exemple V1 5 PI 1 5m V2 6 PI 1 8m V3 10 PI 3 1m VT V1 V2 V3 5PI 1 5m 6PI 1 8m 10PI 3 1m 21 PI 6 4m H1 8 PI 2 4m H2 2 5 PI 0 8m HR H1 H2 8 PI 2 4m 2 5 PI 0 8m 10 5 PI 3 2m HO 0 03...

Страница 60: ...1 8m 2PI 0 6m 8 PI 2 4m HO 0 03 quatre coudes 90 90 0 03 360 90 8 1 PI 2 5m HT HR HO 8 PI 2 4m 8 1 PI 2 5m 16 1 PI 4 9m HT VT 16 1PI 4 9m 4 5PI 1 4m 20 6 PI 6 3m Formule 1 HT 3VT 3VT 3PI 0 9m x 4 5PI...

Страница 61: ...raccord au conduit exible de prise d air et le collet d vacuation de la terminaison au conduit exible d vacuation Les adaptateurs colin aire coaxial Simpson Duravent et Selkirk sont approuv s pour ce...

Страница 62: ...n gaz et lectronique A n d assurer un fonctionnement s curitaire et ad quat de l appareil vous devez observer les instructions d vacuation la lettre Tous les joints des conduits doivent tre scell s av...

Страница 63: ...couvre le haut du conduit d vent l int rieur de l ouverture Assurez vous que l espaceur coupe feu et l cran protecteur conservent le d gagement n cessaire aux mat riaux combustibles C Fixez en place...

Страница 64: ...t de conduit d vacuation Espaceur coupe feu face inf rieure des solves C Dans le grenier faites glisser le collet de conduit d vacuation vers le bas a n de recouvrir l extr mit ouverte du protecteur d...

Страница 65: ...connecteur de terminaison en laissant un minimum de 3 4 19 1mm de connecteur de terminaison visible au dessus du haut du solin Glissez le solin sous les c t s et le bord sup rieur des bardeaux Assure...

Страница 66: ...ion termin e Une bande d corative noire optionnelle est disponible cet effet Dans l ventualit o le syst me d vents doit tre d mont il faudra prendre soin de sceller les vents nouveau Scellant haute te...

Страница 67: ...levez la plaque poin onn e recouvrant les trous et placez les bagues de protection Sortez les ls des deux interrupteurs d coulement par le trou de la bague en s assurant qu ils sont bien tendus Replac...

Страница 68: ...5 1 5m elle devra tre x e au toit avec un support de toit ou des brides de s curit Un chapeau de chemin e devra tre install a n d viter des dommages internes et la corrosion 3 PI 1m MIN 3 PI 1m MIN 10...

Страница 69: ...2 13mm Sans raccord exible l appareil est con u pour recevoir une conduite de gaz de 3 8 9 5mm L appareil est muni d une soupape d arr t manuelle pour fermer l alimentation en gaz Branchez le gaz en c...

Страница 70: ...n gratignez pas la porte vitr e Ne faites pas fonctionner l appareil lorsque la porte vitr e est enlev e ssur e bris e ou gratign e Les mat riaux de fa ade ou de nition ne doivent jamais empi ter sur...

Страница 71: ...E Pour vous assurer que la porte est en position horizontale il sera peut tre n cessaire de la soulever lorsque vous la xez Pour ouvrir la porte suivez les instructions en sens inverse TIGE CHARNI RE...

Страница 72: ...2 3 4 NOTE Assurez vous que la patte de support gauche et les deux pattes de support droite sont pli vers le bas pour assurez que la amme du br leur avant n est pas aspir en dessous du b che avant Le...

Страница 73: ...tard d allumage Les b ches PHAZERMD expos es la amme directe deviendront incandescents Utilisez seulement les braises incandescentes et b ches PHAZERMD disponible de votre d taillant autoris locale AV...

Страница 74: ...eu B Placez les boutons de contr le high et allumez l appareil C Attendez 5 minutes Allumez une allumette et introduisez la une profondeur de 1 25mm l int rieur du trou situ au dessus du support de l...

Страница 75: ...Z Coupez l alimentation en gaz l appareil Ouvrez les fen tres N allumez aucun appareil Ne touchez aucun interrupteur lectrique n utilisez aucun t l phone dans votre immeuble De la maison d un voisin a...

Страница 76: ...ssion Pour v ri er la pression d arriv e tournez la vis A vers la gauche deux trois tours puis embo tez le tube du manom tre sur la pointe d essai Le manom tre doit indiquer la pression comme d crit s...

Страница 77: ...br leur 5 Si votre appareil est fourni avec une cran de protection le nettoyage peut tre n cessaire en raison d un exc s de poussi re peluches des tapis animaux etc utilisez un l attachement du bross...

Страница 78: ...rez nettoyer le capteur de amme l aide d une morceau de de laine d acier ou un tampon r curage Scotch Brite a n de retirer toute trace d oxydation Nettoyez l assemblage du pilote l aide d un aspirateu...

Страница 79: ...nt de la souf erie R installez les collecteurs de prise d air INSTALLATION DEPUIS LA CHAMBRE DE COMBUSTION UN JOINT D TANCH IT DE REMPLACEMENT POUR LA PORTE D ACC S DE LA SOUFFLERIE EST REQUIS Coupez...

Страница 80: ...cement de pi ce sous garantie une photocopie de la facture originale sera requise a n de pouvoir honorer la demande Lorsque vous commandez des pi ces donnez toujours l information suivante Mod le et n...

Страница 81: ...Z552 Souf erie KB 35 Interrupteur vitesse variable avec bouton Assemblage de la porte lat rale X2 W010 2514 23 22 W690 0002 Capteur de chaleur W290 0045 Joint d tanch it d acc s souf erie W385 2010 Lo...

Страница 82: ...ipal W680 0008 Thermocouple En stock En stock Oui Oui 14 14 14 14 14 14 13 14 11 12 1 14 2 3 5 6 7 8 14 4 14 9 10 4 3 5 7 6 1 9 10 11 12 2 Oui Oui Oui 13 14 Oui W455 0052 Injecteur de veilleuse P Oui...

Страница 83: ...on W565 0195 SER 1 En stock AR28SS W660 0081 F45 F60 8 3 3 W361 0239 BULK GS200 SS GS328SSB GS328KSB 4 5 6 7 ANI K 2 Thermostat mural num rique T l commande manuelle L cran de protection GS328 Andiron...

Страница 84: ...PAS TROP FORT V ri ez pour des fuites en appliquant une solution d eau savonneuse Le volet d air est mal r gl Voir la section r glage du venturi pour le r glage de l ouverture du volet d air Du carbo...

Страница 85: ...soupape Remplacez le thermocouple Remplacez la soupape La soupape est d fecteuse Remplacez la soupape La veilleuse br le pas de gaz au br leur principal le bouton du gaz est HI l interrupteur mural th...

Страница 86: ...la terminaison et devrait tre enlev e lorsque n cessaire Installation incorrecte Assurez vous que la con guration d vacuation respecte les param tres d vacuation prescrits GDS28 SYMPT ME PROBL ME SOLU...

Страница 87: ...riodes d humidit la condensation des produits chimiques ou produits d entretien nuisibles ne seront pas la responsabilit de Napol on Durant les dix premi res ann es Napol on remplacera ou r parera les...

Страница 88: ...US S D DE E 4 40 0 A AN NS S D D E EXISTENCE C C C C C CO O O O O ON N N N N N N N NS S S S S SA A A A A AC C CR R R R R S S L L LA A C CO ON NC CE EP PT TIO ON N D DE PR RODUITS DE CONFORT 7200 Rout...

Отзывы: