


33
W415-0788 / 05.15.09
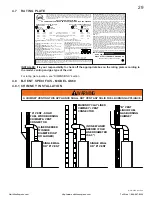
5.5 GLASS / DOOR REPLACEMENT
!
WARNING
DO NOT USE SUBSTITUTE MATERIALS.
GLASS MAY BE HOT, DO NOT TOUCH GLASS UNTIL COOLED.
CARE MUST BE TAKEN WHEN REMOVING AND DISPOSING OF ANY BROKEN GLASS OR
DAMAGED COMPONENTS. BE SURE TO VACUUM UP ANY BROKEN GLASS FROM INSIDE THE
APPLIANCE BEFORE OPERATION.
5.5.1
Place the door frame face down careful not to scratch the paint.
5.5.2
Center the gasketed glass inside the door frame with the thick
side of the gasket facing up.
5.5.3
Bend the glass retainers located along the edge of the door
frame over the gasket holding the glass in place. Be careful not
to break the glass.
GLASS
GASKET
DOOR FRAME
GLASS
RETAINER
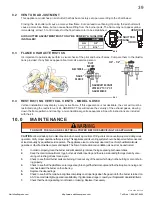
5.4 GLASS DOOR INSTALLATION AND REMOVAL
5.4.1
Lift the top casting off.
5.4.2
Lift the cast front out of its retainers (located at either side on the top).
5.4.3
Open the valve control cover. Pull the latch handles forward to release. The door may now be safely
removed by swinging the bottom out and lifting it off. To install the door, repeat in reverse order.
The
return
fl ange must fi t over the top of the ridge so that it rests on top of the fi rebox.
The 'T' latch portion is threaded and can be loosened or tightened to adjust for an effective door seal.
Care must be taken when re-installing the door to ensure that the gasket at the top of the door does
not bunch.
When installing the glass door, a simple procedure must be followed in order to not damage the door.
LATCH
RIDGE
RETURN
FLANGE
5.3 FRONT CAST REMOVAL
5.3.1
Lift the top casting off the unit.
5.3.2
Loosen the securing bolts on the cast front (located at either side on the top). Lift up and out.
5.3.3
To install the front, repeat in reverse order.
NorthlineExpress.com
http://www.northlineexpress.com
Toll-Free 1-866-667-8454


