


31
W415-0788 / 05.15.09
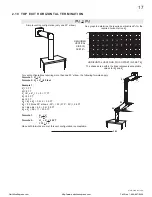
4.8.5 ADDING VENT SECTIONS
For ease of assembly, a 7" telescoping pipe may be
installed over the 4" vent connection of the adapter. Add
vent sections, twist locking (clockwise) securely, to the
required height. The vent should extend, at least, 3 feet
above its point of contact with the roof and, at least, 2 feet
higher than any wall, roof or building within 10 feet. (This
is a guideline only; local venting codes should be followed
which may differ in height and clearance requirements.)
4.8.6 INSTALLING FLASHING AND STORM COLLAR
Remove nails from the shingles above and to the sides of the chim-
ney. Place the fl ashing over the vent pipe and slide it underneath the
sides and upper edge of the shingles. Ensure that the vent pipe is
properly centered within the fl ashing, giving a 3/4" margin all around.
Fasten to the roof on the top and sides.
Do not nail through the lower portion of the fl ashing. Make weather-
tight by sealing with caulking. Where possible, cover the sides and
top edges of the fl ashing with roofi ng material.
Apply waterproof caulking around the vent, 1" above the top of the
fl ashing and push the storm collar down into the caulking. Attach a
rain cap to the top of the last vent section.
SECURELY
ATTACH VENT
ADAPTER TO
FLUE COLLAR
4” “B” VENT
7” OPTIONAL
VENT PIPE
3 FT
MIN
2 FT MIN
10 FT
STORM COLLAR
FLASHING
CAULKING
WEATHER
SEALANT
NorthlineExpress.com
http://www.northlineexpress.com
Toll-Free 1-866-667-8454


