


15
AD V AN C E D S E T T I N G S : R E P L AC E F AI L E D D E V I C E S
You can easily replace an existing failed, un-plugged or missing device with a new device using the
Re-
place Failed Devices
button. The new device must be of the same type as the failed device (e.g. re-
place a failed
dimmer
with a new
dimmer
). Replace a failed device as follows:
1.
Unplug (depower) the failed device and plug-in (power) the new device. Ensure the new device
has been "Removed" from its network if it has ever been used previously (is not "brand-new").
2.
Although it is likely you have already tried testing the failed device, test it again with the device
de-powered using the IBR-ITAB. This will
ensure
the failed device is properly designated as a
"failed" device within the system. After about 10 seconds, a warning popup will appear to indi-
cate the device has failed (press
OK
to close the warning popup and continue).
3.
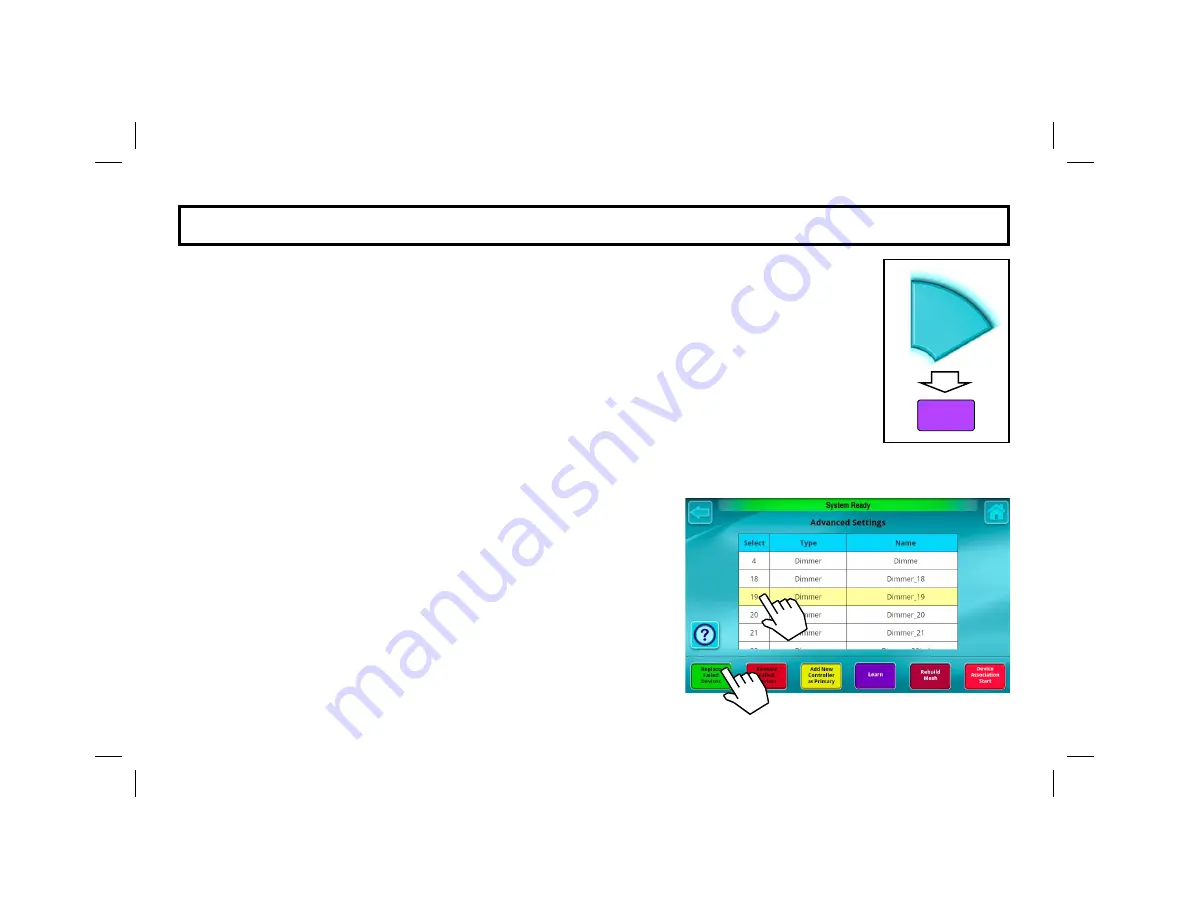
In the
Advanced Settings
screen, tap in the
Select
column to highlight the failed device you
wish to replace (in the image below, device #19 with the
Type
named "
Dimmer
" is selected).
4.
Tap the
Replace Failed Devices
button.
Wait for the system to check to be certain the selected device is
non-operational or is missing (the message "
Checking for failed
device
" will appear).
After a few seconds, another status message will appear: "
Press
the inclusion button"
on the new device. Therefore, press that
button on the new device*.
5.
Wait for the status message field to read "
Replace Complete
".
Test the new device to ensure its correct operation.
Note:
The node number, Type and Name descriptions for the
failed (removed) device are re-used and applied to the new
(replaced) device. If these descriptions need to be changed, see
"
EDIT DEVICE NAMES
" on page 13.
Advanced
Settings
Z-Wave
Device
Setup
*
See the documentation for the specific device to ensure correct operation of its button.


