background image

Mytrex MXD3G User’s Manual 
Rev 0 July 29, 2013 

Page 15 of 21 

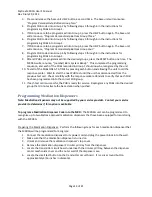
Programming the MXD3G to Recognize the Medication Dispensers: 
1.


With the medication dispenser and the MXD3G units turned on, press and release the T/L 
button on the rear of the MXD3G base unit.  The base unit will announce, 

“Range Test Mode.”


2.


Press and release the base unit HELP button one time.  The base unit will announce, 

“Program 

Personal Help Buttons.”


3.


Press and release the T/L button again.  The base unit will announce, 

“Program Medication 

Dispenser One.”


4.


Press and hold the small button located on the transmitter inside the medication dispenser.  
After two to three seconds, the base unit will sound a steady tone for about one second, pause 
for two seconds, and then sound the steady tone for another second.  The unit will repeat this 
sequence every three seconds until the button is released.  This is the signal that the unit has 
been programmed to recognize the medication dispenser's code.  

5.


After at least one tone is received, release the button on the medication dispenser transmitter.   

6.


If another medication dispenser needs to be programmed to the MXD3G base unit, push the 
HELP button one time.  The base unit will announce, 

“Program Medication Dispenser Two.”


7.


Using the second medication dispenser, repeat steps 4 and 5.  

8.


When up to two medication dispensers have been programmed, press and release the RESET 
button to return the unit to normal operation.  The MXD3G will announce, “

[number] Bars, 

System Ready.”  

9.


Initiate a test call for each medication dispenser by pressing and releasing the small button 
located on the transmitter inside the dispenser.  The MXD3G should detect the medication 
dispenser signal and initiate a call to the response center.  An attendant should answer the call.   

10.


Important:


Verify with the response center attendant that he/she received a medication 

dispenser signal, not a PHB signal.


11.


If each medication dispenser test is successful, the medication dispenser can be placed in service 
in accordance with the dispenser’s instructions.  


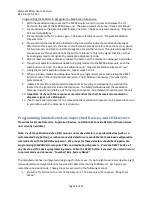
Programming Smoke Detectors, Supervised Devices, and CO Detectors 

Provisions for Smoke Detectors, Supervised Devices, and Carbon Monoxide Detectors (these devices 
not currently available) 


Note:  As of the publication date of this manual, no smoke detectors, supervised devices (such as a 
wall-mounted help button), or carbon monoxide detectors are available that have been configured to 
communicate with the MXD3G equipment.  The groups for these detectors should be skipped when 
programming the MXD3G to recognize PHBs and medication dispensers.   Press the RESET button at 
any time to exit the device programming mode.  When the RESET button is pressed, the unit will return 
to normal mode and announce, “[number] Bars, System Ready.”  

 
The manufacturer has incorporated code groups for future use, for up to eight supervisory devices, eight 
smoke detectors and eight carbon monoxide (CO) detectors into the MXD3G unit.  Each group can 
remember one device code.  These groups are accessed in the following manner:  

1.


Press the T/L button on the rear of the base unit.  The base unit will announce, 

“Range Test 

Mode.”


Содержание MXD3G

Страница 1: ...MXD3G User Manual Revision 0 July 29 2013 Manufactured by Mytrex Inc 10321 South Beckstead Lane South Jordan UT 84095 801 571 4121 Fax 801 571 4606 Toll Free 800 688 9576 Fax 877 571 4606 ...

Страница 2: ...p Buttons PHB and Other Devices Overview 12 MXD3G PHB and Other Device Groups 12 Programming PHBs into Groups 13 Programming Medication Dispensers 14 Programming Smoke Detectors Supervised Devices and CO Detectors 15 Troubleshooting Use of Status Lights 16 Troubleshooting Use of MXD3G Spoken Messages 17 Notifications 19 Notice to End User Wireless Telephone Reliability Considerations 20 When Using...

Страница 3: ...mily friends or emergency services based on the assistance needed Even if you cannot hear or speak to the attendant help will be summoned for you The MXD3G unit is fast and simple to install Your service provider s representative may connect the MXD3G unit during an installation visit you may elect to do it yourself or you may ask a friend or relative to install it for you To ensure that you alway...

Страница 4: ...3G base unit do not place the MXD3G base unit near any liquids Do not spray or wipe cleaners directly on the MXD3G base unit Extensive moisture can cause damage to the MXD3G unit Do not abuse the power cord Never carry the unit by the power cord or yank the cord to disconnect it from an electrical outlet Instead grasp the plug and pull to disconnect ...

Страница 5: ...ure 1 Base Unit Top View Figure 2 Base Unit Back View Base Unit Help Button Speaker Status Light Microphone Power Block and Cord not removable from base unit Cellular Antenna Test Learn T L Button RESET Button Programming Jack for service provider use only Cellular Antenna ...

Страница 6: ...back of the MXD3G These two buttons and the base unit HELP button on the top of the unit are used to conduct range tests turn off the MXD program the MXD3G to recognize personal help buttons PHBs and for other uses See pages 10 16 Two Way Voice Communications After connecting to the response center your MXD3G unit shifts to a voice communication mode The MXD3G usually operates in duplex mode where...

Страница 7: ...l Features Automatic Testing Your MXD3G has the capability of being programmed to carry out automatic tests Your service provider decides whether such tests will be conducted their frequency and the type of tests to be done as part of the service that the provider offers These tests may include automatic voice tests during which the MXD3G sends a test signal to the response center and then connect...

Страница 8: ...tendant Even if you cannot communicate with your response center attendants are trained to treat every received alarm as a call for help until they are sure you are okay Is my MXD3G compatible with all cellular networks The MXD3G is only designed to operate with the AT T 3G Cellular Network It is not designed to work with any other cell network or with any land line telephone service Please contac...

Страница 9: ...base unit in the locations where you plan to use it in order to determine that solid repeatable cell service is present at all times Setting Up Your MXD3G Your MXD3G allows you to request assistance 24 hours per day seven days per week by simply pressing your Personal Help Button Figure 4 Box Contents 1 MXD3G All in One Cellular PERS device 3 Personal Help Button PHB 2 7 inch Cellular Antenna 4 Qu...

Страница 10: ...t again announces Cell Module not activated please contact your service provider for assistance 3 If the MXD again announces Insufficient Cell Service please relocate the base unit to another place in the residence and plug it into a nearby AC outlet that is not controlled by a switch Wait 30 seconds and then press the RESET button If the unit continues to announce Insufficient Cell Service try an...

Страница 11: ...number bars System Ready Testing the MXD3G unit Note The manufacturer recommends that the MXD3G be tested at least every 30 days Most response centers welcome regular testing Attendants are available 24 hours a day to help Please check with your provider concerning their testing policy 1 Press the PHB and wait for the response center attendant to speak to you through the MXD3G 2 When the attendant...

Страница 12: ... to verify that they are programmed correctly and are reporting to the response center under the correct group The following paragraphs describe each of the above steps in more detail MXD3G PHB and Other Device Groups Device codes are stored in one or more groups for each type of device The following groups are available for each type of device Type of Device Number of Groups Number of Devices tha...

Страница 13: ...on is released This is the signal that the unit has recognized and stored the PHB code 4 After at least one tone is received stop pressing the PHB 5 If more than one PHB is to be programmed into Group 1 press and hold the second PHB until the unit sounds a the tone sequence of one second tone followed by two seconds of silence 6 Repeat the process for up to a total of four PHBS in Group 1 7 The MX...

Страница 14: ...B test until the unit has disconnected from the previous test call Check carefully with the response center attendant to verify that each PHB has been programmed into the correct PHB group 11 If each test call is successful the PHB is ready for service Reprogram any PHBs into the desired group that do not activate the base station when pushed Programming Medication Dispensers Note Medication dispe...

Страница 15: ...ars System Ready 9 Initiate a test call for each medication dispenser by pressing and releasing the small button located on the transmitter inside the dispenser The MXD3G should detect the medication dispenser signal and initiate a call to the response center An attendant should answer the call 10 Important Verify with the response center attendant that he she received a medication dispenser signa...

Страница 16: ...dvanced into the desired group category press the HELP button to move from group 1 through 8 8 When the desired devices have been programmed press and release the RESET button to return the unit to normal operation The MXD3G will announce number Bars System Ready 9 Initiate a test call from each programmed device by pressing and releasing the alarm or device test button The MXD3G should detect the...

Страница 17: ...e MXD3G has not been set up with Telular and calls cannot be processed If received during initial installation follow the instructions under Installation Steps page 10 If received after the unit has been installed and tested try pushing the RESET button and listen for a System Ready message If the not activated message persists please contact your service provider Cell module suspended The cell mo...

Страница 18: ...esponse center or has malfunctioned Contact your service provider for further instructions Program Medication Dispenser The unit is ready to be programmed to accept signals from a medication dispenser Follow the instructions as directed on Page 14 Programming mode The unit is in an advanced mode for programming For provider use only Press the RESET button to return the unit to normal operation Pro...

Страница 19: ...rate the equipment Interference Information FCC Rules Part 15 The MXD3G complies with Part 15 of the FCC Rules Operation is subject to the following two conditions 1 this device may not cause harmful interference and 2 this device must accept any interference received including interference that may cause undesired operation Note Your MXD3G has been tested and found to comply with the limits for a...

Страница 20: ...et can affect cell signal connection quality It is possible that your unit will not be able to complete a call because of the lack of cell service even though a connection was made without problems when the unit was first installed and tested A large number of cell phone users trying to use the local network at the same time may overload cell circuits and cause your MXD3G to detect a busy signal i...

Страница 21: ...Before choosing the MXD3G for your medical alarm needs it is extremely important that you press your button to initiate tests of the MXD3G in the locations where you plan to use it most frequently in order to determine that solid repeatable cell service is present at all times NOTICE THE MONITORING CENTER AND THE COMPANIES PROVIDING YOUR MEDICAL ALARM SERVICE ARE NOT LIABLE FOR PROBLEMS RELATED TO...

Отзывы: