MW 829700102 Скачать руководство пользователя страница 13

M1.1.TPT1300-TPT2000.NLFREN   08122017


13

NL

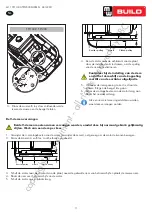
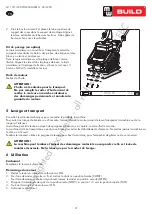
7.  Vul olie in door de vulopening.

Vul niet te veel, omdat dit tot een te hoge temperatuur in 

de excitator kan leiden.

8.  Breng afdichtmiddel op de vuldop en plaats deze terug.

9.  Plaats de bovenplaat, de V-riem en het riemdeksel terug.

8  Opslag

Als de trilplaat langer dan 30 jaar niet gebruikt zal worden, moet deze als volgt voor de opslag voorbereid worden:

1.  Maak de brandstoftank volledig leeg. Opgeslagen brandstof met ethanol of MTBE kan beginnen muf te gaan binnen 

30 dagen. Verbruikte brandstof heeft een hoog gomgehalte en kan de carburator verstoppen en de brandstoftoevoer 

beperken.

2.  Start de motor en laat deze draaien totdat hij stopt, om zeker te maken, dat er geen benzine meer in de carburator blijft. 

Dit voorkamt afzettingen in de carburator, die daardoor beschadigd kan worden.

3.  Terwijl de motor warm is, tap de motorolie af. Vul in met verse olie van het type dat aanbevolen wordt in de handleiding 

van de motor.

4.  Laat de motor afkoelen. Verwijder de bougie et schenk 60 ml kwalitatieve machineolie SAE-30 in de cilinder. Trek 

langzaam op het startkoord, om de olie te verdelen. Plaats de bougie terug. 

Na het opslag, wanneer u de machine opnieuw wilt opstarten, verwijder eerst de bougie en 

maak de cilinder volledig leeg.

5.  Maak de buitenkant van de machine en de luchtopeningen met een doek schoon. 

Gebruik geen sterk reinigingsmiddel of aardolie gebaseerde producten, die de kunststof 

onderdelen kunnen beschadigen.

PLATE COMPACTOR

15

GB

3.

4.

Do not overfill - overfilling can 
result in excessive temperatures in 
the exciter.

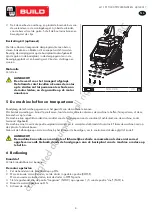
Remove pipe plug from top of exciter 
housing. Tilt housing upside down so oil 
drains from exciter. Examine oil for metal 
chips as a precaution to future problems.

Return plate housing to the upright 
position.

Fill the exciter housing with exciter oil. 

Apply pipe sealant to pipe plug and 
reinstall into top of exciter housing.

Reinstall deck, V-belt(s) and belt guard.

Engine maintenance

Refer to the 

Engine Manual

 included in your 

plate compactor for the information on engine 
maintenance. Your engine manual provides 
detailed information for performing the tasks.

5.

7.

8.

9.

6.

EXCITER

EXCITER
SHAFT

29240 29242 29255 29260 29265

60 ml

80 ml 100 ml 130 ml 130 ml

STORAGE

If the plate compactor will not be used for 
a period longer than 30 days, following the 
steps below to prepare your unit for storage.

Drain the fuel tank completely. Stored fuel 
containing ethanol or MTBE can start to go 
stale in 30 days. Stale fuel has high gum 
content and can clog the carburetor and 
restrict fuel flow.

Start the engine and allow it to run until 
it stops. This ensures no fuel is left in the 
carburetor. Run the engine until it stops. 
This helps prevent deposits from forming 
inside the carburetor and possible engine 
damage.

While the engine is still warm, drain the oil 
from the engine. Refill with fresh oil of the 
grade recommended in the 

Engine Manual

.

Allow the engine to cool. Remove the 
spark plug and put 60 ml of SAE-30 of 
high quality motor oil into the cylinder. Pull 
the starter rope slowly to distribute the oil. 
Replace the spark plug.

1.

2.

3.

4.

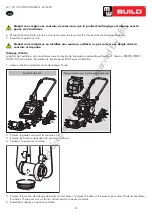
Remove the bolts that hold the deck to the 
housing.

Lift entire deck with engine from housing.

Use clean cloths to clean off the outside of 
the compactor and to keep the air vents 
free of obstructions.

5.

Remove the spark plug and drain all 
of the oil from the cylinder before 
attempting to start the unit after 
storage.

29242UK00M101-改.indd   15

2016/6/23   17:58:40

TPT1300: 100 ml

TPT2000: 130 ml

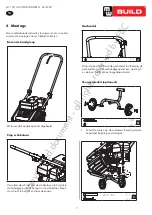
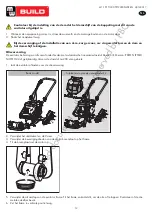
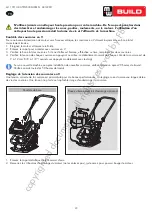
6.  Trek de veerbout omhoog en vouw de wielensteun.

PLATE COMPACTOR

16

GB

TRANSPORTING

See technical data for the weight of the 
machine.

To avoid burns or fire hazards, let engine 
cool before transporting machine or storing 
indoors.

The unit must be transported in the upright 
position to prevent fuel from spilling. Do not 
lay machine on its side or top.

Secure or tie down unit using the lifting handle 
to prevent machine from sliding or tipping 
over.

Pull up the spring bolt and fold up the 
wheels bracket.

Carefully fold the upper handle down. 
Do not allow control cables to become 
pinched or bent.

Store your plate compactor in upright 
position in a clean, dry building that has 
good ventilation.

5.

6.

7.

Machine may fall and cause damage 
or injury if lifted incorrectly. Lift 
using handles at base of plate.

Do not use strong detergents or 
petroleum based cleaners when 
cleaning plastic parts. Chemicals 
can damage plastics.

29242UK00M101-改.indd   16

2016/6/23   17:58:40

copyrighted 

document 

- all 

rights 

reserved 

by 

FBC

Содержание 829700102

Страница 1: ...9700103 Trilplaat Plaque vibrante Plate compactor P 02 Gelieve te lezen en voor later gebruik bewaren P 15 Veuillez lire et conserver pour consultation ultérieure P 28 Please read and keep for future reference FR EN NL c o p y r i g h t e d d o c u m e n t a l l r i g h t s r e s e r v e d b y F B C ...

Страница 2: ...t en blootstel de machine niet aan open vuur Wees uiterst voorzichtig bij het opslaan behandelen en gebruik van brandstoffen Deze zijn zeer vluchtig en explosief in damp toestand SAFETY General Safety Rules Understand your machine Read and understand the operator s manual and labels affixed to the machine Learn its application and limitations as well as the specific potential The rating plate on y...

Страница 3: ...n zoals vonken of vlammen in de buurt van de machine zijn Houd de brandstof steeds weg van ontstekingsbronnen 16 Als tijdens het tanken gemorste brandstof voordoet gebruik een droog doek om af te vegen en verplaats de machine tenminste 5 m ver van het verontreinigde gebied 17 Verzeker u steeds ervan dat de brandstoffilter op zijn plaats en in de juiste volgorde is Vervang de beschadigde filter met...

Страница 4: ...ose Belt Guard Base Plate Optional water sprinkler kit Engine Switch The engine switch enables and disables the ignition system The engine switch must be in the ON position for the engine to run Turning the engine switch to the OFF position stops the engine Choke Lever The choke lever opens and closes the choke valve in the carburetor The closed position enriches the fuel mixture for starting a co...

Страница 5: ... kan uw hand tussen de riem en de koppeling gevangen worden en zwaar verwond worden Excitator Een excentrisch gewicht gemonteerd op de as van de excitator in de behuizing van de excitator wordt op een hoge snelheid gebracht door een koppeling en riemaandrijvingssysteem Deze hoge draaisnelheid van de as zorgt voor een snelle op en neerwaartse beweging eveneens een voorwaartse beweging Olieaftapslan...

Страница 6: ...with Engine an Transmission 2 Foldings Wheels Bracket Optional 3 Wheels Optional 4 Paving Pad Optional 5 Clamp Plate Optional 6 Operator s Manual Engine Manual 7 Hardware Bag Including 1 1 2 5 4 7 6 3 M5 X 1 A X 2 B X 2 Ø14 X 100 X 1 C X 1 M10 X 25 X 3 D OPTIONAL PLATE COMPACTOR 6 GB Compactor with optional water sprinkler kit Basic Models The plate compactor comes partially assembled and is shipp...

Страница 7: ...asher 5 and the bolt 5X35 that just were unscrewed M5 X 1 A PLATE COMPACTOR 7 GB Following the assembly directions below you will assemble the plate compactor in a few minutes Upper Handle Folding Wheels Kit Optional Slide the wheels over the stub axles Secure with hairpin retainers and flat washers Unfold the Handle as shown Remove the screw from stop switch align the hole in handle with hole in ...

Страница 8: ... heffen Bestrating kit optioneel Met de rubberen transparante dempingsmat kunnen beton stenen bakstenen en blokken stil en soepel verdicht worden Bevestig de dempingsmat op de basisplaat zoals afgebeeld Lijn de gaten in de basisplaat in de dempingsmat en in de bevestigingsplaat uit en bevestig met 2 bouten sluitringen en moeren Motorolie Vul olie in AANDACHT De olie werd voor het transport afgetap...

Страница 9: ...eltjes veroorzaken en een goede verdichting verhinderen Als de bodem zeer nat is laat deze drogen voor het verdichten Als de bodem zo droog is dat een stofwolk tijdens het verdichten ontstaat maak deze nat om uw werk te verbeteren Dit reduceert eveneens het gebruik van de luchtfilter De motor stilzetten Om de motor in noodgeval stil te zetten draai de motorschakelaar op OFF In normale omstandighed...

Страница 10: ...rvoir 2 Draai de 4 montagebouten van de motor los verwijder deze niet net genoeg om de motor te kunnen bewegen 1 2 3 4 On new machines or after installing a new belt check belt tension after first 20 hours of operation Check and adjust belt every 50 hours thereafter m s er ng ts ug he s g ny fe e m m te se ng od th o r e l e Tensioning V Belt s Proper belt tension is critical to good performance P...

Страница 11: ...jder deze niet net genoeg om de motor te kunnen bewegen 2 Draai de moeren A en B los zoal hierboven afgebeeld 11 Vibratory Plate Compactor Turn off engine Engine must be cool Remove the belt guard to access the V belt s Check the condition of the V belt s If any V belt is cracked frayed or glazed it should be replaced as soon as convenient Check the V belt tension by squeezing them in the center T...

Страница 12: ...ation Let exciter cool before changing exciter oil When the V belt tension is correct tighten the jam nuts B and the engine mount bolts Replace the belt guard Slide the engine toward the front of plate and slip the old V belt s off of the wheel pulley and install the new V belt s in their place Position the V belt s over the engine pulley Move the engine back 1 6 3 7 4 5 Compactor with optional wa...

Страница 13: ...g with exciter oil 7 6 EXCITER EXCITER SHAFT 29240 29242 29255 29260 29265 60 ml 80 ml 100 ml 130 ml 130 ml Drain the fuel tank completely Stored fuel containing ethanol or MTBE can start to go stale in 30 days Stale fuel has high gum content and can clog the carburetor and restrict fuel flow Start the engine and allow it to run until it stops This ensures no fuel is left in the carburetor Run the...

Страница 14: ...t aan De machine werkt met de starter Zet de starter op OFF Brandstofslang verstopt of brandstof muf Maak de slang schoon Vul de tank in met verse brandstof De luchtopening is verstopt Maak de luchtopening schoon Er is water of vuil in het brandstofsysteem Maak de brandstoftank leeg en vul in met verse brandstof De luchtfilter is vuil Reinig of vervang de luchtfilter De motor oververhit Het oliepe...

Страница 15: ...brûlures graves Ne fumez pas ou n exposez pas la machine à des flammes vives Soyez extrêmement prudent lorsque vous manipulez stockez et utilisez des carburants car ils sont très volatiles et explosifs à l état état de vapeur SAFETY General Safety Rules Understand your machine Read and understand the operator s manual and labels affixed to the machine Learn its application and limitations as well ...

Страница 16: ...essence Attendez que toutes les pièces soient bien refroidies et assurez vous qu il n y a pas de sources d inflammation telles que des étincelles ou des flammes près de la machine Gardez toujours le carburant éloigné des sources d inflammation 16 Si du carburant coule lors du remplissage utilisez un chiffon sec pour l essuyer et déplacez la machine à au moins 5 mètres de la zone où le carburant a ...

Страница 17: ...d Base Plate Optional water sprinkler kit Engine Switch The engine switch enables and disables the ignition system The engine switch must be in the ON position for the engine to run Turning the engine switch to the OFF position stops the engine Choke Lever The choke lever opens and closes the choke valve in the carburetor The closed position enriches the fuel mixture for starting a cold engine The...

Страница 18: ...etrouver coincée entre les courroies et l embrayage et subir de graves blessures Excitateur Un poids excentrique monté sur l axe de l excitateur se trouvant dans le carter de l excitateur est amené à une grande vitesse par le système d embrayage et de courroies Cette grande vitesse de rotation de l axe provoque un mouvement ascendant et descendant très rapide ainsi que le déplacement vers l avant ...

Страница 19: ...Transmission 2 Foldings Wheels Bracket Optional 3 Wheels Optional 4 Paving Pad Optional 5 Clamp Plate Optional 6 Operator s Manual Engine Manual 7 Hardware Bag Including 1 1 2 5 4 7 6 3 M5 X 1 A X 2 B X 2 Ø14 X 100 X 1 C X 1 M10 X 25 X 3 D OPTIONAL 2UK00M101 改 indd 6 PLATE COMPACTOR 6 GB Compactor with optional water sprinkler kit Basic Models The plate compactor comes partially assembled and is s...

Страница 20: ...andle with a flat washer 5 and the bolt 5X35 that just were unscrewed M5 X 1 A PLATE COMPACTOR 7 GB Following the assembly directions below you will assemble the plate compactor in a few minutes Upper Handle Folding Wheels Kit Optional Slide the wheels over the stub axles Secure with hairpin retainers and flat washers Unfold the Handle as shown Remove the screw from stop switch align the hole in h...

Страница 21: ... si elle est levée de manière incorrecte Ne la levez que par le crochet de levage 6 Utilisation Carburant Remplissez le réservoir d essence Démarrage du moteur 1 Mettez le levier du robinet de carburant sur ON 2 Pour faire démarrer un moteur à froid mettez le starter en position fermée CLOSE Pour faire démarrer un moteur déjà chaud laissez le starter en position ouverte OPEN 3 Éloignez la commande...

Страница 22: ...humidité excessive peut provoquer une coagulation de particules et empêcher un bon compactage Si le sol est très humide laissez le sécher avant le compactage Si le sol est sec au point de créer un nuage de poussière pendant le compactage mouillez le pour améliorer votre travail Cela réduira également l entretien du filtre à air Arrêt du moteur Pour arrêter le moteur en cas d urgence tournez l inte...

Страница 23: ...que d endommager la courroie 1 Enlevez le capot métallique ou le réservoir d eau 2 Desserrez les 4 boulons de montage du moteur ne les enlevez pas juste assez pour pouvoir bouger le moteur 1 2 3 4 On new machines or after installing a new belt check belt tension after first 20 hours of operation Check and adjust belt every 50 hours thereafter m s er ng ts ug he s g ny fe te m m te se ng od th o r ...

Страница 24: ...sen 4 engine mount bolts do not remove only enough to move the engine forward Proper belt tension is critical to good performance Proper adjustment will assure long belt life Too much or too little belt tension will cause premature belt failure 1 When the V belt tension is correct tighten the jam nuts B against the bracket Tighten the engine mount bolts Replace the belt guard 4 5 6 If the adjustme...

Страница 25: ...between the belt and pulley operation Let exciter cool before changing exciter oil When the V belt tension is correct tighten the jam nuts B and the engine mount bolts Replace the belt guard Slide the engine toward the front of plate and slip the old V belt s off of the wheel pulley and install the new V belt s in their place Position the V belt s over the engine pulley Move the engine back 1 6 3 ...

Страница 26: ...ure problems Return plate housing to the upright position Fill the exciter housing with exciter oil 7 6 EXCITER EXCITER SHAFT 29240 29242 29255 29260 29265 60 ml 80 ml 100 ml 130 ml 130 ml Drain the fuel tank completely Stored fuel containing ethanol or MTBE can start to go stale in 30 days Stale fuel has high gum content and can clog the carburetor and restrict fuel flow Start the engine and allo...

Страница 27: ...avec le starter Mettez le starter sur OFF Tuyau d essence bouché ou essence éventée Nettoyez le tuyau d essence Remplissez le réservoir avec de l essence propre La bouche d aération est bouchée Nettoyez la bouche d aération Il y a de l eau ou des saleté dans le circuit de carburant Videz le réservoir d essence et remplissez le avec de l essence propre Le filtre à air est sale Nettoyez ou remplacez...

Страница 28: ...ation Serious burns may result Do not smoke or have open flames Use extreme caution when storing handling and using fuels as they are highly volatile and explosive in vapor state SAFETY General Safety Rules Understand your machine Read and understand the operator s manual and labels affixed to the machine Learn its application and limitations as well as the specific potential The rating plate on y...

Страница 29: ...n fuel stop the machine wait the hot parts cooled and make sure there is no ignition source such as sparks flame near the machine Always keep the fuel far away from the ignition sources 16 If any fuel spillage occurs during refuelling use a dry rag to wipe up and carry the machine to another position at least 5 m far from the spillage area to starting it 17 Always make sure that the fuel filter is...

Страница 30: ...ation Handle Muffler Air Cleaner Fuel Tank Exciter Oil Drain Hose Belt Guard Base Plate Optional water sprinkler kit Engine Switch The engine switch enables and disables the ignition system The engine switch must be in the ON position for the engine to run Turning the engine switch to the OFF position stops the engine Choke Lever The choke lever opens and closes the choke valve in the carburetor T...

Страница 31: ... the V belts and clutch thus causing serious injury and bodily harm Exciter An eccentric weight mounted on the exciter shaft contained within exciter housing is driven at high speed by a clutch and belt drive system This high speed shaft revolution causes the rapid lifting and downward ramming motion of the machine as well as imparting a forward motion Oil drain hose Running the engine with dirty ...

Страница 32: ... 1 Plate Compactor Chassis with Engine an Transmission 2 Foldings Wheels Bracket Optional 3 Wheels Optional 4 Paving Pad Optional 5 Clamp Plate Optional 6 Operator s Manual Engine Manual 7 Hardware Bag Including 1 1 2 5 4 7 6 3 M5 X 1 A X 2 B X 2 Ø14 X 100 X 1 C X 1 M10 X 25 X 3 D OPTIONAL PLATE COMPACTOR 6 GB Compactor with optional water sprinkler kit Basic Models The plate compactor comes parti...

Страница 33: ... and the bolt 5X35 that just were unscrewed M5 X 1 A PLATE COMPACTOR 7 GB Following the assembly directions below you will assemble the plate compactor in a few minutes Upper Handle Folding Wheels Kit Optional Slide the wheels over the stub axles Secure with hairpin retainers and flat washers Unfold the Handle as shown Remove the screw from stop switch align the hole in handle with hole in switch ...

Страница 34: ... the fuel tank Starting engine 1 Move the fuel valve lever to the ON position 2 To start a cold engine move the choke to the CLOSE position To restart a warm engine leave the choke lever in the OPEN position 3 Move the throttle lever away from the SLOW position about 1 3 of the way toward the FAST position 4 Turn the engine switch to the ON position 5 Operate the starter 2 Pull up the spring bolt ...

Страница 35: ...er and prevent good compaction If soil is extremely wet allow it to dry somewhat before compacting If soil is so dry as to create dust clouds while operating plate some moisture should be added to the ground material to improve compacting This will also reduce service to the air filter Stopping engine To stop the engine in an emergency simply turn the engine switch to the OFF position Under normal...

Страница 36: ...Remove the metal cover or water tank 2 Loosen 4 engine mount bolts do not remove only enough to move the engine forward 1 2 3 4 On new machines or after installing a new belt check belt tension after first 20 hours of operation Check and adjust belt every 50 hours thereafter m s er ng ts ug he s g ny fe e m m te se ng od th o r e l e Tensioning V Belt s Proper belt tension is critical to good perf...

Страница 37: ...ngine forward 2 Loosen the jam nuts B and bolts A shown in above figure 11 Vibratory Plate Compactor Turn off engine Engine must be cool Remove the belt guard to access the V belt s Check the condition of the V belt s If any V belt is cracked frayed or glazed it should be replaced as soon as convenient Check the V belt tension by squeezing them in the center The normal deflection on each side shou...

Страница 38: ...ore changing exciter oil When the V belt tension is correct tighten the jam nuts B and the engine mount bolts Replace the belt guard Slide the engine toward the front of plate and slip the old V belt s off of the wheel pulley and install the new V belt s in their place Position the V belt s over the engine pulley Move the engine back 1 6 3 7 4 5 Compactor with optional water sprinkler kit Remove t...

Страница 39: ...ter oil 7 6 EXCITER EXCITER SHAFT 29240 29242 29255 29260 29265 60 ml 80 ml 100 ml 130 ml 130 ml Drain the fuel tank completely Stored fuel containing ethanol or MTBE can start to go stale in 30 days Stale fuel has high gum content and can clog the carburetor and restrict fuel flow Start the engine and allow it to run until it stops This ensures no fuel is left in the carburetor Run the engine unt...

Страница 40: ...ghten spark plug wire Unit running on CHOKE Move choke lever to OFF Blocked fuel line or stale fuel Clean fuel line Fill tank with clean fresh gasoline Vent plugged Clear vent Water or dirt in fuel system Drain fuel tank Refill with fresh fuel Dirty air cleaner Clean or replace air cleaner Engine overheats Engine oil level low Fill crankcase with proper oil Dirty air cleaner Clean air cleaner Air ...

Страница 41: ...300 TPT2000 NLFREN 08122017 NL FR EN 10 Onderdelen 10 Pièces détachées 10 Spare parts PLATE COMPACTOR 19 GB 29242 29255 29260 29265 c o p y r i g h t e d d o c u m e n t a l l r i g h t s r e s e r v e d b y F B C ...

Страница 42: ... 2 31 Screw M8X12 4 32 Belt Cover 1 33 Small Pulley Plate 1 No Description Q ty 34 Washer 20 1 35 V Belt 1 36 Circlip 68 1 37 Clutch Pulley 1 38 Circlip 40 1 39 Bearing 6006 2RS P6 1 40 Bolt M10X25 4 41 Engine Chasis 1 42 Engine Pad 1 43 Flat Washer 4 44 Nut M6 4 45 Washer 6 16 46 Bolt M6X45 1 47 Bolt M8X35 2 48 Nut M8 2 49 Bolt M8X40 4 50 Pulley 1 51 Bearing Cover L 1 52 Washer 2 53 Seal Ring FB3...

Страница 43: ... Pipe Weldment 1 25 Connecting Plate 1 26 Washer 8 4 27 Nut M8 4 28 Bolt M8X35 Bolt M8X30 only for 29242 4 29 Bolt M6X40 2 30 Nut M10 2 31 Washer 10 2 No Description Q ty 5 Spring Clip 3 6 Washer 12 2 7 Wheel 2 8 Wheel Bracket 1 9 Plug 1 10 Bolt M10X25 2 11 Shaft B14X100 1 12 Fixing Bracket 1 13 Bolt M10 2 14 Bolt 1 15 Washer 10 2 Optional Paving Pad Kit Optional Water Sprinkler Kit Optional Foldi...

Страница 44: ... richtlijnen met inbegrip van deze betreffende het tijdstip van de verklaring der geldende veranderingen Répond aux normes générales caractérisées plus haut y compris celles dont la date correspond aux modifications en vigueur Meets the provisions of the aforementioned directive including any amendments valid at the time of this statement Bart Vynckier Director Vynckier Tools sa Vynckier Tools sa ...

Отзывы: