background image

© MuxLab Inc. 

Extender Model 500759 

Page 164 

3.


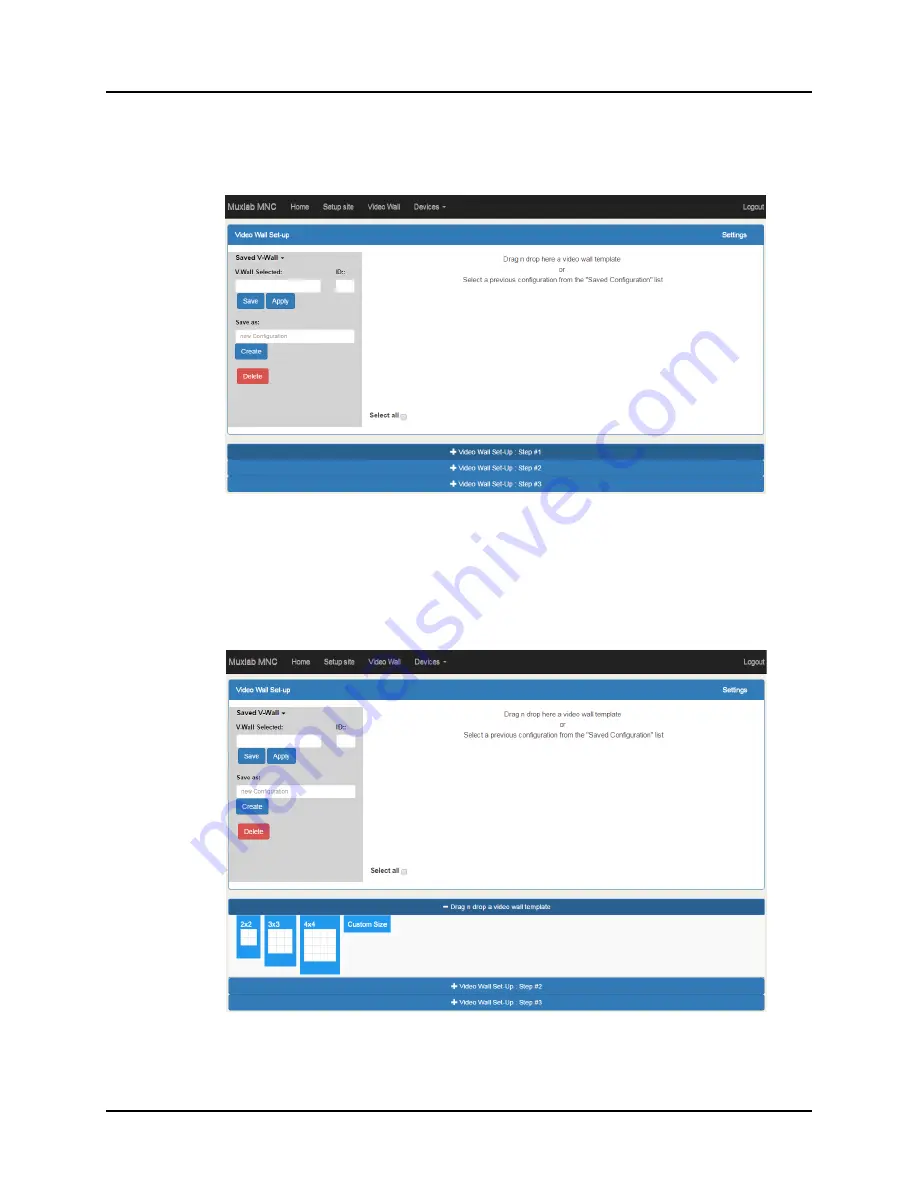
Products Screen - Video Wall Tab 

The 

Video Wall

 tab enables the user to configure an NxM video wall consisting of 

NxM monitors, all of the same size (Figure 252). 

Figure 252: Video Wall Tab 

This screen is laid-out in a 3-step pattern, with a display pane that shows the NxM 
video wall setup: 
 
1.


The user clicks on 

+Video Wall Set-Up: Step #1

, which expands to provide the 

user with video wall size options (Figure 253). 

Figure 253: Video Wall Tab 

Содержание 500811

Страница 1: ...P N 94 000810 E SE 000810 E MuxLab Pro Digital Network Controller MNC Model 500811 Operation Manual ...

Страница 2: ... reserved Printed in Canada No part of this publication may be reproduced stored in a retrieval system or transmitted in any form or by any means electronic mechanical photocopying recording or otherwise without prior written permission of the author Trademarks MuxLab is a registered trademark of MuxLab Inc ...

Страница 3: ...8 136 Extender Model 500759 153 Extender Model 500755 AMP 174 Extender Model 500762 193 4 Troubleshooting 211 5 Appendix IP Command API 212 5 1 IP Command API definition and format 212 5 1 1 Definition 212 5 1 2 General Format 212 5 2 IP Command API for 500752 753 754 755 756 command response list 213 5 2 1 Automatic discovery 213 5 2 2 Manual discovery 213 5 2 3 Get devices from the database 214 ...

Страница 4: ... 219 5 2 15VIDEO WALL Connection command For 500754 759 220 5 2 16VIDEO WALL Select and apply a configuration For 500754 500759 221 5 2 17VIDEO WALL Changing source to a configuration For 500754 500759 221 5 3 IP Command API for 500480 command response list 222 5 3 1 Get all port status from the database 222 5 3 2 Get all presets 223 5 3 3 Connect disconnect device 223 5 3 4 Update some ports attr...

Страница 5: ...ducts through an Ethernet Web interface An Application Program Interface API is available supporting a number of third party partner control applications running on smartphones and tables Figure 1 System Overview Applications include but are not limited to commercial and residential AV systems classroom projector systems digital signage video wall systems boardroom systems multi room systems class...

Страница 6: ...View Rear Side View Figure 1 Pro Digital Network Controller Front Panel Power LED Power button Back Panel VGA video out port HDMI video out port LAN port RJ 45 jack Audio in 3 5 mm Audio out 3 5 mm Micro SD memory slot K lock Power connector Side Panel Three 3 USB 2 0 ports ...

Страница 7: ...erals USB 2 0 ports 3x micro SD slot 1x Network interface 1x VGA Video out port 1x HDMI Video out port 1x Audio in via 3 5mm port 1x Audio out via 3 5mm port 1x Operating System Ubuntu 14 04 LTS Operating Temperature 5 ºC to 50 ºC Dimensions 4 52 x 4 52 x 1 4 inch 115 x 115 x 35 mm Weight 1 1lbs 0 5kg Accessories Included External Power Adaptor Regulatory FCC CE RoHS WEEE Order Information 500811 ...

Страница 8: ...Installation and Use 3 1 Part List The MuxLab Pro Digital Network Controller comes with the following parts Base unit 1x External Power Adapter 1x Please verify that both parts are present before proceeding Figure 2 Base Unit Figure 3 External Power Adaptor ...

Страница 9: ...led in Figure 4 and Figure 5 Please familiarize yourself with them before installing the unit Figure 4 Rear Panel A1 DC Power A2 VGA video out A3 HDMI video out A4 RJ45 Ethernet A5 Audio in A6 Audio out A7 Micro SD Memory Slot A8 K Lock A9 Wifi antenna not supported in current software release Figure 5 Side Panel B1 USB 2 0 1 B2 USB 2 0 2 B3 USB 2 0 3 A1 A2 A3 A4 A5 A6 A7 A9 A8 ...

Страница 10: ...let to manage the MuxLab devices with third party software applications is optional but is the most common method of control and generally preferred however MuxLab devices may also be managed via the Pro Digital Network Controller web interface In order for the DHCP server within the Ethernet Switch to support the MuxLab device subnet set the static IP of the Ethernet Switch to 192 168 168 1 recom...

Страница 11: ...ters and Receivers are set by default to support DHCP and will automatically be set to the subnet specified by the DHCP Server These units need only be physically connected into the network as described in their respective Installation Guides and by using the 500811 Pro Digital Network Controller to discover them But before the MNC can be used the new MNC subnet must also be set To change the subn...

Страница 12: ...er fails to connect to the MNC a failure message will appear Perform the following steps Steps 4 through 6 in order to set the computer to the same subnet as the MNC to be able to then change the MNC subnet from Step 7 onward to match the subnet of the existing installation refer to Figure 7 A Move the mouse to the bottom of the screen and click on the Start button at the lower left B Click into t...

Страница 13: ... the screen and click on the Start button at the lower left C Click on Control Panel D Click on Network and Internet E Click on Network and Sharing Center F Click on Local Area Connection G Click on Properties H Click on Internet Protocol Version 4 TCP IPv4 It will turn blue I Click on Properties J Click the Use the following IP address radio button K In the IP address field type the following 192...

Страница 14: ... MuxLab Inc ProDigital Network Controller MNC Page 14 L In the Subnet mask field type the following 255 255 255 0 M Click on OK Step 5A Steps 5B 5C Figure 9 ...

Страница 15: ... MuxLab Inc ProDigital Network Controller MNC Page 15 Step 5D Step 5E Step 5F Figure 10 ...

Страница 16: ... MuxLab Inc ProDigital Network Controller MNC Page 16 Step 5G Steps 5H 5I Figure 11 ...

Страница 17: ...er is now ready to communicate with the MNC Refer to Figure 13 6 Open up an Internet browser Explorer Chrome Firefox etc and type the following address in the address bar near the top of the screen http 192 168 168 50 mnc NOTE mnc must be written in lower case Figure 13 Internet Browser Entry ...

Страница 18: ...7 The MuxLab Pro Digital Network Controller Web interface Login Screen will appear Figure 14 Login Screen 8 In the User Name field type admin Use lower case 9 In the Password field type admin Use lower case 10 Click Log in Refer to Figure 15 Figure 15 Network Settings Screen ...

Страница 19: ... 168 2 5 see Figure 15 Error Reference source not found Just make sure the Static IP address for the NC does conflict with the Static IP address of the Ethernet Switch and the Router or any other Static IP address already pre assigned in the given network 14 In the Network mask field type 255 255 255 0 15 In the Router field type the IP address of the network Router which in our example is 192 168...

Страница 20: ...ed by an Ethernet cable to the network router on which the MNC is physically installed Open up an Internet browser Explorer Chrome Firefox etc and type in the MNC IP address in the address bar near the top of the screen such as which in our example is 192 168 2 5 192 168 2 5 mnc NOTE 192 168 2 x represents the first three IP address entries of the network subnet on which the MNC is physically inst...

Страница 21: ...describe its operation There is no need to read the remainder of this manual in its entirety each Extender section is complete and self contained Model Type Resolution Features Pages 500752 HDMI 1080p 60 IR PoE 22 39 500753 HDMI 1080p 60 RS232 IR PoE 40 58 500754 HDMI Video Wall Capable 1080p 60 RS232 IR PoE 59 81 500755 Audio 2 Ch Audio RS232 IR PoE 82 100 500756 SDI 3G SDI RS232 IR PoE 101 119 5...

Страница 22: ...Once the user has logged in the Products screen will appear Figure 18 Figure 18 Products Screen Initial View In the SELECT A PRODUCT TO ADD drop down box select Hdmi Over IP 500752 753 754 755 756 and then click on ADD DEVICE Figure 19 Figure 19 Products Screen Selecting a Product ...

Страница 23: ...user then types a name in the Custom Name field and clicks on OK Note that if the user decides to click on CANCEL the previous screen appears Figure 19 without a product being added Figure 20 Products Screen Naming a Product The custom name has been added to YOUR CURRENT SYSTEM Figure 21 Figure 21 Products Screen Your Current System Selection ...

Страница 24: ...uct the user clicks on Select which brings up a multi tabbed screen Figure 22 Figure 22 Products Screen Load Dialog By default a dialog appears asking the user to load a previously saved device list in case such a list has already been stored This dialog will appear even if no device list has been previously saved Six tabs appear within the Products screen 1 Set up 2 Matrix 3 Video Wall 4 RS 232 5...

Страница 25: ...ttings of any found device to remain active After selecting Automatic or Manual click on Launch discovery Figure 23 Figure 23 Products Screen Set up Tab The system will scan the network for all source side devices 500752 transmitters and display side devices 500752 receivers and will display the scan results in tabular form Figure 24 Each 500752 transmitter and receiver can be assigned an arbitrar...

Страница 26: ... MuxLab Inc Extender Model 500752 Page 26 Figure 24 Products Screen Set up Tab Figure 25 Name Editing ...

Страница 27: ... click on Save A green UPDATED tag will appear next to newly changed names Figure 26 Figure 26 Saving Name Changes To view and modify component parameters click on the Detail button next to the given component A dialog appears Figure 27 Figure 27 Device Detail Dialog ...

Страница 28: ...ce The user also has the option of using Presets to save connection schemes Presets as well as to edit and delete existing presets Figure 28 Figure 28 Matrix Tab To connect a display to a source the user first clicks on the drop down list next to the given display for example RX 1 and selects which source to connect it to Figure 29 Figure 29 Change Connection ...

Страница 29: ...alize the change A green SUCCESS tag will appear next to the new or changed connection Figure 30 Figure 30 Change Successful To create a new preset the user clicks the Save current connections as new preset field Figure 31 and types a name This assigned preset name will be linked to the existing connection scheme being shown within the Matrix tab Figure 31 Create New Preset ...

Страница 30: ...ext to the Save current connections as new preset field and the newly created preset becomes the Current active Preset Figure 32 Figure 32 Confirmation of New Preset To delete a preset the user clicks the Delete following preset drop down box and selects a preset name from the list shown Figure 33 Figure 33 Delete Preset ...

Страница 31: ...ppear asking the user to confirm the deletion request Figure 34 Figure 34 Confirmation of Deleted Preset Click on OK The preset will be deleted and a green SUCCESS tag will appear next to the Delete following preset field Figure 35 Figure 35 Confirmation of Deleted Preset ...

Страница 32: ...nt Active Preset Once selected the Preset will be saved and a green SUCCESS tag will appear next to the Save current connections in following preset field Figure 37 Figure 37 Confirmation of Changed Preset Name In order to activate an existing Preset select Current active Preset and select the Preset name from the drop down box and the Preset will become active The active Preset will also be displ...

Страница 33: ...500752 does not support the Video Wall feature Clicking on this tab will display the following screen Figure 38 Figure 38 Video Wall Tab For more information on the Video Wall tab and its features refer to the section of this manual dealing with MuxLab Extender 500754 and MuxLab Extender 500759 ...

Страница 34: ... s Extender 500752 does not support the RS 232 feature Clicking on this tab will display the following screen Figure 39 Figure 39 RS 232 Tab For more information on the RS 232 tab and its features refer to the section of this manual dealing with MuxLab Extender 500753 and 500754 ...

Страница 35: ... via the Network Controller IR pass through mode is also supported using an IR handheld remote as the control source Figure 40 IR Tab When sending IR commands through the Network Controller the user first selects the device that the IR commands will be sent to This is done by clicking on the Select a device drop down list and making a selection Figure 41 Figure 41 IR Tab Selecting a Device ...

Страница 36: ...om a handheld remote to an IR receiver IR In port and attached IR Sensor When sending IR commands directly from an IR Source device such as an IR handheld remote from 500752 receiver through to a transmitter the user must set up a pass through for IR signals to be sent to and from devices This requires the following step The user must tell the 500752 receiver the device near the IR handheld remote...

Страница 37: ...e for MuxLab transmitters and receiver Figure 42 Figure 42 Firmware Tab The user first selects either Display RX or Source TX then chooses the firmware update file to upload to the given device Once the file is selected the user checks the box next to the given device listed under DISPLAY and SOURCE targeted for firmware upgrade and then clicks Apply ...

Страница 38: ...the IP address of the MuxLab Network Controller MNC the network mask as well as the router IP address It also allows the user to enable or disable DHCP Figure 43 Settings Screen Network Tab The Administration tab is used to create or delete user accounts change passwords restore data backup data and retrieve logs Figure 44 Figure 44 Settings Screen Administration Tab ...

Страница 39: ...Controller software Figure 45 This software is available on MuxLab s website www muxlab com Download the software to the local PC before performing the update Figure 45 Software Update Screen Help Screen The Help screen offers quick contact information for customer support and all other inquiries Figure 46 Figure 46 Help Screen ...

Страница 40: ...Once the user has logged in the Products screen will appear Figure 47 Figure 47 Products Screen Initial View In the SELECT A PRODUCT TO ADD drop down box select Hdmi Over IP 500752 753 754 755 756 and then click on ADD DEVICE Figure 48 Figure 48 Products Screen Selecting a Product ...

Страница 41: ...user then types a name in the Custom Name field and clicks on OK Note that if the user decides to click on CANCEL the previous screen appears Figure 48 without a product being added Figure 49 Products Screen Naming a Product The custom name has been added to YOUR CURRENT SYSTEM Figure 50 Figure 50 Products Screen Your Current System Selection ...

Страница 42: ...uct the user clicks on Select which brings up a multi tabbed screen Figure 51 Figure 51 Products Screen Load Dialog By default a dialog appears asking the user to load a previously saved device list in case such a list has already been stored This dialog will appear even if no device list has been previously saved Six tabs appear within the Products screen 1 Set up 2 Matrix 3 Video Wall 4 RS 232 5...

Страница 43: ...ttings of any found device to remain active After selecting Automatic or Manual click on Launch discovery Figure 52 Figure 52 Products Screen Set up Tab The system will scan the network for all source side devices 500753 transmitters and display side devices 500753 receivers and will display the scan results in tabular form Figure 53 Each 500753 transmitter and receiver can be assigned an arbitrar...

Страница 44: ... MuxLab Inc Extender Model 500753 Page 44 Figure 53 Products Screen Set up Tab Figure 54 Name Editing ...

Страница 45: ... click on Save A green UPDATED tag will appear next to newly changed names Figure 55 Figure 55 Saving Name Changes To view and modify component parameters click on the Detail button next to the given component A dialog appears Figure 56 Figure 56 Device Detail Dialog ...

Страница 46: ...ce The user also has the option of using Presets to save connection schemes Presets as well as to edit and delete existing presets Figure 57 Figure 57 Matrix Tab To connect a display to a source the user first clicks on the drop down list next to the given display for example RX 1 and selects which source to connect it to Figure 58 Figure 58 Change Connection ...

Страница 47: ...alize the change A green SUCCESS tag will appear next to the new or changed connection Figure 59 Figure 59 Change Successful To create a new preset the user clicks the Save current connections as new preset field Figure 60 and types a name This assigned preset name will be linked to the existing connection scheme being shown within the Matrix tab Figure 60 Create New Preset ...

Страница 48: ...ext to the Save current connections as new preset field and the newly created preset becomes the Current active Preset Figure 61 Figure 61 Confirmation of New Preset To delete a preset the user clicks the Delete following preset drop down box and selects a preset name from the list shown Figure 62 Figure 62 Delete Preset ...

Страница 49: ...ppear asking the user to confirm the deletion request Figure 63 Figure 63 Confirmation of Deleted Preset Click on OK The preset will be deleted and a green SUCCESS tag will appear next to the Delete following preset field Figure 64 Figure 64 Confirmation of Deleted Preset ...

Страница 50: ...nt Active Preset Once selected the Preset will be saved and a green SUCCESS tag will appear next to the Save current connections in following preset field Figure 66 Figure 66 Confirmation of Changed Preset Name In order to activate an existing Preset select Current active Preset and select the Preset name from the drop down box and the Preset will become active The active Preset will also be displ...

Страница 51: ...500753 does not support the Video Wall feature Clicking on this tab will display the following screen Figure 67 Figure 67 Video Wall Tab For more information on the Video Wall tab and its features refer to the section of this manual dealing with MuxLab Extender 500754 and MuxLab Extender 500759 ...

Страница 52: ... directly by connecting a PC to the RS 232 port of any transmitter or receiver Figure 68 RS 232 Tab When sending RS 232 commands through the Network Controller the user first selects the device that the RS 232 commands will be sent to This is done by clicking on the Select a device drop down list and making a selection Figure 69 The IP Feedback field should also contain the IP address of the Netwo...

Страница 53: ...any transmitter or receiver the user must set up a pass through system for RS 232 signals to be sent to and from devices This requires two steps 1 The user first tells the local device the device connected directly to the PC the IP address of the far device where the RS 232 commands are being sent This is done by first clicking on the Select a device drop down list and selecting the local device f...

Страница 54: ... via the Network Controller IR pass through mode is also supported using an IR handheld remote as the control source Figure 70 IR Tab When sending IR commands through the Network Controller the user first selects the device that the IR commands will be sent to This is done by clicking on the Select a device drop down list and making a selection Figure 71 Figure 71 IR Tab Selecting a Device ...

Страница 55: ...om a handheld remote to an IR receiver IR In port and attached IR Sensor When sending IR commands directly from an IR Source device such as an IR handheld remote from 500753 receiver through to a transmitter the user must set up a pass through for IR signals to be sent to and from devices This requires the following step The user must tell the 500753 receiver the device near the IR handheld remote...

Страница 56: ...e for MuxLab transmitters and receiver Figure 72 Figure 72 Firmware Tab The user first selects either Display RX or Source TX then chooses the firmware update file to upload to the given device Once the file is selected the user checks the box next to the given device listed under DISPLAY and SOURCE targeted for firmware upgrade and then clicks Apply ...

Страница 57: ...e the IP address of the MuxLab Network Controller the network mask as well as the router IP address It also allows the user to enable or disable DHCP Figure 73 Settings Screen Network Tab The Administration tab is used to create or delete user accounts change passwords restore data backup data and retrieve logs Figure 74 Figure 74 Settings Screen Administration Tab ...

Страница 58: ...Controller software Figure 75 This software is available on MuxLab s website www muxlab com Download the software to the local PC before performing the update Figure 75 Software Update Screen Help Screen The Help screen offers quick contact information for customer support and all other inquiries Figure 76 Figure 76 Help Screen ...

Страница 59: ...Once the user has logged in the Products screen will appear Figure 77 Figure 77 Products Screen Initial View In the SELECT A PRODUCT TO ADD drop down box select Hdmi Over IP 500752 753 754 755 756 and then click on ADD DEVICE Figure 78 Figure 78 Products Screen Selecting a Product ...

Страница 60: ...user then types a name in the Custom Name field and clicks on OK Note that if the user decides to click on CANCEL the previous screen appears Figure 78 without a product being added Figure 79 Products Screen Naming a Product The custom name has been added to YOUR CURRENT SYSTEM Figure 80 Figure 80 Products Screen Your Current System Selection ...

Страница 61: ...uct the user clicks on Select which brings up a multi tabbed screen Figure 81 Figure 81 Products Screen Load Dialog By default a dialog appears asking the user to load a previously saved device list in case such a list has already been stored This dialog will appear even if no device list has been previously saved Six tabs appear within the Products screen 1 Set up 2 Matrix 3 Video Wall 4 RS 232 5...

Страница 62: ...ttings of any found device to remain active After selecting Automatic or Manual click on Launch discovery Figure 82 Figure 82 Products Screen Set up Tab The system will scan the network for all source side devices 500754 transmitters and display side devices 500754 receivers and will display the scan results in tabular form Figure 83 Each 500754 transmitter and receiver can be assigned an arbitrar...

Страница 63: ... MuxLab Inc Extender Model 500754 Page 63 Figure 83 Products Screen Set up Tab Figure 84 Name Editing ...

Страница 64: ... click on Save A green UPDATED tag will appear next to newly changed names Figure 85 Figure 85 Saving Name Changes To view and modify component parameters click on the Detail button next to the given component A dialog appears Figure 86 Figure 86 Device Detail Dialog ...

Страница 65: ...ce The user also has the option of using Presets to save connection schemes Presets as well as to edit and delete existing presets Figure 87 Figure 87 Matrix Tab To connect a display to a source the user first clicks on the drop down list next to the given display for example RX 1 and selects which source to connect it to Figure 88 Figure 88 Change Connection ...

Страница 66: ...alize the change A green SUCCESS tag will appear next to the new or changed connection Figure 89 Figure 89 Change Successful To create a new preset the user clicks the Save current connections as new preset field Figure 90 and types a name This assigned preset name will be linked to the existing connection scheme being shown within the Matrix tab Figure 90 Create New Preset ...

Страница 67: ...ext to the Save current connections as new preset field and the newly created preset becomes the Current active Preset Figure 91 Figure 91 Confirmation of New Preset To delete a preset the user clicks the Delete following preset drop down box and selects a preset name from the list shown Figure 92 Figure 92 Delete Preset ...

Страница 68: ...ppear asking the user to confirm the deletion request Figure 93 Figure 93 Confirmation of Deleted Preset Click on OK The preset will be deleted and a green SUCCESS tag will appear next to the Delete following preset field Figure 94 Figure 94 Confirmation of Deleted Preset ...

Страница 69: ...nt Active Preset Once selected the Preset will be saved and a green SUCCESS tag will appear next to the Save current connections in following preset field Figure 96 Figure 96 Confirmation of Changed Preset Name In order to activate an existing Preset select Current active Preset and select the Preset name from the drop down box and the Preset will become active The active Preset will also be displ...

Страница 70: ...deo wall consisting of NxM monitors all of the same size Figure 97 Figure 97 Video Wall Tab This screen is laid out in a 3 step pattern with a display pane that shows the NxM video wall setup 1 The user clicks on Video Wall Set Up Step 1 which expands to provide the user with video wall size options Figure 98 Figure 98 Video Wall Tab ...

Страница 71: ...size In the example shown in Figure 99 a 2x2 video wall consisting of 4 monitors is created Custom video wall sizes may also be created Figure 99 Video Wall Tab Dragging to Create a 2x2 Video Wall b Once dragged into the display pane the user is asked for display dimensions Figure 100 Fill in the requested information Figure 100 Video Wall Tab Newly Created 2x2 Video Wall ...

Страница 72: ... unpopulated video wall consisting of 4 monitors Figure 101 Figure 101 Video Wall Tab Newly Created 2x2 Video Wall 2 The user clicks on Video Wall Set Up Step 2 which expands to provide the user with display mapping options Figure 102 Figure 102 Video Wall Tab Newly Created 2x2 Video Wall ...

Страница 73: ... cells in the display pane c The clicked cell in the display pane is now mapped to the given display d The user must continue mapping the remaining displays to the remaining cells The display pane then becomes fully display mapped Figure 103 Figure 103 Video Wall Tab Fully Display Mapped Video Wall 3 The user clicks on Video Wall Set Up Step 3 which expands to provide the user with source mapping ...

Страница 74: ...wall consists of only one type of display all displays are the same the user only needs to modify the dimensions for only one representative display Note that Unit screen width and screen height values are derived from the information provided by the user when first creating the video wall Figure 100 Also Bezel top bezel bottom bezel left and bezel right are all set to 0 1 inch by default but thes...

Страница 75: ...ep 3 assign the initial source and save this configuration Tip use a configuration name that is representative of the actual setup such as Upper Left 2x2 in this case Any saved configuration can be activated and displayed on the video wall with the initial assigned source by simply loading it Once activated the initial source can easily be changed by repeating Step 3 above with a different source ...

Страница 76: ...to DVD 1 The Data feedback received in HEX field displays the HEX version the feedback sent to the Network Controller by DVD 1 When sending RS 232 commands directly from a PC to any transmitter or receiver the user must set up a pass through system for RS 232 signals to be sent to and from devices This requires two steps 1 The user first tells the local device the device connected directly to the ...

Страница 77: ...via the Network Controller IR pass through mode is also supported using an IR handheld remote as the control source Figure 109 IR Tab When sending IR commands through the Network Controller the user first selects the device that the IR commands will be sent to This is done by clicking on the Select a device drop down list and making a selection Figure 110 Figure 110 IR Tab Selecting a Device ...

Страница 78: ...om a handheld remote to an IR receiver IR In port and attached IR Sensor When sending IR commands directly from an IR Source device such as an IR handheld remote from 500754 receiver through to a transmitter the user must set up a pass through for IR signals to be sent to and from devices This requires the following step The user must tell the 500754 receiver the device near the IR handheld remote...

Страница 79: ... for MuxLab transmitters and receiver Figure 111 Figure 111 Firmware Tab The user first selects either Display RX or Source TX then chooses the firmware update file to upload to the given device Once the file is selected the user checks the box next to the given device listed under DISPLAY and SOURCE targeted for firmware upgrade and then clicks Apply ...

Страница 80: ... the IP address of the MuxLab Network Controller the network mask as well as the router IP address It also allows the user to enable or disable DHCP Figure 112 Settings Screen Network Tab The Administration tab is used to create or delete user accounts change passwords restore data backup data and retrieve logs Figure 113 Figure 113 Settings Screen Administration Tab ...

Страница 81: ...ntroller software Figure 114 This software is available on MuxLab s website www muxlab com Download the software to the local PC before performing the update Figure 114 Software Update Screen Help Screen The Help screen offers quick contact information for customer support and all other inquiries Figure 115 Figure 115 Help Screen ...

Страница 82: ...ce the user has logged in the Products screen will appear Figure 116 Figure 116 Products Screen Initial View In the SELECT A PRODUCT TO ADD drop down box select Hdmi Over IP 500752 753 754 755 756 and then click on ADD DEVICE Figure 117 Figure 117 Products Screen Selecting a Product ...

Страница 83: ...ser then types a name in the Custom Name field and clicks on OK Note that if the user decides to click on CANCEL the previous screen appears Figure 117 without a product being added Figure 118 Products Screen Naming a Product The custom name has been added to YOUR CURRENT SYSTEM Figure 119 Figure 119 Products Screen Your Current System Selection ...

Страница 84: ...ct the user clicks on Select which brings up a multi tabbed screen Figure 120 Figure 120 Products Screen Load Dialog By default a dialog appears asking the user to load a previously saved device list in case such a list has already been stored This dialog will appear even if no device list has been previously saved Six tabs appear within the Products screen 1 Set up 2 Matrix 3 Video Wall 4 RS 232 ...

Страница 85: ...erence the sink side RX the actual sink devices are powered speakers or an amplifier The system will scan the network for all source side devices 500755 transmitters and display side devices 500755 receivers and will display the scan results in tabular form Figure 122 Note that there is only one type of 500755 Extender which is a Transceiver Each 500755 Transceiver is configured either as a transm...

Страница 86: ... MuxLab Inc Extender Model 500755 Page 86 Figure 122 Products Screen Set up Tab Figure 123 Name Editing ...

Страница 87: ...lick on Save A green UPDATED tag will appear next to newly changed names Figure 124 Figure 124 Saving Name Changes To view and modify component parameters click on the Detail button next to the given component A dialog appears Figure 125 Figure 125 Device Detail Dialog ...

Страница 88: ...urce The user has the option of using Presets to save connection schemes Presets as well as to edit and delete existing presets Figure 126 Figure 126 Matrix Tab To connect a sink to a source the user first clicks on the drop down list next to the given sink for example RX1 and selects which source to connect it to such as Audio 1 Figure 127 Figure 127 Change Connection ...

Страница 89: ...e the change A green SUCCESS tag will appear next to the new or changed connection Figure 128 Figure 128 Change Successful To create a new preset the user clicks the Save current connections as new preset field Figure 129 and types a name This assigned preset name will be linked to the existing connection scheme being shown within the Matrix tab Figure 129 Create New Preset ...

Страница 90: ...t to the Save current connections as new preset field and the newly created preset becomes the Current active Preset Figure 130 Figure 130 Confirmation of New Preset To delete a preset the user clicks the Delete following preset drop down box and selects a preset name from the list shown Figure 131 Figure 131 Delete Preset ...

Страница 91: ...ear asking the user to confirm the deletion request Figure 132 Figure 132 Confirmation of Deleted Preset Click on OK The preset will be deleted and a green SUCCESS tag will appear next to the Delete following preset field Figure 133 Figure 133 Confirmation of Deleted Preset ...

Страница 92: ...nt Active Preset Once selected the Preset will be saved and a green SUCCESS tag will appear next to the Save current connections in following preset field Figure 135 Figure 135 Confirmation of Changed Preset Name In order to activate an existing Preset select Current active Preset and select the Preset name from the drop down box and the Preset will become active The active Preset will also be dis...

Страница 93: ...00755 does not support the Video Wall feature Clicking on this tab will display the following screen Figure 136 Figure 136 Video Wall Tab For more information on the Video Wall tab and its features refer to the section of this manual dealing with MuxLab Extender 500754 and MuxLab Extender 500759 ...

Страница 94: ...er or directly by connecting a PC to the RS 232 port of any transmitter or receiver Figure 137 RS 232 Tab When sending RS 232 commands through the Network Controller the user first selects the device that the RS 232 commands will be sent to This is done by clicking on the Select a device drop down list and making a selection Figure 138 The IP Feedback field should also contain the IP address of th...

Страница 95: ...hen sending RS 232 commands directly from a PC to any transceiver transmitter or receiver the user must set up a pass through system for RS 232 signals to be sent to and from devices This requires two steps 1 The user first tells the local device the device connected directly to the PC the IP address of the far device where the RS 232 commands are being sent This is done by first clicking on the S...

Страница 96: ...e 139 via the Network Controller IR pass through mode is also supported using an IR handheld remote as the control source Figure 139 IR Tab When sending IR commands through the Network Controller the user first selects the device that the IR commands will be sent to This is done by clicking on the Select a device drop down list and making a selection Figure 140 Figure 140 IR Tab Selecting a Device...

Страница 97: ...r connected to the transceiver set as a transmitter IR out port The IR code received in HEX field displays the HEX version of an IR command send from a handheld remote to an IR transceiver set as a receiver IR In port and attached IR Sensor When sending IR commands directly from an IR Source device such as an IR handheld remote from 500755 transceiver set as a receiver through to a transceiver set...

Страница 98: ...ver Figure 141 Figure 141 Firmware Tab The user first selects either Display RX which is the sink unit connected to powered speakers or an amplifier or Source TX then chooses the firmware update file to upload to the given device Once the file is selected the user checks the box next to the given device listed under DISPLAY and SOURCE targeted for firmware upgrade and then clicks Apply ...

Страница 99: ... the IP address of the MuxLab Network Controller the network mask as well as the router IP address It also allows the user to enable or disable DHCP Figure 142 Settings Screen Network Tab The Administration tab is used to create or delete user accounts change passwords restore data backup data and retrieve logs Figure 143 Figure 143 Settings Screen Administration Tab ...

Страница 100: ...ntroller software Figure 144 This software is available on MuxLab s website www muxlab com Download the software to the local PC before performing the update Figure 144 Software Update Screen Help Screen The Help screen offers quick contact information for customer support and all other inquiries Figure 145 Figure 145 Help Screen ...

Страница 101: ...ce the user has logged in the Products screen will appear Figure 146 Figure 146 Products Screen Initial View In the SELECT A PRODUCT TO ADD drop down box select Hdmi Over IP 500752 753 754 755 756 and then click on ADD DEVICE Figure 147 Figure 147 Products Screen Selecting a Product ...

Страница 102: ...ser then types a name in the Custom Name field and clicks on OK Note that if the user decides to click on CANCEL the previous screen appears Figure 147 without a product being added Figure 148 Products Screen Naming a Product The custom name has been added to YOUR CURRENT SYSTEM Figure 149 Figure 149 Products Screen Your Current System Selection ...

Страница 103: ...ct the user clicks on Select which brings up a multi tabbed screen Figure 150 Figure 150 Products Screen Load Dialog By default a dialog appears asking the user to load a previously saved device list in case such a list has already been stored This dialog will appear even if no device list has been previously saved Six tabs appear within the Products screen 1 Set up 2 Matrix 3 Video Wall 4 RS 232 ...

Страница 104: ...ings of any found device to remain active After selecting Automatic or Manual click on Launch discovery Figure 151 Figure 151 Products Screen Set up Tab The system will scan the network for all source side devices 500756 transmitters and display side devices 500756 receivers and will display the scan results in tabular form Figure 152 Each 500756 transmitter and receiver can be assigned an arbitra...

Страница 105: ... MuxLab Inc Extender Model 500756 Page 105 Figure 152 Products Screen Set up Tab Figure 153 Name Editing ...

Страница 106: ...click on Save A green UPDATED tag will appear next to newly changed names Figure 154 Figure 154 Saving Name Changes To view and modify component parameters click on the Detail button next to the given component A dialog appears Figure 155 Figure 155 Device Detail Dialog ...

Страница 107: ... The user also has the option of using Presets to save connection schemes Presets as well as to edit and delete existing presets Figure 156 Figure 156 Matrix Tab To connect a display to a source the user first clicks on the drop down list next to the given display for example RX 1 and selects which source to connect it to Figure 157 Figure 157 Change Connection ...

Страница 108: ...ize the change A green SUCCESS tag will appear next to the new or changed connection Figure 158 Figure 158 Change Successful To create a new preset the user clicks the Save current connections as new preset field Figure 159 and types a name This assigned preset name will be linked to the existing connection scheme being shown within the Matrix tab Figure 159 Create New Preset ...

Страница 109: ...xt to the Save current connections as new preset field and the newly created preset becomes the Current active Preset Figure 160 Figure 160 Confirmation of New Preset To delete a preset the user clicks the Delete following preset drop down box and selects a preset name from the list shown Figure 161 Figure 161 Delete Preset ...

Страница 110: ...pear asking the user to confirm the deletion request Figure 162 Figure 162 Confirmation of Deleted Preset Click on OK The preset will be deleted and a green SUCCESS tag will appear next to the Delete following preset field Figure 163 Figure 163 Confirmation of Deleted Preset ...

Страница 111: ...ent Active Preset Once selected the Preset will be saved and a green SUCCESS tag will appear next to the Save current connections in following preset field Figure 165 Figure 165 Confirmation of Changed Preset Name In order to activate an existing Preset select Current active Preset and select the Preset name from the drop down box and the Preset will become active The active Preset will also be di...

Страница 112: ...00756 does not support the Video Wall feature Clicking on this tab will display the following screen Figure 166 Figure 166 Video Wall Tab For more information on the Video Wall tab and its features refer to the section of this manual dealing with MuxLab Extender 500754 and MuxLab Extender 500759 ...

Страница 113: ...directly by connecting a PC to the RS 232 port of any transmitter or receiver Figure 167 RS 232 Tab When sending RS 232 commands through the Network Controller the user first selects the device that the RS 232 commands will be sent to This is done by clicking on the Select a device drop down list and making a selection Figure 168 The IP Feedback field should also contain the IP address of the Netw...

Страница 114: ...m a PC to any transmitter or receiver the user must set up a pass through system for RS 232 signals to be sent to and from devices This requires two steps 1 The user first tells the local device the device connected directly to the PC the IP address of the far device where the RS 232 commands are being sent This is done by first clicking on the Select a device drop down list and selecting the loca...

Страница 115: ... via the Network Controller IR pass through mode is also supported using an IR handheld remote as the control source Figure 169 IR Tab When sending IR commands through the Network Controller the user first selects the device that the IR commands will be sent to This is done by clicking on the Select a device drop down list and making a selection Figure 170 Figure 170 IR Tab Selecting a Device ...

Страница 116: ...cted to the transmitter IR out port The IR code received in HEX field displays the HEX version of an IR command send from a handheld remote to an IR receiver IR In port and attached IR Sensor When sending IR commands directly from an IR Source device such as an IR handheld remote from 500756 receiver through to a transmitter the user must set up a pass through for IR signals to be sent to and from...

Страница 117: ...e for MuxLab transmitters and receiver Figure 171 Figure 171 Firmware Tab The user first selects either Display RX or Source TX then chooses the firmware update file to upload to the given device Once the file is selected the user checks the box next to the given device listed under DISPLAY and SOURCE targeted for firmware upgrade and then clicks Apply ...

Страница 118: ... the IP address of the MuxLab Network Controller the network mask as well as the router IP address It also allows the user to enable or disable DHCP Figure 172 Settings Screen Network Tab The Administration tab is used to create or delete user accounts change passwords restore data backup data and retrieve logs Figure 173 Figure 173 Settings Screen Administration Tab ...

Страница 119: ...ntroller software Figure 174 This software is available on MuxLab s website www muxlab com Download the software to the local PC before performing the update Figure 174 Software Update Screen Help Screen The Help screen offers quick contact information for customer support and all other inquiries Figure 175 Figure 175 Help Screen ...

Страница 120: ...een Once the user has logged in the Products screen will appear Figure 176 Figure 176 Products Screen Initial View In the SELECT A PRODUCT TO ADD drop down box select Hdmi Over IP H264 500757 and then click on ADD DEVICE Figure 177 Figure 177 Products Screen Selecting a Product ...

Страница 121: ...ser then types a name in the Custom Name field and clicks on OK Note that if the user decides to click on CANCEL the previous screen appears Figure 177 without a product being added Figure 178 Products Screen Naming a Product The custom name has been added to YOUR CURRENT SYSTEM Figure 179 Figure 179 Products Screen Your Current System Selection ...

Страница 122: ...ven product the user clicks on Select which brings up a multi tabbed screen Figure 180 Figure 180 Products Screen Load Dialog By default a dialog appears asking the user to load a previously saved device list in case such a list has already been stored This dialog will appear even if no device list has been previously saved Four tabs appear within the Products screen 1 Set up 2 Matrix 3 RS 232 4 F...

Страница 123: ...ings of any found device to remain active After selecting Automatic or Manual click on Launch discovery Figure 181 Figure 181 Products Screen Set up Tab The system will scan the network for all source side devices 500757 transmitters and display side devices 500757 receivers and will display the scan results in tabular form Figure 182 Each 500757 transmitter and receiver can be assigned an arbitra...

Страница 124: ... MuxLab Inc Extender Model 500757 Page 124 Figure 182 Products Screen Set up Tab Figure 183 Name Editing ...

Страница 125: ...click on Save A green UPDATED tag will appear next to newly changed names Figure 184 Figure 184 Saving Name Changes To view and modify component parameters click on the Detail button next to the given component A dialog appears Figure 185 Figure 185 Device Detail Dialog ...

Страница 126: ... The user also has the option of using Presets to save connection schemes Presets as well as to edit and delete existing presets Figure 186 Figure 186 Matrix Tab To connect a display to a source the user first clicks on the drop down list next to the given display for example RX 1 and selects which source to connect it to Figure 187 Figure 187 Change Connection ...

Страница 127: ...ize the change A green SUCCESS tag will appear next to the new or changed connection Figure 188 Figure 188 Change Successful To create a new preset the user clicks the Save current connections as new preset field Figure 189 and types a name This assigned preset name will be linked to the existing connection scheme being shown within the Matrix tab Figure 189 Create New Preset ...

Страница 128: ...xt to the Save current connections as new preset field and the newly created preset becomes the Current active Preset Figure 190 Figure 190 Confirmation of New Preset To delete a preset the user clicks the Delete following preset drop down box and selects a preset name from the list shown Figure 191 Figure 191 Delete Preset ...

Страница 129: ...pear asking the user to confirm the deletion request Figure 192 Figure 192 Confirmation of Deleted Preset Click on OK The preset will be deleted and a green SUCCESS tag will appear next to the Delete following preset field Figure 193 Figure 193 Confirmation of Deleted Preset ...

Страница 130: ...ent Active Preset Once selected the Preset will be saved and a green SUCCESS tag will appear next to the Save current connections in following preset field Figure 195 Figure 195 Confirmation of Changed Preset Name In order to activate an existing Preset select Current active Preset and select the Preset name from the drop down box and the Preset will become active The active Preset will also be di...

Страница 131: ... either through the Network Controller or directly by connecting a PC to the RS 232 port of any transmitter or receiver Figure 196 RS 232 Tab When sending RS 232 commands through the Network Controller the user first selects the device that the RS 232 commands will be sent to This is done by clicking on the Select a device drop down list and making a selection Figure 197 Figure 197 RS 232 Tab Sele...

Страница 132: ...d originating from the Network Controller in the direction of the transmitter to DVD 1 When sending RS 232 commands directly from a PC to any transmitter or receiver in pass through mode this is automatically accomplished by the existing connection between the transmitter and receiver As such this connection must exist for pass through to operate IR Pass through Special note concerning IR pass thr...

Страница 133: ...e for MuxLab transmitters and receiver Figure 198 Figure 198 Firmware Tab The user first selects either Display RX or Source TX then chooses the firmware update file to upload to the given device Once the file is selected the user checks the box next to the given device listed under DISPLAY and SOURCE targeted for firmware upgrade and then clicks Apply ...

Страница 134: ... the IP address of the MuxLab Network Controller the network mask as well as the router IP address It also allows the user to enable or disable DHCP Figure 199 Settings Screen Network Tab The Administration tab is used to create or delete user accounts change passwords restore data backup data and retrieve logs Figure 200 Figure 200 Settings Screen Administration Tab ...

Страница 135: ...ntroller software Figure 201 This software is available on MuxLab s website www muxlab com Download the software to the local PC before performing the update Figure 201 Software Update Screen Help Screen The Help screen offers quick contact information for customer support and all other inquiries Figure 202 Figure 202 Help Screen ...

Страница 136: ...en Once the user has logged in the Products screen will appear Figure 203 Figure 203 Products Screen Initial View In the SELECT A PRODUCT TO ADD drop down box select Hdmi Over IP 4K 500758 759 and then click on ADD DEVICE Figure 204 Figure 204 Products Screen Selecting a Product ...

Страница 137: ...ser then types a name in the Custom Name field and clicks on OK Note that if the user decides to click on CANCEL the previous screen appears Figure 204 without a product being added Figure 205 Products Screen Naming a Product The custom name has been added to YOUR CURRENT SYSTEM Figure 206 Figure 206 Products Screen Your Current System Selection ...

Страница 138: ...the user clicks on Select which brings up a multi tabbed screen Figure 207 Figure 207 Products Screen Load Dialog By default a dialog appears asking the user to load a previously saved device list in case such a list has already been stored This dialog will appear even if no device list has been previously saved Five tabs appear within the Products screen 1 Set up 2 Matrix 3 Video Wall 4 RS 232 5 ...

Страница 139: ...ings of any found device to remain active After selecting Automatic or Manual click on Launch discovery Figure 208 Figure 208 Products Screen Set up Tab The system will scan the network for all source side devices 500758 transmitters and display side devices 500758 receivers and will display the scan results in tabular form Figure 209 Each 500758 transmitter and receiver can be assigned an arbitra...

Страница 140: ... MuxLab Inc Extender Model 500758 Page 140 Figure 209 Products Screen Set up Tab Figure 210 Name Editing ...

Страница 141: ...to newly changed names Figure 211 Figure 211 Saving Name Changes To view and modify component parameters click on the Detail button next to the given component A dialog appears Figure 212 You can set the output video format and DHCP format enable or disable auto detect resolution and HDR Figure 212 Device Detail Dialog ...

Страница 142: ... The user also has the option of using Presets to save connection schemes Presets as well as to edit and delete existing presets Figure 213 Figure 213 Matrix Tab To connect a display to a source the user first clicks on the drop down list next to the given display for example RX 1 and selects which source to connect it to Figure 214 Figure 214 Change Connection ...

Страница 143: ...ize the change A green SUCCESS tag will appear next to the new or changed connection Figure 215 Figure 215 Change Successful To create a new preset the user clicks the Save current connections as new preset field Figure 216 and types a name This assigned preset name will be linked to the existing connection scheme being shown within the Matrix tab Figure 216 Create New Preset ...

Страница 144: ...xt to the Save current connections as new preset field and the newly created preset becomes the Current active Preset Figure 217 Figure 217 Confirmation of New Preset To delete a preset the user clicks the Delete following preset drop down box and selects a preset name from the list shown Figure 218 Figure 218 Delete Preset ...

Страница 145: ...pear asking the user to confirm the deletion request Figure 219 Figure 219 Confirmation of Deleted Preset Click on OK The preset will be deleted and a green SUCCESS tag will appear next to the Delete following preset field Figure 220 Figure 220 Confirmation of Deleted Preset ...

Страница 146: ...ent Active Preset Once selected the Preset will be saved and a green SUCCESS tag will appear next to the Save current connections in following preset field Figure 222 Figure 222 Confirmation of Changed Preset Name In order to activate an existing Preset select Current active Preset and select the Preset name from the drop down box and the Preset will become active The active Preset will also be di...

Страница 147: ...00758 does not support the Video Wall feature Clicking on this tab will display the following screen Figure 223 Figure 223 Video Wall Tab For more information on the Video Wall tab and its features refer to the section of this manual dealing with MuxLab Extender 500754 and MuxLab Extender 500759 ...

Страница 148: ... either through the Network Controller or directly by connecting a PC to the RS 232 port of any transmitter or receiver Figure 224 RS 232 Tab When sending RS 232 commands through the Network Controller the user first selects the device that the RS 232 commands will be sent to This is done by clicking on the Select a device drop down list and making a selection Figure 225 Figure 225 RS 232 Tab Sele...

Страница 149: ...d originating from the Network Controller in the direction of the transmitter to DVD 1 When sending RS 232 commands directly from a PC to any transmitter or receiver in pass through mode this is automatically accomplished by the existing connection between the transmitter and receiver As such this connection must exist for pass through to operate IR Pass through Special note concerning IR pass thr...

Страница 150: ...s Screen Firmware Tab The Firmware tab of the Products screen enables the user to update the firmware for MuxLab transmitters and receiver Figure 227 Figure 227 Firmware Tab The user first selects either Display RX or Source TX then chooses the firmware update file to upload to the given device Once the file is selected the user checks the box next to the given device listed under DISPLAY and SOUR...

Страница 151: ... the IP address of the MuxLab Network Controller the network mask as well as the router IP address It also allows the user to enable or disable DHCP Figure 228 Settings Screen Network Tab The Administration tab is used to create or delete user accounts change passwords restore data backup data and retrieve logs Figure 229 Figure 229 Settings Screen Administration Tab ...

Страница 152: ...ntroller software Figure 230 This software is available on MuxLab s website www muxlab com Download the software to the local PC before performing the update Figure 230 Software Update Screen Help Screen The Help screen offers quick contact information for customer support and all other inquiries Figure 231 Figure 231 Help Screen ...

Страница 153: ...en Once the user has logged in the Products screen will appear Figure 232 Figure 232 Products Screen Initial View In the SELECT A PRODUCT TO ADD drop down box select Hdmi Over IP 4K 500758 759 and then click on ADD DEVICE Figure 233 Figure 233 Products Screen Selecting a Product ...

Страница 154: ...ser then types a name in the Custom Name field and clicks on OK Note that if the user decides to click on CANCEL the previous screen appears Figure 233 without a product being added Figure 234 Products Screen Naming a Product The custom name has been added to YOUR CURRENT SYSTEM Figure 235 Figure 235 Products Screen Your Current System Selection ...

Страница 155: ...the user clicks on Select which brings up a multi tabbed screen Figure 236 Figure 236 Products Screen Load Dialog By default a dialog appears asking the user to load a previously saved device list in case such a list has already been stored This dialog will appear even if no device list has been previously saved Five tabs appear within the Products screen 1 Set up 2 Matrix 3 Video Wall 4 RS 232 5 ...

Страница 156: ...ings of any found device to remain active After selecting Automatic or Manual click on Launch discovery Figure 237 Figure 237 Products Screen Set up Tab The system will scan the network for all source side devices 500759 transmitters and display side devices 500759 receivers and will display the scan results in tabular form Figure 238 Each 500759 transmitter and receiver can be assigned an arbitra...

Страница 157: ... MuxLab Inc Extender Model 500759 Page 157 Figure 238 Products Screen Set up Tab Figure 239 Name Editing ...

Страница 158: ...click on Save A green UPDATED tag will appear next to newly changed names Figure 240 Figure 240 Saving Name Changes To view and modify component parameters click on the Detail button next to the given component A dialog appears Figure 241 Figure 241 Device Detail Dialog ...

Страница 159: ... The user also has the option of using Presets to save connection schemes Presets as well as to edit and delete existing presets Figure 242 Figure 242 Matrix Tab To connect a display to a source the user first clicks on the drop down list next to the given display for example RX 1 and selects which source to connect it to Figure 243 Figure 243 Change Connection ...

Страница 160: ...ize the change A green SUCCESS tag will appear next to the new or changed connection Figure 244 Figure 244 Change Successful To create a new preset the user clicks the Save current connections as new preset field Figure 245 and types a name This assigned preset name will be linked to the existing connection scheme being shown within the Matrix tab Figure 245 Create New Preset ...

Страница 161: ...xt to the Save current connections as new preset field and the newly created preset becomes the Current active Preset Figure 246 Figure 246 Confirmation of New Preset To delete a preset the user clicks the Delete following preset drop down box and selects a preset name from the list shown Figure 247 Figure 247 Delete Preset ...

Страница 162: ...pear asking the user to confirm the deletion request Figure 248 Figure 248 Confirmation of Deleted Preset Click on OK The preset will be deleted and a green SUCCESS tag will appear next to the Delete following preset field Figure 249 Figure 249 Confirmation of Deleted Preset ...

Страница 163: ...ent Active Preset Once selected the Preset will be saved and a green SUCCESS tag will appear next to the Save current connections in following preset field Figure 251 Figure 251 Confirmation of Changed Preset Name In order to activate an existing Preset select Current active Preset and select the Preset name from the drop down box and the Preset will become active The active Preset will also be di...

Страница 164: ...o wall consisting of NxM monitors all of the same size Figure 252 Figure 252 Video Wall Tab This screen is laid out in a 3 step pattern with a display pane that shows the NxM video wall setup 1 The user clicks on Video Wall Set Up Step 1 which expands to provide the user with video wall size options Figure 253 Figure 253 Video Wall Tab ...

Страница 165: ...trix of the same size In the example shown in Figure 254 a 2x2 video wall consisting of 4 monitors is created Custom video wall sizes may also be created Figure 254 Video Wall Tab Dragging to Create a 2x2 Video Wall b Once dragged into the display pane the user is asked for display dimensions Figure 255 Figure 255 Video Wall Tab Newly Created 2x2 Video Wall ...

Страница 166: ...y unpopulated video wall consisting of 4 monitors Figure 256 Figure 256 Video Wall Tab Newly Created 2x2 Video Wall 2 The user clicks on Video Wall Set Up Step 2 which expands to provide the user with display mapping options Figure 257 Figure 257 Video Wall Tab Newly Created 2x2 Video Wall ...

Страница 167: ...e cells in the display pane c The clicked cell in the display pane is now mapped to the given display d The user must continue mapping the remaining displays to the remaining cells The display pane then becomes fully display mapped Figure 258 Figure 258 Video Wall Tab Fully Display Mapped Video Wall 3 The user clicks on Video Wall Set Up Step 3 which expands to provide the user with source mapping...

Страница 168: ...o wall consists of only one type of display all displays are the same the user only needs to modify the dimensions for only one representative display Note that Unit screen width and screen height values are derived from the information provided by the user when first creating the video wall Figure 255 Also Bezel top bezel bottom bezel left and bezel right are all set to 0 1 inch by default but th...

Страница 169: ...e actual setup such as Upper Left 2x2 in this case Any saved configuration can be activated and displayed on the video wall with the initial assigned source by simply loading it Once activated the initial source can easily be changed by repeating Step 3 above with a different source selected after which you can either save this change or choose not to save it so the next time this configuration is...

Страница 170: ...ding an RS232 command originating from the Network Controller in the direction of the transmitter to DVD 1 When sending RS 232 commands directly from a PC to any transmitter or receiver in pass through mode this is automatically accomplished by the existing connection between the transmitter and receiver As such this connection must exist for pass through to operate IR Pass through Special note co...

Страница 171: ...cts Screen Firmware Tab The Firmware tab of the Products screen enables the user to update the firmware for MuxLab transmitters and receiver Figure 265 Figure 265 Firmware Tab The user first selects either Display RX or Source TX then chooses the firmware update file to upload to the given device Once the file is selected the user checks the box next to the given device listed under DISPLAY and SO...

Страница 172: ... the IP address of the MuxLab Network Controller the network mask as well as the router IP address It also allows the user to enable or disable DHCP Figure 266 Settings Screen Network Tab The Administration tab is used to create or delete user accounts change passwords restore data backup data and retrieve logs Figure 267 Figure 267 Settings Screen Administration Tab ...

Страница 173: ...ntroller software Figure 268 This software is available on MuxLab s website www muxlab com Download the software to the local PC before performing the update Figure 268 Software Update Screen Help Screen The Help screen offers quick contact information for customer support and all other inquiries Figure 269 Figure 269 Help Screen ...

Страница 174: ...n Once the user has logged in the Products screen will appear Figure 270 Figure 270 Products Screen Initial View In the SELECT A PRODUCT TO ADD drop down box select Hdmi Over IP 500752 753 754 755 756 and then click on ADD DEVICE Figure 271 Figure 271 Products Screen Selecting a Product ...

Страница 175: ... user then types a name in the Custom Name field and clicks on OK Note that if the user decides to click on CANCEL the previous screen appears Figure 271 without a product being added Figure 272 Products Screen Naming a Product The custom name has been added to YOUR CURRENT SYSTEM Figure 273 Figure 273 Products Screen Your Current System Selection ...

Страница 176: ...duct the user clicks on Select which brings up a multi tabbed screen Figure 274 Figure 274 Products Screen Load Dialog By default a dialog appears asking the user to load a previously saved device list in case such a list has already been stored This dialog will appear even if no device list has been previously saved Six tabs appear within the Products screen 1 Set up 2 Matrix 3 Video Wall 4 RS 23...

Страница 177: ...tual sink devices are speakers The system will scan the network for all source side devices 500755 AMP transmitters and display side devices 500755 AMP receivers and will display the scan results in tabular form Figure 276 Note that the 500755 AMP consists of a transmitter and receiver unit supporting a 50W per channel amplifier whereby one transmitter can connect with multiple receivers supportin...

Страница 178: ... MuxLab Inc Extender Model 500755 AMP Page 178 Figure 276 Products Screen Set up Tab Figure 277 Name Editing ...

Страница 179: ...arameters click on the Detail button next to the given component A dialog appears Figure 279 This allows for control of TX settings for volume volume attenuation if mic is detected bass treble mic gain mic bass mic treble mic auto detect level and for selection of input port 1 or 2 mic type It also allows for control of RX settings for volume bass treble within each zone Figure 279 Device Detail D...

Страница 180: ... to any source The user has the option of using Presets to save connection schemes Presets as well as to edit and delete existing presets Figure 280 Figure 280 Matrix Tab To connect a sink to a source the user first clicks on the drop down list next to the given sink for example RX1 and selects which source to connect it to Figure 281 Figure 281 Change Connection ...

Страница 181: ...lize the change A green SUCCESS tag will appear next to the new or changed connection Figure 282 Figure 282 Change Successful To create a new preset the user clicks the Save current connections as new preset field Figure 283 and types a name This assigned preset name will be linked to the existing connection scheme being shown within the Matrix tab Figure 283 Create New Preset ...

Страница 182: ...next to the Save current connections as new preset field and the newly created preset becomes the Current active Preset Figure 284 Figure 284 Confirmation of New Preset To delete a preset the user clicks the Delete following preset drop down box and selects a preset name from the list shown Figure 285 Figure 285 Delete Preset ...

Страница 183: ...appear asking the user to confirm the deletion request Figure 286 Figure 286 Confirmation of Deleted Preset Click on OK The preset will be deleted and a green SUCCESS tag will appear next to the Delete following preset field Figure 287 Figure 287 Confirmation of Deleted Preset ...

Страница 184: ...rrent Active Preset Once selected the Preset will be saved and a green SUCCESS tag will appear next to the Save current connections in following preset field Figure 289 Figure 289 Confirmation of Changed Preset Name In order to activate an existing Preset select Current active Preset and select the Preset name from the drop down box and the Preset will become active The active Preset will also be ...

Страница 185: ...00755 AMP does not support the Video Wall feature Clicking on this tab will display the following screen Figure 290 Figure 290 Video Wall Tab For more information on the Video Wall tab and its features refer to the section of this manual dealing with MuxLab Extender 500754 and MuxLab Extender 500759 ...

Страница 186: ...r directly by connecting a PC to the RS 232 port of any transmitter or receiver Figure 291 RS 232 Tab When sending RS 232 commands through the Network Controller the user first selects the device that the RS 232 commands will be sent to This is done by clicking on the Select a device drop down list and making a selection Figure 292 The IP Feedback field should also contain the IP address of the Ne...

Страница 187: ... RS 232 commands directly from a PC to any transmitter or receiver the user must set up a pass through system for RS 232 signals to be sent to and from devices This requires two steps 3 The user first tells the local device the device connected directly to the PC the IP address of the far device where the RS 232 commands are being sent This is done by first clicking on the Select a device drop dow...

Страница 188: ...93 via the Network Controller IR pass through mode is also supported using an IR handheld remote as the control source Figure 293 IR Tab When sending IR commands through the Network Controller the user first selects the device that the IR commands will be sent to This is done by clicking on the Select a device drop down list and making a selection Figure 294 Figure 294 IR Tab Selecting a Device ...

Страница 189: ...Emitter connected to the transmitter IR out port The IR code received in HEX field displays the HEX version of an IR command send from a handheld remote to an IR receiver IR In port and attached IR Sensor When sending IR commands directly from an IR Source device such as an IR handheld remote from 500755 AMP receiver through to a transmitter the user must set up a pass through for IR signals to be...

Страница 190: ...ters and receiver Figure 295 Figure 295 Firmware Tab The user first selects either Display RX which is the sink unit connected to speakers or Source TX then chooses the firmware update file to upload to the given device Once the file is selected the user checks the box next to the given device listed under DISPLAY and SOURCE targeted for firmware upgrade and then clicks Apply ...

Страница 191: ...ge the IP address of the MuxLab Network Controller the network mask as well as the router IP address It also allows the user to enable or disable DHCP Figure 296 Settings Screen Network Tab The Administration tab is used to create or delete user accounts change passwords restore data backup data and retrieve logs Figure 297 Figure 297 Settings Screen Administration Tab ...

Страница 192: ...Controller software Figure 298 This software is available on MuxLab s website www muxlab com Download the software to the local PC before performing the update Figure 298 Software Update Screen Help Screen The Help screen offers quick contact information for customer support and all other inquiries Figure 299 Figure 299 Help Screen ...

Страница 193: ... Once the user has logged in the Products screen will appear Figure 300 Figure 300 Products Screen Initial View In the SELECT A PRODUCT TO ADD drop down box select Hdmi Over IP H264 H 265 500762 and then click on ADD DEVICE Figure 301 Figure 301 Products Screen Selecting a Product ...

Страница 194: ...ser then types a name in the Custom Name field and clicks on OK Note that if the user decides to click on CANCEL the previous screen appears Figure 301 without a product being added Figure 302 Products Screen Naming a Product The custom name has been added to YOUR CURRENT SYSTEM Figure 303 Figure 303 Products Screen Your Current System Selection ...

Страница 195: ... product the user clicks on Select which brings up a multi tabbed screen Figure 304 Figure 304 Products Screen Load Dialog By default a dialog appears asking the user to load a previously saved device list in case such a list has already been stored This dialog will appear even if no device list has been previously saved Four tabs appear within the Products screen 1 Set up 2 Matrix 3 RS 232 4 IR 5...

Страница 196: ...ings of any found device to remain active After selecting Automatic or Manual click on Launch discovery Figure 305 Figure 305 Products Screen Set up Tab The system will scan the network for all source side devices 500762 transmitters and display side devices 500762 receivers and will display the scan results in tabular form Figure 306 Each 500762 transmitter and receiver can be assigned an arbitra...

Страница 197: ... MuxLab Inc Extender Model 500762 Page 197 Figure 306 Products Screen Set up Tab Figure 307 Name Editing ...

Страница 198: ...n UPDATED tag will appear next to newly changed names Figure 308 Figure 308 Saving Name Changes To view and modify component parameters click on the Detail button next to the given component A dialog appears Figure 309 Figure 309a TX Device Detail Dialog Figure 309b RX Device Detail Dialog ...

Страница 199: ... codec type to AAC or MP3 Audio Bit Rate Select audio bit rate from 48Kbps to 320Kbps Audio Frequency Select audio frequency to 44100Hz or 48000Hz Communication Protocol Selection RTMP RTSP HLS TS FLV and Multicast Note Only a limited selection should be made at a time Do not enable all at the same time Multicast Allows for enabling or disabling the multicast protocol Multicast IP Shows the multic...

Страница 200: ... The user also has the option of using Presets to save connection schemes Presets as well as to edit and delete existing presets Figure 310 Figure 310 Matrix Tab To connect a display to a source the user first clicks on the drop down list next to the given display for example RX 1 and selects which source to connect it to Figure 311 Figure 311 Change Connection ...

Страница 201: ...ize the change A green SUCCESS tag will appear next to the new or changed connection Figure 312 Figure 312 Change Successful To create a new preset the user clicks the Save current connections as new preset field Figure 313 and types a name This assigned preset name will be linked to the existing connection scheme being shown within the Matrix tab Figure 313 Create New Preset ...

Страница 202: ...xt to the Save current connections as new preset field and the newly created preset becomes the Current active Preset Figure 314 Figure 314 Confirmation of New Preset To delete a preset the user clicks the Delete following preset drop down box and selects a preset name from the list shown Figure 315 Figure 315 Delete Preset ...

Страница 203: ...pear asking the user to confirm the deletion request Figure 316 Figure 316 Confirmation of Deleted Preset Click on OK The preset will be deleted and a green SUCCESS tag will appear next to the Delete following preset field Figure 317 Figure 317 Confirmation of Deleted Preset ...

Страница 204: ...ent Active Preset Once selected the Preset will be saved and a green SUCCESS tag will appear next to the Save current connections in following preset field Figure 319 Figure 319 Confirmation of Changed Preset Name In order to activate an existing Preset select Current active Preset and select the Preset name from the drop down box and the Preset will become active The active Preset will also be di...

Страница 205: ...work Controller to a MuxLab 500762 transmitter or receiver Figure 320 Figure 320 RS 232 Tab When sending RS 232 commands through the Network Controller the user first selects the device that the RS 232 commands will be sent to This is done by clicking on the Select a device drop down list and making a selection Figure 321 Figure 321 RS 232 Tab Selecting a Device ...

Страница 206: ...ied data command to the attached source device Note that any RS232 feedback data returned from the end device is automatically sent to the Network Controller and displayed in the Data Feedback Received field Note that RS232 pass through mode is not currently supported 4 Products Screen IR Tab The IR tab of the Products screen enables the user to send IR commands from the Network Controller to a Mu...

Страница 207: ... also been selected meaning that a command sent to TX2 will travel from the Network Controller to the Ethernet Switch and from the Ethernet Switch to the transmitter connected to the TX2 port with an attached IR Emitter That transmitter will then send the specified data command via the attached IR Emitter to the source device Note that IR pass through mode is not currently supported Learning IR Co...

Страница 208: ...e for MuxLab transmitters and receiver Figure 324 Figure 324 Firmware Tab The user first selects either Display RX or Source TX then chooses the firmware update file to upload to the given device Once the file is selected the user checks the box next to the given device listed under DISPLAY and SOURCE targeted for firmware upgrade and then clicks Apply ...

Страница 209: ... the IP address of the MuxLab Network Controller the network mask as well as the router IP address It also allows the user to enable or disable DHCP Figure 325 Settings Screen Network Tab The Administration tab is used to create or delete user accounts change passwords restore data backup data and retrieve logs Figure 326 Figure 326 Settings Screen Administration Tab ...

Страница 210: ...ntroller software Figure 327 This software is available on MuxLab s website www muxlab com Download the software to the local PC before performing the update Figure 327 Software Update Screen Help Screen The Help screen offers quick contact information for customer support and all other inquiries Figure 328 Figure 328 Help Screen ...

Страница 211: ...e the computer IP subnet address matches the IP subnet address of the Ethernet Switch and Router General communication problem between devices As a general rule all devices required to communicate together on the same local network must have an IP address in the same subnet Static IP address must be unique and in the same subnet DHCP addresses must be assigned within the same subnet and configured...

Страница 212: ... p_targetId target id p_cmd command name p_userName MNC User Name p_password MNC password Response format without additional data p_targetId target id p_cmd command name p_rspStatus command status p_msg a message Command with data parameters p_targetId target id p_cmd command name p_userName MNC User Name p_password MNC password p_data key1 value1 key2 value2 Response format with additional data p...

Страница 213: ...C User Name p_password MNC password Response p_targetId systemID p_cmd launch_discovery_auto p_rspStatus SUCSESS p_msg a_message p_data productName value modelName value cust omName value mac value ip value mask value isDhcp 0 1 multicastGroupIp value videoResolution value videoFrameRate value audioFormat value isVideoS ignalDetected 0 1 isIrOn 0 1 isDipSwitchEnabled 0 1 fwVer value uartBaudRate v...

Страница 214: ...ord Response p_targetId systemID p_cmd launch_discovery_auto p_rspStatus SUCSESS p_msg a_message p_data productName value modelName value cust omName value mac value ip value mask value isDhcp 0 1 multicastGroupIp value videoResolution value videoFrameRate value audioFormat value isVideoS ignalDetected 0 1 isIrOn 0 1 isDipSwitchEnabled 0 1 fwVer value uartBaudRate val ue irMode emitter sensor rs23...

Страница 215: ...to 720P 50Hz value 2035 to set video resolution to 720P 60Hz value 2041 to set video resolution to 1080P 24Hz value 2042 to set video resolution to 1080P 25Hz value 2044 to set video resolution to 1080P 50Hz value 2045 to set video resolution to 1080P 60Hz value 3041 to set video resolution to 1080I 50Hz value 3042 to set video resolution to 1080I 60Hz isAutoResolutionOn 1 to let the device auto s...

Страница 216: ...X X X n a irFeedbackIP n a n a n a X n a is60fps X X n a X n a 5 2 5 Reboot device Description The system will reboot the devices Command p_targetId systemID p_cmd reboot_devices p_userName MNC User Name p_password MNC password p_data mac device mac address NOTE You have the option to use a port ID to be defined in web server instead of the mac address o portIn input port number o portOut output p...

Страница 217: ...vice mac address rspStatus SUCCESS or FAILED msg 5 2 7 Select and apply a preset Description Apply a existent preset Command p_targetId systemID p_cmd select_preset p_userName MNC User Name p_password MNC password p_data presetId preset id number Response p_targetId systemID p_cmd select_preset p_rspStatus SUCCSESS p_msg amessage p_data macRx Rx device mac address macTx Tx device mac address rspSt...

Страница 218: ...NC password p_data presetId preset id number Response p_targetId systemID p_cmd delete_preset p_rspStatus SUCCSESS p _msg a message p_data presetId preset ID number 5 2 11 Send data to RS 232 For 500753 754 755 756 757 758 759 Description Send data in hexadecimal to RS232 port of a device Command p_targetId systemID p_cmd send_data_to_rs232 p_userName MNC User Name p_password MNC password p_data m...

Страница 219: ...on to use a port ID to be defined in web server instead of the mac address o portIn input port number o portOut output port number Response p_targetId systemID p_cmd send_data_to_ir p_rspStatus SUCCSESS p_msg a message p_data mac device mac address rspStatus SUCCESS or FAILED msg 5 2 13 Modify network setting OF THE MNC Description Modify any network settings of the MNC ip mask gateway dhcp Comman...

Страница 220: ...connect to isVideoWallMode true vwGlobalSize Global nb of TV on x axis x global nb of TV on y axis vwSizeX nb of TV of current video wall on x axis vwSizeY nb of TV of current video wall on y axis xCoordonate x coordinate of this RX yCoordonate x coordinate of this RX measureUnit inch or cm screenWidth screen width screenHeight screen Heigth bezelTop measure of top Tv bezel bezelBottom measure of ...

Страница 221: ...ge p_data macRx Rx device mac address macTx Tx device mac address rspStatus SUCCESS or FAILED msg 5 2 16 VIDEO WALL Select and apply a configuration For 500754 500759 Description Apply a existent video wall configuration Command p_targetId systemID p_cmd vwApplyConfig p_userName MNC User Name p_password MNC password p_data vwConfigId vwConfig id number Response p_targetId systemID p_cmd vwApplyCon...

Страница 222: ...tus SUCCESS or FAILED msg Note p_data will return all the connections result that took place 5 3 IP Command API for 500480 command response list 5 3 1 Get all port status from the database Description The system will retrieve all the current port status Command p_targetId systemID p_cmd get_devices p_userName MNC User Name p_password MNC password Response p_targetId systemID p_cmd get_devices p_rs...

Страница 223: ...nection p_userName MNC User Name p_password MNC password p_data portOut output portIn input To disconnect set input 0 Response p_targetId systemID p_cmd connection p_rspStatus SUCCS ESS p_msg a message p_data portOut output portIn input rspStatus SUCCESS or FAILED msg 5 3 4 Update some ports attributes Description The system will update the ports specified with the new attributes provided Command ...

Страница 224: ...Name MNC User Name p_password MNC password p_data presetId preset id number Response p_targetId systemID p_cmd select_preset p_rspStatus SUCCSESS p_msg amessage p_data portOut 5 output portIn 1 input rspStatus SUCCESS or FAILED msg Note p_data will return all the connections result that took place 5 4 Examples of commands Muxlab MNC controller IP address 192 168 168 50 Login admin Password admin T...

Страница 225: ...in p_password admin p_data portOut 2 portIn 1 c p_targetId 1 p_cmd send_data_to_rs232 p_userName admin p_password admin p_data portOut 2 hexdata 5F45Ac9B ack 1 feedback 1 d p_targetId 1 p_cmd send_data_to_ir p_userName admin p_password admin p_data por tIn 1 hexdata AABBCC01020355FF e p_targetId 1 p_cmd select_preset p_userName admin p_password admin p_data preset Id 6 f p_targetId 1 p_cmd update_...

Страница 226: ...er RMA issued by its Customer Service Department and a proof of purchase date If this product is delivered to MuxLab by mail you agree to assume risk of loss or damage in transit to prepay shipping charges to the warranty service location and to use the original shipping container or equivalent THE ABOVE LIMITED WARRANTY IS THE ONLY WARRANTY COVERING YOUR MUXLAB PRODUCT THERE ARE NO OTHER WARRANTI...

Страница 227: ...t For credit replace R M A customer will be liable to pay replacement invoice if defective products are not returned Product more than six months old including shelf life The defective unit must be returned prepaid to MuxLab and then the unit will be repaired or if repair is not possible replaced by an equivalent unit and returned to the customer within one 1 month of receiving any returned produc...

Страница 228: ...ital Network Controller MNC Page 228 MuxLab Inc 8495 Dalton Road Mount Royal Quebec Canada H4T 1V5 Tel 1 514 905 0588 Fax 1 514 905 0589 Toll Free North America 877 689 5228 URL www muxlab com E mail videoease muxlab com ...

Отзывы: