
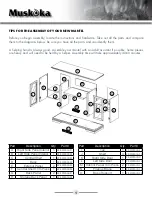
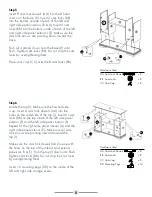


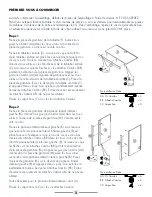

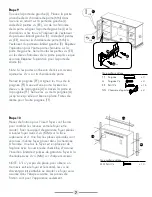


Step 9
Locate the left door (L). Place the rounded part of
the door hinge (NN) into the recessed area on
the left door (L). Using 2 small screws (EE), secure
the hinge to the door. Line up the left door (L) and
the hinge with the holes on the inside of the left
side panel exterior (E). Using 2 small screws (EE),
secure the door hinge (NN) to the left side panel
exterior (E). Repeat for the other door hinge on the
left door. Tighten all the small screws (EE) on both
door hinges until secure. Repeat for the right side
door (K).
Note: If the doors need leveling, adjust the 2
screws on the door hinge as needed.
Locate a handle (FF). Line up the holes in the
handle (FF) with the holes in a door. Insert 2
handle screws (LL) through the door and into
the handle (FF). Tighten handle screws (LL) until
secure. Repeat for the other handle (FF).
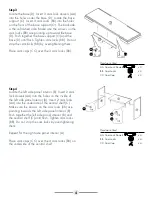
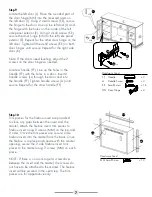
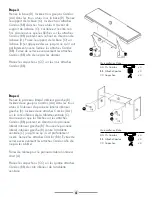
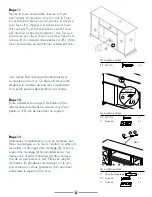
Step 10
Trim pieces for the firebox insert are provided
to close any gaps between the insert and the
mantel. Attach the firebox insert trim pieces to
firebox insert using 2 screws (MM) on the top and
2 sides. Once the trim pieces are secure, slide
firebox insert into the mantel from the back. Once
the firebox is in place and square with the mantel
opening, secure the 2 side firebox insert trim
pieces to the mantel using 2 screws (MM) on each
piece.
NOTE: If there is no room to get a screwdriver
between the insert and the mantel, the screws do
not have to be attached to the mantel. The firebox
insert will be secured in the next step. The trim
pieces are for appearance only.
7
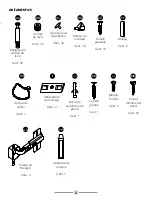
FF
LL
EE
EE
x8
x8
NN
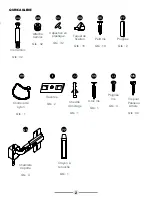
Hardware Used
FF
Handle
x 2
LL
Handle Screw
x 4
EE Small Screw
x 16
NN Door Hinge
x 4
MM
MM
MM
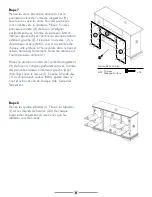
Hardware Used
MM Small Screw
x 10


