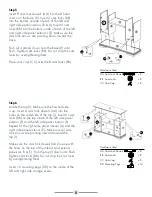
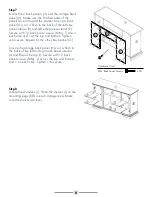
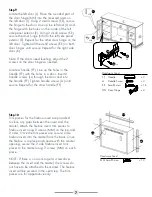
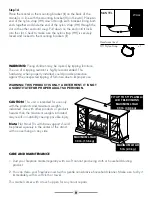
Muskoka Standish MTVS2500SCH Скачать руководство пользователя страница 11

wArrAnTy

Greenway Home Products is pleased to offer in-home warranty repairs. Please refer to your Firebox Use and Care Guide for warranty 

information on your Firebox.

DO NOT RETURN THIS PRODUCT TO THE STORE:  

Please contact Customer Service at: 

1-866-253-0447

Monday to Thursday from 8:30AM to 5:00PM (EST), Friday from 8:30AM to 4:00PM (EST)

Web: 

www.greenwayhp.com

Email: 

[email protected]

Canada:

  400 Southgate Dr., Guelph, Ontario, Canada, N1G 4P5

usA: 

1270 Flagship Dr., Perrysburg, Ohio, USA, 43551

Limited Warranty Definitions:

Greenway Home Products:  

(Greenway) 

  Manufacturer.

Mantel: 

  Mantel manufactured by Greenway Home Products.

Purchaser: 

  Purchaser of the Mantel

Distributor: 

  Facility authorized to sell Greenway Home Products.

Warranty Card    Greenway Home Products Limited Warranty Registration Card identifying the Purchaser and product model.

Greenway limited warranty:

Greenway warrants to the Purchaser that the Mantel is free from defects in material and workmanship, under normal use and service, for 

1 year (1 year limited parts) from the date of purchase.

All warranty repairs must be preauthorized by Greenway Home Products. Greenway will, at its’ option, replace or repair free of charge 

any defective part, which the Purchaser shall notify their Distributor or Greenway Home Products within the warranty period. The obligation 

of Greenway Home Products under this warranty, is expressly limited to such replacement or repairs.

The provisions of this limited warranty shall not apply to the following:

  1.

  Accidents.

  2.

  Unauthorized repairs or alterations.

  3. 

Normal maintenance.

  4.

  Changes made to other units manufactured after this mantel was manufactured.

  5.

  Incidental damages caused by failure of the mantel such as inconvenience or loss of use.

  6.  

Improper installation.

The provisions of this limited warranty shall not apply to deterioration due to wear and exposure beyond the following limitations:

  1.

  For 180 days from the date of purchase for exterior finished surfaces.

Due to the properties of natural wood, Greenway Home Products makes no warranty against mineraling of wood components.

Greenway Limited Warranty is void unless the following conditions are adhered to: 

  1.

  Warranty registration must be completed and returned to a Greenway Home Products.

  2.

  All warranty repairs must be preauthorized by a Greenway repair facility.

  3.

  Greenway  reserves  the  right  to  inspect  defective  parts  that  have  been  replaced  under  warranty.    Dealer  is  expected  to  hold  


  defective parts for 60 days.

  4.

  Only parts and accessories and other materials, available through Greenway Home Products are to be used in the performance  


  of warranty service.

  5.

  Purchasers  are  responsible  for  presenting/notifying  their  Distributor  as  soon  a  problem  exists.  The  warranty  repairs  should  be  


  completed in a reasonable amount of time from the date of authorization. Not to exceed 30 days past notification.

This limited warranty is expressly in lieu of any other expressed or implied warranty, including any implied warranty or merchantability 

or  fitness  for  a  particular  purpose  and  of  any  obligations  or  liabilities  on  Greenway  Home  Products  which  neither  assumes  nor  

authorizes any other person to assume for it any other liability in connection with the Mantel manufactured by it.

The warranty is null and void if used in commercial or industrial applications.

10

Содержание Standish MTVS2500SCH

Страница 1: ...elevision Foyer lectrique Le support de TV supportent un t l vision plat jusqu 55 Chimenea El ctrica El soporte de Televisi n sostiene hasta un televisor de pantalla plana de 55 save These Instruction...

Страница 2: ...500SCH 11 L Left Side Door 1 ZZ 2500SCH 12 M Interior Panel Trim Piece 2 ZZ 2500SCH 13 N Firebox Brace 1 ZZ 2500SCH 14 O Base Support 1 ZZ 2500SCH 15 I C H D G E G B A J E L J J J K N O M M F Tips for...

Страница 3: ...32 HH Handle Qty 2 FF Plastic Cam Cap Qty 32 Mounting Bracket Qty 2 Nylon Strap Qty 1 II JJ KK LL Mounting Peg Qty 16 Small Screw Qty 19 Large Screw Qty 1 Wall Anchor Qty 1 Back Panel Screws Qty 44 Ha...

Страница 4: ...interior B Make sure the left side panel interior B finished side is facing out with the mouse hole at the bottom Insert cam locks BB into the holes on the right side of the left side panel interior...

Страница 5: ...e panel interior B Insert 2 cam lock dowels AA into the holes on the inside of the left side panel interior B Insert 2 cam locks AA into the underside of the central shelf C Make sure the arrows on th...

Страница 6: ...A into the holes on the underside of the top I Insert 2 cam locks BB on the top inside of the left side panel exterior E and the left side panel interior B Repeat for the right side panel interior A a...

Страница 7: ...side and 1 at the top and bottom Tighten until secure Repeat for the other back panel G Line up the storage back panel H so it is flush to the back of the left and right side panel interiors A and B a...

Страница 8: ...into the handle FF Tighten handle screws LL until secure Repeat for the other handle FF Step 10 Trim pieces for the firebox insert are provided to close any gaps between the insert and the mantel Atta...

Страница 9: ...use mantel imbalance Step 12 Attach one of the mounting brackets II securely to the back underside edge of the mantel Use 1 small screws EE to make sure it is secure Step 13 Determine where mantel is...

Страница 10: ...ct is only a deterrent It is not a substitute for proper adult supervision CAUTION This unit is intended for use only with the products and maximum weights indicated Use with other products or product...

Страница 11: ...ce 4 Changes made to other units manufactured after this mantel was manufactured 5 Incidental damages caused by failure of the mantel such as inconvenience or loss of use 6 Improper installation The p...

Страница 12: ...M Garniture pour Panneau Int rieur 2 ZZ 2500SCH 13 N Traverse pour foyer encastrable 1 ZZ 2500SCH 14 O Support de Base 1 ZZ 2500SCH 15 I C H D G E G B A J E L J J J K N O M M F Conseils pour l assembl...

Страница 13: ...oign e Qt 2 FF Capuchon en plastique Qt 32 Traverse Qt 2 Courroie de nylon Qt 1 II JJ KK LL Taquet de fixation Qt 16 Petit Vis Qt 19 Gros Vis Qt 1 Cheville d ancrage Qt 1 Vis pour Panneau Arri re Qt 4...

Страница 14: ...lat ral int rieur gauche B est plac face vers l ext rieur et que le trou de souris est en bas Ins rez des attaches Camloc BB dans les trous situ s du c t droit du panneau lat ral int rieur gauche B As...

Страница 15: ...auche B Ins rez deux goujons Camloc AA dans les trous situ s l int rieur du panneau lat ral int rieur gauche B Ins rez deux attaches Camloc AA sur le c t inf rieur de la tablette centrale C Assurez vo...

Страница 16: ...s trous situ s du c t inf rieur du dessus I Ins rez deux attaches Camloc BB du c t int rieur sup rieur du panneau lat ral ext rieur gauche E et du panneau lat ral int rieur gauche B Recommencez cette...

Страница 17: ...horizontale dans le haut et le bas Serrez les fermement Faites de m me pour l autre panneau arri re G Placez le panneau arri re de l unit de rangement H de fa on l aligner parfaitement avec l arri re...

Страница 18: ...n e FF Alignez les trous de la poign e FF ceux d une porte Ins rez les deux vis de la poign e LL travers la porte et la poign e FF Serrez les vis de la poign e LL jusqu ce qu elle soit bien en place F...

Страница 19: ...teau tape 12 Fixez solidement un support de fixation II au rebord arri re du manteau Servez vous d une petite vis EE afin de bien fixer ce support tape 13 D terminez l emplacement voulu du manteau pui...

Страница 20: ...N GARDE Cette unit est uniquement compatible avec les produits sp cifi s et ne peut supporter que la charge maximale indiqu e Le fait d utiliser cette unit avec d autres produits ou avec des produits...

Страница 21: ...4 Changements apport s aux autres unit s fabriqu es apr s la fabrication du manteau de chemin e 5 Les dommages secondaires caus s par une une panne du manteau de chemin e tels que inconv nients ou la...

Страница 22: ...M Panel de Interior el borde decorativo 2 ZZ 2500SCH 13 N Abrazadera del accesorio para chimenea 1 ZZ 2500SCH 14 O Base de apoyo 1 ZZ 2500SCH 15 I C H D G E G B A J E L J J J K N O M M F Consejos para...

Страница 23: ...leva de pl stico Cant 32 Abrazadera de montaje Cant 2 Correa de nailon Cant 1 II JJ KK LL Estaca de montaje Cant 16 Tornillo peque o Cant 19 Tornillo grande Cant 1 Ancla de expansi n de pared Cant 1 V...

Страница 24: ...zquierdo interior B mire hacia afuera con el orificio de rat n en la parte inferior Inserte cerrojos de leva BB en los orificios del costado derecho del panel lateral izquierdo interior B Aseg rese de...

Страница 25: ...para cerrojo de leva AA en los orificios de la parte interna del panel lateral izquierdo interior B Inserte 2 cerrojos de leva AA en la parte inferior del estante central C Aseg rese de que las flech...

Страница 26: ...e la cubierta I Inserte 2 cerrojos de leva BB en la parte superior interna del panel lateral izquierdo exterior E y el panel lateral izquierdo interior B Repita para el panel lateral derecho interior...

Страница 27: ...hasta lograr un ajuste firme Repita este procedimiento con el otro panel posterior G Alinee el panel posterior de almacenamiento H de modo que quede al ras con la parte posterior de los paneles latera...

Страница 28: ...la puerta y en la manija FF Apriete los tornillos para manija LL hasta que est n seguros Repita la operaci n para la otra manija FF Paso 10 Piezas especiales para la inserci n del fog n se proporciona...

Страница 29: ...ique puede desequilibrar la repisa para chimenea Paso 12 Fije una de las abrazaderas de montaje II firmemente al borde inferior posterior de la repisa para chimenea Use 1 tornillo peque o EE para aseg...

Страница 30: ...NO REEMPLAZA LA SUPERVISI N ADECUADA POR PARTE DE ADULTOS PRECAUCI N Esta unidad est dise ada para ser usada nicamente con los productos y con los pesos m ximos indicados El uso con otros productos o...

Страница 31: ...aciones que se ejecutaron en otras unidades fabricadas despu s de fabricar este Repisa de chimenea 5 Da os incidentales causados por fallas del Repisa de chimenea tal como molestias o p rdida del uso...

Отзывы: