
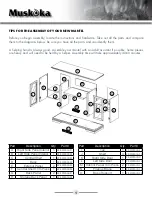


4
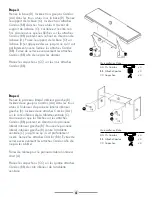
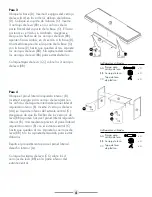
Étape 3
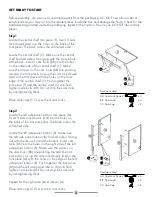
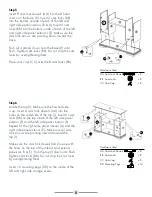
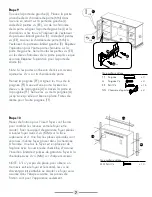
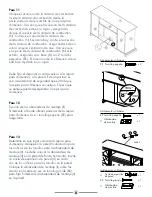
Prenez la base (D). Insérez trois goujons Camloc
(AA) dans les trous situés sous la base (D). Prenez
le support de la base (O). Insérez trois attaches
Camloc (BB) dans les trous situés à l’avant du
support de la base (O). L’arrière est le côté non
fini. Assurez-vous que les flèches sur les attaches
Camloc (BB) pointent vers le haut en direction de
la base (D). Posez le support de la base (O) sur
la base (D) et appuyez dessus jusqu’à ce qu’il soit
parfaitement inséré. Serrez les attaches Camloc
(BB). Évitez de serrer excessivement les attaches
Camloc (BB) afin de ne pas les abîmer.
Placez les capuchons (CC) sur les trois attaches
Camloc (BB).
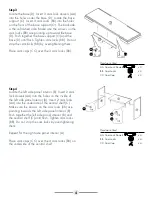
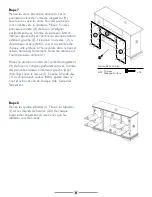
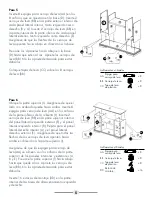
Étape 4
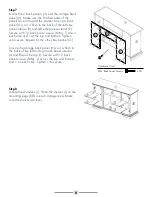
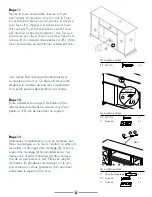
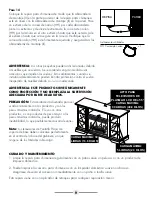
Prenez le panneau latéral intérieur gauche (B).
Insérez deux goujons Camloc (AA) dans les trous
situés à l’intérieur du panneau latéral intérieur
gauche (B). Insérez deux attaches Camloc (AA)
sur le côté inférieur de la tablette centrale (C).
Assurez-vous que les flèches sur les attaches
Camloc (BB) pointent en direction du panneau
latéral intérieur gauche (B). Poussez le panneau
latéral intérieur gauche (B) contre la tablette
centrale (C) jusqu’à ce qu’il soit parfaitement
inséré. Serrez les attaches Camloc (BB). Évitez de
serrer excessivement les attaches Camloc afin de
ne pas les abîmer.
Faites de même pour le panneau latéral intérieur
droit (A).
Placez les capuchons (CC) sur les quatre attaches
Camloc (BB) du côté inférieur de la tablette
centrale.
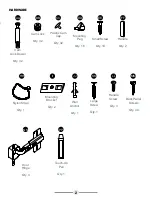
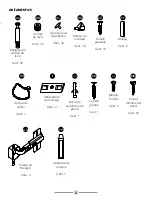
Quincaillerie utilisée
AA Vis Camloc
x 3
BB Attache Camloc
x 3
CC Capuchon
x 3
Quincaillerie utilisée
AA Vis Camloc
x 4
BB Attache Camloc
x 4
CC Capuchon
x 4
AA
BB
CC
AA
BB
CC


