


8
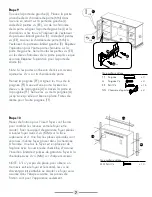
Paso 11
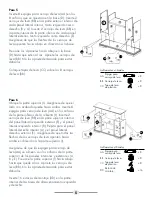
Ubique el accesorio de la cámara de combustión.
Inserte la cámara de combustión desde la
parte posterior del ensamble de la repisa para
chimenea. Una vez que el accesorio de la cámara
de combustión esté en su lugar y asegurado,
ubique el soporte de la cámara de combustión
(N). Coloque el soporte de la cámara de
combustión (N) hacia arriba y contra el accesorio
de la cámara de combustión, asegurándose de no
cubrir ninguna ventilación de aire. Una vez que
el soporte de la cámara de combustión (N) esté
ceñido, asegúrelo a la base (D) con 2 tornillos
pequeños (EE). El accesorio de la chimenea ahora
está bien ajustado en su lugar.
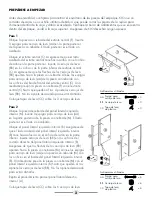
Debe fijar el dispositivo contra vuelcos a la repisa
para chimenea y a la pared. Este dispositivo es
una característica de seguridad que evitará que
la repisa para chimenea se vuelque. El peso que
se aplique puede desequilibrar la repisa para
chimenea.
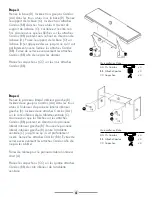
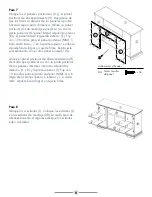
Paso 12
Fije una de las abrazaderas de montaje (II)
firmemente al borde inferior posterior de la repisa
para chimenea. Use 1 tornillo pequeño (EE) para
asegurarla.
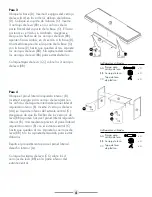
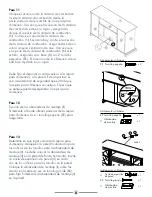
Paso 13
Determine en qué lugar colocará la repisa para
chimenea y marque en la pared la ubicación para
los orificios de los tornillos para la abrazadera de
montaje (II). Se debe colocar la abrazadera de
montaje (II) en la pared de forma horizontal. Inserte
un ancla de expansión de pared (JJ) en cada
uno de los orificios para los tornillos en la pared.
Coloque la abrazadera de montaje (II) sobre las
marcas en la pared y use un tornillo grande (KK)
para fijar firmemente la abrazadera de montaje (II)
en la pared.
Aditamentos utilizados
JJ Ancla de expansión
de pared
x 1
KK Tornillo grande
x 1
II
Abrazadera
de montaje
x 1
JJ
II
KK
PARED
Aditamentos utilizados
EE Tornillo pequeño
x 2
D
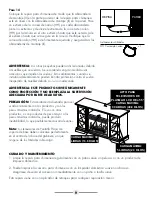
Aditamentos utilizados
EE Tornillo pequeño
x 1
II Abrazadera
de montaje
x 1
EE
I I
TORNILLO
PEQUEñO
ABRAZADERA
DE MONTAJE
BORDE DE LA
CHIMENEA


