background image

Configuration/settings

User manual 55170_hdb_en_13

 111 / 145

IRT communication:

Setting up the Sync

master

NOTE

This procedure describes the configuration of the not isochronous IRT com-

munication. How to set up an isochronous IRT communication can be found 

in the software manual of your engineering software.

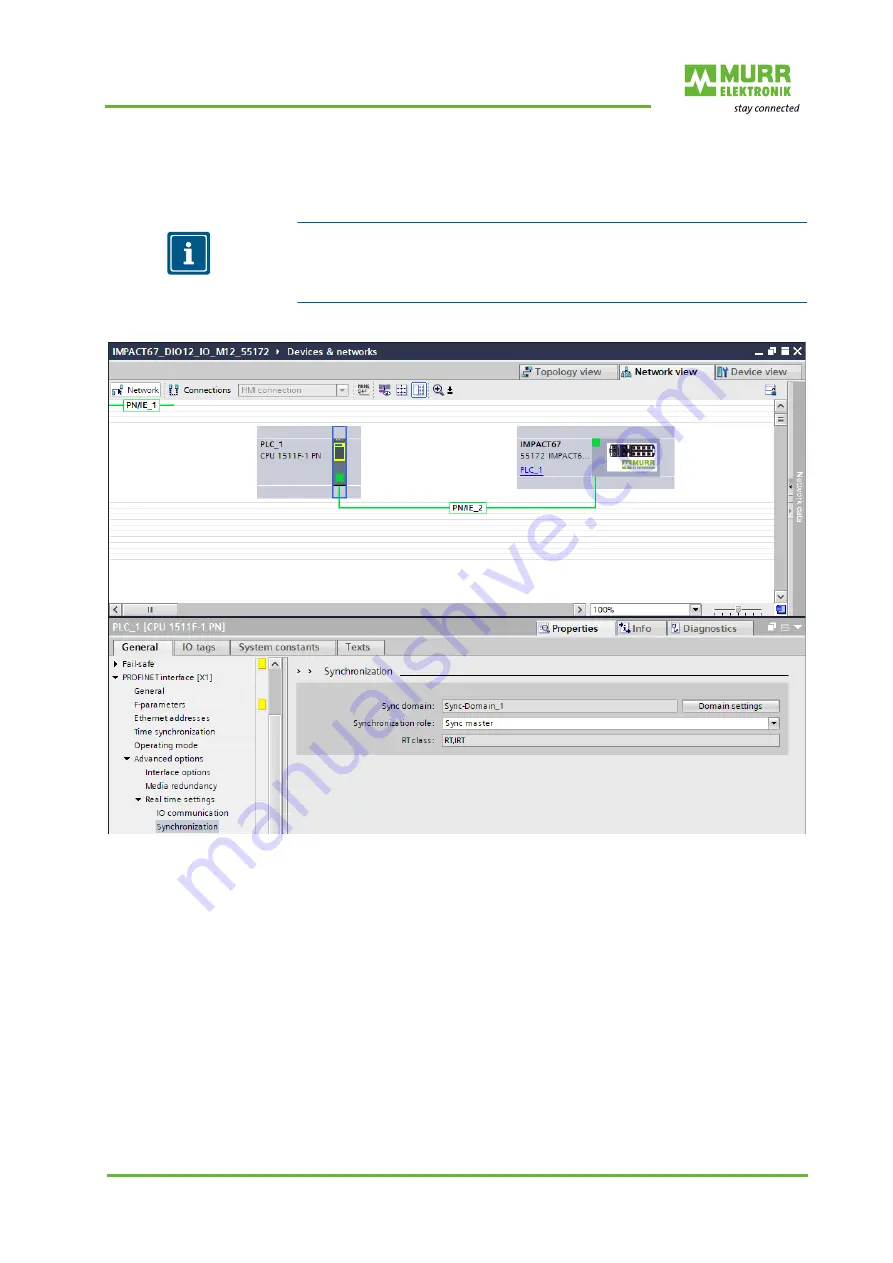
Fig. 8-40: IRT communication: Setting up the Sync master

1 |

Double-click the 

PLC_1 controller

.

2 |

Navigate to the menu item 

Advanced options | Real-time setting | 

Synchronization.

3 |

For “Synchronization role”, set the

 Sync master.

Содержание Impact67 DIO12 DIO4 M12L 4P

Страница 1: ...MANUAL ENGLISH for devices of the IMPACT67 series Art No 55150 55151 55152 55170 55171 55172 Murrelektronik GmbH...

Страница 2: ...ctions This document is valid for the following products Document status Name Art No Impact67 DIO16 M12L 4P 55150 Impact67 DIO14 DIO2 IOL2 M12L 4P 55151 Impact67 DIO12 DIO4 IOL4 M12L 4P 55152 Impact67...

Страница 3: ...2 Structure of the conformance classes 14 3 2 3 PROFIenergy 15 3 2 4 Shared Device 16 3 3 PROFINET IRT 17 3 4 Media redundancy 18 3 5 IO Link 20 3 5 1 Data storage mode 21 3 6 Module 22 3 6 1 Module...

Страница 4: ...uration 83 8 4 Cyclic and acyclic communication 85 8 4 1 Acyclic IO Link access 86 8 4 2 I M data 87 8 4 3 IO Link function block 90 8 5 Basic setting 94 8 6 Project planning of the Fast Start Up 103...

Страница 5: ...MANUAL ENGLISH for devices of the IMPACT67 series Art No 55150 55151 55152 55170 55171 55172 5 145 10 Appendix 141 10 1 Accessories 141 10 1 1 Tools 141 10 2 Glossary 142 11 Legal notes 144...

Страница 6: ...e the competitiveness of your machines and plants Customer Service Cen ter CSC Our staff of the Customer Service Center will help you with all questions con cerning installation and start up They supp...

Страница 7: ...ot contained in this manual Software Purpose of this document This document instructs the technical staff of the machine manufacturer or machine operator on the safe use of the devices described in th...

Страница 8: ...can lead to mild to moderate injuries NOTICE Possible material damage Failure to observe the warning may cause damage to the device and or the system NOTE Other technical information and notes of Mur...

Страница 9: ...70_hdb_en_13 9 145 1 1 3 Trademarks Trademarks of the following companies and institutions are used in this docu mentation PROFINET PROFINET IO PROFIBUS Nutzerorganisation e V PNO IO Link c o PROFIBUS...

Страница 10: ...ed personnel Only qualified personnel instructed in safety is allowed to install the module and to put it into operation They are qualified if they meet the following requirements They have undergone...

Страница 11: ...esign engineering or electrical features of the module Do not use the module outside the application fields described in this manual the Technical Data or in the operating instructions Do not use the...

Страница 12: ...ontaminated with hazardous substances will not be accepted for repair or disposal Returns Label the product and the packaging with For disposal Package the product Send the package to Murrelektronik G...

Страница 13: ...rollers and IO devices communicate by means of Ethernet telegrams Devices exchange data cyclically based on the provider consumer principle Devices function as receiver consumer and transmitter provid...

Страница 14: ...m to class CC A The TREE unmanaged switches by MURRELEKTRONIK can be used as switches CC B CC B expands the concept by the inclusion of network diagnostics and topol ogy information Cycle time typical...

Страница 15: ...achieving and managing energy savings in production networks Using special commands scheduled saving functions can be performed via PROFIenergy These are implemented in the devices and require no addi...

Страница 16: ...two IO controllers A special advantage is the use of Shared Device in systems with standard and failsafe control units The module gives the second standard IO controller read access to the input and o...

Страница 17: ...e IRT Isochronous Real Time concept The beginning of a bus cycle is adhered to with the highest precision jitter 1 s Each of the individual time intervals during the IRT communication is split into an...

Страница 18: ...o IEC 62439 describes the PROFINET redundancy with a typical reconfiguration time of 200 ms for the communication lines with TCP IP and RT frames after an error The fault free operation of an automati...

Страница 19: ...intact An MRM uses this behavior to prevent circulation of telegrams and to convert a ring structure into a line structure A Media Redundancy Client MRC is a switch that functions only as a so called...

Страница 20: ...onnected per port which means that the IO Link is a point to point communication system and not a fieldbus The IO Link master module builds the interface between the higher fieldbus level and the IO L...

Страница 21: ...on In data storage mode the parameter data storage facilities on IO Link master and IO Link device are synchronized Following replacement of a device the master writes the saved device pa rameters to...

Страница 22: ...55151 Art No 55171 X0 X5 Digital inputs and digital outputs M12 X6 X7 Digital inputs and digital outputs or IO Link M12 Art No 55152 Art No 55172 X0 X3 Digital inputs and digital outputs M12 X4 X7 Di...

Страница 23: ...rial damage caused by male connectors and female connectors that have not been sealed The degree of protection IP67 is only guaranteed if all connections are sealed with connectors screw plugs or seal...

Страница 24: ...uts Art No 55151 Art No 55171 X0 X5 LED digital inputs and digital outputs X6 X7 LED digital inputs and digital outputs or IO Link Art No 55152 Art No 55172 X0 X3 LED digital inputs and digital output...

Страница 25: ...55170 55171 55172 Power M12 55150 55151 55152 Art No DIO IO Link Class B 55150 55170 X0 X7 55151 55171 X0 X7 X6 X7 55152 55172 X0 X7 X4 X7 X0 X7 Pin 1 24 V Pin 2 DI DO Pin 3 0 V Pin 4 DI DO Pin 5 X6...

Страница 26: ...Description User manual 55170_hdb_en_13 26 145 M12 female D coded Port 1 Port 2 XF1 XF2 Pin 1 TD Pin 2 RD Pin 3 TD Pin 4 RD Pin 5 n c...

Страница 27: ...itches are in the OFF position DIP switch Set the DIP switch to the desired function 10 bit DIP switch Function bit Switch position Description Reserved 1 8 OFF Reserved Deactivate web server 9 ON Web...

Страница 28: ...6 A Actuator current UA 40 C see Derating 16 A Current consumption At idle 0 18 A Cross section of M12L connector 1 5 mm2 Protection against reverse polarization for US and UA Yes Reverse polarity pro...

Страница 29: ...3 29 145 Derating total current actuator sensor supply Fig 4 1 Derating total current actuator sensor supply Derating total current outputs Fig 4 2 Derating total current outputs Derating DO output cu...

Страница 30: ...95 Installation hight Above sea level 2 000 m Mechanical Oscillation test EN 60068 Part 2 6 10 150 Hz Oscillation angle 0 35 mm 5 g Shock test EN 60068 Part 2 27 15 g duration 11 ms Electrical safety...

Страница 31: ...tection module supply Ensure by load circuit monitoring Yes Inverse polarity protection modul supply Yes Short circuit protection input Electronically Short circuit protection output Electronically Pr...

Страница 32: ...2 Programmable logic controller part 2 Conform EMC 2014 30 EU Conform RoHS 2011 65 EU Conform REACH Conform CE 2014 30 EU Conform ULc CSA C22 2 No 61010 2 201 CSA C22 2 No 61010 1 In accordance with F...

Страница 33: ...ounting surface to avoid mechanical tension Provide suitable grounding Suitable installation site in terms of vibration and shock load temperature and humidity see chap 4 Technical Data Protected to a...

Страница 34: ...2 Distance in mm NOTICE For correct installation and improved heat dissipation we recommend keeping a minimum distance of 3 mm when mounting the IMPACT67 NOTE When using angled connectors a minimum di...

Страница 35: ...te for the condition of the mount ing surface Tighten the screws carefully The specified tightening torques must be ob served NOTICE Material damage through improper use Do not use the modules as clim...

Страница 36: ...ting Mount the module in the order indicated below 1 Slightly tighten the top M6 bolt 2 Align housing 3 Slightly tighten the lower M6 bolt 4 Tighten screws M6 according to the torque 5 Grounding the m...

Страница 37: ...e screw to attach the ground strap Fig 5 4 Grounding strap fastening Without grounding strap NOTE Remove the grounding strap and secure the module to the metal substrate with a conducting screw Fig 5...

Страница 38: ...Mounting User manual 55170_hdb_en_13 38 145 5 4 2 Addressing lid Addressing lid fastening Fig 5 6 Addressing lid fastening M3 0 8 Nm Art No 7000 98001 0000000...

Страница 39: ...toring system or fuse The fuse must be designed for max 9 A CAUTION Loss of function Only install cables and accessories which meet the requirements and reg ulations for safety electromagnetic compati...

Страница 40: ...d actuators NOTICE Material damage caused by male connectors and female connectors that have not been sealed The degree of protection IP67 is only guaranteed if all connections are sealed with connect...

Страница 41: ...circuit the connected cable or sensor must be disconnected from the M12 female connector Supported IO Link communication The module supports the IO Link communication using the following speeds 4 800...

Страница 42: ...Installation User manual 55170_hdb_en_13 42 145 6 1 2 Connecting the Ethernet bus Connecting the M12 port Fig 6 2 Example of M12 connection Ethernet bus M12 0 6 Nm Art No 7000 99102 0000000...

Страница 43: ...ng colors should be taken A fifth strand which is not placed in the module can increase the interference on the 24V conductor in the event of EMC interference due to capacitive cou pling Connect M12 m...

Страница 44: ...al unused connectors and sockets Suitable sealing connectors screw plugs for the network port the POWER OUT port and I O female connectors are available as ACCESSORIES Connection of cables Fig 6 4 Con...

Страница 45: ...is sequence 1 Insert the module 2 System check and approval by an expert 3 Put into operation NOTICE Functional errors in residential areas Devices of EMC Class A may cause interferences in residentia...

Страница 46: ...figuration program When using TIA this module can then be found in the hardware catalog in the directory structure Other field devices PROFINET IO I O Murrelektronik IMPACT67 V5 0 If the engineering s...

Страница 47: ...V5 0 In the hardware catalog mark the IMPACT67 module Drag and drop the entry to an empty area in the Devices networks win dow Assign the module to a new IO controller Fig 7 2 Assign the module to a...

Страница 48: ...evice modules Standard modules Device Parameterization of the module Read and write access to the digital IOs Access to the system status IO Link master Read and write access to the IO Link Devices Po...

Страница 49: ...iversal IO channels a virtual parameter diagnostic module and the IO Link master with 4 IO Link ports Fig 8 1 Modul configuration The ports created can optionally be occupied by defined virtual submod...

Страница 50: ...2 1 General diagnos tic messages Standard submodules Parameter Diagnostic Parameterization of the module Diagnostic behavior Threshold values for undervoltage LED behavior Availability of the Murrelek...

Страница 51: ...170_hdb_en_13 51 145 Module configuration addresses Fig 8 2 Modul configuration addresses Once the IO Master has been allocated to the IO Controller the I O addresses are assigned to the project in ac...

Страница 52: ...as digital input The data are read via Digital IO IOL_I_x Byte x bytes In IO link device with x byte s input data The status can be identified via the corresponding bit in Qualifier DI It is possible...

Страница 53: ...3 Example of a module configuration in the TIA portal Optionally the virtual modules IO Link state and State can be added to the IO Link master The modules permit a read only access to the IO Link ma...

Страница 54: ...ameterize the diagnostics However the entry in IO link master is decisive for the actual configuration of the IO link device IOL_O_y Byte y bytes In IO link device with y byte s output data The curren...

Страница 55: ...0 and 1 Value of the inputs as individual bits Layout according to parameter settings Bytes 2 and 3 Currently configured value of the outputs as indi vidual bits Layout according to parameter setting...

Страница 56: ...or power supply Default value 16 8 17 3 V 4 Report do not report undervoltage actuator supply Enables Disables the report about undervoltage of the actua tor supply 5 Undervoltage actuator supply thre...

Страница 57: ...Configuration settings User manual 55170_hdb_en_13 57 145 Module parameters Fig 8 4 Module parameters...

Страница 58: ...to the controller connected to the slot Tab 8 10 Diagnostic report Fig 8 5 Diagnostic report Selection Meaning D Default Report Global diagnostic enabled D The module reports all module specific diag...

Страница 59: ...ostic to that effect is reported Tab 8 11 Undervoltage bus and sensor supply Fig 8 6 Undervoltage bus and sensor supply Selection Meaning D Default Report D The module reports the Undervoltage of sens...

Страница 60: ...e bus and sensor supply Threshold value undervoltage bus and sensor supply defines the threshold which when values drop below it causes the diag nostic Undervoltage in the sensor supply to be reported...

Страница 61: ...ltage of the actuator supply diagnostic to that effect is reported Tab 8 12 Undervoltage actuator supply Selection Meaning D Default Report D The module reports the diagnostic Undervolt age in the act...

Страница 62: ...Undervoltage actuator supply threshold value Fig 8 9 Undervoltage actuator supply threshold value Undervoltage actuator supply threshold value defines the threshold below which the diagnostic Undervol...

Страница 63: ...ure of the actuator supply a diagnostic to that effect is reported Tab 8 13 No actuator power supply Selection Meaning D Default Report D The module reports the diagnostic Failure of actuator supply t...

Страница 64: ...tics defines whether disabled diagnostics should still use LEDs for indicating purpos es Tab 8 14 LED indication for suppressed diagnostics Selection Meaning D Default No LED indication D Disables the...

Страница 65: ...fines whether the module can be accessed via the Murrelektronik IO Link de vice tool Tab 8 15 Murrelektronik IO Link Tool enable disable Selection Meaning D Default Enable D Access to the IO Link devi...

Страница 66: ...Configuration settings User manual 55170_hdb_en_13 66 145 8 2 4 General parameters Pin Port based IO Layout Fig 8 13 Pin port based IO layout...

Страница 67: ...individual channels in the process data This relates to inputs and outputs as well as to the associated qualifiers Tab 8 16 Pin port based IO layout Selection Meaning D Default Port based D The arran...

Страница 68: ...Bit 0 Bit 1 Bit 2 Bit 3 Bit 4 Bit 5 Bit 6 Bit 7 Port X4 Pin 4 Port X4 Pin 2 Port X5 Pin 4 Port X5 Pin 2 Port X6 Pin 4 Port X6 Pin 2 Port X7 Pin 4 Port X7 Pin 2 Pin based I O data Qualifier I O Byte 0...

Страница 69: ...Configuration settings User manual 55170_hdb_en_13 69 145 Input delay Fig 8 14 Input delay default value 1 ms 0 5...

Страница 70: ...13 70 145 Input delay defines the delay for evaluation of the digital inputs That means the time after which a signal change is detected Default value for input delay 1 ms 0 5 Fig 8 15 Input delay E1...

Страница 71: ...3 8 0x0008 Reserved 4 16 0x0010 Sensor short circuit on at least one channel 5 32 0x0020 Actuator short circuit on at least one chan nel 6 64 0x0040 Actuator warning on at least one channel 7 128 0x00...

Страница 72: ...Configuration settings User manual 55170_hdb_en_13 72 145 8 2 5 Description of the parameters of the IO Link ports IO Link port unit param eters Fig 8 16 IO Link port unit parameters...

Страница 73: ...all IO Link device diagnostics Report all diagnostics except for line break The module will report all diagnostics except for line break This means that all IO Link port diag nostics will be reported...

Страница 74: ...cted on standardized PROFINET diagnostics Murrelektronik IO Link integration Depiction of the IO Link event number with the help of mathematical processes on PROFINET diagnostics Events of Murrelektro...

Страница 75: ...ut the original IO Link event code Error type IO Link events are reported as PROFINET diagnostics with Fault maintenance IO Link events of the Warning type are reported with Maintenance de manded IO L...

Страница 76: ...ance demanded Events of the Notification type are not reported as PROFINET diagnos tics but are instead handled as Notifications from the device in accor dance with the parameterization The diagnostic...

Страница 77: ...Processing of events of the Notification type Property of the generated PROFINET process alarm User Structure Identifier Format 0x8320 Process alarm data Selection Meaning D Default Discard D IO Link...

Страница 78: ...integration of the Murrelektronik IO Link 1 LSB 2 Channel properties MSB 0x0000 3 LSB 4 Reason for alarm MSB 0x9500 IO Link event code 0x0000 0 0x7FFF 32767 0x9501 IO Link event code 0x8000 32768 0xFF...

Страница 79: ...When estab lishing communication the master and the device select the shortest possible cycle time Under certain circumstances e g when using inductive couplers or other de vices switched between the...

Страница 80: ...er ID nor the Device ID of the connected device All saved data storage information for the selected IO Link port is deleted from the IO Link master Compatible device The IO Link master checks the IO L...

Страница 81: ...DS_UPLOAD_FLAG 1 a DataStorage DS upload from the device is carried out An incompatible device is left in PREOPER ATE see Table Tab 9 3 LED indication IO Link Compatible device with Restore function T...

Страница 82: ...list byte wise values separat ed by comma and in hexadecimal notation Vendor ID of the connected IO Link device Is used for an activated validation compatible device Selection Meaning 3 byte list byte...

Страница 83: ...contact your sales representa tive at Murrelektronik GmbH IO Link integration in PROFINET The IO Link integration in PROFINET is a standardized method for providing access to the parameters and config...

Страница 84: ...nterface You can find the Murrelektronik IO Link Device Tool software in our online shop under the product s article number http shop murrelektronik com The exact handling of the software can be found...

Страница 85: ...ize of 0 to 32 bytes input and output respectively and will be transmitted via the set ad dress ranges The process data size is defined by the device The port qualifier indicates whether the process d...

Страница 86: ...IOL_Subindex 0x00 0xFF See IO Link Integration Part1 2812_V100_080124 and IO Link Integration for PROFINET_Ed2_2832_V10_Jun17 The IO Link function block supports the following tasks Parametrization o...

Страница 87: ...ata record I M0 Data Size in byte access read write Description Vendor ID 2 r ID of the manufacturer Vendor ID Order ID 20 r Product name IM_Serial_Number 16 r Serial number of device IM_Hardware_Revi...

Страница 88: ...r Supported IO Link revision of the master 0x11 IO Link version 1 1 IOL_PROFILE_VERSION 1 r IO Link Profile 0x10 IO Link profile ver 1 0 IOL_FEATURE_SUPPORT 4 r Bit field displaying features 0x000000...

Страница 89: ...ord Function block RDREC_Instance in the TIA portal Example I M Index 0xAFF0 Fig 8 23 Function Block RDREC_Instance Website https support industry siemens com RDREC block Functionality RDREC_Instance...

Страница 90: ...in the TIA Portal is similar to the IOL_ CALL block IOL_CALL is defined in the IO Link specification Fig 8 24 IO Link device function block Library Website IO_LINK_Library_V14 zal14 https support ind...

Страница 91: ...port 1 etc IOL_INDEX INT Number of IO Link index to be read out or described IOL_SUBINDEX INT Number of IO Link subindex to be read out or described 0 total records 1 255 Parameter from record LEN IN...

Страница 92: ...master possible bus error 0xxx80A6xx MASTER_NO_DATA No data received 0xxx80A7xx MASTER_BUSY IO Link master overloaded 0xxx80A9xx MASTER_FEATURE_NOT_ SUPPORTED Function not supported by IO Link master...

Страница 93: ...ISDU_CHECKSUM Master reports checksum error access to device not possible 0x5700 M_ISDU_ILLEGAL Device cannot process request from master 0x8000 APP_DEV Application error in device 0x8011 IDX_NOTAVAIL...

Страница 94: ...t the topology setting and automatic topology recognition by the engineering tool The section below describes how to set the topology for the IMPACT67 de vice Setting via connected neighboring devices...

Страница 95: ...me type they need to be clearly differentiated Using the following path and selecting the PN IE_1 network in the network view you can search for available users Online Assign PROFINET device name Fig...

Страница 96: ...clearly identified a module you can assign a name The IP address is entered automatically by the PNIO controller via DCP Discovery and Configuration Protocol Fig 8 27 Assign a device name The address...

Страница 97: ...Configuration settings User manual 55170_hdb_en_13 97 145 PROFINET device name Fig 8 28 PROFINET device name The TIA portal now displays IMPACT67 with the newly assigned device name...

Страница 98: ...ntering IP addresses You can assign an IP address to the IMPACT67 module that will not be stored To do so enter the desired IP address and the subnet mask to be used Fig 8 29 Entering IP addresses In...

Страница 99: ...ck Online Diagnostics Under the Functions tab click Reset to factory settings to open a window Activate the Retain I M data selection Press the Reset button The module is reset to its factory settings...

Страница 100: ...Configuration settings User manual 55170_hdb_en_13 100 145 Reset to factory settings retain I M data Fig 8 30 Reset to factory settings retain I M data...

Страница 101: ...ame time deletes the I M data stored in memory Proceed as follows Click Connect online in the TIA portal After connection mark the module in question Open the IMPACT67 module in project navigation Dou...

Страница 102: ...Configuration settings User manual 55170_hdb_en_13 102 145 Reset to factory settings delete I M data Fig 8 31 Reset to factory settings delete I M data...

Страница 103: ...ieve the desired run time characteristics several steps are needed The correspond ing parameters are set directly in the module Select the module in the Topology view Fig 8 32 Topology Activation of t...

Страница 104: ...SU Select Port 1 and Port 2 in the properties for the module and set the cor responding parameters there Fig 8 34 Setting transfer rate duplex Set the transfer rate duplex to TP 100 Mbit s full duplex...

Страница 105: ...described in the engineering software manual In this document a configuration example is described using the Siemens TIA Portal engineering software Preparatory steps 1 Set up a project in the TIA po...

Страница 106: ...FINET managed switch or a S7 CPU must be set as ring manager and all other users as clients Fig 8 36 Setting up the MPR manager 1 Select the PROFINET Managed Switch 2 Navigate to the PROFINET interfac...

Страница 107: ...client Fig 8 37 Setting up an MRP client 1 Select the IMPACT67 module 2 Navigate to the menu item PROFINET interface Advanced options Media redundancy 3 With Media redundancy role set Client 4 Enable...

Страница 108: ...e parameterized Depending on the PLC the RT requirements and the system structure the IO cycle times and factors have to be set in the following window Fig 8 38 Setting up the MRP cycle times 1 To the...

Страница 109: ...rpdomain 1 to obtain the overview of ring users 2 Assign the PROFINET Managed Switch to the IO controller 3 Save the created project 4 Click the PNIE subnet The bus PLC_1 PROFINET IO System 100 is dis...

Страница 110: ...prerequisite for this communication type special hardware components capable of real time IRT are required NOTE The module is no active participant in the IRT data exchange It supports the loss free t...

Страница 111: ...t isochronous IRT com munication How to set up an isochronous IRT communication can be found in the software manual of your engineering software Fig 8 40 IRT communication Setting up the Sync master 1...

Страница 112: ...guration settings User manual 55170_hdb_en_13 112 145 IRT communication Setting up the Sync slave Fig 8 41 IRT communication Setting up the Sync slave For further information refer to chap 3 3 PROFINE...

Страница 113: ...guration of the Shared Device can be found in the engineering software manual Here we describe a configuration example using the Siemens TIA Portal This procedure requires two projects to be created a...

Страница 114: ...n the TIA portal with the name of PLC_1 2 Add a controller 3 Add the IMPACT67 module as well as an IO Link state and a State 4 Assign the name PLC_1 to the controller 5 Assign the IMPACT67 module to c...

Страница 115: ...Configuration settings User manual 55170_hdb_en_13 115 145 Creating project 2 Fig 8 43 Setting PLC_2 access...

Страница 116: ...it in the network view of the PLC_2 project 6 Assign the IMPACT67 module to the PLC_2 controller 7 Select the IMPACT67 module to navigate to the Shared Device menu item and 8 set access to the PLC_2 c...

Страница 117: ...sion V1 2 The module supports two different energy saving modes Mode I The mode can be activated via pause_time 1000 ms 1s and 10000 ms 10s Switching off the outputs pin 2 pin 4 The mode is indicated...

Страница 118: ...ws the arrangement of the LEDs and the table shows the functions 9 1 1 LED indications LED indication Digital inputs Tab 9 1 LED indication digital input LED indication Digital outputs Tab 9 2 LED ind...

Страница 119: ...Green Lights continu ously IO Link in status Operate Green Flashing at 1 Hz No IO Link connection Green Flashing at 10 Hz IO Link in the Pre Operate state during data storage Red Flashing at 2 Hz Val...

Страница 120: ...ou can do Check the line connections Check the PLC configuration Indica tion State Description Green Continuously lit Error free operation Red Continuously lit An error is active on the module Indica...

Страница 121: ...is is what to do Check the line connections Indica tors State Description Green Lit continuously Module in valid IO data exchange with valid configuration Red Lit continuously Parameterization error M...

Страница 122: ...cation POWER UA Indica tion State Description Green Lit continuously 17 5 V US 30 V Error free operation Red Lit continuously 12 5 V US 17 V Undervoltage Red Flashing 1 Hz 7 5 V US 12 V No voltage Red...

Страница 123: ...9 12 Extended LED display identification of the module LED Display State Description POWER US Green Flashing 3 s off 1 5 s on Module in PROFIenergy operation Mode I LED Display State Description POWER...

Страница 124: ...ate Description BUS RUN CfgF POWER UA POWER US Yellow Flashing alter nately 1 Hz Update check in progress Red Flashing 5 Hz Update flashing interrupted Red Flashing alter nately 1 Hz Update failed ST...

Страница 125: ...stem run LED Display State Description ST Yellow Flash flash pause double flash Recovery firmware system startup BUS_RUN CfgF POWER UA POWER US Off LED Display State Description BUS RUN Green Lights c...

Страница 126: ...ontinu ously Firmware update initialization of trans mission ST Yellow Flash flash pause double flash POWER US Yellow Flashing at 1 Hz LED Display State Description ST Yellow Flash flash pause double...

Страница 127: ...ication V2 3 NOTE Diagnostics are signaled to the PLC in form of incoming or outgoing alarms If an alarm is present for only a short time it is preferable if the PLC is equipped with a diagnostic buff...

Страница 128: ...sor supply voltage of the module 0x03 0x432C Actuator overvoltage Check the actuator supply voltage of the module 0x03 0x4334 Sensor overvoltage Check the sensor supply voltage of the module 0x17 0x57...

Страница 129: ...o the IO Link device 0x04 4 0x0020 32 0x5410 21520 0x9804 38916 IO Link device Overload at the outputs Check the wiring on the IO Link de vice 0x05 5 0x0020 32 0x4110 16656 0x4120 16672 0x4210 16912 0...

Страница 130: ...e vice is connected and that only cor rect parameters are used 0x12 18 0x0020 32 0x5450 21584 0x5451 21585 0x5452 21586 0x5453 21587 0x5454 21588 0x5455 21589 0x5456 21590 0x5457 21591 0x5458 21592 0x...

Страница 131: ...ntegration The Extended Channel Error Type corresponds to the original IO Link event code 0x4511 17681 0x0000 0 0x7FFF 32767 0x8000 32768 0xFFFF 65535 Event from an IO Link device that supports Murrel...

Страница 132: ...0x4502 17666 0x7F24 32548 Invalid backup Overflow of data storage buffer Check the IO Link device or delete data storage 0x4502 17666 0x7F25 32549 Invalid backup Access to data storage parameters den...

Страница 133: ...x5116 20758 0x5116 20758 Device power supply Undervoltage U6 vendor specific Check availability 0x4500 17664 0x5117 20759 0x5117 20759 Device power supply Undervoltage U7 vendor specific Check availab...

Страница 134: ...0x4500 17664 0x6321 25377 0x6321 25377 Parameter missing Check the data sheet 0x4500 17664 0x6330 25392 0x6330 25392 Parameter not initialized Check the data sheet and the val ues 0x4500 17664 0x6340...

Страница 135: ...ss value below the valid range Process value uncertain 0x4501 17665 0x0C40 3136 0x8C40 35904 Service requirement cleaning Clean the device 0x4501 17665 0x0C41 3137 0x8C41 35905 Service requirement top...

Страница 136: ...vervoltage in the secondary power supply Port Class B UA Check the permitted voltage range 0x4510 17680 0x1831 6193 0x1831 6193 Undervoltage in the secondary power sup ply Port Class B UA Check the cu...

Страница 137: ...e range 0x4510 17680 0x5112 20754 0x5112 20754 Faults in the secondary power supply port class B Check the permitted voltage range 0x4510 17680 0x5113 20755 0x5113 20755 Device power supply Undervolta...

Страница 138: ...92 Device software Reset watchdog Check the firmware release ver sion 0x4510 17680 0x6100 24832 0x6100 24832 Device software Internal fault Check the firmware edition sta tus 0x4510 17680 0x6300 25344...

Страница 139: ...integration The Extended Channel Error Type plus 0x8000 32768 corresponds to the original IO Link event code 0x4511 17681 0x0100 256 0x8100 33024 Communication monitoring General error Check the devi...

Страница 140: ...the devices is not guaranteed Replace defective or damaged devices Clean the soiled contacts with oil free compressed air or with spirit and a leather cloth only Do not use contact spray NOTICE In th...

Страница 141: ...d a wide range of products in our catalog or in our Murrelektronik online shop http shop murrelektronik com Description Art No Screw Plug M12 Metal 996049 Blind plug M12 plastic 10 pieces 58627 Ground...

Страница 142: ...ta and functions on different modules IP67 Ingress protection degree of protection according to DIN EN 60529 IP address Address for identification in an Ethernet network LED Light Emitting Diode LNK A...

Страница 143: ...Appendix User manual 55170_hdb_en_13 143 145 IO Link validation Verification of compatibility or identity of a selected IO Link de vice Term Meaning...

Страница 144: ...his technical documenta tion to create their own technical documentation For this purpose the docu mentation produced by Murrelektronik GmbH may be changed in parts or amended or copied and transferre...

Страница 145: ...NY 49 7191 47 0 49 7191 47 491 000 info murrelektronik com www murrelektronik com The information in the manual has been compiled with utmost care Liability for the correctness completeness and topica...

Отзывы: