background image

Contents

Basic TV features

Fault fi

 nding 

guide

Information and

specifi

 cations

Digital TV Operation

Connection to other

equipment

4

Auto setup

Your unit has an Automatic 
installation which makes 
installation in your unit 
easy. When you turn on 
the unit for the fi rst time, 
the Automatic installation 
routine is activated. Using 
this routine, you can select 
the on-screen language 
and automatically search 
for and store all the 
receivable analogue and 
digital (DVB) channels.
The Automatic station 
presetting feature is for the 
set’s built-in tuner only. If 
you have a device such 
as a digital decoder (eg. 
Satellite or Digital Terrestrial) 
connected (see page 26), 
you would need to tune it in 
separately according to its 
own instructions.

Note:

To cancel the Auto 
Tuning, press 

EXIT


during the process.
If on the “Auto installation 
(Country)” screen “UK” 
is selected, “Move To” 
cannot be used in UK 
(see page 17).

THE AUTOMATIC 
TUNING PROCESS WILL 
ONLY START BY ITSELF 
THE FIRST TIME YOU 
SWITCH THE SET ON. 
HOWEVER YOU CAN 
RESTART THIS PROCESS 
VIA THE MENU SYSTEM 
(see page 6 for analogue 
channels, and page 14 for 
digital channels).

Preparation:

Press   

(Power)

 on the unit or press   

(On/Standby)

 on the remote.

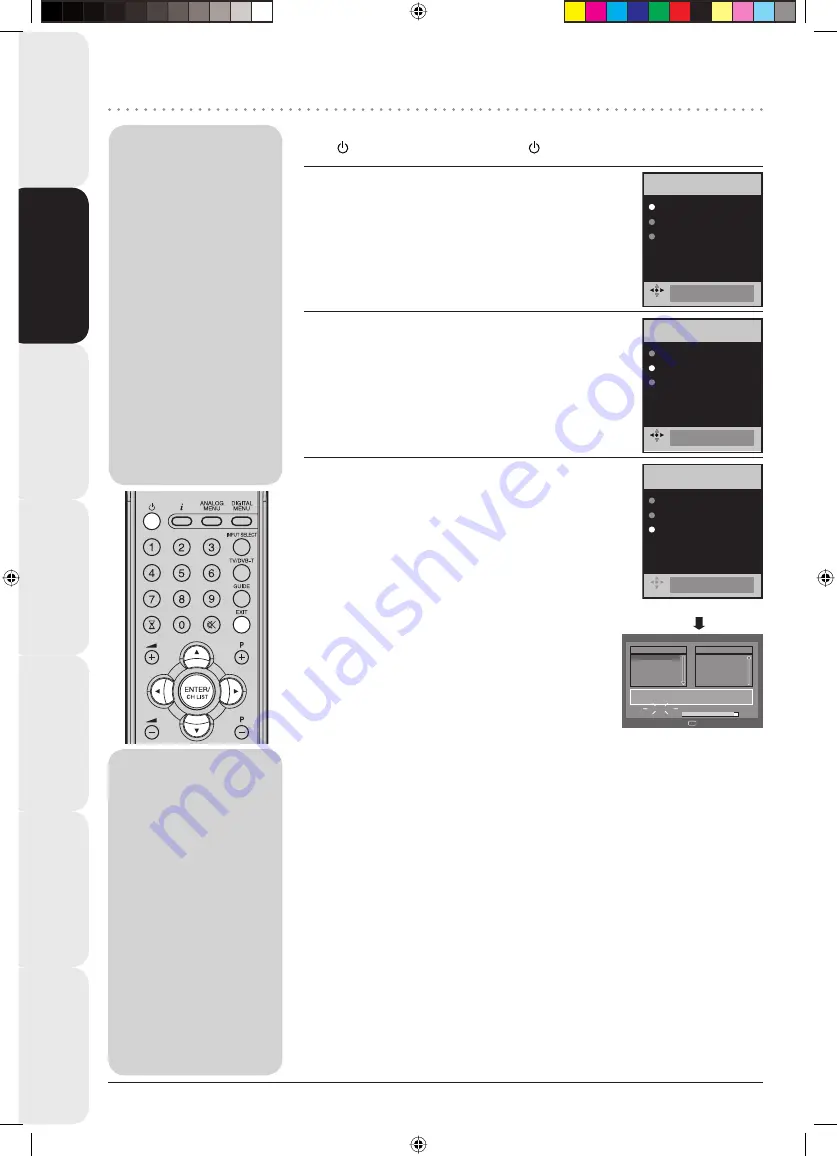
1

LANGUAGE
 ENGLISH

COUNTRY
 UK
AUTO TUNING

AUTO INSTALLATION

ENGLISH

AUTO INSTALLATION menu will appear.
Press 

C

 or 

D

 to select LANGUAGE, then press 

ENTER

Press 

B

 or 

A

 to select desired language. 

Then press 

ENTER

.

2

LANGUAGE
 ENGLISH

COUNTRY
 UK

AUTO TUNING

AUTO INSTALLATION

UK

Press 

C

 or 

D

 to select COUNTRY, then press 

ENTER

.

Press 

B

 or 

A

 to select your country.

Then press 

ENTER

.

3

LANGUAGE
 ENGLISH
COUNTRY
 UK

AUTO TUNING

AUTO INSTALLATION

10 %

AUTO TUNING

(ANALOGUE)

Auto Scan

TV

Progress

Searching...

Carrier

:1

Frequency (kHz)

:562000

:003

DVB-T 16QAM

Radio

070

BBC Radio 1

:001

001

BBC ONE

002

BBC TWO

007

BBC THREE

Exit

(DIGITAL)

Press 

C

 or 

D

 to select AUTO TUNING, then press 

ENTER

.

The confi rmation screen will be displayed. Press 

ENTER


to start automatic tuning.
Your TV will now automatically tune in all available 
channels.
Your TV will tune the analogue channels fi rst, then tune 
the digital channels.

Note:

Please be patient - the Auto Tuning 
process can take several minutes to 
complete.

When the programme on the screen stops changing 
and the sound comes on, the search process is 
complete.

Connection and Analogue 

Channel Setup

35Q0901A.indd   Sec1:4

35Q0901A.indd   Sec1:4

4/10/08   2:30:47 PM

4/10/08   2:30:47 PM

Содержание TV26RN20D

Страница 1: ...rating the unit please read this manual thoroughly If you experience any difficulties or would like further assistance please contact our Helpline on 020 8236 9090 Please Note This is for operating problems and NOT for Service or Technical enquiries DIGITAL LCD TELEVISION 35Q0901A indd 1 4 9 08 12 08 14 PM ...

Страница 2: ...th is free from any dirt that could cause scratching to the surface Wipe the set clean using minimal pressure Do not use standard window cleaning fluid Its alcohol ammonia will dissolve the front window s coating Never use solvent or thinner Never use special cleaners which are designed for cleaning PC Monitors or CRT TVs Finally carefully rub dry with a clean dry lint free cloth Do not use paper t...

Страница 3: ...Quick guide for ANALOG MENU operation Page 5 Selecting the video input source Page 5 On screen Language Selection Page 5 Automatic station presetting with the built in Tuner Page 6 Changing the order of stored channels Page 6 Manual TV station presetting Page 7 Basic TV features Basic TV function Page 8 Teletext Page 9 Stereo reception with the built in analogue tuner Page 10 Picture format Page 1...

Страница 4: ... volume When the Menu is on the screen these are used for changing settings 5 Channel buttons Press to move up a channel number Press to move down a channel number When the Menu is on the screen these are used for changing settings When the set is in standby they can also be used to switch the power on 6 MENU button To display the menu screen 7 TV AV PC ENTER button Select input mode for TV AV COM...

Страница 5: ...V network D Ask your specialist retailer The built in combi tuner receives all analogue cable programmes and DVB T channels E HDMI input HDMI 1 HDMI 2 See page 25 F PC MONITOR input PC See page 24 G PC HDMI 1 AUDIO input jack See pages 24 25 H SCART sockets AV 1 AV 2 For the connection of scart cables See page 26 I DIGITAL AUDIO output digital output for DVB T sound see page 27 J COMPONENT input S...

Страница 6: ... for digital channels Preparation Press Power on the unit or press On Standby on the remote 1 LANGUAGE ENGLISH COUNTRY UK AUTO TUNING AUTO INSTALLATION ENGLISH AUTO INSTALLATION menu will appear Press C or D to select LANGUAGE then press ENTER Press B or A to select desired language Then press ENTER 2 LANGUAGE ENGLISH COUNTRY UK AUTO TUNING AUTO INSTALLATION UK Press C or D to select COUNTRY then ...

Страница 7: ...ERTICAL POSITION 0 AUTO 4 3 DEFAULT 16 9 Press B or A to select 3 AUTO TUNING MANUAL TUNING CH ALLOCATION LANGUAGE ENGLISH VERTICAL POSITION 0 AUTO 4 3 DEFAULT 16 9 Press C or D to select AUTO TUNING then press ENTER to enter the AUTO TUNING menu on the following pages the menu can be called in the same way as here 4 Press EXIT to return to the normal screen Selecting the video input source Press ...

Страница 8: ...GE ENGLISH VERTICAL POSITION 0 AUTO 4 3 DEFAULT 16 9 Select CH ALLOCATION Then press ENTER 2 SORT ERASE PROGRAM SKIP CH LABEL Select desired option then press ENTER 3 After setting the each option press ANALOG MENU to return to CH ALLOCATION menu 4 Press EXIT to return to the normal screen Description about the each setting option SORT Press C or D to select the channel that you want to move then ...

Страница 9: ...note that PAL should be selected for use in UK 4 AUTO SEARCH FINE 168 30MHz COLOUR SYSTEM AUTO AUTO SOUND SYSTEM BBC1 48 25 MHz Press C or D to select SOUND SYSTEM then press ENTER Press B or A to select AUTO B G I D K or L L then press ENTER 5 SEARCH FINE 168 30MHz COLOUR SYSTEM AUTO SOUND SYSTEM AUTO BBC 2 125 60 MHz Press C or D to select SEARCH Press ENTER Press B or A to start tuning Tuning w...

Страница 10: ...l appear for approx 4 seconds The muting can be released by pressing again or or Information display In the analogue TV mode Press Channel number and picture size setting will appear for approx 4 seconds In the digital TV mode Press The program information will appear see Channel banner on page 20 S T E R E O 1 B B C 1 A U T O SLEEP TIMER To set the sleep timer press SLEEP and the minutes until sh...

Страница 11: ...annel TELETEXT TELETEXT Select Page Press P or until the page you desire appears Or enter the requested page number by using the 10 Number Buttons And if you mistype something just enter the complete 3 digit wrong page number then enter the desired number again Or press one of the coloured teletext buttons so that a page from Fastext TOPtext is shown Hold Pages Some pages are divided up into subpa...

Страница 12: ...s received N I C A M S T NICAM M1 illuminates for approx 4 seconds when a NICAM MONO A broadcast signal is received N I C A M M 1 NICAM M1 M2 illuminates for approx 4 seconds when a NICAM MONO A and MONO B broadcast signal is received N I C A M M 1 M 2 This will be displayed for approx 4 seconds if a NICAM signal is received when the NICAM OFF option is selected N I C A M O F F Stereo reception in...

Страница 13: ...ed as a horizontally compressed 4 3 image this mode restores the image to its correct 16 9 proportions 16 9 CINEMA This mode is used to zoom in on expand 4 3 letterbox format pictures with black bars at the top and bottom so that they fill more of the screen CINEMA Note In the CINEMA mode part of the picture may be slightly cut off due to the expansion However it is possible to scroll the picture u...

Страница 14: ...stereo signals from TV broadcast or AV input SPEAKERS 2 ON OFF Use this feature to turn the TV speakers off when you connect an audio system see page 27 HDMI1 AUDIO See page 25 RESET Select RESET to reset BASS TREBLE and BALANCE to the factory preset values AUTO TUNING See page 6 MANUAL TUNING See page 7 CH ALLOCATION See page 6 LANGUAGE See page 5 VERTICAL POSITION When the CINEMA mode is selecte...

Страница 15: ...ge Setup Navigate Enter Exit Preparation Press TV DVB T to select the digital TV mode 1 Press DIGITAL MENU to display the Main menu Press B or A to select desired options Example selecting the Language Setup option 2 Language Setup Menu Language English Pref Audio Language English Pref Subtitle Language English Pref Digital Service Language English Navigate Enter Exit Press ENTER The selected menu...

Страница 16: ... the connections have been made correctly see page 3 1 Press C or D to select Auto Scan then press ENTER Manual Scan Auto Scan Carrier Setup n o i t a l l a t s n I u n e m n i a M ABC CH1 CH2 CH3 Texd CI i ABC i 2 The confirmation banner will be displayed Press B or A to select Yes or No then press ENTER 3 Auto Scan TV Progress Searching Carrier 1 Frequency kHz 562000 003 DVB T 16QAM Radio 070 BBC...

Страница 17: ...art the scanning During the scan process the list of services TV Radio collected for the carrier will be listed 4 Then the confirmation banner will be displayed Press B or A to select Yes or No then press ENTER 5 Press EXIT to return to the normal screen Carrier Setup The Carrier setup option menu lists all the carriers multiplexes that are currently available and allows you to Rename Delete or Res...

Страница 18: ...p Del Move 001 BBC ONE 002 BBC TWO 003 BBC THREE 004 CBBC 1 Fav 5 Delete 2 Lock 6 Rename 3 Skip 7 Move 4 Go To 8 Move To Enter View Navigate Enter D Menu TV Radio Exit 0 9 TV 005 BBC News 24 The Channel Organizer menu will appear The available programmes will be listed depending on the current mode The selected programme will be highlighted To toggle within the service list press C or D 3 By press...

Страница 19: ...d then press ENTER The highlight moves to the selected service Delete Delete the selected service s from the memory Press C D to select the desired service Press 5 on the remote control An icon displays indicating the service to be deleted Pressing 5 will turn the delete icon on and off Press DIGITAL MENU A confirmation message displays Press B A to select Yes and then press ENTER Rename Change ind...

Страница 20: ...tup then press ENTER 2 Enter Password will appear Press 0 0 0 0 using the Number Buttons This is the default password 3 Press C or D to select Parental Lock then press B or A to select desired parental rating see note Then press EXIT to return to the normal screen 4 You can also change the password using the next option Press C or D to select Change password Then enter your chosen new password be ...

Страница 21: ...grade is available from an Over Air Download OAD then the message S W available do you want to download will be displayed you can then select Yes or No by pressing B or A then press ENTER 3 If you select the option Yes then the Software Upgrade process will be initiated It will take about 20 minutes and after this process is complete the TV will be rebooted automatically If you select the option N...

Страница 22: ...nel banner menu information such as current date time channel name etc will be displayed 1 While watching the service press to display the Channel banner at any time It will disappear after the Banner timeout value this can be adjusted to your preferred value see page 18 o e r e t S E N O C B B 1 0 0 251_ABC_Monosco_0 17 17 37 7 0 0 2 8 0 0 2 8 3 7 1 8 0 7 1 0 1 e g A 1 Service No Service name Loc...

Страница 23: ...ct a Language code press C or D to select code within Language code list 3 Press EXIT Your selected audio preferences will be saved DVB Subtitle DVB Subtitle is a feature supported in DVB Digital Video Broadcasting applications in which the service shown can be accompanied by a text display on the screen in parallel with the corresponding audio service The DVB Subtitle feature can be enabled or di...

Страница 24: ...s that are currently available As you scroll through the service list by pressing C or D the Event list will be refreshed accordingly and you will see the programme information for the currently highlighted programme To scroll through the service list page by page press Red or Green Key Events list List the events in a grid of rows and columns Each row shows the list of events that are available f...

Страница 25: ...d timer events press GUIDE twice The EPG Timer menu see step 3 below will appear You can also delete or change the frequency Once Daily Weekly of the stored timer events but please note that you cannot edit the time details that have been set from the EPG 2 The confirmation banner will be displayed Press B or A to select Yes or No then press ENTER the selected option is shown in blue 3 Event Timer ...

Страница 26: ...his LCD TV is not a PC monitor correct display cannot be guaranteed for every PC graphics card Digital PC connection to HDMI input is not supported If by any chance the PC should create a picture on the HDMI input then there can be no guarantees for its correct representation Digital PC connection is not an assured function of this TV appliance Select WXGA ON in the menu according to the following...

Страница 27: ...ress EXIT to return to the normal screen Note Follow the user s manual that came with the HDMI system which you try to connect to this TV if there is no picture available via HDMI connection do connect via SCART cable first Use the HDMI system s remote control to call the HDMI system s setup menu onto the screen Follow the HDMI system s manual to set its video output to HDMI When successfully set t...

Страница 28: ... on the TV If you miss to make these settings properly picture quality will be inferior and parts of the picture might be missing This is not a fault of this TV set In case you need help to make this adjustment with your satellite receiver DVD player pls consult the related instructions or contact the supplier or maker of those apparatus for support Pls use the satellite s remote control handset t...

Страница 29: ...iable AUDIO OUT COAXIAL AUDIO OUT Coaxial digital lead not supplied Surround sound amplifier system Stereo amplifier Audio input Audio lead not supplied 4 Connecting a Video camera or Games console Connect the Video camera or Games console etc to the TV with an appropriate AV cable RCA Phono as shown Select the AV3 input mode to view see page 5 Note If you have a camcorder with S video use an S vide...

Страница 30: ... STATUS RESET TV SETTING OFF AV AV 0 3 Press EXIT to return to the normal screen AV colour adjustment The AV Colour setting only applies when viewing devices connected to the AV inputs 1 In select AV COLOUR then press ENTER 2 AUTO AV1 INPUT AV2 INPUT SLEEP TIMER AV COLOUR AUTO REC SCREEN STATUS RESET TV SETTING OFF AV AV 0 Press B or A to select AUTO 3 If AUTO option does not work press B or A to ...

Страница 31: ...rea try using an aerial booster to improve the quality of the signal Is the power for your TV off Press Power on the unit or press Power on the remote Have you pressed MUTE Have you set the volume at minimum Press MUTE again or increase the volume using volume control Unable to select channel numbers 8 through to 99 During automatic tuning your signal didn t find enough channels to place them in nu...

Страница 32: ...al signal strength is low Check all aerial connections Move the aerial away from areas of possible interference Try using an aerial booster Some digital channels cannot be viewed Some channels are encrypted and are only available via subscription Contact the service provider to subscribe Database empty message appears on the screen The auto tuning process has not been successful Check all aerial c...

Страница 33: ...onsumption Operation approx 115W Operation approx 160W Standby approx 1W LCD 26 01 TYPE 66 05 cm visible 31 51 TYPE 80 04 cm visible TFT low glass Active Matrix Colour LCD 1366 x 768 Pixel Terminals Antenna input UHF VHF 75Ω Din type AV 1 SCART AV input RGB input Y C input TV output AV 2 SCART AV input output RGB input Y C input AV 3 RCA pin AV input COMPONENT COMPONENT Y Pb CB Pr CR input RCA Aud...

Страница 34: ... to an incorrect mains voltage or inadequate aerial cable or satellite installation None of the foregoing comments or statements affect your Statutory Rights as currently provided for by law in the United Kingdom Electrical and electronic equipment should never be disposed of with general household waste but must be separately collected for their proper treatment and recovery The crossed out bin s...

Отзывы: