background image

PRO SERIES WALK-BEHIND TROWELS • OPERATION MANUAL — REV. #0 (9/21/17) — PAGE 53

TROUBLESHOOTING

Troubleshooting (Walk-Behind Trowel)

Symptom

Possible Problem

Solution

Engine running rough or not at all.

Engine ON/OFF Switch in "OFF" position 

or malfunctioning?

Make sure that the Engine ON/OFF Switch is ON 

or replace switch if necessary.

Centrifugal ON/OFF Switch in "OFF" 

position or malfunctioning?

Place centrifugal stop switch in "ON" position. 

Check wiring. Replace switch if necessary.

Fuel?

Look at the fuel system. Make sure there is fuel 

being supplied to the engine. Check to ensure that 

the fuel fi lter is not clogged.

Ignition?

Check to ensure that the ignition switch has power 

and is functioning correctly.

Loose wire connections

Check wiring. Replace or repair as necessary.

Bad contacts in ON/OFF switch?

Replace ON/OFF switch. 

Trowel bounces, rolls concrete, or makes 

uneven swirls in concrete.

Blades?

Make certain blades are in good condition, not 

excessively worn. Finish blades should measure 

no less than 2"" (50mm) from the blade bar to 

the trailing edge, combo blades should measure 

no less that 3.5"" (89mm). Trailing edge of blade 

should be straight and parallel to the blade bar.

Pitch adjustment?

Check that all blades are set at the same 

pitch angle as measured at the spider. A fi eld 

adjustment tool is available for height adjustment 

of the trowel arms. (Contact Parts Dept.)

Bent trowel arms?

Check the spider assembly for bent trowel arms. 

If one of the arms is even slightly bent, replace it 

immediately.

Spider?

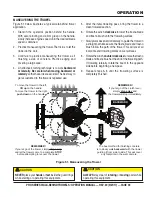
Check fi t of arms in spider. This can be done by 

moving the trowel arms up and down. If there is 

more than 1/8 inch (3.2 mm) of travel at the tip of 

the arm, the spider and arms should be replaced. 

Thrust collar?

Check the fl atness of the thrust collar by rotating 

it on the spider. If it varies by more than 0.02 inch 

(0.5 mm) replace the thrust collar.

Thrust collar bushing?

Check the thrust collar by rocking it on the spider. 

If it can tilt more than 3/32 inch (2.4 mm) - as 

measured at the thrust collar O.D., replace the 

thrust collar.

Thrust bearing worn?

Check the thrust bearing to see that it is spinning 

freely.  Replace if necessary.

Содержание PRO36

Страница 1: ...MUST ACCOMPANY THE EQUIPMENT AT ALL TIMES To find the latest revision of this publication visit our website at www multiquip com PRO SERIES WALK BEHIND TROWELS HONDA GASOLINE ENGINES Revision 0 9 21...

Страница 2: ...these chemicals are Leadfromlead basedpaints Crystallinesilicafrombricks Cementandothermasonryproducts Arsenicandchromiumfromchemically treatedlumber Your risk from these exposures varies dependingonh...

Страница 3: ...se cancer birth defects or other reproductive harm If you are unfamiliar with the risks associated with the particular process and or material being cut or the composition of the tool being used revie...

Страница 4: ...sure Warnings 2 Silicosis Respiratory Warnings 3 Table Of Contents 4 Training Checklist 5 Daily Pre Operation Checklist 6 Safety Information 7 11 Specifications 12 13 Dimensions 14 General Information...

Страница 5: ...ponents checking of engine oil level 3 Fuel system refueling procedure 4 Operation of controls machine not running 5 Safety controls safety stop switch operation 6 Emergency stop procedures 7 Startup...

Страница 6: ...BEHINDTROWELS OPERATION MANUAL REV 0 9 21 17 DAILY PRE OPERATION CHECKLIST Daily Pre Operation Checklist 1 Engine oil level 2 Gearbox oil level 3 Condition of blades 4 Blade pitch operation 5 Safety...

Страница 7: ...tor and are preceded by one of four words DANGER WARNING CAUTION or NOTICE SAFETY SYMBOLS DANGER Indicates a hazardous situation which if not avoided WILL result in DEATH or SERIOUS INJURY WARNING Ind...

Страница 8: ...bodily harm even death DECAL DEFINITION P N 36099 L P N 23803 XXX WA XXXdB GENERAL SAFETY CAUTION NEVER operate this equipment without proper protective clothing shatterproof glasses respiratory prote...

Страница 9: ...even death DANGEROUS GAS FUMES WARNING ALWAYS keep clear of rotating or moving parts while operating the trowel DO NOT start or operate the trowel if the drive train will not disengage Centrifugal for...

Страница 10: ...r or with a dirty air filter Severe engine damage may occur Service air filter frequently to prevent engine malfunction NEVER tamper with the factory settings of the engine or engine governor Damage t...

Страница 11: ...r oil directly onto the ground down a drain or into any water source Contact your country s Department of Public Works or recycling agency in your area and arrange for proper disposal of any electrica...

Страница 12: ...QA2 Honda GX340UT2QAP2 Trowel Model PRO36 PRO46 Type Air Cooled 4 Stroke Single Cylinder OHV Horizontal Shaft Gasoline Engine Bore Stroke 3 0 in 2 3 in 76 mm 58 mm 3 5 in 2 5 in 89 mm 64 mm Displaceme...

Страница 13: ...perating condition of the machine that generates the most repeatable but highest values in accordance with the applicable standards for the machine 3 Per EU Directive 2002 44 EC the daily exposure act...

Страница 14: ...Dimensions C D B A SIDE VIEW TOP VIEW Table 4 PRO SeriesTrowel Dimensions Model PRO36 PRO46 A Height Fresno Brush 31 7 in 805 mm 34 5 in 876 mm B Height Handle 41 4 in 1 052 mm 41 1 in 1 044 mm C Widt...

Страница 15: ...PRO SERIESWALK BEHINDTROWELS OPERATION MANUAL REV 0 9 21 17 PAGE 15 NOTES...

Страница 16: ...ner s manual for instructions regarding the operation and maintenance of your engine If the original manual is lost or damaged please contact your nearest Multiquip dealer for a replacement INSTACLUTC...

Страница 17: ...w the path of the fresno blade in a floating or loose configuration The floating configuration allows trowel operators to independently match the fresno brush to their troweling preference without the...

Страница 18: ...PAGE 18 PRO SERIESWALK BEHINDTROWELS OPERATION MANUAL REV 0 9 21 17 COMPONENTS TROWEL Figure 2 PRO Series Trowel Components 4 2 1 6 7 8 9 10 12 13 14 15 16 17 19 20 5 11 3 18...

Страница 19: ...ed to be adjusted Refer to the Maintenance section for more information COMPONENTS TROWEL 11 Access Panel Allows access to the blade area NEVER run the trowel with the access panel removed 12 Gearbox...

Страница 20: ...pull briskly and smoothly to start the engine 6 FuelValve Lever Open to allow the flow of fuel and close to prevent the flow of fuel 7 Oil Drain Bolt Remove to drain oil from the engine crankcase 8 D...

Страница 21: ...el can be operated This section provides general instructions on how to install these components FOLDED POSITION BOOM WINCH NOT SHOWN FOR CLARITY OPERATIONAL POSITION STAR WHEEL SET UP HandleTube Inst...

Страница 22: ...he cable BLADE PITCH STAR WHEEL INCREASE BLADE PITCH CW DECREASE BLADE PITCH CCW BLADE PITCH CABLE BRASS SET NUT 1 BRASS SET NUT 2 Figure 9 Cable Yoke Attachment 5 Tighten brass set nut 2 against the...

Страница 23: ...ening or tightening the locking nut and cable retaining screw on the throttle lever Figure 10 CABLE END SWIVEL STOP ADJUSTER NUT SWIVEL STOP HOLE CLAMP SCREW CABLE HOUSING CLAMP CABLE HOUSING END THRO...

Страница 24: ...inner nut CLUTCH CABLE TOP RUNG OF GUARD RING 5 16 OUTER NUT CLUTCH CABLE THREADED END RUBBER CAP Figure 16 Inner Nut Adjustment 8 Insert the exposed cable into the cable slot on the clutch cable sup...

Страница 25: ...CKET Boom Installation Refer to Figure 20 Figure 20 Boom Installation 1 Position the boom and weight posts as shown 2 Remove the 1 2 screw 1 2 lock washer and 1 2 hex nut from the rod end of the boom...

Страница 26: ...T WASHER CENTER MOUNTING HOLES 2 BLADE MOUNTING PLATE BOOM FRESNO BLADE MOUNTING HOLES Brush Arm Attachment Refer to Figure 22 Figure 22 Brush Arm Attachment 1 Usinga9 16 wrench slightlyloosenthe3 8 1...

Страница 27: ...wn in Figure 24 NOTICE Positioning of the fresno brush and brush arms relative to the fresno blade is determined by the operator BRUSH ARM REMOVE HEX NUTS LOCK WASHERS AND SCREWS Figure 24 Fresno Brus...

Страница 28: ...o install equal weights on both sides of the weight posts A LOCKING PIN WEIGHT POST WEIGHT POST HOLE NOTICE The six fresno brush weights are an optional feature The use of the weights is determined by...

Страница 29: ...e the blades into position 3 Secure the blade tie downs to the far side of the Z clip brackets with the tie down knobs 4 Make sure the blade edges are secured under the Z clips and the tie downs are s...

Страница 30: ...wrench tighten the 5 16 18 lock nut NOTICE Make sure the fresno blade pitch cable is clear of any moving parts on the trowel and moves freely before continuing Re route the fresno blade pitch cable if...

Страница 31: ...5 16 OUTER NUT PITCH WINCH CABLE THREADED END BOOM BOOM CABLE ANCHOR WINCH CABLE BOOM ARM PITCH CABLE ZIP TIE E G G A C F 5 16 18 LOCK NUT B 5 16 18 1 HEX HEAD BOLT PITCH CABLE CLEVIS WEIGHTS NOT SHO...

Страница 32: ...angerous if mishandled DO NOT smoke while refueling NEVER attempt to refuel while the engine is running or hot WARNING ALWAYS use a strainer for filtration while refueling NEVER top off fuel ALWAYS wi...

Страница 33: ...Blade Inspection CRACK CRACK MISSING HARDWARE MOUNTING HARDWARE WORN INSPECTION V BELT 1 Inspect theV belt Figure 33 to determine if it is frayed peeling full of tiny cracks has pieces of rubber missi...

Страница 34: ...operatingthetrowel DONOTattempttooperateyour trowel until this section is thoroughly understood BEFORE STARTING 1 Clean the trowel particularly the engine cooling air inlet Remove all dirt and dust 2...

Страница 35: ...spring loaded pins to lock the fresno brush in position SPRING LOADED PIN BRUSH ARM FRESNO BRUSH RAISING AND LOWERINGTHE BOOM 1 Make sure the fresno blade fresno brush and plated weights if used are i...

Страница 36: ...he choke lever in the CLOSED position Figure 43 Figure 43 Choke Lever Closed IDLE THROTTLE LEVER OPEN CLOSE CHOKE LEVER OPERATION STARTINGTHE ENGINE 1 Place the engine fuel valve lever in the ON posit...

Страница 37: ...not started repeat steps 1 through 6 8 Before operating the trowel run the engine for several minutes and check for fuel leaks and loose components OPEN CLOSE CHOKE LEVER STARTER GRIP INSTACLUTCH OPER...

Страница 38: ...and SERIOUS INJURY TO THE OPERATOR OR BYSTANDERS CAUTION When engaging the clutch lever make sure to keep hands clear of the clutch lever engagement path as shown in Figure 49 to avoid pinching and p...

Страница 39: ...f the trowel This will cover all footprints and troweling marks on wet surfaces 8 Rotate the winch counterclockwise to raise the fresno blade and fresno brush at the end of the troweling path If trowe...

Страница 40: ...taining control of the trowel with a firm grasp on the left side hand grip 1 Release the clutch lever and verify that the trowel blades have stopped rotating 2 Return the throttle lever to the IDLE po...

Страница 41: ...They are easily removed once floating is complete so that finishing can be started immediately Figure 57 Clip On Float Blade FLOAT DISCS OPTIONAL Float discs or pans Figure 53 attach to the spider as...

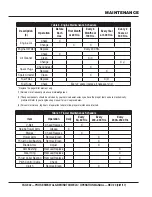
Страница 42: ...ore frequently when used in dusty areas 2 These components should be serviced by your service dealer unless you have the proper tools and are mechanically proficient Refer to your engine shop manual f...

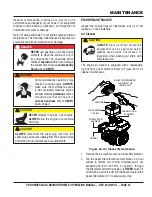
Страница 43: ...llow the engine to cool before servicing CAUTION ALWAYS disconnect the spark plug wire from the spark plug and secure it away from the engine before performing trowel maintenance or adjustments ENGINE...

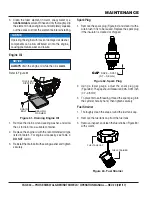
Страница 44: ...ed air cleaner components can allow unfiltered air into the engine causing premature wear and failure NOTICE ALWAYS drain the engine oil while the oil is warm DRAIN BOLT SEALING WASHER OIL FILLER DIPS...

Страница 45: ...SCREW SPARK ARRESTER SCREEN WIRE BRUSH 5 Replace the spark arrester if it is damaged has breaks or holes 6 Reinstall the spark arrester muffler protector and exhaust deflector in reverse order of disa...

Страница 46: ...locks under the main guard ring for support Any uneven spots in the floor or debris under the trowel blades will cause an incorrect perception of adjustment Ideally a 5 ft 5 ft 1 5 m 1 5 m 3 4 inch th...

Страница 47: ...be necessary to dislodge the spider from the main shaft of the gearbox Blade Replacement It is recommended to replace all of the trowel blades at the same time If only one or some of the blades are ch...

Страница 48: ...slab or any other surface which is true and flat Figure 74 Figure 74 Trowel Arm Inspection 2 Check each of the six sides of the trowel arm hex section Figure 74 A feeler gauge of 004 inch 0 1 mm shou...

Страница 49: ...on the trowel arm to lock it in place Figure 75 8 Loosen the locking bolts on the adjustment tool and remove the trowel arm 9 Repeat steps 1 8 for the remaining trowel arms REASSEMBLY 1 Clean the wea...

Страница 50: ...he trowel for more than 30 days Drain the fuel tank completely or add STA BIL to the fuel Run the engine until all gasoline in the carburetor is completely consumed Completely drain the oil from the c...

Страница 51: ...plicable Difficult to start fuel is available and spark is present at the spark plug ON OFF switch is shorted Check switch wiring replace switch Ignition coil defective Replace ignition coil Improper...

Страница 52: ...Recoil starter malfunctions if applicable Recoil mechanism clogged with dust and dirt Clean recoil assembly with soap and water Spiral spring loose Replace spiral spring Starter malfunctions Loose da...

Страница 53: ...des should measure no less than 2 50mm from the blade bar to the trailing edge combo blades should measure no less that 3 5 89mm Trailing edge of blade should be straight and parallel to the blade bar...

Страница 54: ...Adjust per maintenance section in manual Clutch slipping or sluggish response to engine speed change Worn V belts Replace V belt Hand clutch out of adjustment Adjust per instructions in maintenance s...

Страница 55: ...9 21 17 PAGE 55 WIRING DIAGRAM OIL LEVEL SWITCH GRN OIL ALERT UNIT YEL OIL LEVEL INDICATOR ENGINE STOP SWITCH UNIT IGNITION COIL CHASSIS GND SPARK PLUG BLK YEL TRANSISTORIZED IGNITION UNIT BLK BLK BLK...

Страница 56: ...6 4UJ Contact sales multiquip co uk Tel 0161 339 2223 Fax 0161 339 3226 COPYRIGHT 2017 MULTIQUIP INC Multiquip Inc the MQ logo and the Whiteman logo are registered trademarks of Multiquip Inc and may...

Отзывы:

Похожие инструкции для PRO36