PRO SERIES WALK-BEHIND TROWELS • OPERATION MANUAL — REV. #0 (9/21/17) — PAGE 45
Spark Arrester
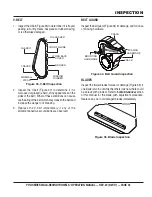
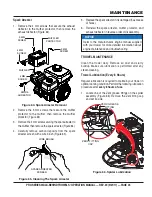
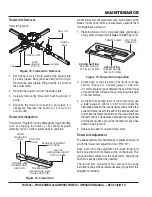
1. Remove the 4 mm screws that secure the exhaust
deflector to the muffler protector, then remove the
exhaust deflector (Figure 64).
Figure 64. Spark Arrester Removal
2. Remove the 5 mm screws that secure the muffler
protector to the muffler, then remove the muffler
protector (Figure 64).
3. Remove the 4 mm screw securing the spark arrester to
the muffler, then remove the spark arrester (Figure 64).
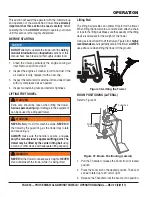
4. Carefully remove carbon deposits from the spark
arrester screen with a wire brush (Figure 65).
Figure 65. Cleaning The Spark Arrester
5 MM
SCREW
5 MM
SCREW
MUFFLER
MUFFLER
PROTECTOR
4 MM
SCREW
SPARK
ARRESTOR
4 MM
SCREW
SPARK ARRESTER
SCREEN
WIRE BRUSH
5. Replace the spark arrester if it is damaged (has breaks
or holes).
6. Reinstall the spark arrester, muffler protector, and
exhaust deflector in reverse order of disassembly.
TROWEL MAINTENANCE
Clean the trowel daily. Remove all dust and slurry
buildup. Make sure lubrication is performed after any
steam-cleaning.
Trowel Lubrication (Every 8 Hours)
Regular lubrication is required to maintain your trowel in
optimal working condition. Perform the following lubrication
procedure after
every 8 hours of use.
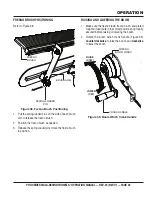
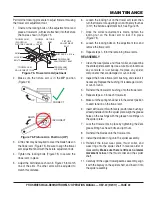
1. Locate one of the Zerk grease fittings on the spider
assembly (Figure 66). Remove the Zerk fitting cap
and set it aside.
Figure 66. Spider Lubrication
NOTICE
Refer to the manufacturer's engine manual supplied
with your trowel for more detailed information about
engine maintenance and troubleshooting.
ZERK FITTING
CAP
ZERK GREASE
FITTING
MAINTENANCE


