background image

Bolt X Quick Start Guide

18

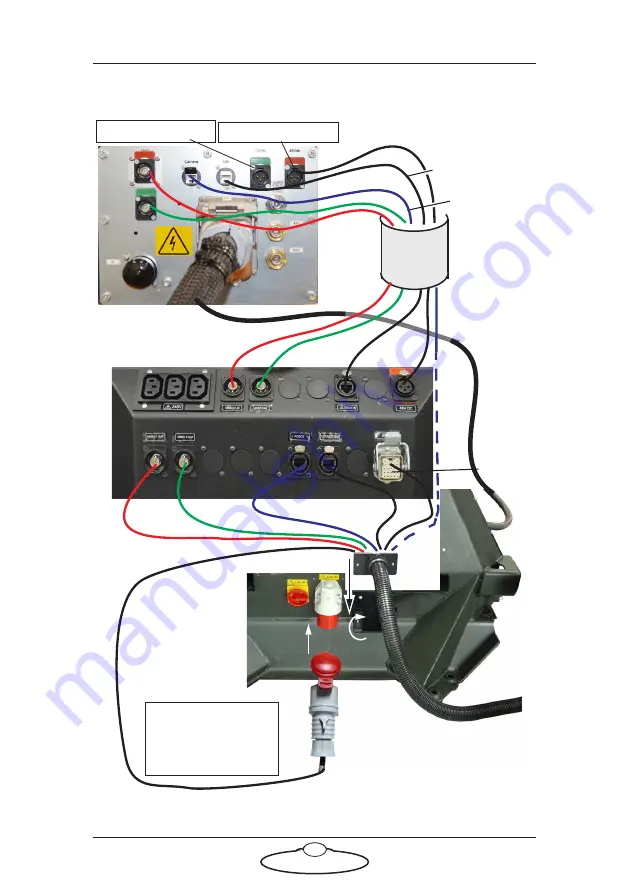
Connecting the cables — Bolt X On Track 

Cable 
wrap

VIDEO 1

VIDEO 2

VIDEO 1

ETHERNE

T

VIDEO 2

ULTI ETH

415 Volt


for C

amer

a

E-STOP

ULTI OUT

ROBOT

ETHERNET for 
camera

Power Supply:  
415 Volt, 3-phase, 
5-wire including 
Neutral and Ground

VIDEO 1

VIDEO 2

ETHERNE

T

for Ulti

48V OUT

Power for Ulti box

Power for Camera

YRC1000 Robot 
Controller

Содержание Bolt X

Страница 1: ...Bolt X Quick Start Guide QSG Product Code MRMC 2253 00 Products Covered MRMC 2023 00 MRMC 2080 00...

Страница 2: ...hat the information in this document is accurate and up to date Mark Roberts Motion Control continuously strives to improve their products and may make changes to the hardware firmware and software de...

Страница 3: ...X On Track 18 Bolt X arm connectors for Ulti box and camera 21 Starting up the Bolt X system 22 Bolt X start up summary 24 Shutting down the Bolt X system 25 Appendix 1 Troubleshooting 26 Typical symp...

Страница 4: ...r 51 CAN connector 51 Appendix 3 Specifications 53 Physical Specification 53 Range of Travel 54 Power requirements 54 Cable Colours 55 General Electric Data 55 Earth 55 Earth Leakage Protection 55 Pow...

Страница 5: ...y in day out use in professional studio and Outside Broadcast environments There are two versions of Bolt X Bolt X On Pedestal has a stationary base which you either hold down with weights or for more...

Страница 6: ...Unlike traditional motion control equipment Bolt X can get to maximum speed in the blink of an eye too fast for someone to be able to quickly move out of the way If you are using Bolt X On Track then...

Страница 7: ...ake sure you can either push Bolt X into position on its wheels or carry it there using a pallet truck or forklift Does the site have a power source with sufficient capacity for the robot and the corr...

Страница 8: ...arthed grounded and of the correct voltage see above If the rig is mounted to something other than the floor then the mount should be heavy and strong enough to take the forces and not move or fall ov...

Страница 9: ...ds should be used or similar alternatives such as laser scanners to stop anyone entering the No Go Zone during motion Ideally have the robot surrounded on all four sides by a safety barrier but where...

Страница 10: ...nd the crew to keep away from the robot and not approach it when any of its red lights are on which indicates it is powered up Have them sign the appropriate safety documents and disclaimers to ensure...

Страница 11: ...fully briefed on the safety requirements and that they know not to change their position or do anything other than the rehearsed moves without fully warning the operator Any such person is to have a...

Страница 12: ...mounting plates on the arm using 4 x M12 screws on each side Ensure that each plate is mounted on the correct side 2 Securely attach shackles on each of the four corners of the lifting plates 3 Use t...

Страница 13: ...olt X in a stationary position that is temporary or if you don t want to damage the floor by installing anchors in it you must weigh down the Bolt X base to keep it stable during high speed moves To d...

Страница 14: ...e base completely so it is resting on both wings 7 Put the weights onto the wings Bolt requires 800kg of weights on both sides Anchoring Bolt X On Pedestal to the floor If you are setting up Bolt X On...

Страница 15: ...orarily remove Bolt X On Pedestal and at one of the four circles that you have drawn draw a cross centred on the circle to help you precisely locate the drill bit Repeat for the other three corners 4...

Страница 16: ...the anchor spreader tool with a hammer until the anchor is fully spread in the concrete 10 Remove the anchor spreader tool 11 Repeat steps 7 to 10 for the other three corners 12 Put Bolt X On Pedestal...

Страница 17: ...Bolt X Quick Start Guide 13 Notes...

Страница 18: ...rack motor Mounting bar 3 Replace the retaining pin in the pinch wheel assembly by pushing on the ring not the sleeve to hold the assembly in place on the track motor 4 Ensure that the track motor gea...

Страница 19: ...key in the cavity on the block of the pinch wheel assembly and using the allen key pull the block towards the racking 6 Plug the pinch wheel cable to the socket on the rig underside and use cable tie...

Страница 20: ...y 415 Volt 3 phase 5 pin including Ground For different voltage check Yaskawa manual E T H E R N E T f o r C a m e r a E Stop Safety PLC ROBOTONLY Power for Ulti box VIDEO 1 VIDEO 2 E T H E R N E T f...

Страница 21: ...Bypass jumper Power Supply 120 240 Volts ETHERNET for Ulti ETHERNET for Camera 5V Ethernet Hub RT 14 Hand Held Box E STOP ETHERNET ROBOT ONLY INtime dongle cable in USB port Bypass jumper YRC1000 Con...

Страница 22: ...IDEO 1 VIDEO 2 VIDEO 1 ETHERNET VIDEO 2 ULTI ETH 415 Volt for Camera E STOP ULTI OUT ROBOT ETHERNET for camera Power Supply 415 Volt 3 phase 5 wire including Neutral and Ground VIDEO 1 VIDEO 2 ETHERNE...

Страница 23: ...y 415 Volt 3 phase 5 wire including Neutral and Ground VIDEO SIGNALS Power Supply 120 240 Volts hub 5V RT 14 Ethernet for Camera ETHERNET ETHERNET 24V IN E stop Bypass jumper 15843 TRACK Wifi Dongle B...

Страница 24: ...ingle robot operation For more information on using the Universal Robot system with multiple robots refer to the Universal E stop System Quick Start Guide The desk top E stop box can also be daisy cha...

Страница 25: ...the end of the arm POWER input 48 Volts DC Video 2 Video 1 ETHERNET POWER input for camera 12 Volts DC Power input for the Ulti box 48V DC Ulti box which provides various connectors for camera and len...

Страница 26: ...track as necessary and tell others on the set that you are now powering up the rig 2 Release the E stop that is plugged into the YRC1000 teach pendant twist and pull and also the E stop that is on th...

Страница 27: ...10 Release the E stop that is plugged into the computer stack by turning the button clockwise until the red button pops up and then pressing the Enable button Also make sure the key on the PLC box is...

Страница 28: ...4 Switch on all the equipment on the system 5 Switch on the Flair PC 6 Start Flair 7 Release the E stop on the computer stack In Flair 8 Engage Robot 9 Send the arm to Home position carefully 10 Zero...

Страница 29: ...e Track button 4 Press down all E stop buttons On the computer stack On the YRC1000 controller unit if using Bolt X On Pedestal or on the Bolt X base if using Bolt X On Track 5 Close the Flair softwar...

Страница 30: ...the Flair PC and YRC1000 for Bolt X On Pedestal and in the umbilical between the Flair PC and Track Base for Bolt X on Track needs to be a high quality fault free straight through that is not cross o...

Страница 31: ...at the Orange LED on YRC1000 is on Switch the key in the teach pendant to TEACH position Try to move the arm using the Teach Pendant 1 On the Teach pendant press the Servo On Ready button The Servo On...

Страница 32: ...mode without using Flair 1 Ensure that YRC1000 is powered up and booted 2 Switch the key on the pendant to Teach position 3 If the E stop cable as well as the rest of the system are still connected s...

Страница 33: ...xes buttons X to Z shown to move the joints on Bolt X To move the Bolt X base or to switch from moving Rotate to Track press the Ex Axis button To switch to moving Rotate axis press the Robot button 2...

Страница 34: ...ep the encoder position saved at all times even when the power to the robot is off If the batteries run out then the encoder position will be lost If any of the encoder cables is unplugged then the en...

Страница 35: ...tely as possible this can be done either with the software or the pendant in Manual Mode 2 Go to MAIN MENU ROBOT CURRENT POSITION Check that the value is close to zero 3 If one axis is not zero change...

Страница 36: ...dicating that there is a problem with the calibration In this example we are using Pan 6 A message appears when you press Select Select Yes The values in the ABSOLUTE DATA column will not change as th...

Страница 37: ...Bolt X Quick Start Guide 33 7 Select MAIN MENU ROBOT CURRENT POSITION The axis is changed to 0 Changing User Profile 1 Select MAIN MENU SYSTEM INFO SECURITY...

Страница 38: ...the current axis position can change in the Second Home Position page This might generate an error due to a mismatch between the memorised position and actual position For example when Flair is start...

Страница 39: ...light should start blinking 1 8 Press the Dead Man s Handle at the rear of the pendant half way to turn the robot on and release to turn it off 1 9 Press the Servo On Ready button on the pendant again...

Страница 40: ...Difference will be 0 Sometimes you might need to move each axis individually 4 Press DATA 5 Click on Confirm Position You might need to do this twice 6 The error should now clear 7 Switch the key bac...

Страница 41: ...7 Setting Joint Limits 1 Switch user profile to Safety Mode 2 Select MAIN MENU ROBOT SOFT LIMIT SETTING 3 Select the limit setting and enter a new setting Values are in pulses Joint T Roll is 100000 w...

Страница 42: ...some reason this has changed then the robot will fail to communicate with Flair The file names used for Flair is Flair2Motoman out To check this setting 1 Turn on the robot YRC1000 2 In the Pendant s...

Страница 43: ...Bolt X Quick Start Guide 39 Notes...

Страница 44: ...ight through connection to the VIDEO 2 OUT connector 7 4 and 9 ULTI ETHERNET IN and ULTI ETHERNET OUT connectors for communications between Ulti box on the arm and Ethernet hub via the umbilical cable...

Страница 45: ...BOT connector You use this to connect the robot Controller YRC1000 inside the Bolt X base via the umbilical cable to the hub in where the Flair PC is connected 10 E STOP connector You connect this to...

Страница 46: ...net connector in Bolt X base for Bolt X On Track 3 VID 1 output connector for the video 1 signal from the camera This can be connected to the VIDEO 1 IN connector on the Bolt X base 4 VID 2 output con...

Страница 47: ...X Quick Start Guide 43 7 YRC1000 power and controller connector This is for the encoder and power cable that runs between the Bolt X arm and the YRC1000 controller unit which supplies control to the...

Страница 48: ...out information 12VDC connector This type of connector is used to power the camera through the robot arm 1 GND 2 Not used 3 12V 48VDC connector This type of connector is used to power the camera throu...

Страница 49: ...d to control servo motors on many MRMC heads and Lens Control Motor LCM units The Ulti box offers versatile connections for many camera and lens configurations although some of the axes connectors suc...

Страница 50: ...ted devices from a Flair PC This Ethernet port is rated at 100 Mbits sec but can operate at lower speeds of 10 Mbits sec or less 6 DATA DataLink In Up Link connector for controlling the Ulti box and i...

Страница 51: ...s 10 11 ZOOM FOCUS connectors for external servo Lens Control Motors LCMs mounted on the camera platform For pin out information see Servo motor connector on page 48 12 TILT connector for a Tilt servo...

Страница 52: ...Z 5 N C 6 MOTOR_B 7 MOTOR_A 8 LIMIT 9 5V 10 GND Program serial connector Serial connector for connection to a controller using a Serial RS232 connection and for updating the firmware in the Ulti box...

Страница 53: ...ccessory connector with connections for three stepper motors two serial lens controls two trigger in controls and two trigger out controls 1 Step1 2 Gp2In Trigger In 2 3 Step2 4 SerialTxB serial lens...

Страница 54: ...nk connection DataLink In Up Link connector for connection to a DataLink device higher up in the DataLink daisy chain For usage see page 50 1 Watchdog 2 Link1Out 3 Link1Out 4 Link1In 5 Link1In 6 Watch...

Страница 55: ...his is a Lemo Size 1 2 way connector external circuitry should keep the pins closed 1 E STOP 2 E STOP CAN connector This is a Lemo Size 0 3 way connector is used to communicate with external CAN capab...

Страница 56: ...Bolt X Quick Start Guide 52 Notes...

Страница 57: ...weight of the base Weight anchor weights and wings kg 1600 1600 if taken off the track Weight floor plates 2 per section of track 80 x 2 Maximum payload kg 20 20 Height maximum lens height m 3 5 3 6 H...

Страница 58: ...e power line with Neutral in Wye connection plus Earth Ground 50 60 Hz Phase to phase voltage must be 380V at least any lower voltage would reduce maximum track speed Maximum applied voltage is 480V B...

Страница 59: ...ns where you are running large machinery the earth leakage breaker RCD GFI must be at least 100mA preferably 300mA Otherwise the machine will not power up and will sometimes trip when running Power fo...

Страница 60: ...the supply side is NOT used by MRMC rigs Only the three hot wires and the earth are connected from the rig to the X Y Z and E W is not connected 3 The transformer recommended here is 11KVA 208VAC thr...

Страница 61: ...Bolt X Quick Start Guide 57 Notes...

Страница 62: ...Bolt X Quick Start Guide 58 Notes...

Страница 63: ...are wrapped or covered so the tiny pins cannot get damaged Do not spry cleaning fluids into these plugs and sockets Cleaning The Bolt X on tracks should be turned off and unplugged for cleaning Main B...

Страница 64: ...once per month if the machine is busy and especially in sandy or gritty environments The bearings should be pumped with grease into one end grease nipple with the bearing on the rail moving slowly alo...

Страница 65: ...Bolt X Quick Start Guide 61 Notes...

Страница 66: ...Bolt X Quick Start Guide 62 Notes...

Страница 67: ...Bolt X Quick Start Guide 63 Notes...

Страница 68: ...Mark Roberts Motion Control Ltd Unit 3 South East Studios Blindley Heath Surrey RH7 6JP United Kingdom Telephone 44 0 1342 838000 info mrmoco com www mrmoco com...

Отзывы: