background image

34

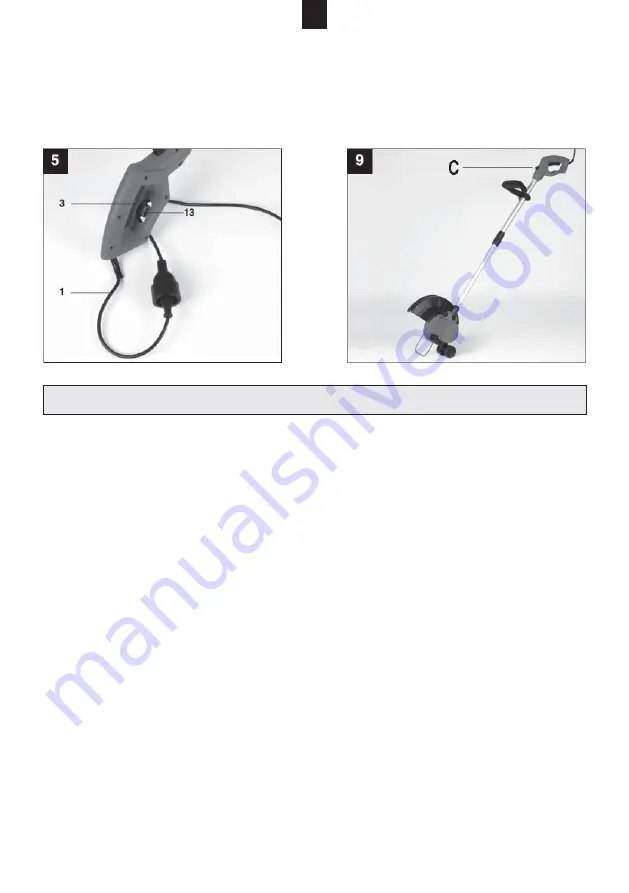
Upper handle setup (Picture 9)

When you press button (C), you can rotate the upper pipe into 2 different positions. 
This can be, for example, useful when cutting lawn edges (90°). Make sure that the 
upper handle clicks in into one of these work positions.

Use

Note: If the string is too long, it will be automatically cut to the co-
rrect length upon starting the trimmer by the little knife located on 
the protective shield.

If the string is too short, it can be extended by pushing the button on the cutting 
head. When the trimmer is running, the string is automatically extended to the 
required length upon gently tapping the head on the ground.

1) Never use the trimmer without protective accessories.
2)  Do not use the trimmer if the grass is wet. The best results are achieved when the 

grass is dry.

3)  Attach the extension cord and secure it to the extension cord lug located on the 

handle (13).

4) Turn the trimmer on by pressing the ON/OFF switch (3).
5) To turn the trimmer off, release the ON/OFF switch (3).
6)  Do not position the trimmer in the grass until you press the switch, i.e. until the 

trimmer is running.

7)  The correct motion for cutting the grass is a swinging motion of the trimmer from 

one side to another and a slow progress forward. The angle of the cutting head 
should be approximately 30° (see Pictures 6 and 7).

8)  In the case of tall grass, cut it gradually in several steps, starting from the end of 

the stems in the downward direction (see Picture 8).

9)  To reduce the wear and tear of the string caused by obstacles use the protection 

strap. Keep the trimmer out of contact with hard objects.

EN

Содержание LEVITA GT 550

Страница 1: ...2015 Strunov seka ka Strunov kosa ka Grass Trimmer Rasentrimmer LEVITA GT 550 N vod k pou it a dr b N vod na pou itie a dr bu Operating Instructions Benutzungs und Wartungsanleitung...

Страница 2: ...5 R icov matice pro p edn rukoje 6 P evle n matice pro nastaven d lky seka ky 7 Vrchn trubka 8 Spodn trubka 9 Ochrann t men 10 Pohonn jednotka 11 Strunov adapt r 12 Ochrann t t 13 chyt prodlu ovac ho...

Страница 3: ...doj t k v znamn mu zv en rovn vystaven obsluhy vibrac m v pr b hu celkov doby provozu P i odhadov n rovn vystaven vibrac m by se m la br t v vahu tak doba po kterou je n ad vypnut nebo b napr zdno To...

Страница 4: ...ujte odstup od ostatn ch osob Vy nac hlavice po vypnut p stroje je t chv li rotuje zachov vejte bezpe nou vzd lenost Tento elektrick p stroj chra te p ed vlhkem P i po kozen elektrick ho kabelu odpoj...

Страница 5: ...je p ed pou it m t to seka ky Strunov seka ky jsou v hradn ur eny pro dosek v n okrasn ch tr vn k tzn okraj tr v n k Jin nebo tento rozsah p ekra uj c pou it jako nap sek n ke a iv ch plot nebo velko...

Страница 6: ...rodlu ovac kabel vidlici sp na a sekac hlavici 3 P ed pou it m se mus zkontrolovat zda p vodn a prodlu ovac kabel nevykazuj zn mky po kozen nebo st rnut Seka ka na tr vu se nesm pou vat pokud jsou kab...

Страница 7: ...zenou vy nac hlavici okam it nechte vym nit i v p pad zd nliv nepatrn ch vlasov ch trhlin Po kozenou vy nac hlavici neopravujte 29 Po p eru en a ukon en pr ce Odpojte vidlici Prove te dr bu seka ky p...

Страница 8: ...orn trubku 7 Zajist te p edn rukoje roubem A a r icovou matic 5 Ochrann t men rostlin Konce ochrann ho t menu 9 um st te do otvor na boc ch pohonn jednotky 10 Ochrann t t obr 3d Nasa te ochrann t t 12...

Страница 9: ...te op t p evle nou matici 6 Nastaven p edn rukojeti obr 3b Postavte strunovou seka ku na pevnou plochu Povolte r icovou matici na p edn rukojeti 5 a naklopte ji do optim ln pozice Upevn te p edn ruko...

Страница 10: ...1 Nikdy nepou vejte strunovou seka ku bez bezpe nostn ch za zen 2 Nepou vejte seka ku pokud je tr va vlhk Nejlep ch v sledk dos hnete p i such tr v 3 P ipojte prodlu ovac kabel a zajist te ho v chytu...

Страница 11: ...P ed v m nou c vky se ujist te e je vidlice odpojena od s t 1 Stiskn te bo n jaz ky na krytu c vky jak je vyobrazeno a kryt vyjm te obr 10 a 2 Vyjm te pr zdnou c vku 3 Prot hn te konce strun o ky v k...

Страница 12: ...n k ekologick recyklaci Tato mal sil kter je k tomu t eba vynalo it bude ve prosp ch na eho ivotn ho prost ed POZOR P ed jak mkoliv konem odpojte seka ku od zdroje elektrick ho proudu Pokud seka ka vi...

Страница 13: ...aplikacibezpe nostn chazdravotn chpo adavk uveden chvejmenovan ch sm rnic ch ES byly vyu ity n sleduj c normy a nebo technick speci kace EN 60335 1 2012 EN 50636 2 91 2014 EN 62233 2008 ZEK 01 4 08 11...

Страница 14: ...v matica pre predn rukov 6 Prevle n matica pre nastavenie d ky kosa ky 7 Horn r rka 8 Spodn r rka 9 Ochrann strme 10 Pohonn jednotka 11 Strunov adapt r 12 Ochrann t t 13 chyt predl ovacieho k bla 14 S...

Страница 15: ...k v znamn mu zv eniu rovne vystavenia obsluhy vibr ci m v priebehu celkovej doby prev dzky Pri odhadovan rovne vystavenia vibr ci m by sa mala bra do vahy aj doba po ktor je n radie vypnut alebo be na...

Страница 16: ...odstup od ostatn ch os b Vy nacia hlavica po vypnut zariadenia e te chv u rotuje zachov vajte bezpe n vzdialenos Toto elektrick zariadenie chr te pred vlhkom Pri po koden elektrick ho k bla odpojte za...

Страница 17: ...ajte si ich pred pou it m tejto kosa ky Strunov kosa ky s ur en v hradne na dokosovanie okrasn ch tr vnikov tzn okrajov tr vnikov In pou itie alebo pou itie prekra uj ce tento rozsah ako napr sekanie...

Страница 18: ...d pou it m sa mus skontrolova i pr vodn k bel a predl ovac k bel nevykazuj zn mky po kodenia alebo starnutia Kosa ka na tr vu sa nesmie pou va ak s k ble po koden alebo opotreben 4 Ak d jde k po koden...

Страница 19: ...ivo nepatrn ch vla sov ch trhl n Po koden vy naciu hlavicu neopravujte 29 Po preru en a ukon en pr ce odpojte vidlicu Vykonajte dr bu kosa ky pri odpojenej vidli ci Vykonajte len tie dr b rske pr ce k...

Страница 20: ...rku 7 Zaistite predn rukov skrutkou A a ru icovou maticou 5 Ochrann strme rastl n Konce ochrann ho strme a 9 umiestnite do otvorov na bokoch pohonnej jednot ky 10 Ochrann t t obr 3d Nasa te ochrann t...

Страница 21: ...maticu znova 6 Nastavenie prednej rukov te obr 3b Postavte strunov kosa ku na pevn plochu Povo te ru icov maticu na prednej rukov ti 5 a naklopte ju do optim lnej polohy Upevnite predn rukov dotiahnu...

Страница 22: ...ajte strunov kosa ku bez bezpe nostn ch zariaden 2 Nepou vajte kosa ku ak je tr va vlhk Najlep ie v sledky dosiahnete pri su chej tr ve 3 Pripojte predl ovac k bel a zaistite ho v chyte predl ovacieho...

Страница 23: ...nie Pred v menou cievky sa uistite e vidlica je odpojen od siete 1 Stla te bo n jaz ky na kryte cievky ako je vyobrazen a vyberte kryt obr 10 a 2 Vyberte pr zdnu cievku 3 Potiahnite konce str n o kami...

Страница 24: ...h v pr slu nej zberni na ekologick recykl ciu Toto mal silie ktor je k tomu potrebn vynalo i bude na prospech n ho ivotn ho prostredia POZOR Pred ak mko vek konom odpojte kosa ku od zdroja elektrick h...

Страница 25: ...cii bezpe nostn ch a zdravotn ch po iadaviek uveden ch v menovan ch smerniciach ES boli vyu it nasleduj ce normy a alebo technick peci k cie EN 60335 1 2012 EN 50636 2 91 2014 EN 62233 2008 ZEK 01 4...

Страница 26: ...nut for the front handle 6 Cap nut for setting the trimmer length 7 Upper pipe 8 Bottom pipe 9 Protection strap 10 Driving unit 11 String adapter 12 Protective shield 13 Extension cord holder 14 Bolt...

Страница 27: ...nt This situation could result in an increased exposure of the operation personnel to vibrations during the entire work period When estimating the operator s exposure level to vibrations the time when...

Страница 28: ...m other people The trimming head keeps rotating for a while after the machine is turned off maintain a safe distance Protect this electric machine from moisture Remove plug from the mains if the cable...

Страница 29: ...s trimmers have been designed exclusively for nal trimming of decorative lawns i e lawn edges Any other use that exceeds the extent of the speci ed usage such as trimming hedges and bushes or large la...

Страница 30: ...nspect its correct operation and its prescribed safe operation condition Some of the most important parts to inspect include the power cord extension cord plug switch and the cutting head 3 Prior to e...

Страница 31: ...r hold the trimmer in its normal work position and turn it on 28 Replace a damaged cutting head immediately even in the case of just slight hair cracks Do not attempt to repair a damaged cutting head...

Страница 32: ...front handle using the bolt A and the rose nut 5 Protection plant strap The ends of the protection strap place into the openings on both sides of the driving unit 10 Protective shield Picture 3d Attac...

Страница 33: ...Front handle setup Picture 3b Put the trimmer on a rm surface Loosen the rose nut on the front handle 5 and tilt it to an optimal position Fasten the front handle by tightening the rose nut Cutting he...

Страница 34: ...Do not use the trimmer if the grass is wet The best results are achieved when the grass is dry 3 Attach the extension cord and secure it to the extension cord lug located on the handle 13 4 Turn the t...

Страница 35: ...s disconnected from the outlet 1 Press the side pointers on the coil cover as shown on the picture and remove the cover Picture 10a 2 Remove the empty coil 3 Thread the ends of the string through the...

Страница 36: ...tal recycling instead The negligible effort that is necessary to do so will bene t our environment ATTENTION Disconnect the trimmer from electricity prior to any work conducted on the machine Shall th...

Страница 37: ...e been used for the application of the safety and health requirements stated in the above mentioned EC directives EN 60335 1 2012 EN 50636 2 91 2014 EN 62233 2008 ZEK 01 4 08 11 11 EN 55014 1 2006 A1...

Страница 38: ...en Griff 6 berwurfmutter f r die Einstellung der L nge der Rasentrimmer 7 Oberes Rohr 8 Unteres Rohr 9 Schutzb gel 10 Antriebseinheit 11 Passst ck f r die Faden 12 Schutzschild 13 Halterung f r das Ve...

Страница 39: ...ssionen unterschiedlich sein Es kann aber auch zu der bedeutenden Erh hung des Pegels der Emissionen im Verlauf des ganzen Arbeitszeitraums kommen Bei der Sch tzung des Pegels der Aussetzung der Vibra...

Страница 40: ...nen Abstand von den sonstigen Personen halten Der Grasenkopf nach dem Ausschalten des Ger ts noch eine Weile rotiert halten Sie einen sicheren Abstand ein Das Ger t nicht der Feuchtigkeit aussetzen Be...

Страница 41: ...haben In jedem Fall sind die Anweisungen f r den Unfallschutz einzuhalten Lesen Sie diesen Anweisungen noch vor der Benutzung dieser Rasentrimmer Die Rasentrimmer sind ausschlie lich f r das Nachm he...

Страница 42: ...m Ausl sestrom max 30 mA einzuspeisen Die weiteren Informationen wird Ihnen der Elektromecha niker mitteilen 2 Vor jeder Benutzung ist die richtige Funktionalit t und den betrieblich sicheren Zustand...

Страница 43: ...e erstens die Rasen trimmer in der normalen Arbeitsposition erst dann schalten Sie das Ger t ein 28 Den besch digten Grasenkopf lassen Sie sofort umtauschen auch f r den Fall der scheinbar geringf gig...

Страница 44: ...rderen Griff mit der Schraube A und Rosettenmutter 5 Der Schutzb gel f r die P anzen Legen Sie die Enden des Schutzb gels 9 in fnungen an den Seiten der Antriebseinheit 10 ein Schutzschild Abb 3c Befe...

Страница 45: ...n Sie wieder die berwurfmutter 6 zu Einstellen der vorderen Griffs Abb 3b Stellen Sie die Rasentrimmer auf die feste Ober che auf L sen Sie die Rosetten mutter an dem vorderen Griff 5 und kippen Sie i...

Страница 46: ...nrichtungen 2 Nie benutzen Sie die Rasentrimmer wenn das Gras feucht ist Die besten Ergebnisse erreichen Sie an dem trockenen Gras 3 Schlie en Sie das Verl ngerungskabel an und sichern Sie es in dem H...

Страница 47: ...er Steckdose ausgezogen ist Ab dem Stromnetz getrennt 1 Dr cken Sie die seitlichen Zungen an dem Geh use der Spule so wie es abgebildet ist und das Geh use nehmen Sie heraus Abb 10a 2 Nehmen Sie die l...

Страница 48: ...entsprechende Sammelstelle zu dem kologischen Recycling Diese kleine M he welche dazu ben tigt wird wird zu Gunsten unserer Umwelt sein ACHTUNG Vor jeder T tigkeit trennen Sie die Rasentrimmer von der...

Страница 49: ...der Sicherheits und Gesundheitsanforderungen welche in den genannten EG Richtlinien genannt sind waren die folgenden Normen und oder technischen Lastenhefte benutzt EN 60335 1 2012 EN 50636 2 91 2014...

Страница 50: ...50...

Страница 51: ...51...

Страница 52: ...Mount eld a s Miro ovick 697 25164 Mnichovice...

Отзывы: