background image

Step 6 — Settings for Printing with Palette

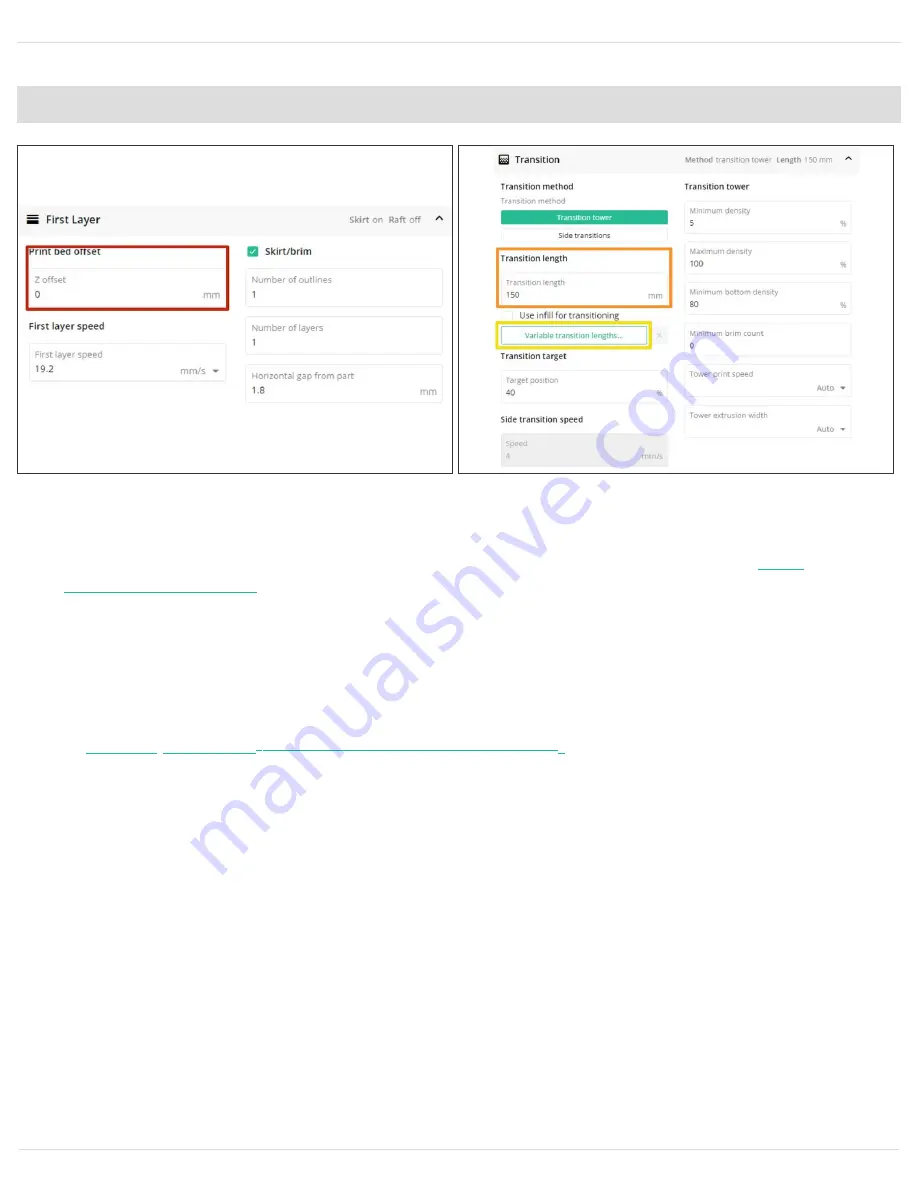
Print Bed Offset: If the z-offset calibration has been done for this printer, that z-height can be 
entered here (Note: please check the printer profile's start sequence to see if this is already 
included there). A z-offset that is too close to the bed will result in a print with low

 pings


(mm3d.co/ping-po

n

g)

, which can affect the color calibration at print start.

Transition Length: The transition length will determine the amount of filament extruded when 
transitioning from one color to another. Higher transition lengths can help reduce bleed, but will 
increase print times and transition tower size.

To learn about how transition lengths can be adjusted based on color strength, see 

Variable Transitions


(mm3d.co/p2variable-transitions)

.

Print Speed (Solid Layer in General, Infill Speed, Perimeter Speed):  To help ensure Palette 
has sufficient filament in its buffer while printing, please avoid using very high speeds for these 
settings.

Add a style profile

© 2022

support.mosaicmfg.com/

Transition Target: 

Specifies to what percent into a transition length the Palette 

should aim for the new color to reach the nozzle. Lower percentages will use more of 

the transition length for cleaning out the blended regions, with a well calibrated 

Palette and printer extruder. 

21 of 74

Содержание Palette 3

Страница 1: ...Palette 3 Pro Manual V1_03 29 2022 Looking for help Get in touch with our team support mosaicmfg com support mosaicmfg com 1 of 74...

Страница 2: ...d Slicing for Palette 3 in Canvas 27 Initial Setup Update Palette 3 Firmware 33 Printer Setup 36 Splicing and Printing Splice Tuning for Palette 3 41 Connected Mode with Palette 3 52 Accessory Mode wi...

Страница 3: ...tuning Canvas Tutorials Setup Painting Stamping Variable Transitions mm3d co p3 internet canvas mm3d co p3 canvas mm3d co paintingintro mm3d co stamping tutorial mm3d co p2variable transitions Calibra...

Страница 4: ...ly new to 3D printing we recommend checking out this video mm3d co tt beginners It is a complete beginner s guide to how 3D printers operate how to set it up and complete a frame check A frame check w...

Страница 5: ...librating your extruder is very important for perfecting your print quality This guide mm3d co extruder calibration will take you through all of the steps from start to finish If extruder multiplier c...

Страница 6: ...is both level and an appropriate distance from the nozzle This will ensure that the first layer of your prints are correct as this is essential to perfecting your prints Here mm3d co tt firstlayer is...

Страница 7: ...Photo below Z Offset Photo below First Layer Height 7 of 74...

Страница 8: ...indication if there are any issues with your printer Here mm3d co tt baseline is a guide on how to change the settings of your printer as needed If once you complete the baseline print you are seeing...

Страница 9: ...test the print quality in single color first before printing in multicolor Importing profiles from Simplify3D Slic3r Prusaslicer or Kisslicer If a profile is imported from another slicer a style prof...

Страница 10: ...the printer profile Printer tagging allows style profile data to be anonymously aggregated from printer profiles and shared with others who use the same printer When you tag a printer you will be abl...

Страница 11: ...ers will have a standard 0 4mm nozzle Bowden tube length Used only for Bowden style printers We recommend measuring from the filament feed to the tip of the hot end It s better to overestimate than un...

Страница 12: ...printer s bed For delta printers only the diameter and height are required Origin offset Usually located in the middle or bottom left corner of the print bed You can also set a custom origin by manual...

Страница 13: ...coded purge when beginning a print Because this purge is not in the print file calculated splice lengths will all be incorrectly short by this amount If your printer has a firmware purge estimate the...

Страница 14: ...Transition Custom transition settings can be added here if side transitions mm3d co p3 sidetransitions or a purge bucket is used 14 of 74...

Страница 15: ...nd end sequence into here You can learn about advanced scripting in Canvas using PrinterScript canvas3d io printerscript Please note that if else syntax is not supported at this time Layer change scri...

Страница 16: ...setting profiles in Canvas Style profiles are preset slicer settings which can be saved and used in projects You can add a style profile when you re setting up a printer profile for the first time or...

Страница 17: ...if you already have some tried and tested settings Go to Printer Profiles and double click the printer you want to add a new a style profile to Click Add a New Style Profile Click Import from a Diffe...

Страница 18: ...will require you to enter and modify different parameters Go to Printer Profiles and double click the printer you want to add a new style profile to Click New Style Profile Click Start from Blank Prof...

Страница 19: ...gs Slicer settings can be changed on a per project basis in Canvas When settings changed are made on a project you can do the following to update or return to standard settings Update The selected sty...

Страница 20: ...r Holes in Print Adding a gap fill can help generate toolpaths for areas that appear missing in the slice preview Enter a number value to represent the millimeter length of the gap Retraction for Stri...

Страница 21: ...lengths can help reduce bleed but will increase print times and transition tower size To learn about how transition lengths can be adjusted based on color strength see Variable Transitions mm3d co p2...

Страница 22: ...is guide you will learn how to Connect Palette to the Internet using Wi Fi on Palette 3 WiFi and ethernet on Palette 3 Pro Toggle Wi Fi on off disconnect and forget Wi Fi networks Connect Palette to y...

Страница 23: ...irelessly and will make printer profile presets available Additionally it will allow you to connect Palette to your Canvas account There are two options for connecting to the internet Wi Fi Palette 3...

Страница 24: ...Wi Fi on off disconnecting and forgetting networks if needed Step 3 Connect Using Ethernet Ethernet connection is available on Palette 3 Pro To Connect to Ethernet Click Ethernet to connect using an e...

Страница 25: ...cting Palette to your Canvas account with Internet will allow for prints to be sent and monitored from Canvas If you skip connecting to Canvas during the initial setup you can always connect your Canv...

Страница 26: ...s and visit this link on another computer canvas3d io connect This is also available from the main menu Devices Connect device Enter the activation code beside Online devices Palette should now be con...

Страница 27: ...canvas3d io for free or login to your existing account to complete the steps below In this guide you will learn how to Create a new printer profile and setup Add Palette to your setup Slice for multi...

Страница 28: ...using a printer preset or c importing a profile from Simplify3D Slic3r PrusaSlicer or KISSlicer If you have a custom start and end sequence for your printer please enter it in the Sequences page Crea...

Страница 29: ...w you to send print files to Palette 3 directly If you add the offline Palette 3 in connected mode after slicing the mcfx file for printing can be transferred to the USB drive for Palette If you activ...

Страница 30: ...ve From the project view click on Add models Upload the STL files you would like to print If the model uploaded is only one STL upload it as a single color model If the model has multiple STL files up...

Страница 31: ...ized with painting mm3d co painting intro If you are printing the test keychain please click and drag the colors and do not paint the model Once you re happy with the colors used on the models click o...

Страница 32: ...in accessory mode you will have two files available for download a mafx for Palette 3 and gcode file for the printer If Palette 3 is saved in connected mode one file will be available to send to Palet...

Страница 33: ...n Palette 3 over WiFi or with a USB drive INTRODUCTION In this guide you will learn how to Check if a new firmware release is available following Palette 3 s on screen instructions How to update firmw...

Страница 34: ...ases page to see if a new version is available Check that Palette 3 is connected to the Internet mm3d co p3 internet canvas from the side bar menu If there is a new version that Palette 3 can be upgra...

Страница 35: ...t the version you would like to update Palette to and proceed with the on screen instructions Please do not power off Palette 3 or unplug the power during the update After the update is complete tap P...

Страница 36: ...N In this guide you will learn how to Assemble the spoolholder included with Palette 3 Attach the tube clip guide to the printer s extruder and where to find custom tube clips Palette and printer plac...

Страница 37: ...older Insert two rods into the bases of the spool holder ends press the ends together firmly Place filament onto the remaining rods Lower the rods onto the notches located on top of the spool holder e...

Страница 38: ...head or hot end For Bowden style Printers this tube clip will be positioned on the Bowden extruder before travelling through the Bowden PTFE to reach the hot end Position the circular section of the c...

Страница 39: ...tte on its stand Position the spoolholder directly below Palette Place Palette flat on the surface Position the spoolholder on a surface with the same height as Palette Mount Palette Align the spoolho...

Страница 40: ...ible can allow for calibration adjustments to appear sooner while printing due to the lesser distance the filament has to travel The long tube mainly used for large printers where positioning requires...

Страница 41: ...ality splices Avoid using brittle filament Check that the filament is not brittle before splicing or printing If the filament snaps easily without much effort it s likely become too brittle Use filame...

Страница 42: ...amount of time heat is applied during a splice Compression The distance that the two filament pieces are pressed into each other Cooling The amount of time the splice has to cool down after exiting th...

Страница 43: ...ain screen tap Controls Splice Tuning Clear the unit of any filament before starting and then insert the outgoing tube You may use the small outgoing tube when doing splice tuning so the filament will...

Страница 44: ...met and from there the splice can be pulled out to be examined The following splice tuning values for PLA can be used as a starting point if the default settings of 0 0 0 result in a weak splice 1 1 1...

Страница 45: ...output During splice tuning Palette will splice the filament in drive 2 ingoing to the end of the filament in drive 1 outgoing The outgoing filament is heated first in the splice core before the ingoi...

Страница 46: ...lice Settings screen If you would like to create a new material profile click the Add New Material button You may edit the name of the material and the material type and then Save material Once you ha...

Страница 47: ...rameters may be different depending on the material being pushed ingoing and the material already in the splice core outgoing Two sets of splice tuning values are possible with the ability to reverse...

Страница 48: ...ial but different colors will be loaded into Palette If any remaining drives are used for this print please ensure the material profile is also selected Drives 1 and 2 will use the one set of splice t...

Страница 49: ...eated for too long causing splices to neck and create a thin string like center at the splice Decrease the heat factor and increase the cooling factor In this photo example the necking splice was crea...

Страница 50: ...ate a larger penetration cone will help with splice quality In this photo example the outgoing end red will have a deeper plunge and there will be more of the residual outgoing red filament on the con...

Страница 51: ...e from the printer s extruder there is no filament leading to the hot end An extremely large bulging splice may get caught in the splice core or in the extruder If a bulging splice gets caught in the...

Страница 52: ...rinter to Palette 3 by USB How to measure the loading offset for your extruder and how it s used for calibration How to start a print Connected Mode printing is where Palette s splicing and the printe...

Страница 53: ...nternet and Canvas or download the file and transfer to a USB drive for Palette Step 2 Connect to Printer If the printer connection was skipped during the initial setup this can still be done from the...

Страница 54: ...file If Palette 3 is offline the manual printer selection screen will be skipped Step 4 Printer Check Extruder Clip and Outgoing Tube Check that the extruder clip is attached to the printer Ensure th...

Страница 55: ...e LO your printer s calibration data will be saved If you are not using one of the preset printer profiles on Palette feel free to rename the printer for easier identification If a preset printer was...

Страница 56: ...If Palette is connected to WiFi this can be done through the setup controls on Canvas Or you can use the printer s screen controls to drive filament forward through the extruder Once the filament is...

Страница 57: ...available if Palette 3 is connected to the Internet Measure the loading offset for your extruder and how this is used in calibration How to start a print Accessory Mode printing is where Palette s spl...

Страница 58: ...e printer Step 2 Start Print and Enter Printer Details From Palette s menu screen tap on Start Print Select the location for the MAF file If the printer setup was skipped during the initial setup but...

Страница 59: ...Printer Check Extruder Clip and Outgoing Tube Check that the extruder clip is attached to the printer Ensure that the correct outgoing tube length is selected on screen Accessory Mode with Palette 3 5...

Страница 60: ...e LO your printer s calibration data will be saved If you are not using one of the preset printer profiles on Palette feel free to rename the printer for easier identification If a preset printer was...

Страница 61: ...Insert this filament end into the extruder and use the printer s screen controls to drive filament forward Once the filament is gripped by the extruder s gears jog the filament to insert the tube end...

Страница 62: ...Troubleshooting loading offset from first print In the event you find that transitions are happening too early or too late it s possible that the loading offset for the printer profile is inaccurate T...

Страница 63: ...tually uses 9 5 m it is typically unnoticeable the filament showing up in the print will be the same color material regardless of where it is from in the spool However when creating precise multi colo...

Страница 64: ...at 7 5 Now I m at 11 Every time a ping occurs Palette compares how much filament has been used with how much the printer was supposed to use in the GCode The printer sent us a Ping which means we re 1...

Страница 65: ...t may cause errors in how much filament Palette is producing In order to explain Ponging we first need to explain the Buffer System It allows Palette s filament production and a printer s filament con...

Страница 66: ...e found under the Palette tab in OctoPrint You can save these logs after a print is completed but they will be deleted from the tab once another print has initiated For Palette 3 pings are displayed o...

Страница 67: ...profile from Canvas How to Edit or Delete Existing Printer Profile s Palette 3 Loading Offset and Historical Modifier While viewing your Printer Profiles you may tap on a single profile to edit its c...

Страница 68: ...ical Modifier HM is an average of your pings over time It is a percentage that tells Palette how much filament to make based on your printer s extrusion For example if your HM is 98 your printer may u...

Страница 69: ...om Palette easier please do not use clear or white in Palette b Start the mcfx maf file on Palette and proceed with the steps provided on the screen to load filament to the extruder You will come to t...

Страница 70: ...te has been extruded the LO may be too short and needs to be increased You may continue the print and increase the LO based on when you see the colored filament print on the first layer or you may rem...

Страница 71: ...age for your HM With this example we would edit the HM to be 80 Go to Settings Preferences Printer Profiles Tap on the profile you wish to edit and then tap Next Tap Edit and you will be brought to a...

Страница 72: ...Palette s screen and choosing Logs Pings These ping percentages must be converted into decimal eg 98 becomes 0 98 Old HM Average Pings New HM Example 0 95 Old HM 0 98 Average Pings 0 93 New HM 0 93 9...

Страница 73: ...nt feedback for the first 3 5 prints on a printer This will allow you to improve your prints over time By tapping on Great this will save the calibration data This will improve the HM historical modif...

Страница 74: ...ping was so low at this point that it was not registered Additionally if you had a calibration print that had a No Pings error you will find that in your printer profile HM will be None By ignoring th...

Отзывы: