background image

66

/148

S14 Camera Manual: Installation

© MOBOTIX AG  •  Security Vision Systems  •  Made in Germany

www.mobotix.com  •  [email protected]

Rectangular Rooms

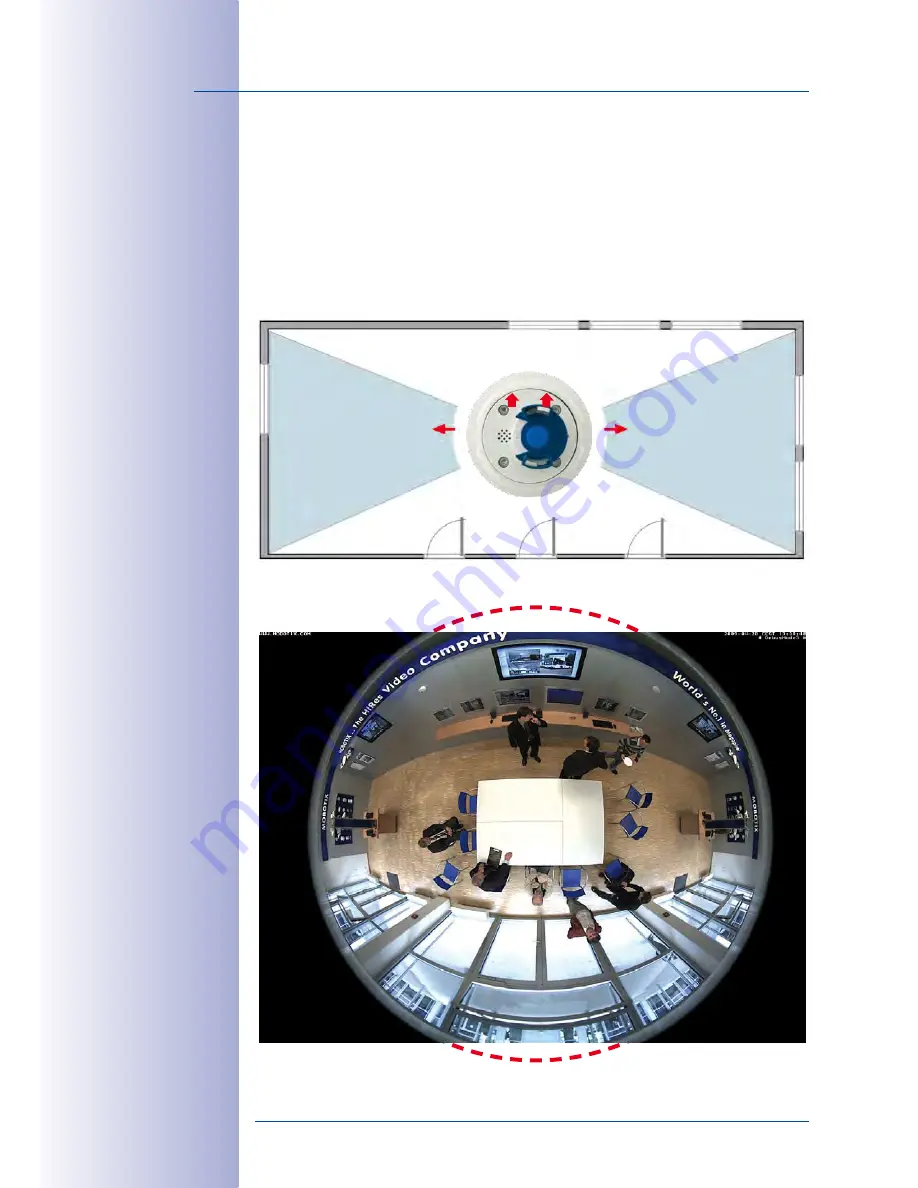
When viewing a 360° panaroma image in the browser, you will notice that the top and 
bottom of the image are not fully visible, i.e., some image information has been clipped. 
This is not the fault of the camera, but intended behavior that aims at achieving the best 
possible utilization of the image sensor by the camera software. Bearing this in mind, it 
is advisable to turn the S14 sensor module in rectangular rooms so that the area marked 
with two arrows or the rotary plug in a S14M (= top border or North of displayed image) 
is pointing towards one of the longer walls of the room.

Original full image 

(ceiling installation in 

a rectangular room)

Содержание S14

Страница 1: ...6 190 sales mobotix com HiRes 6 Megapixel 4096 x 1536 Software zoom Skyline Format free Each image format freely definable 30 Frames s VGA 640 x 480 30 F s Mega Virtual PTZ Digital pan tilt zoom Backlight Safe using CMOS without mechanical iris Internal DVR Internal via Flash external via Network Win Lin Mac Recording via Network on PC up to 1 Terabyte Microphone speaker Audio bi directional via I...

Страница 2: ...ter and MxEasy are internationally protected trademarks of MOBOTIX AG Microsoft Windows and Windows Server are registered trademarks of Microsoft Corporation Apple the Apple logo Macintosh OS X Bonjour the Bonjour logo and the Bonjour symbol are trademarks of Apple Computer Inc Linux is a trademark of Linus Torvalds All other brands service provi sion brands and logos referred to are brands servic...

Страница 3: ... Camera Functions 34 1 5 Lens Options 40 1 6 S14 FlexMount Hardware Features 42 1 7 Software Features For All Camera Modules 43 1 8 Technical Data 44 1 9 S14 FlexMount Scope Of Delivery 46 1 9 1 S14D FlexMount Scope Of Delivery 46 1 9 2 S14D FlexMount Dimensions 50 1 9 3 L11 Sensor Module Scope Of Delivery 52 1 9 4 L11 Sensor Module Dimensions 53 1 9 5 S14M FlexMount Scope Of Delivery 54 1 9 6 S14...

Страница 4: ...Cable 80 2 2 7 Using MxBus Modules 81 2 2 8 External Audio Support Microphone Speaker 81 2 2 9 Replacing The MicroSD Card 82 2 2 10 Tools Required For Installation 82 2 2 11 Preparatory Steps 83 2 3 Installing The S14D FlexMount 84 2 3 1 Attaching The S14D Base Module 84 2 3 2 Attaching And Connecting The S14D Sensor Modules 85 2 3 3 Plugging In And Lifting Off Extensions 86 2 3 4 Connecting Netwo...

Страница 5: ... 116 3 3 2 Full Image Recording 118 3 3 3 Special S14 Configuration In The Browser 120 3 4 MicroSD Card Recording 130 3 4 1 Introduction 130 3 4 2 Formatting The MicroSD Card 132 3 4 3 Activate Recording 133 3 4 4 Accessing Camera Data 134 3 4 5 Deactivating The Card Memory 134 3 4 6 Using A MicroSD Card In A Different MOBOTIX Camera 135 3 4 7 Limitations On Warranty When Using Flash Storage Media...

Страница 6: ... laws MOBOTIX AG is not liable for any illegal use of MOBOTIX products Network Security MOBOTIX products include all of the necessary configuration options for operation in Ethernet networks in compliance with data protection laws The operator is respon sible for the data protection concept across the entire system The basic settings required to prevent misuse can be configured in the software and...

Страница 7: ...MOBOTIX AG Security Vision Systems Made in Germany www mobotix com sales mobotix com S14D Dual Camera System With Dual Imaging Giving Up To 6 Megapixel Resolution S14M Mono Camera System With Integrated Lens ...

Страница 8: ...base module via a 2 m 6 6 ft long cable The flat housing including integrated 4 GB MicroSD card and external connectors Ethernet MiniUSB MxBus audio can be installed discreetly and with optimal protection behind a wall or ceiling panel so that only the lenses are visible in the room The S14D can be fitted with hemispheric day or night lenses Two adjacent rooms can be completely secured with just o...

Страница 9: ...g initial images on a PC Please see the Camera Software Manual Part 2 for information on how to operate the camera This is free to download as a PDF from www mobotix com Support Operating Instructions The MxEasy and MxControlCenter video software can also be downloaded free of charge from Support Software Downloads If you have any questions our support staff is available at support mobotix com fro...

Страница 10: ...a views while significantly reducing the number of cameras and therefore the costs For example four lanes of a gas station may be recorded with one single MOBOTIX camera instead of the four standard cameras normally required for such a task Disadvantages Of The Old Centralized Solution Usually cameras only supply images Processing and recording take place later on a central PC using expensive vide...

Страница 11: ...detail of panoramic images with mega pixel technology fewer recording devices because in the decentralized system ten times the standard number of cameras can be used to record high resolution HDTV video with sound on one PC server simultaneously lower network bandwidth because everything is processed in the camera itself and the high resolution images therefore do not have to be constantly transp...

Страница 12: ...rrection software allowing a view of the scene from the usual perspective The virtual PTZ feature allows you to enlarge or move image sections within the hemisphere just like PTZ camera yet without the need for moving parts Handle Several Image Sections at Once One or more image sections can be corrected for perspective in the hemispheric view allowing you to monitor and record several different a...

Страница 13: ... produces a confusing situation for the viewer because objects may disappear from sight for a moment or even appear twice if the viewing areas overlap This is not the case with hemispheric panoramic cameras Objects remain in view at all times and the viewer can always keep good track of objects in the scene Everything Stored In The Recording Traditional optical PTZ cameras can only record what is ...

Страница 14: ... camera lens The S14D boasts double hemispheric features and can replace the time consuming expensive installation of several standard cameras while offering surveillance of two adjacent rooms at the same time This camera a world first is evidence of MOBOTIX commitment to innovation as the global leader in megapixel video security systems Virtual PTZ vPTZ Without Motor The S14 also zooms in on det...

Страница 15: ...ult to analyze MOBOTIX solves this problem by perfectly straightening the uneven lines in the live image using the camera software Since the image distortion correction of the hemispheric view and the generat ing of the panoramic view take place in the camera itself no additional load is placed on the viewer PC unlike a standard camera Thus displaying a large number of MOBOTIX cameras simultaneous...

Страница 16: ... example two frames per second are sufficient for recordings in a gas station are made inside the camera itself reducing the load on both the network and the recording device PC server MOBOTIX cameras can minimize the recording independent of the live video and the sound channel is also retained even at two frames per second No Storage Limit The decentralized MOBOTIX concept enables the user to sa...

Страница 17: ...weeks of continuous recording of four gas station lanes Four days of video in TV quality 200 000 clips in high resolution each lasting 10 s Two million images Ideal for difficult network conditions or Wi Fi MOBOTIX cameras are ideal for difficult network conditions or wireless connections because the internal flash recording bridges network failures or bandwidth fluctuations and syn chronizes data...

Страница 18: ...ust The camera images are only accessible to authorized persons and are encrypted via SSL when they are transferred over the network Notification Of Failure Your MOBOTIX video management system will automatically report any impairment or failure of individual network components for example cameras This ensures maximum reliability and readiness for use Subsequent Searches Unlike any other surveilla...

Страница 19: ...S14 can also demonstrate its advantages even in critical environments The inconspicuous appearance and low visibility contact surfaces of the sensor modules combined with the inaccessible camera housing including connectors which can be mounted behind a wall or cover panel make acts of vandalism significantly more difficult than with conventional cameras The S14 is also equipped with a shock detec...

Страница 20: ...ts No Extra Heating Anti fogging without heating allows the system to be powered throughout the year usingnetworkcableortwowires PoEstandard andsavesonthecostofpowercabling 6 Backup Power Supply Costs Reduced By 80 Low power consumption approx 5 watts enables year round PoE no heating required withonecentralizedUPSfromtheinstallationroomusingnetworkcable 7 Robust And Practically Maintenance Free F...

Страница 21: ...d setsnolimitsonthenumberofusers camerasorservers 4 Very Low Network Load Efficient video codecs motion detection and data storage of up to 64 GB in the camera guarantee a very low network load 5 No Storage Limit There is no storage limit for the entire system because each camera is able to manage its own terabyte sized storage device NAS via the network 6 Sun And Backlight Compensation CMOS senso...

Страница 22: ...t an ideal solution for where discreet design and appearance are paramount Cameras without mechanical moving parts require low maintenance In addition they are silent when panning and focusing on a specific image area Hotels and restaurants are typical locations for the S14 FlexMount but installation in public buildings waiting rooms showrooms parking garages storage rooms and exhibition booths is...

Страница 23: ...into most installation environments The S14D features up to two HiRes image sensors which can be combined to output a color double image up to 6 megapixels in size The system can be fitted with two day and two night sensor modules or with one day and one night sensor module Depending on the resolution selected the maximum frame rate is between 6 and 30 images per second 6 fps 6MEGA 20 fps 3MEGA 30...

Страница 24: ...he front secure it with a nut plug the connection cable into the base module and secure it You re done S14M Hemispheric Camera For Concealed Installation With the S14M which features a permanently attached lens the camera housing can be concealed behind a cover or cladding for example stainless steel up to 6 4 mm 0 25 in in thickness Thicker surfaces may also be suitable for mounting the S14M if t...

Страница 25: ... secured with a weatherproof bayonet catch or the eight indi vidual strands of the installation cable can be attached directly to the LSA cutting clamp inside the camera housing A number of additional devices can be used together with the S14 They are connected via a network switch or directly to the camera housing via a MxBus or MiniUSB cable for example ExtIO MOBOTIX function modules audio devic...

Страница 26: ...tdoors can be monitored simultaneously using just one camera MOBOTIX s S14D is also the world s first hemispheric day and night camera In this version the black and white and color sensor modules are mounted directly next to each other so they cover the same area The camera automatically chooses the best available mode depending on the lighting conditions either the color sensor with daylight lens...

Страница 27: ...om sales mobotix com 180 Panorama Full Image Wall Mounted 180 Panorama Panorama Focus Wall Mounted Panorama Focus Normal View Zoom Wall Mounted Double Panorama Ceiling Mounted Panorama Focus Wall Mounted S14D Different image views can be selected figures show examples only for two sensor modules ...

Страница 28: ...blind spots It offers a substantially better view of the scene compared to other cameras and it also results in the need for fewer cameras overall Panorama Focus One Camera Three Views Wall Mounted Maximum room overview while simultaneously viewing detail in a single image A hemi spheric sensor module can also provide two additional views so that you can focus on two detail scenes simultaneously i...

Страница 29: ...mera is mounted in the center of the ceiling in a room the Double Panorama display mode provides a corrected panorama image of both halves of the room It corre sponds roughly to the situation of personally standing in the middle of the room and being able to look both forwards and backwards at the same time This is a superb overview for the user provided by a single sensor module Original full ima...

Страница 30: ...com Full Image And Normal View The full image view displays the circular non software corrected original fisheye view of the entire image sensor just as it is stored in full image recording The Normal view displays a corrected image section that is easier to pan tilt or zoom Original fisheye image full image Corrected image section Normal ...

Страница 31: ... as separate views Each of the four views features a software controlled pan tilt zoom function virtual PTZ allowing it to be customized as necessary In order to simplify usage the camera can store numerous user defined camera views which can easily be brought up using joystick keys or softbut tons using the vPTZ function Besides being able to manually bring up specific camera views the camera can...

Страница 32: ... significantly increased performance thanks to the use of the PXA320 XScale processor it also includes FPGA hardware that noticeably frees up the CPU Enables Long Distances Between Sensor Modules Integrated MxLink The cables to the sensor modules can each be up to 2 m 6 6 ft long thanks to FPGA technology This way a single camera can be used to monitor applications such as two adjacent rooms Weath...

Страница 33: ... can be connected simultaneous display and recording not compatible with M12 DevKit Audio S14D sensor modules provide an integrated microphone Additional con nections for microphone and speaker are provided on the S14 housing MicroSD card Replaces SD card and R models of the M12 DevKit MiniUSB Adapter cable available from MOBOTIX MxBus Enables connection of numerous extensions MX GPS Box ExtIO Cam...

Страница 34: ...t the time of the recording Automatic Image Correction With L22 Lenses Only A problem familiar from the field of photography is the distortions that result from using wide angle lenses Straight lines near the image borders are curved The integrated distortion correction features of the MOBOTIX camera and of MxControlCenter allow the curve of various lenses to be corrected using software functions ...

Страница 35: ...ized approach 30 live cameras can store images of up to 30 frames per second each including sound on a single computer Internal DVR Storage On MicroSD Cards MOBOTIX cameras support the direct storage on an internal MicroSD SD card By using the integrated DVR the camera is able to offer the following additional applications Standalone operation of the camera without a file server by recording to th...

Страница 36: ...ed as Power over Ethernet via the network cable using the MOBOTIX NPA PoE Set MX NPA Box or a PoE compatible switch according to the IEEE 802 3af or 802 3at PoE standard Caution Previous MOBOTIX network power accessories such as the NPA Set Power Box and Power Rack MX NPA Set MX NPR 4 and MX NPR8 20 are not suitable for use with the S14 No heating is necessary thanks to the well insulated plastic ...

Страница 37: ...ows you to quickly create floor plans by simply dragging dropping the cameras onto a background image Load a floor plan as a background image drag and drop the cameras and you re done MxEasy Intuitive Application For Windows Apple And Linux MxEasy aims at easy operation of the most important camera functions through its intu itive user interface thus creating a new user experience when viewing and...

Страница 38: ...wide range of accessories for any conceivable application scenario Additional Camera Functions Software True software scaling generates smaller image formats easily for PDAs such as 320 240 160 120 etc Audio video recording has three different recording modes event recording with sound continuous recording with variable frame rate and sound and event controlled snapshot recording of JPEG images St...

Страница 39: ...rk connections besides the standard LAN DynDNS client for accessing the camera via the Internet using a symbolic name for example mymobotixcam dyndns org if the provider assigns a new dynamic IP address every time the camera connects to the Internet Non voidable backup system starts the cameras in the original operating state if a software update fails allowing the user to easily restart the updat...

Страница 40: ...d virtual PTZ features of the camera software or MxControlCenter MxEasy properly correct the lens distortion that is specific to each of the lenses These lenses deliver good image quality even when using maximum digital zoom Since MOBOTIX cameras are backlight proof they do not require a mechanical auto iris making them extremely robust and maintenance free Full image with L11 180 fisheye in publi...

Страница 41: ...3 0 Image height not specified 66 0 41 0 30 5 20 0 9 5 Notes The specified focal lengths of MOBOTIX lenses do not reflect the actual focal length of the lenses but the focal length Lxx mm converted to 35 mm camera format For example the MOBOTIX L11 hemispheric lens has an actual focal length of 1 8 mm This would be the equivalent of 11 mm on a 35 mm camera This lens is thus called L11 Since the im...

Страница 42: ...ensitivity of BW sensor at 1 second lux 0 005 0 005 0 005 Automatic night mode switch for color BW X RAM storage MB 128 128 128 Temp video storage MB ring buffer 64 64 64 Internal DVR MicroSD ring buffer up to 64 GB2 up to 64 GB2 up to 64 GB2 CIF images 64 GB int DVR approx 4 million3 4 million3 4 million3 VGA images 64 GB int DVR approx 2 million3 2 million3 2 million3 MEGA images 64 GB int DVR a...

Страница 43: ... controlled X X Event controlled frame rate with continuous audio X X Flexible event logic X Master slave arming by one camera X Time scheduled privacy zones several areas X Bidirectional sound IP from to browser X5 X5 Customized voice messages X X VoIP telephony audio video SIP X5 X5 Alarm calls to softphones SIP for example X Lite X X Remote alarm notification alarm via network message X X RS232...

Страница 44: ... MEGA 30 fps 3MEGA 20 fps 6MEGA 8 fps Image compression MxPEG M JPEG JPEG H 264 for SIP video only Internal DVR MicroSD slot including 4 GB max 64 GB External video ring buffer Directly on NAS and PC server without additional recording software Software included MxEasy video management software MxControlCenter control room software Image processing Backlight compensation automatic white balance im...

Страница 45: ...F Dimensions weight S14M W x H x D 115 x 130 x 39 4 mm installation dimensions weight approx 457 g including lens Dimensions weight S14D W x H x D 115 x 130 x 33 mm weight approx 444 g without sensor modules see below Dimensions weight Sensor module L11 Diam x H 50 x 33 4 mm installation dimensions weight approx 91 g including lens available colors white and black Weight of 2 m 6 6 ft con nection ...

Страница 46: ...tix com 1 9 S14 FlexMount Scope Of Delivery 1 9 1 S14D FlexMount Scope Of Delivery www mobotix com go to Products S14 FlexMount and open the basket that contains the Product Configurator Use this to order the required parts in any of the available colors 1 1 1 11 1 8 1 7 1 6 1 3 1 4 1 10 1 9 1 2 1 5 M 6 M 3 M 2 M 1 M 7 M 5 M 4 M 9 M 8 ...

Страница 47: ...le installed 1 8 1 Single wire plug white Ethernet installation cable microphone speaker MxBus 1 9 1 MicroSD card 4 GB installed 1 10 1 Rotary plug SD card blue installed 1 11 1 Ethernet patch cable 50 cm 20 in with seal Installation Accessories Item Number Part Name M 1 4 Stainless steel washers diam 4 3 mm M 2 4 Dowels 6 mm M 3 4 Stainless steel wood screws 4x40 mm with PZ 2 driver bit M 4 2 Cab...

Страница 48: ...ly be used with the designated sealed MOBOTIX cables Ethernet patch cable MX OPT CBL LAN 1 2 5 10 MiniUSB straight straight MX CBL MU STR 05 2 5 MiniUSB straight angled MX CBL MU EN STR 05 2 5 MiniUSB to USB A straight to USB socket MX CBL MU STR AB 05 2 5 Sensor module MX S14 OPT CBL 05 1 2 Pressure compensation element Base plate R L 115 mm 4 53 in 130 mm 5 12 in 2 1 LEDs MicroSD card Keys Tripl...

Страница 49: ...ng cover are removed Before laying the Ethernet installation cable remove the bayonet catch and replace the Ethernet patch cable plug with either one of the additional plugs M 4 5 or the single wire plug 1 8 depending on the cable used Ethernet installation cable or MxBus microphone speaker MOBOTIX RJ45 or MxBus microphone speaker LSA terminal Ethernet installation cable Screw terminals MxBus micr...

Страница 50: ...ion Systems Made in Germany www mobotix com sales mobotix com 1 9 2 S14D FlexMount Dimensions Attaching The Base Module M6 tap holes Slots 115 mm 4 53 in 100 mm 3 94 in M6 Diam 5 5 mm 0 22 in 130 mm 5 12 in 47 5 mm 1 87 in 100 mm 3 94 in 110 mm 4 33 in 8 5 mm 0 33 in 13 5 mm 0 53 in ...

Страница 51: ...51 148 S14 FlexMount Scope Of Delivery MOBOTIX AG Security Vision Systems Made in Germany www mobotix com sales mobotix com 33 5 mm 1 32 in 5 mm 0 2 in ...

Страница 52: ...3 L11 Sensor Module Scope Of Delivery Item Number Part Name 3 1 1 Sensor module with glued on sealing 3 2 1 L11 lens installed 3 3 1 Dome installed 3 4 1 Cable retainer with bayonet catch 3 5 1 Sealing plug blue small sensor modules USB inserted 3 6 1 Nut reinforced plastic Sensor module including status LEDs and microphone 3 1 3 4 3 5 3 2 3 6 3 3 ...

Страница 53: ...p border of image North Diam 50 mm 2 in Diam 50 mm 2 in 2 1 L11 sensor module housing LEDs Microphone LED defaults 1 Power on Error flashes 2 Recording flashes 30 3 mm 1 19 in 58 mm 2 28 in Diam 43 mm 1 7 in Diam 43 mm 1 7 in 15 3 mm 0 6 in 40 mm 1 6 in Sensor module Weight 91 g Extension Diam 43 mm 1 7 in Diam 43 mm 1 7 in L11 sensor module housing Markers for top Sensor cable connection Pressure...

Страница 54: ...om sales mobotix com 1 9 5 S14M FlexMount Scope Of Delivery www mobotix com go to Products S14 FlexMount and open the basket that contains the Product Configurator Use this to order the required parts in any of the available colors M 6 2 1 2 13 M 3 M 2 M 1 2 10 2 9 2 8 2 5 2 6 2 12 M 7 2 2 2 11 2 4 2 3 2 7 M 5 M 4 M 9 M 8 ...

Страница 55: ...rnet patch cable installed 2 10 1 Single wire plug white Ethernet installation cable microphone speaker MxBus 2 11 1 MicroSD card 4 GB installed 2 12 1 Rotary plug SD card blue installed 2 13 1 Ethernet patch cable 50 cm 20 in with seal Installation accessories Item Number Part Name M 1 4 Stainless steel washers diam 4 3 mm M 2 4 Dowels 6 mm M 3 4 Stainless steel wood screws 4x40 mm with PZ 2 driv...

Страница 56: ...BOTIX S14M provides the following external connections that can be accessed once the cover plugs are removed The external connections may only be used with the designated sealed MOBOTIX cables MX OPT CBL LAN 1 2 5 10 Ethernet patch cable and MX MX CBL_MU_STR 5 MiniUSB cable Pressure compensation element Lens with dome Base plate R L 115 mm 4 53 in 130 mm 5 12 in 2 1 LEDs MicroSD card Keys Triple c...

Страница 57: ...g cover are removed Before laying the Ethernet installation cable remove the bayonet catch and replace the Ethernet patch cable plug with either one of the additional plugs M 4 5 or the single wire plug 2 10 depending on the cable used Ethernet installation cable or MxBus microphone speaker MOBOTIX RJ45 or MxBus microphone speaker LSA terminals Ethernet installation cable Screw terminals MxBus mic...

Страница 58: ... 6 S14M FlexMount Dimensions Attaching The Camera Housing The drilling templates can be found at the end of the manual Always print or copy drilling templates in their original size M6 tapped slots Slots 115 mm 4 53 in 100 mm 3 94 in M6 Diam 5 5 mm 0 22 in 130 mm 5 12 in 47 5 mm 1 87 in 100 mm 3 94 in 110 mm 4 33 in 8 5 mm 0 33 in 13 5 mm 0 53 in ...

Страница 59: ...59 148 S14 FlexMount Scope Of Delivery MOBOTIX AG Security Vision Systems Made in Germany www mobotix com sales mobotix com 33 5 mm 1 32 in 39 5 mm 1 56 in 48 mm 1 89 in 5 mm 0 2 in ...

Страница 60: ...y colored wedge for the visible area and the other wedge for inserting on the rear 1 10 3 Connection Cable For Sensor Module Order no MX S14 OPT CBL 05 1 2 This cable which is up to 2 m 6 6 ft long connects one sensor module to the S14D The seals integrated into the cable combine with the bayonet catch on the sensor module and the S14D s sealed port to provide IP65 compliant weatherproofing The pa...

Страница 61: ...PoE injector according to the IEEE 802 3af standard with three connectors for network camera PoE device PC universal power supply unit with interchangeable adapter plugs and crossover function The NPA PoE Set connects and remotely supplies a S14 with power via an Ethernet cable up to 100 m 110 yd in length The blue adapter can also be connected to mobile voltage sources from 12 to 42 V DC by means...

Страница 62: ...pecified posi tion exceeding or not reaching a specified speed The MX GPS Box can be connected as an add on module to all MOBOTIX cameras with an MxBus interface The MX GPS Box has the same compact exterior housing as the MX Patch Box and the MX NPA Box IP65 protection class 30 C to 60 C 22 F to 120 F Note that this box should not be installed below other wall mounted units It should be installed ...

Страница 63: ... PW The Mx2wire system allows an Ethernet network with PoE to be set up via two wire cables which saves users from having to lay several hundred meters of Ethernet cable For example an existing two wire cable of an analog video camera can be reused to connect a high resolution and modern IP network camera Mx2wire is delivered in the standard wall outlet frame in different designs however it can al...

Страница 64: ...tact your MOBOTIX partner or MOBOTIX Support directly Contact information can be found at www mobotix com under Support 2 1 Determining The Installation Position The installation options indicated in both the following sections are examples of the most common applications for a S14 FlexMount Many other installation ideas for example with customized lens units can also be successfully implemented t...

Страница 65: ... even at distances of 5 m 16 4 ft and more from the camera Ceiling Mounted A single S14 sensor module can monitor an entire room right into each of the four corners 360 Panorama View thanks to its hemispheric lens The camera should ideally be positioned on the ceiling in the center of the room Rooms with a square floor area of up to approx 40 m generally allow the recognition of detail even at the...

Страница 66: ...ion has been clipped This is not the fault of the camera but intended behavior that aims at achieving the best possible utilization of the image sensor by the camera software Bearing this in mind it is advisable to turn the S14 sensor module in rectangular rooms so that the area marked with two arrows or the rotary plug in a S14M top border or North of displayed image is pointing towards one of th...

Страница 67: ...on an inside or outside wall The entire hemisphere of the room directly in front of the camera is then effectively monitored from the wall on the left of the camera to the wall on the right Corresponding fine tuning in the user interface software allows the displayed panorama image to be adjusted to different practical applications at any time 15 wedge for sen sor module S14M panorama one camera t...

Страница 68: ...e two arrows on the back of the sensor module housing S14D or the rounded side of the camera housing S14M are pointing towards the ceiling To install the sensor module on thicker walls or with the 15 wedge see next section the MOBOTIX offers an extension that is attached to the sensor module at the back and secured with a bayonet catch 1 50 m 5 ft 3 m 10 ft 2 50 to 3 50 m 8 2 to 11 5 ft 5 m 16 4 f...

Страница 69: ...the lens will return better results as the center of the lens is then focused more directly on the center of activity in the room optimal utilization of lens capabilities MOBOTIX therefore offers easy to install mounting accessories with a 15 tilt for the S14D sensor modules Size Of The Drilling Holes With Different Material Thicknesses Material thickness a Diam of drilling hole b mm in mm in 5 0 ...

Страница 70: ...ones are not used an additional microphone can also be connected directly to the camera Hemispheric Day And Night Camera S14D With Sensor Modules D11 And N11 The S14D is the first hemispheric dual camera for use in extremely variable lighting condi tions equipped with two L11 lenses each with a black white and color sensor It is impor tant in terms of mounting whether on a wall or ceiling that bot...

Страница 71: ...d a ceiling panel connector and lock It should be ensured when selecting installation sites that each of the sensor cables do not exceed 2 m 6 6 ft The theoretical maximum distance between the two sensor modules of a S14D where the base module is placed centrally is therefore 4 m 13 1 ft Caution If there is a risk of water collecting on the back of the sensor modules for example in outdoor areas o...

Страница 72: ...les next to one another but pointing in opposite direc tions in particularly long narrow rooms for example hotel corridors buses aircraft railroad cars etc delivers double hemispheric images of up to 6 megapixels that in terms of sharpness of detail significantly outperforms a single hemispheric camera with just one lens For these kinds of installations MOBOTIX will soon offer an appro priate moun...

Страница 73: ... MOBOTIX also offers the appropriate installation accessories for mounting the sensor module on thicker walls Longer tunnel holes through a wall can also be bridged using several extension pieces each approx 40 mm 1 6 in The maximum wall thickness is therefore only limited by the length of the sensor cable depending on the installation position of the base module which is in theory 2 m 6 6 ft Prod...

Страница 74: ...r and the area outside the entrance with stand up tables Floor Mounting Mounting sensor modules on the floor can also make sense for industrial uses or in areas where there are no people Examples of such uses are vehicle ramps where the vehicles can also be easily captured from below Indoors Outdoors Cable up to 2 m 6 6 ft in length Cable up to 2 m 6 6 ft in length S14D simultane ously monitors in...

Страница 75: ...34 in The S14M can simply be fixed behind the wall and leave only the lens visible This allows the following installation options Wall and ceiling mounting behind correspondingly thin or countersunk panels cover plates Individual mounting solutions such as installation in industrial equipment paneling air ducts mail boxes homemade mounts etc Note on Installation Frame This installation frame with ...

Страница 76: ...allation cable can also be fitted directly onto the integrated LSA cutting clamp MOBOTIX USB cable with MiniUSB connector This MOBOTIX cable provides the required impermeability even in adverse weather conditions and thereby prevents corrosion of the connectors for example on an external USB hard drive Sensor cable for the sensor modules S14D only The sensor modules are con nected to the S14D via ...

Страница 77: ...must be secured using appropriate cable plugs and by closing the corresponding locks to protect the inside of the housing against water and dust Removing MOBOTIX Cables And Plugs The corresponding lock must first be removed or released to remove one of the cables or plugs indicated above from the S14 Patch cable MiniUSB sensor cable 1 Turn the bayonet catch to the left 2 Remove the bayonet catch 3...

Страница 78: ...A PoE or MX NPA Box Multiple cameras with PoE products conforming to IEEE 802 3af PoE switch The maximum length of the network cable for power supply over an Ethernet cable is 100 m 110 yd Make sure that you only use switches or routers that support the 10 100 Mbps network interface of the camera We highly recommend using uninterruptible power supplies UPS to provide backup power If you are using ...

Страница 79: ...or MX NPA Box Then insert the MOBOTIX patch cable into the box and secure the cable using the bayonet catch More information on installing an MX Patch Box or MX NPA Box is available at www mobotix com under Products Accessories Functional Boxes Insert the MOBOTIX patch cable of the S14 into the network port for standard connections only permitted in indoor areas Connecting Peripheral Devices MxBus...

Страница 80: ...eft hand connector must be removed for this purpose The single wire plug or one of the other cable plugs M 4 5 is then pushed into the opening depending on the cable used The bayonet catch will no longer be used The cable used must be fixed to the base plate using one of the cable ties supplied M 8 to ensure that less strain is placed on the cable The individual cable wires must be fixed on the sc...

Страница 81: ...ays be fed into the camera through appropriate plugs before mounting If the single wire plug is used one wire must be pushed through a hole in the plug Do not mix up the polarity of the cables during installa tion Select a consistent cable color for in the entire MxBus system for example red blue 2 2 8 External Audio Support Microphone Speaker The camera connector for an external microphone and an...

Страница 82: ... used If you are using a new MicroSD card it needs to be formatted first see Section 3 4 2 Formatting The MicroSD Card 4 Attach the rotary plug Insert the rotary plug as shown and screw it tight using a coin approximately two turns the plug slot is pointing forwards 2 2 10 Tools Required For Installation Please make sure that all the camera components are included in the original packag ing see Se...

Страница 83: ...X patch cable The network connector has been guided either with an MX Patch Box an MX NPA Box or a standard network port only permitted in indoor areas into the vicinity of the mounting position of the camera Connection with installation cable If a network installation cable is used instead it may not conduct any voltage and may not be connected to the network Even surface Make sure before attachi...

Страница 84: ...the base module of a S14D can be installed quickly 1 If necessary mark the drill holes at the intended mounting position drill the holes for the base plate and hammer in the 6 mm dowels supplied 2 If this has not been done already insert the cable tie needed to ensure that less strain is placed on the connection cable into the slot provided below in the base plate without closing it 3 Screw on the...

Страница 85: ... end of the sensor cable max distance to the plug 10 cm 4 in as shown in the figure 4 If extensions are required at least one in sensor mod ule L11 and 15 wedge they should now be pushed over the sensor cable and joined to the sensor module or extensions that have already been mounted using the bayonet catch see Section 2 3 3 Plugging In And Lifting Off Extensions 5 If a 15 wedge is used the visib...

Страница 86: ...nector and the sensor cable of the second sensor module to the Cam2 connector of the S14D pull the blue triple cable retainer up remove the plug insert the sensor cable and push the cable retainer down again 2 3 3 Plugging In And Lifting Off Extensions The extensions are fixed onto the sensor modules or other extensions with the help of a bayonet catch Attaching Extensions 1 Turn the sensor module...

Страница 87: ...net catch and may result in the nuts not being properly attached Removing Extensions Proceed as follows to loosen and undo an extension lock 1 Push the extension towards the sensor module to unlock it 2 Turn the extension in an anti clockwise direction viewed from the back to open the bayonet catch 3 Remove the extension 2 3 4 Connecting Network Cables And Additional S14D Cables Once you have moun...

Страница 88: ...one speaker before mounting the camera as described in Section 2 5 Network And Power Connection Additional Cables 2 4 2 Attaching The S14M Camera Housing Use the drilling template supplied at the end of this manual to mark the position of the drilling holes for the camera Make sure that it is not scaled down when printing or copying the drilling template Caution Make sure the camera is mounted on ...

Страница 89: ...e cables Attachment Behind Screens Walls or Ceiling Elements This type of mounting can be completed using various attachment elements Bonded nuts with stud bolts nuts and washers as shown in the illustration Thicker materials greater than 6 4 mm 0 25 in need to be machined accordingly in order to accommodate the camera housing They can then be attached using anchor nuts or screw sockets as well as...

Страница 90: ...e into the camera and secure the cable using the bayonet catch Connecting The Patch Cable To An MX Patch Box MX NPA Box or Standard Network Port First remove the blue bayonet catch and the blue sealing plug in the right hand connector on the box to establish the network connection to an MX Patch Box or MX NPA Box Then insert the MOBOTIX patch cable into the box and secure the cable using the bayon...

Страница 91: ... 0 2 to 0 28 in remove 35 mm 1 38 in of insulation and separate into indi vidual twisted wire pairs including 15 mm 0 6 in sheathing Wind the shield mesh around the sheath to a width of 10 mm 0 4 in so that it can be fixed on the contact surface later using the cable tie 4 Secure the cable Push the plug out and insert the installa tion cable with single wire plug 5 7 mm 0 2 to 0 28 in into the ope...

Страница 92: ...ordance with the EIA TIA 568A or B standard used see printed color coding above the clamp see red arrow in the illustration below Caution Make sure that all cable end offcuts are removed from inside the camera If not this could lead to short circuits Hint Hold the cable ends firm before cutting them with the LSA tool If additional cables are required inside the housing MxBus microphone speaker the...

Страница 93: ...ne speaker 1 Replace any single wire plugs with appropriate cable plugs M 4 5 for additional cables Additional cables MxBus microphone speaker 1 Remove the bayonet catch and the patch cable and push the single wire plug or appropriate cable plug M 4 5 in so that the edges protrude inside The bayonet catch will no longer be used 2 Push the single wire plug with the individual wires through or push ...

Страница 94: ...actory default Normal mode max 1 W for peripheral devices 3 6 49 W 12 95 W Full power mode max 4 W for peripheral devices e g MX GPS Box on MxBus The MOBOTIX factory default is PoE class 2 This default setting is usually fine and noth ing needs to be changed However the PoE power class must be changed in the browser if the higher power class 3 is required for your application 1 Select Admin Menu N...

Страница 95: ...ch router or the Ethernet port 3 Plug the RJ45 connector of the power supply unit into the PC Power connector of the PoE adapter The IP addresses in the diagram are shown only as an example For the S14 you should use the blue MX NPA PoE Set or the MX NPA Box previous MOBOTIX network power acces sories such as the NPA Set Power Box and Power Rack MX NPA Set MX NPR 4 and MX NPR8 20 are not suitable ...

Страница 96: ...e camera to the Ethernet connector of the PoE switch router The switch router must support the PoE standards IEEE 802 3af or IEEE 802 3at The IP addresses in the diagram are shown only as an example PoE adapter MX NPA PoE Power supply unit PC 10 8 0 11 255 0 0 0 LAN Power PC Power Camera RJ45 RJ45 RJ45 Camera 10 8 0 99 The PoE adapter replaces the crossover cable when directly connect ing to a com...

Страница 97: ... backup operating system Waiting for key pressed Both LEDs light up for four seconds If you press the R or L key of the camera during this time the camera will execute the corresponding function see Section 3 2 6 Starting The Camera With The Factory IP Address and Section 3 2 7 Starting The Camera With An Automatic IP Address DHCP Ready Once the camera software has been started the green LED is on...

Страница 98: ... browser see Section 3 2 1 Manually Setting Up The Network Parameters In A Browser and below Automatically with MxControlCenter MxEasy see Section 3 2 3 and Section 3 2 4 or via DHCP see Section 3 2 7 Starting The Camera With An Automatic IP Address DHCP 3 Configure the camera using the web based user interface MxControlCenter or MxEasy Every MOBOTIX camera comes preconfigured with a static IP add...

Страница 99: ...ant Settings In The Browser Next click on the Admin Menu button to open the camera s Quick Installation in the browser s user interface This is where you can configure the desired network parameters of the camera Once you have com pleted the Quick Installation you can connect the camera with its new network parameters to the desired network Advantages The camera does not need to be physically acce...

Страница 100: ...e network parameters of MOBOTIX cameras that are not operating on the same IP address range as the computer Advantages You can connect the camera directly to the target network The camera does not need to be physically accessible that is it may already be mounted The camera can be configured to automatically receive an IP address optional The network parameters can be manually set optional You do ...

Страница 101: ... booted using DHCP see Section 3 2 7 Starting The Camera With An Automatic IP Address DHCP The IP address automatically assigned by the DHCP server will be announced via the camera speaker as soon as the camera has booted successfully Advantages You can connect the camera directly to the target network Network parameters are automatically assigned No additional software is required You do not need...

Страница 102: ... 0 99 in the following exam ples Replace this IP address with the IP address of your camera You will find the IP address of your camera on a small sticker on the camera Make sure that the IP addresses used in the following examples are not already being used by other devices in the network 3 2 1 Manually Setting Up The Network Parameters In A Browser You need a computer that is using a 10 x x x IP...

Страница 103: ...ing Enter displays the user interface of the MOBOTIX camera see also Section 3 2 2 First Images And The Most Important Settings In The Browser 2 Click on the Admin Menu softbutton in the user interface of the MOBOTIX camera The Quick Installation starts automatically once the admin user has logged on Note The Quick Installation can also be executed at a later stage by opening Admin Menu Network Se...

Страница 104: ... any other graphical browser with activated JavaScript is suitable It does not matter which operating system is used After entering the camera s IP address in the browser s address bar you will see the live view of the MOBOTIX camera with its user interface controls such as softbuttons buttons for the different camera screens pull down menus Quick Controls icons for accessing the online help and t...

Страница 105: ...en displays several cameras with live or recorded images MultiView allows you to view several cameras via a proxy camera especially useful if you want to access your cameras from outside of the network with reduced bandwidth and the PDA mode provides a special screen for mobile devices Note For more information on camera screens see the section Camera Screens In The Browser in the Camera Software ...

Страница 106: ...r versions will be removed automati cally and the designated shortcuts are created during the installation process Desktop Start Menu etc Caution MxControlCenter will automatically attempt to find all MOBOTIX cameras in the physically connected network that is even a MOBOTIX camera with a factory IP address of 10 x x x Make sure that the firewall settings on your computer are low enough so that Mx...

Страница 107: ...earches for MOBOTIX cameras in the local network when you launch the program for the first time Select Video Source Add from the menu to perform a camera search at a later time If your MOBOTIX camera is properly connected it should appear together with the exist ing video sources in the following list Note Video sources in this context not only refer to MOBOTIX cameras but also to third party IP c...

Страница 108: ... image is automatically displayed in the preview window when a camera is selected to help you identify the cameras For cameras marked with Different subnet or if you want to add additional video sources follow the instructions in the following sections You can also display the selected cameras directly in a layout For more information see Creating A New Layout further down Reconfiguring Cameras In...

Страница 109: ...rrect network settings even after they have been rebooted Click on OK to close the dialog box Wait until MxControlCenter has changed the network settings and rebooted the cameras The status of the reconfigured camera changes from Different subnet to OK Defining Additional Video Sources In addition to the MOBOTIX cameras that are found automatically you can also manually add video sources to the li...

Страница 110: ...nfiguration at that time It is also possible to open the Configure selected cameras dialog box using the shortcut menu in order to change the camera network parameters Creating A New Layout Select the camera or other video sources that you would like to display in a layout a view with a group of selected cameras in the Add video sources dialog box and then click on Add selected video sources The C...

Страница 111: ...d displays all cameras found in a list The camera list will be updated automatically as soon as new MOBOTIX cameras are connected to or removed from the network MxEasy also automatically monitors and displays the operating status of all cameras Cameras that are not on the same subnet as the computer will get a differently colored symbol than the cameras that are on the same subnet Likewise the cam...

Страница 112: ...k on Continue After a security prompt a new dialog box for configuring the selected camera is displayed If your computer automatically obtains its IP address from a DHCP server then this is certainly the best choice for that specific camera and most likely for all other cameras that have been found in a different subnet Get IP address automatically option If you have assigned a static IP address t...

Страница 113: ...egration and complete the remaining dialog boxes of the MxEasy Assistant until the main window appears If one of the integrated cameras includes a S14D the MxEasy Assistant opens an additional page where you can specify the mounting positions Ceiling Wall Floor and display modes Panorama Surround etc of the individual sensor modules After you are done with the MxEasy Assistant the application s ma...

Страница 114: ...time 3 Press the L key within the next four seconds and hold it down if you need to try again go back to Step 1 4 Only release the L key once the camera emits a single sound boing Notes If you use the camera s L key to load the factory network configuration this configu ration is not automatically saved in the camera s flash memory When the camera is next rebooted without using the L key the last ...

Страница 115: ...h LEDs light up simultaneously for the first time 3 Press the R key within the next four seconds and hold it down if you need to try again go back to Step 1 4 Only release the R key once the camera emits a double sound boing boing Notes Starting the camera with an automatic IP address DHCP is only temporary The network configuration of the camera can be permanently set to DHCP under Admin Menu Eth...

Страница 116: ...Z function of the S14 can be controlled in the browser using the mouse This posi tion becomes the new image center by clicking on any position on the image displayed on the monitor The image moves accordingly and the image distortion is automatically corrected The scroll wheel can be used to control the zoom function This functionality is disabled in the default settings of the camera and must the...

Страница 117: ... Switch to Browser in the Quick Control Under Browser select the option ActiveX in the field to the right The USB joystick can then be used until the browser is closed To store the setting permanently ActiveX must be activated in the Admin Menu To do so use Language and Start Page in the Admin Menu Under the page options select the ActiveX operating mode Store the settings permanently in the camer...

Страница 118: ...he main advantage of full image recording lies in the special functionality of the D14D in that it can always ensure the availability of a maximum size full image for later searches despite vPTZ actions carried out on the live image The mechanical limitations of motor driven PTZ cameras mean that they simply cannot provide this unique advantage to the user Notes Post event search in the full image...

Страница 119: ...ty Vision Systems Made in Germany www mobotix com sales mobotix com Activate Deactivate Full Image Recording In The Browser To configure this feature open the Setup Menu Event Control Recording dialog box and activate or deactivate the Full Image Recording option ...

Страница 120: ...ge the available display modes and configuration possibilities by using the MOBOTIX S14D with different sensor modules Because of this a S14D automatically detects which sensor modules are installed and proceeds as follows When the camera is started for the first time it detects the connected sensor modules and captures their data focal length day or night version If only one sensor module is conn...

Страница 121: ...entation of the camera or sensor module is from top to bottom and for Floor the camera or sensor module s orientation is from bottom to top When you are setting up a S14D with two sensor modules specify their mounting positions separately in the Installation right and Installation left Quick Control fields for the right and left sensor modules i e camera images respectively As a result you will ge...

Страница 122: ...ay differ from the desired image section due to the installation position or any accessories in use for example However it is not necessary to physically move the camera as in this case the browser alone can be used to adjust the visible panorama image by zooming panning and tilting Tilted vertical lines may also be optically straightened to the image edges using the panorama correction function T...

Страница 123: ...Screen Control appears 4 Using the OnScreen Control visible in the live camera image you can now change the displayed live camera image as desired panning tilting zooming rotating and panorama correction see fig on the right When doing so the vPTZ function using the mouse or joystick is deactivated In case of a S14D with two sensor modules click on the corresponding camera image right left to edit...

Страница 124: ...the left and or right of the center point The same applies for every area The further away that you click from an area s center point the greater the change triggered To reset an area click on its center point again During panorama correction clicking between the two trapezoid symbols straightens the left or right tilting lines which are best visible at the edges of the image section Image tilt co...

Страница 125: ...of sight or the focus of the camera or sensor module It serves as a reference for the North direction in the Surround and Double Panorama display modes the Ceiling option was already selected in the Installation Type Quick Control 1 In the case of a double image click on the corresponding sensor module camera image and select the Normal option from the Display Mode Quick Control 2 Rotate the live ...

Страница 126: ... North option 4 Store the desired North direction permanently by first activating the checkbox and then clicking on Yes 5 You have now set the North direction for the Surround and Double Panorama display modes In the next step you can set these views as the standard view for the camera live image Caution No OnScreen Control is available in Double Panorama mode East South North West ...

Страница 127: ...ew and close lock again Camera Images And Subviews Of Camera Images The S14D s ability to operate multiple sensor modules means that in double image display the live image s camera images left right can be used for differing display modes Depending on the display mode selected for each camera image this may be divided into subviews When you click inside one of the subviews this area is highlighted...

Страница 128: ...r Configuration dialog box in the following cases Swapping the displayed camera images You wish to display the left camera image on the right and vice versa without having to replug the sensor module cables on the camera itself Replacement of sensor modules In this case the S14D detects after startup that the sensor modules have been replaced and indicates this through an alert super imposed on th...

Страница 129: ...Section 2 2 8 External Audio Support Microphone Speaker Microphones for the S14D With this camera you can either use an external microphone or the connected sensor modules built in microphones or just one of these If the microphones of both sensor mod ules are used the camera records the sound of both microphones to a single audio track Microphone for the S14M You have to use an external microphon...

Страница 130: ...OBOTIX cameras constantly monitor activated flash storage devices MOBOTIX has developed a technology to test the wear of the flash device by logging the number of write delete cycles patent pending The flash memory wear is automatically displayed in the status bar in the live camera image but it can also be viewed at any time in the Admin Menu Camera Status dialog box Conservative Memory Usage Tha...

Страница 131: ...B Time for one full cycle 12 hours 4 hours 14 4 hours 9 2 hours 4 4 hours Caution The MicroSD card s service life depends on production quality and frequency of use Set the type of recording event controlled or continuous recording frame rate resolution according to your specific requirements We recommend changing the pre installed high quality 4 GB MicroSD card once a year if you have it constant...

Страница 132: ...r name and the password of a user of the admins group and click on OK to confirm The MOBOTIX camera now starts format ting the card It takes 5 to 12 minutes to format an 8 GB MicroSD card if the Secure deletion mode slow option is disabled If Secure deletion mode slow is enabled this may take anywhere between 3 and 14 hours Once the formatting has been completed you can activate the MicroSD card f...

Страница 133: ... If not you must activate the recording see below Activating The Recording If the FR REC symbols are not visible in the live image after rebooting you need to activate the recording using one of the following methods In the web browser Automatic activation by clicking on the Arm Record softbut ton Confirm this in the Easy Dialog by clicking on the Yes button In the web browser Manual activation vi...

Страница 134: ...enter If the recordings stored on the MicroSD card were encrypted you need to enter the password used for the encryption before you can access the data If this is the case both MxControlCenter and MxEasy will provide a dialog box for this purpose Caution When using the MicroSD card from one MOBOTIX camera in another MOBOTIX camera you need to make sure that the time on the original camera is in sy...

Страница 135: ... MOBOTIX camera Once a MicroSD card recording has been activated requires a reboot the new MOBOTIX camera automatically synchro nizes with the card and resumes recording No data is lost in this process Make sure that you deactivate MicroSD card recording before removing the card and then reboot the MOBOTIX camera If the MicroSD card s contents are encrypted you need to enter the same password in t...

Страница 136: ...The settings are stored in the camera s flash memory This section contains an overview of the general browser settings of the MOBOTIX camera as well as further configuration options The Software Camera Manual Part 2 contains more detailed descriptions of the software features 3 5 2 General Browser Settings Run the Quick Installation After booting the MOBOTIX camera for the first time accessing the...

Страница 137: ...reboot Make sure that you deactivate the automatic reboot if this is not desired Admin Menu Time Tasks Software Camera Manual Part 2 Section 7 9 2 Optimize the image settings The factory image settings of MOBOTIX cameras deliver excellentimagesformostapplicationscenariosandshouldnotbechanged Ifyoudowish to make changes your changes should be minor and gradual You should however set animageprograma...

Страница 138: ...lacing a phone call uploading an alarm image to an FTP server switching a signal output line of the camera for example for switching on the lights opening a door For the settings see Setup Menu Action Group Overview The actions to be per formed are defined and used in these action groups in the form of action profiles The different action profiles can also be defined in the following areas Admin M...

Страница 139: ...ge when you click on Close you will be asked to store the complete configuration in the camera s permanent memory or in the Admin Menu Admin Menu Store current configuration into flash memory The Configuration section of the Administration Menu provides more functions for stor ing copying and managing camera settings For more information on this topic see Chapter 5 Basic Camera Configuration in th...

Страница 140: ... the user name and password exactly as shown above Note that all entries are case sensitive Caution Make sure that you store information on user names and passwords in a secure place If you lose the administrator password and cannot access the administration menu the password can only be reset at the factory This service is subject to a fee 3 6 3 Permanently Deactivating The Microphone Deactivatin...

Страница 141: ...es images as soon as the motion detection window detects movements 3 6 7 Deactivate Text And Logo Options As camera arming is deactivated in its default configuration see preceding section the MOBOTIX camera displays only the text WWW MOBOTIX COM the time stamp and the MOBOTIX logo at the top of the image Once the camera arming has been activated the text at the bottom of the live image event acti...

Страница 142: ...t abrasive particles Make sure you instruct cleaning personnel on how to clean the camera 3 6 11 Safety Warnings Electrical surges MOBOTIX cameras are protected against the effects of small electrical surges by a range of measures These measures however cannot prevent the camera from being damaged when stronger electrical surges occur Particular care should be taken when installing the camera outs...

Страница 143: ...help of the camera s browser interface Click on the icon to open the camera s online help Furthermore detailed information on the camera and its current configuration is displayed in the Camera Status dialog box Click on the icon to open the relevant page 3 6 13 RoHS Declaration The products of MOBOTIX AG are in full compliance with Art 5 of the German Electrical and Electronic Equipment Act and t...

Страница 144: ...isclaimer MOBOTIX AG does not assume any liability for damage that is the result of improper use of its products or failure to comply with the operating manuals or the applicable rules and regu lations Our General Terms and Conditions apply You can download the current version at www mobotix com using the COS link at the bottom of each page ...

Страница 145: ...145 148 MOBOTIX AG Security Vision Systems Made in Germany www mobotix com sales mobotix com Notes ...

Страница 146: ...curity Vision Systems Made in Germany www mobotix com sales mobotix com S14 FlexMount Camera Original declaration of conformity www mobotix com Support Media Library Certificates O r i g i n a l d e c l a r a t i o n o f c o n f o r m i t y w w w m o b o t i x c o m ...

Страница 147: ...nufacturer Executive Board MOBOTIX AG Dr Ralf Hinkel Kaiserstrasse 67722 Langmeil Germany Registration Office Kaiserslautern Local Court Germany Registration Number HRB 3724 Tel 49 6302 9816 103 Tax Code 19 650 0812 1 Fax 49 6302 9816 190 Tax Office Kaiserslautern Germany http www mobotix com VAT ID sales mobotix com DE202203501 You can find the latest version of this document at www mobotix com u...

Страница 148: ...6 190 sales mobotix com HiRes 6 Megapixel 4096 x 1536 Software zoom Skyline Format free Each image format freely definable 30 Frames s VGA 640 x 480 30 F s Mega Virtual PTZ Digital pan tilt zoom Backlight Safe using CMOS without mechanical iris Internal DVR Internal via Flash external via Network Win Lin Mac Recording via Network on PC up to 1 Terabyte Microphone speaker Audio bi directional via I...

Страница 149: ...Drilling Template S14D and S14M Scale 1 1 The HiRes Video Company Diam 33 6 mm 1 32 in 130 mm 5 12 in 110 mm 4 33 in 100 mm 3 94 in 8 5 mm 0 33 in 115 mm 4 53 in 100 mm 3 94 in 100 mm 3 94 in Slot holes 10 5 mm 0 41 in diam 5 5 mm 0 22 in Tap holes M6 Drill hole for lens diam 33 6 mm 1 32 in S14M only ...

Отзывы: