background image

Four-Channel Digital Video Recorder 

67 

Days with recorded video display on the calendar with white numbers.  Highlight a day using arrow 
buttons and press the   button to select it. 


A time bar will display at the bottom of the calendar.  Hours in which video was recorded will be 
highlighted with blue.  Highlight the time bar and select the time using the arrow buttons. 


NOTE:  The time bar is in one-hour segments.  If a segment is highlighted, it means that some 
video was recorded during that hour.  However, it does NOT mean video was recorded for the 
entire hour. 


Once you have set the date and time you want to search, highlight the 

GO

 button and press the   

button.  The selected date and time will display.  The 

arrow buttons

 can now be used to review the 

surrounding video. 


Event Search 


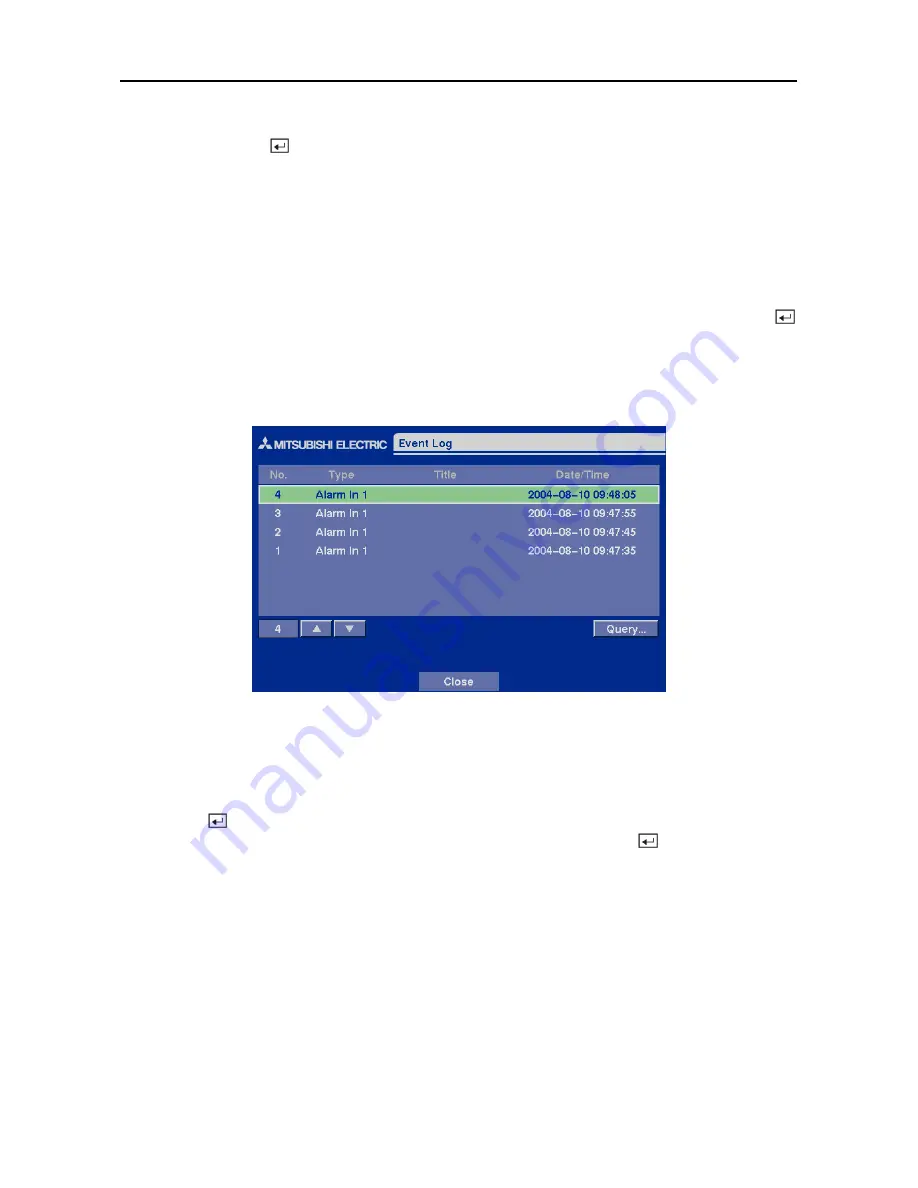
Figure 87 — Event Log screen. 

 
The DVR maintains a log of each time the Alarm Input port is activated.  The 

Event Log

 screen 

displays this list.  Highlight the event for which you would like to see video. 


Pressing the 

 button will extract the event video and display the first image of the event.  Pressing 

the arrow button will start playing the “event” video segment.  Pressing the   button again pauses 
the video, and pressing the button again returns to live monitoring. 


You can also narrow your event search by selecting the 

Query…

 button and setting up the new 

search condition. 
 

Содержание DX-TL4E

Страница 1: ......

Страница 2: ......

Страница 3: ...s or locations with salt air environment THIS EQUIPMENT DOES NOT PROVIDE CONNECTION FOR USED WITH OUTDOOR OR CABLE DISTRIBUTION SYSTEMS NO OBJECTS FILLED WITH LIQUIDS SUCH AS VASES SHALL BE PLACED ON THE APPARATUS DO NOT PLACE HEAVY OBJECT ON THIS UNIT DO NOT STEP ONTO THIS UNIT The unit may drop or fall by losing its balance It may cause injury or failure of the unit WARNING TO PREVENT FIRE OR SH...

Страница 4: ...any purpose related to human lives When this unit cannot recognize the external device which is being used for recording due to the power failure decreased voltage or other failures the recording point may be moved to the internal HDD of this unit or the other external HDD To prevent occurrence of such problem it is recommended to use uninterruptible power supply If the power plug is disconnected ...

Страница 5: ... required to take adequate measures DISCLAIMER In any event Mitsubishi assumes no responsibility or reliability for the following 1 Disassembly repair or alteration of this unit by user or installer 2 Failure or breakdown in or damage to this unit resulting from misuse or careless handling by user or installer 3 Inconvenience or damages arising out of inability to display or record pictures due to...

Страница 6: ......

Страница 7: ...ting the RGB Monitor 5 Connecting Alarms 5 AI 1 to 4 Alarm In 6 GND Ground 6 ARI Alarm Reset In 6 Alarm Out 6 Connecting to the Network Port 6 Connecting to the RS 232C Port 7 Factory Reset 7 Connecting to the USB Port 8 Connecting the Power Cord 8 Chapter 3 Configuration 9 Front Panel Controls 9 POWER LED 9 REC LED 9 ALARM LED 9 Panic Button 10 Camera Buttons 1 to 4 10 Quad Sequence Button 10 PTZ...

Страница 8: ...Action Alarm Out Setup Screen 36 Alarm In Event Action Notify Setup Screen 36 Motion Detector Event Action Record Setup Screen 37 Motion Detector Event Action Alarm Out Setup Screen 38 Motion Detector Event Action Notify Setup Screen 38 Text In Event Action Record Setup Screen 39 Text In Event Action Alarm Out Setup Screen 40 Text In Event Action Notify Setup Screen 40 Video Loss Event Action Reco...

Страница 9: ...uad Sequence Button 64 Digital Zoom Playback Mode 64 Searching Video 65 Date Time Search 66 Calendar Search 66 Event Search 67 Text In Search 69 Appendix A USB Hard Disk Drive Preparation 71 Preparing the USB IDE hard disk drive in Windows 2000 71 Preparing the USB IDE hard disk drive in Windows 98 71 Appendix B Text In Query Examples 73 Query Example I 73 Query Example II 74 Appendix C Troublesho...

Страница 10: ...yboard 15 Figure 24 Date Time setup screen 16 Figure 25 Holiday Setup screen 17 Figure 26 Time Sync screen 17 Figure 27 System Check Config screen 19 Figure 28 System Check Alarm Out Notify screen 20 Figure 29 Storage screen 20 Figure 30 S M A R T Setup screen 21 Figure 31 System Log screen 22 Figure 32 Device menu screen 23 Figure 33 Camera setup screen 23 Figure 34 PTZ Device list 24 Figure 35 A...

Страница 11: ...N Manual Setup screen 47 Figure 65 Port Number Setup screen 48 Figure 66 LAN DHCP Setup screen 49 Figure 67 LAN ADSL Setup screen 49 Figure 68 Modem Setup screen 50 Figure 69 DVRNS Setup screen 51 Figure 70 Callback Center LAN Setup screen 52 Figure 71 Callback Center Modem Setup screen 53 Figure 72 Password setup screen 54 Figure 73 Config screen 55 Figure 74 Clip Copy screen 56 Figure 75 Disk Pa...

Страница 12: ...User s Manual ...

Страница 13: ...ngines Date Time Calendar Event y Records up to 100 Images per Second y Loop Through Video Connectors y Continuous Recording in Disk Overwrite Mode y Continues Recording while Archiving Transmitting to Remote Site and during Playback y User friendly Graphical User Interface GUI Menu System y Various Record Modes Time Event Pre event and Panic y 1 Ch Audio Recording and Playback y Alarm Connections...

Страница 14: ...an freeze frames fast forward fast reverse slow forward and slow reverse without image streaking or tearing Digital video can be indexed by time or events and you can instantly view video after selecting the time or event Your DVR can be set up for event or time lapse recording You can define times to record and the schedule can change for different days of the week and user defined holidays The D...

Страница 15: ...peration Software CD and User s Manual y Infrared Remote Control Required Installation Tools No special tools are required to install the DVR Refer to the installation manuals for the other items that make up part of your system Figure 2 DVR rear panel Connecting the Video Source Figure 3 Video input connectors Connect the coaxial cables from the video sources to the BNC Video In connectors ...

Страница 16: ...esponsibility to determine if local laws and regulations permit recording audio Figure 5 Audio In and Out connectors Your DVR can record audio Connect the audio source to Audio In Connect Audio Out to your amplifier NOTE The audio input is from an amplified source The DVR does not have amplified audio output so you will need a speaker with an amplifier Setting Unit for CVBS or VGA output Figure 6 ...

Страница 17: ...Monitor Figure 8 VGA connector A VGA port is provided for RGB monitor output Connect the RGB monitor to the VGA connector if required Connect an RGB cable with a DB 15 male connector which is usually less than 10 feet to the DVR connector NOTE For RGB monitor output set the CVBS VGA selector switch to the VGA Connecting Alarms Figure 9 Alarm Input connector strips NOTE To make connections on the A...

Страница 18: ...ctors Alarm Out Figure 10 Alarm Output connector strips The DVR can activate external devices such as buzzers or lights Mechanical or electrical switches can be wired to the NC Normally Closed and C Common connectors or NO Normally Open and C Common connectors Permitted current is up to 0 5 A for 125 VAC 1 A for 30 VDC See Chapter 3 Configuration for configuring alarm output Connecting to the Netw...

Страница 19: ...sions that you want to return all the settings to the original factory settings CAUTION When using the Factory Reset you will lose any setting you have made If you want to use the same DVR name registered on the DVRNS server after initializing the system using the factory reset you need to contact the DVRNS server manager Please record and save the help desk information before factory reset To res...

Страница 20: ...an external USB IDE hard disk drive USB CD RW drive or USB flash drive Connecting the Power Cord Figure 15 Power cord connector Connect the power cord to the DVR and then to the wall outlet WARNING ROUTE POWER CORDS SO THAT THEY ARE NOT A TRIPPING HAZARD MAKE CERTAIN THE POWER CORD WILL NOT BE PINCHED OR ABRADED BY FURNITURE DO NOT INSTALL POWER CORDS UNDER RUGS OR CARPET THE POWER CORD HAS A GROU...

Страница 21: ...ded Pressing any keys on the front panel or remote control resets alarm output including the internal buzzer when the alarm is activated However when you are in the menu or PTZ mode you have to exit the menu or PTZ mode first to reset alarm output NOTE The sensor for the infrared remote control is just to the left of the PANIC button Make certain that nothing blocks the sensor or the remote contro...

Страница 22: ...on enters the digital zoom mode and pressing the button again in the digital zoom mode returns to the live monitoring mode When a PTZ device is not installed pressing the PTZ button enters the digital zoom mode directly Pressing the PTZ button in the playback mode enters the digital zoom playback mode NOTE When the DVR is in the PTZ mode a white line will display around the image NOTE In the digit...

Страница 23: ...ccess the Main Menu Pressing the button again closes the current menu or setup dialog box It is also used to display the search menu in the playback mode and load the PTZ Menu in the PTZ mode Connecting the Infrared Remote Control Figure 17 Infrared Remote Control If a DVR unit ID is set to 0 the infrared remote control will control that DVR without any additional operations Refer to the System In...

Страница 24: ...og boxes Press the MENU button on the front panel or remote control to enter the setup screens The Admin Password screen appears Figure 18 Admin Password screen Enter the password by pressing the appropriate combination of camera number buttons and then the button The factory default password is 4321 There are two Setup screens Quick Setup and Normal Setup The factory default is the Quick Setup sc...

Страница 25: ...if local laws and regulations permit recording audio Highlight the box beside Sequence Dwell Time and select from 3 to 60 seconds for the camera sequence dwell time Selecting System Information enters a screen where you can set up system information Selecting Storage enters a screen where you can check the storage status Selecting Camera enters a screen where you can set up camera information Sele...

Страница 26: ...screen gives you access to all the DVR s setup screens System Information Highlight System Information and press the button The System Information screen appears Figure 21 System Information screen In the System Information screen you can name the site location assign a unit ID number and select the language to use Highlight Change and press the button The System Information Change screen appears ...

Страница 27: ...ss the button Change the number by highlighting it and using the arrow buttons to increase and decrease the number The Unit ID number is used to identify the unit when it is networked with other DVRs You cannot use the same number for two or more DVRs that are within the same network NOTE When the unit ID is set to 0 the infrared remote control will control that DVR without any additional operatio...

Страница 28: ...ust the numbers Once you have the correct time press the button NOTE The clock will not start running until you have restarted the unit so you may wish to set the time last Highlight the box beside Time Zone and press the button Select the time zone you are in from the list and press the button Highlight the box beside Daylight Saving Time and press the button Pressing the button toggles between O...

Страница 29: ... servers that are available in most time zones and countries or between the DVR and another DVR Figure 26 Time Sync screen Highlight the box beside Automatic Time Sync and press the button This toggles between On and Off Highlight the box beside SNTP Server and press the button Change the numbers by highlighting them and using the Up and Down arrow buttons to increase or decrease the number value ...

Страница 30: ...e minute the DVR might not synchronize the time to prevent any unexpected loss of recorded video data If you want to synchronize the time manually select Now Highlight the box beside Run as Server and press the button Pressing the button toggles between On and Off When it is On the DVR you are setting up will run as a time server You can save your changes by highlighting OK and pressing the button...

Страница 31: ... if there is no alarm during the designated time Highlight the box under the Interval heading and press the button A slide bar appears allowing you to set the check interval from 1 Hour to 30 Days The Status field displays Good when the DVR continues operating according to the user s settings without any problems there was recording or any alarm occurred during the designated time The Status field...

Страница 32: ... Out cannot be set to Check Point System Highlight the box under Notify and press the button This toggles between On and Off When it is On the DVR notifies the remote site of its System Good and Record Bad Storage Screen Highlight Storage in the Main menu and press the button The Storage setup screen appears Figure 29 Storage screen The Type field displays the type and capacity of storage device T...

Страница 33: ...s the button to select from Beep the alarm output terminal that you want to associate with the storage problem event and or Notify Highlight the S M A R T Setup and press the button The S M A R T Setup screen appears NOTE If no hard disk drives are installed in the DVR the S M A R T Setup button will be disabled Figure 30 S M A R T Setup screen Your DVR shows the conditions of Hard Disk Drives whe...

Страница 34: ...e System Log screen displays a record of various events logged by the DVR The list shows the dates and times the system was turned ON and OFF system was restarted recording was started or stopped playback was started or stopped setup changes were made and data banks were cleared The events are listed from the most recent to the oldest You can scroll through the list a page at a time by selecting t...

Страница 35: ...he Camera setup screen appears Figure 33 Camera setup screen You can turn on or off each camera and also hide the video of the camera number by highlighting the camera Setup heading and pressing the button Select the On Off Covert 1 or Covert 2 from a drop down list NOTE When selecting Covert 1 the DVR displays the camera title and status icons on the covert video When selecting Covert 2 the DVR d...

Страница 36: ...VR following the camera manufacturer s instructions Figure 34 PTZ Device list NOTE When selecting the PTZ device you wish to control by selecting it from the menu the displays on the PTZ camera screen You can assign IDs to each camera by highlighting the ID heading and pressing the button Change the number by highlighting it and using the arrow buttons to increase and decrease the number The PTZ I...

Страница 37: ...tor Figure 36 Motion Detector setup screen Your DVR has built in video motion detector Video motion detector can be turned On or Off for each camera Highlighting the box under the Sensitivity heading allows you to adjust the DVR s sensitivity to motion There are five settings with 1 being the least sensitive and 5 being the most sensitive You can define the area of the image where you want to dete...

Страница 38: ...n the Main menu and press the button The Text In setup screen appears Figure 38 Text In setup screen NOTE If networking is configured by the external modem and RS 232 port is set to PTZ or Remote Control the text in cannot be set up Set the DVR for LAN connections and set up Text In for RS 232C port NOTE Text in data will not be recorded during clip copy You can set the DVR to display the text in ...

Страница 39: ...rom the text in device you will want to turn On Any Character Highlight Any Character and press the button to toggle between On and Off NOTE If Any Character is turned On you will not be able to enter any text in the Start String box Highlight the box beside Transaction End and press the button Use the virtual keyboard to enter the Transaction End string Refer to the device manufacturer s document...

Страница 40: ...n Set the length of time to wait for the new text string The DVR will consider a transaction ended if there is no text string during timeout dwell time after the last text input string You can adjust the timeout dwell from 0 to 300 seconds Highlight the box beside Display Dwell and press the button Set the length of time you would like to display text in data You can adjust the display dwell time ...

Страница 41: ...hlighting the day of the week or Holiday on the left of the screen Select an entire block of time by highlighting the time at the top of the screen Select the entire screen by highlighting the empty box in the upper left corner of the screen Press the button from No Arming no block to On blue block to Event yellow block When set to On the Alarm Out is active during the scheduled time When set to E...

Страница 42: ...ighting OK and pressing the button Selecting Cancel exits the screen without saving the changes NOTE The DVR will NOT record audio when the recording speed is set to less 12 5 ips The DVR may not record audio depending on the Transfer Speed when the DX PC4E Remote Operation Software Watch application program is connected RS232 Setup Screen The RS232 setup screen allows you to set up the RS 232C po...

Страница 43: ... Highlight the box beside Resolution and press the button to toggle between Standard 336x224 pixels and High 672x224 pixels NOTE The maximum recording speed is 25 images per second when the resolution is set to Standard However when set to High the recording speed will be decreased to 12 5 images per second Highlight the box beside End Of Disk and press the button This toggles between Overwrite an...

Страница 44: ...t to Standard However when set to High the recording speed will be decreased to 12 5 images per second NOTE When the DVR is in the Panic Recording mode the REC LED on the front panel flickers and the displays on each camera screen Highlight the first box beside Auto Deletion Pressing the button toggles between On and Off When set to On the DVR will delete video recorded earlier than user defined p...

Страница 45: ...se video to be stored Once the DVR reaches this amount it will start recording over the oldest time lapse video The time lapse video is stored separate from Event video When Keep the continuous pictures is set to On you can set the time from 1 Hour to the maximum allowed by the storage capacity of your hard disk drive NOTE The maximum storage time is only an estimate because the amount of space re...

Страница 46: ...ing Date Time You can save your changes by highlighting OK and pressing the button Selecting Cancel exits the screen without saving the changes Pre Event Recording Setup Screen Figure 48 Pre Event Record Setup screen When the DVR is in the Event Record mode it is possible to have it record images before the event occurs The Pre Event Record screen allows you to define how to handle pre event recor...

Страница 47: ... Action Record Setup Screen The DVR can be set to react to events differently Each sensor can be assigned a schedule camera recording speed video quality and dwell time Figure 49 Alarm In Event Action Record setup screen Highlight the Sched box and press the button A schedule screen appears Set the schedule as described earlier Highlight the Camera box and press the button A camera selection scree...

Страница 48: ...ss the button A schedule screen appears Set the schedule as described earlier Highlight the Alarm Out box and either Beep or the alarm output terminal that you want to associate with the sensor Highlight the Dwell Time box and set the length of time you want the output activated Alarm In Event Action Notify Setup Screen The DVR can be set to notify the remote site when certain events are activated...

Страница 49: ...ach camera can be assigned a schedule associated camera recording speed video quality and dwell time Figure 52 Motion Detector Event Action Record setup screen Highlight the Sched box and press the button A schedule screen appears Set the schedule as described earlier Highlight the Camera box and press the button A camera selection screen appears Select the camera number you would like to associat...

Страница 50: ...the button A schedule screen appears Set the schedule as described earlier Highlight the Alarm Out box and either Beep or the alarm output terminal that you want to associate with the motion event Highlight the Dwell Time box and set the length of time you want the output activated Motion Detector Event Action Notify Setup Screen The DVR can be set to notify the remote site when certain motion eve...

Страница 51: ...device The text in can be assigned a schedule associated camera recording speed video quality and dwell time Figure 55 Text In Event Action Record setup screen Highlight the Sched box and press the button A schedule screen appears Set the schedule as described earlier Highlight the Camera box and press the button A camera selection screen appears Select the camera number you would like to associat...

Страница 52: ...he button A schedule screen appears Set the schedule as described earlier Highlight the Alarm Out box and either Beep or the alarm output terminal that you want to associate with the text in device Highlight the Dwell Time box and set the length of time you want the output activated Text In Event Action Notify Setup Screen The DVR can be set to notify the remote site in the case of text in Figure ...

Страница 53: ... differently Each camera can be assigned a schedule associated camera recording speed video quality and dwell time Figure 58 Video Loss Event Action Record setup screen Highlight the Sched box and press the button A schedule screen appears Set the schedule as described earlier Highlight the Camera box and press the button A camera selection screen appears Select the camera number you would like to...

Страница 54: ... screen Highlight the Sched box and press the button A schedule screen appears Set the schedule as described earlier Highlight the Alarm Out box and either Beep or the alarm output terminal that you want to associate with the camera that has lost video Video Loss Event Action Notify Setup Screen The DVR can be set to notify the remote site in the case of video loss Figure 60 Video Loss Event Actio...

Страница 55: ...ra Display Setup Highlight the OSD Main Monitoring in the Main menu and press the button to set up the on screen display or camera display on the main monitor OSD On Screen Display Setup The DVR can be set up to display Date Time Title and Status on screen Each feature can be turned on or off and you can adjust the margins Figure 61 OSD Setup screen Highlight the box beside Date and press the butt...

Страница 56: ... Video Loss Displays when the camera loses video signal y PTZ Displays on each PTZ camera NOTE When the camera is set to Covert 1 status icons are not displayed on the screen Highlight the box beside Left Right Margin and press the button to adjust the left and right margins The margins can be set from 1 to 24 Highlight the box beside Top Bottom Margin and press the button to adjust the top and bo...

Страница 57: ...ime and press the button You can adjust the sequence dwell time from 3 to 60 seconds NOTE The DVR does not sequence the camera having video loss Highlight the box beside Event Monitoring and press the button to toggle between On and Off When it is On video from the lowest camera number among those connected with the event detected sensor will be displayed full screen on the main monitor for the pr...

Страница 58: ... are for network use They are different from the Admin and User passwords for the DVR itself NOTE The passwords are case sensitive The factory default password for both Administrator and User is 12345678 CAUTION Write the password down and keep it in a safe place Once the password has been reset the default will no longer work If the password is forgotten the unit must be reset using the Factory R...

Страница 59: ...You will need to get the appropriate IP Address Gateway and Subnet Mask from your network administrator Change the numbers by highlighting them and using the Up and Down arrow buttons to increase or decrease the number The factory default LAN settings are IP Address 192 168 1 129 Gateway 192 168 1 254 Subnet Mask 255 255 255 0 Highlight the box beside DNS Server and press the button to enter the I...

Страница 60: ... The system restarts automatically after changing the port settings NOTE Do NOT use the same port number for two different programs otherwise the DVR cannot be connected with a PC running DX PC4E CAUTION When changing the port settings you must change the port settings on a PC running DX PC4E as well Refer to the DX PC4E manual for details You can save your changes and return to the Network Setup ...

Страница 61: ...he box beside ID and press the button A virtual keyboard appears allowing you to enter the ID for ADSL connection Highlight the box beside Password and press the button A virtual keyboard appears allowing you to enter the password for ADSL connection NOTE Entering the ID and Password and highlighting OK reads the current IP Address of the DVR configured by the ADSL network NOTE If the DVR is confi...

Страница 62: ...ormats Highlight the box beside Stop Bit and press the button This toggles between 1 and 2 Stop Bits Highlight the box beside Parity and press the button A drop down list appears You can select from None Odd or Even parity You can save your changes by highlighting OK and pressing the button Selecting Cancel exits the screen without saving the changes NOTE If the RS 232C port is in use for Remote C...

Страница 63: ...nd enter the port number of the DVRNS server The port number can be set from 10000 to 12000 NOTE The DVRNS server settings on your DVR should match the settings on the registered DVRNS server Any changes on the DVRNS server might cause improper operation Highlight the Use NAT box and press the button to toggle On and Off NOTE When using the NAT Network Address Translation device refer to the NAT m...

Страница 64: ...stered to multiple DVRNS servers Please contact your network administrator when you want to register the DVR to another DVRNS server Callback Center Setup Screen The DVR can be set up to contact a computer running DX PC4E Remote Operation Software on a LAN when an event occurs Also it can be set up to dial a pager with a numeric message when an event occurs if you have a modem connected to the DVR...

Страница 65: ...al keyboard appears allowing you to enter the ID Highlight the box beside Password and enter the SMTP password A virtual keyboard appears allowing you to enter the password NOTE Authentication should be turned On and ID and Password should be entered when using an SMTP server requiring user authentication Callback Center Setup by Modem connections Figure 71 Callback Center Modem Setup screen Highl...

Страница 66: ...er password is required to enter playback fast forward playback and fast backward playback modes from live monitoring mode and enter the search menu screen in live monitoring mode Highlight Password in the Main menu and press to enter the Password screen Figure 72 Password setup screen Highlight the box beside User and press the button to toggle between On and Off If the password is set to On you ...

Страница 67: ...er the correct password to unlock the keys The Key Lock password is 4321 The Administrator password also can be used to unlock the keys You can save your changes by highlighting OK and pressing button Selecting Cancel exits the screen without saving the changes Config Screen The Config menu is used to perform functions such as switching between Quick Setup and Normal Setup backing up video loading...

Страница 68: ...Name box and press the button A virtual keyboard appears Enter a file name for the video you are backing up and select Close The DVR will automatically add the camera number for example 01 and exe to the file name If you want to save the file in a specific folder enter the folder name followed by a For example folder filename Once you have given the video a file name highlight the Start button and...

Страница 69: ...hange the system setup from a remote site NOTE The recording speed will be decreased to 1 ips per camera during CD burning or while the DVR is preparing clip copy data on hard disk drive CAUTION Do NOT use poor quality CD R or CD RW discs or ones that have been scratched or damaged in any way CAUTION Do NOT disconnect the USB cable or the power from the external drive while backing up video If the...

Страница 70: ...in the File Name field Selecting Load will load the selected saved settings and change the DVR settings accordingly NOTE Even after changing the DVR settings by loading saved settings the time related settings Date Time Time Zone and Daylight Saving Time will NOT be changed NOTE If you want to change the network settings check Include network setup Otherwise the network settings will NOT be change...

Страница 71: ...stem settings that are not related to hard disk drive operation Also the unit can be connected with DX PC4E Watch either via Ethernet or modem The Front Panel controls are described in Chapter 3 Configuration Turning on the Power Once you have installed the DVR following the instructions in Chapter 2 Installation it is ready to record The unit will take approximately 60 seconds to initialize The D...

Страница 72: ... PTZ Mode The DVR will control cameras with Pan Tilt and Zoom capabilities Pressing the PTZ button while in full screen mode of the desired camera enters the PTZ mode You can control the camera using buttons on the front panel or remote control or by setting up presets Press the arrow buttons to pan left and right and tilt the camera up and down Use CAMERA 1 and CAMERA 2 to zoom in or zoom out CAM...

Страница 73: ...ectly to desired views Select Set Preset in the PTZ Menu Select the number you want to assign to the preset and press the button Use the virtual keyboard to enter the preset name and enter the button again to save as preset Figure 79 PTZ Preset screen Preset Apply Once you have set the camera presets you can go directly to desired views Press the QUAD SEQUENCE button to load the Preset Apply dialo...

Страница 74: ...ecord Unless you change the setup the DVR is recording video and will continue recording until the hard disk drive is full The factory default is Stop when the hard disk drive is full The DVR can be set to continue recording Overwrite once the hard disk drive is full It does this by recording over the oldest video Although you will be able to record without changing the unit from its original fact...

Страница 75: ... regulations when recording audio Playing Recorded Video Once video has been recorded you can view it using the arrow buttons When playing video for the first time the DVR will display the most recent image When playing video subsequent times the DVR will start playing video from the last recalled image When playing video the DVR will display the text in data if there is any text input The text in...

Страница 76: ...you can change the display format from full screen to quad 2x2 mode by pressing the QUAD SEQUENCE button in the pause mode Pressing a camera button during quad 2x2 mode returns the display to full screen NOTE When playing recorded video at maximum speed with very high image quality playback of recorded audio may be interrupted occasionally NOTE The user cannot change the system setup from a remote...

Страница 77: ...annel Digital Video Recorder 65 Figure 82 Digital Zoom screen Figure 83 Enlarged Digital Zoom screen Searching Video Pressing the MENU button in the playback mode displays the Search Menu Figure 84 Search Menu ...

Страница 78: ... Date Time Search screen Move the cursor over the date and press the button Adjust the numbers using arrow buttons Once you have set the date you want to search for video press the button Move the cursor over the time and press the button Adjust the numbers using arrow buttons Once you have entered the time you want to search for video press the button Once you have set the date and time you want ...

Страница 79: ...set the date and time you want to search highlight the GO button and press the button The selected date and time will display The arrow buttons can now be used to review the surrounding video Event Search Figure 87 Event Log screen The DVR maintains a log of each time the Alarm Input port is activated The Event Log screen displays this list Highlight the event for which you would like to see video...

Страница 80: ... to last recorded images or you can set the start and stop times and dates When you select the Search by Camera select the target cameras and event options When you select the Search by Event select event options for each device Once you set your desired search conditions highlight Find and press the button to display the search results in the Event Log screen Selecting Cancel exits the screen wit...

Страница 81: ... of the event Pressing the arrow button will start playing the text in video segment with the text in data on the image Pressing the button again pauses the video and pressing the button again returns to live monitoring You can also narrow your event search by selecting the Query button and setting up the new search condition Figure 91 Text In Search Query screen You can search video from the firs...

Страница 82: ... keyboard Highlight the Comp box and enter the comparison operator using the virtual keyboard Highlight the Value box and enter the comparison value using the virtual keyboard NOTE The Column and Line can be used for more specific search of the text in data Column indicates the location of each individual category and Line indicates the line where the category is located Change the number of Colum...

Страница 83: ...elected for the file system NOTE The partition size should be less than 32GB because of Windows OS limitations After formatting is complete the USB IDE hard disk drive will be added to My Computer 7 Connect the USB IDE hard disk drive to the DVR Preparing the USB IDE hard disk drive in Windows 98 NOTE Preparing a USB IDE hard disk drive under Windows ME is almost identical to Windows 98 1 Connect ...

Страница 84: ...ESC to exit the screen after the USB IDE hard disk drive partition is created 11 Restart your computer and verify the newly created drive is in My Computer 12 Right click the newly created hard disk drive icon and select Format 13 In the Format Screen select Full as the Format type and click Start 14 After formatting is complete connect the USB IDE hard disk drive to the DVR ...

Страница 85: ...i 1 95 1 s 1 95 total 16 85 Thank you In the above text in data you can find that the comparison value is located at 17th Unit price mark will be ignored automatically 28th Qty and 40th amount characters including spaces from the left In this case you can enter 17 28 and 40 in each Column box For example if you want to search for Coke with a Qty Quantity of more than 1 and Hotdog with an amount to...

Страница 86: ...omparison value is located at 17th Unit price mark will be ignored automatically 28th Qty and 40th amount characters including spaces from the left but the value of amount category is located on a different line from Item In this case you can enter 17 28 and 40 in each Column box and enter 1 in the Line box for the next line For example if you want to search for Coke with a Qty Quantity of more th...

Страница 87: ...connected to a properly terminated device DVR has stopped recording If hard disk drive is full you will either need to delete video or set the DVR to the Overwrite Mode DVR displays an error message stating that the last recorded image date and time is later than the current date and time setting of the DVR The DVR will automatically reset the time and date of the unit according to the time and da...

Страница 88: ...User s Manual 76 Appendix D Connector Pin Outs Input Output AI 1 to 4 Alarm Inputs 1 to 4 GND Chassis Ground ARI Alarm Reset In NC Normally Closed C Common NO Normally Open ...

Страница 89: ...Four Channel Digital Video Recorder 77 Appendix E Map of Screens ...

Страница 90: ...mable Alarm Output 2 relay out terminal block NC NO 0 5A for 125VAC 1A for 30VDC Alarm Reset Input 1 TTL Transistor Transistor Logic terminal block Internal Buzzer 80dB at 10cm Network Connectivity 10 100 Base Ethernet RS 232C for external modem Audio Input 1 line in Audio Output 1 line CONNECTORS Video Input Composite 4 BNC Video Loop Composite 4 BNC Monitor Output Composite 1 BNC Analog RGB 1 VG...

Страница 91: ...ensions W x H x D 340mm x 46 5mm x 310mm 13 4 x 1 8 x 12 2 Unit Weight 3 2kg 7 05 lbs Shipping Weight 4 7kg 10 36 lbs Shipping Dimensions W x H x D 460mm x 158mm x 410mm 18 1 x 6 2 x 16 1 Operating Temperature 5 C to 40 C 41F to 104F Operating Humidity 0 to 90 Operating Altitude 2 000M Power 100 240V 50 60Hz 0 6A Specifications are subject to change without notice ...

Страница 92: ......

Страница 93: ... de générer une trop grande quantité d hydrogène sulfuré par exemple les sources thermales Endroits et lieux empreints d air salin CET ÉQUIPEMENT NE FOURNIT PAS DE CONNEXION À UTILISER AVEC DES SYSTÈMES EXTÉRIEURS OU DE DISTRIBUTION CÂBLÉE AUCUN RÉCIPIENT CONTENANT UN LIQUIDE TEL QU UN VASE NE DOIT ÊTRE DÉPOSÉ SUR L APPAREIL NE POSEZ AUCUN OBJET LOURD SUR L APPAREIL NE MARCHEZ PAS SUR L APPAREIL L...

Страница 94: ...re déplacé au HDD interne de l appareil ou à un autre HDD extérieur L emploi d une alimentation sans coupure est recommandé pour éviter la survenance d un tel problème Si la fiche d alimentation est déconnectée ou que le disjoncteur est coupé pendant l enregistrement le HDD peut être endommagé ou la lecture des données enregistrées peut devenir impossible Si le disjoncteur est enclenché et coupé t...

Страница 95: ... copie Mais pendant l enregistrement ou la lecture d images à débit élevé certaines images peuvent être omises à cause du débit lent du transfert de données ou de la réponse du dispositif extérieur raccordé Vérifiez bien préalablement le fonctionnement N utilisez pas la fonction de contrôle d alimentation du dispositif extérieur qui utilise l alimentation de bus de cet appareil Le dispositif extér...

Страница 96: ...lator an der Rückseite des Gerätes nicht blockiert ist UNGEEIGNETE AUFSTELLUNGSORTE Aufstellung des Gerätes an den folgenden Orten kann die Lebensdauer des Erzeugnisses verkürzen Sehr kalte Orte wie gekühlte Lagerhäuser Kühlhäuser Sehr warme Orte z B geschlossene Schränke mit indeirekter Sonnenbestrahlung Orte an denen übermäßige Mengen Schwefelwasserstoff erzeugt werden z B in der Nähe von heißen...

Страница 97: ...enlaufwerk verlegt werden Um das Auftreten einer derartigen Störung zu verhindern empfiehlt es sich eine unterbrechungsfreie Stromversorgung zu verwenden Wenn der Netzstecker abgetrennt ist oder der Schalter Pause während der Aufnahme ausgeschaltet wurde kann das HDD Laufwerk unter Umständen beschädigt werden oder die Wiedergabe der aufgenommenen Daten nicht mehr mög lich sein Wird der Bremsschalt...

Страница 98: ...Kopierer zu verwenden Bei der Aufzeichnung oder Wiedergabe eines Bildes bei schneller Übertragung könnten jedoch einige Bilder wegen der langsamen Datenübertragungsrate oder langsamen Reaktion des angeschlossenen externen Geräts ausgelassen werden Achten Sie darauf dass Sie die Funktion vorab gründlich überprüfen Verwenden Sie nicht die Leistungsreglerfunktion der externen Vorrichtung die den Bus ...

Страница 99: ...non sia ostruita LUOGHI NON ADATTI Se si colloca l unità nei seguenti luoghi si può abbreviare la sua vita utile Luoghi estremamente freddi come magazzini refrigerati e ghiacciaie Luoghi in cui può essere generato troppo solfato di idrogeno come in aree con fonti termali Luoghi o posizioni con salsedine QUESTO COMPONENTE NON FORNISCE UN COLLEGAMENTO DA USARE PER I SISTEMI ESTERNI O I SISTEMI DI DI...

Страница 100: ...à per effettuare una valutazione critica o altre azioni del genere Quando questa unità non è in grado di riconoscere il dispositivo esterno utilizzato per la registrazione a causa di una caduta di corrente diminuzione di voltaggio o altri problemi è possibile che il punto di registrazione venga spostato all HDD interno di questa unità oppure all altro HDD esterno Per evitare il verificarsi di tale...

Страница 101: ...dispositivo di copiatura Comunque durante la registrazione o la riproduzione di un immagine ad alta velocità alcune immagini possono andare perse per via della bassa velocità del trasferimento dati o della risposta del dispositivo esterno collegato Assicuratevi di controllare il funzionamento in sufficiente anticipo Non usate la funzione di controllo corrente del dispositivo esterno se quest ultim...

Страница 102: ...o LUGARES INAPROPIADOS Instalar la unidad en los siguientes lugares podría acortar la vida de servicio de este producto Lugares extremadamente fríos como depósitos refrigerados y fábricas de hielo Lugares en que existen emanaciones excesivas de sulfuro de hidrógeno como en las zonas de aguas termales Lugares o emplazamientos impregnados de aire salino ESTE EQUIPO NO OFRECE LA CONEXIÓN A UTILIZAR C...

Страница 103: ...ce la función de notificación de esta unidad para hacer evaluaciones críticas ni para otros propósitos relacionados con vidas humanas Cuando esta unidad no pueda reconocer el equipo externo que se utilice para grabación debido a un corte eléctrico disminución del voltaje u otro fallo el punto de grabación puede moverse al disco duro interno de esta unidad o al otro disco duro externo Para evitar q...

Страница 104: ...moria o para utilizar como equipo de copia Sin embargo durante la grabación o reproducción de una imagen a alta velocidad algunas imágenes pueden perderse debido a la baja velocidad de la transferencia de datos o respuesta al equipo externo conectado Asegúrese de verificar bien el funcionamiento por adelantado No utilice la función de control eléctrico del equipo externo que utiliza la electricida...

Страница 105: ...armtebron 2 Een stevige trillingsvrije ondergrond biedt 3 Niet zeer vochtig of stoffig is en uit de buurt van magnetische velden 4 Zorg ervoor dat de ventilator aan de achterkant van het toestel niet geblokkeerd wordt ONGESCHIKTE PLEKKEN De levensduur van het toestel kan bekort worden indien het op één van de volgende plekken wordt geïnstalleerd Zeer koude plekken zoals gekoelde opslagplaatsen en ...

Страница 106: ... houden Indien door een stroomonderbreking een verlaagde voedingsspanning of een andere storing het externe apparaat dat voor opname wordt gebruikt niet door het toestel kan worden herkend dan kan het opnamepunt worden verplaatst naar de ingebouwde HDD of een andere externe HDD Om dergelijke problemen te voorkomen is het raadzaam om voor een ononderbroken en stabiele stroomtoevoer te zorgen Indien...

Страница 107: ... voor het maken van reservekopieën kunnen er diverse externe HDD s op het toestel worden aangesloten Tijdens opname of weergave met relatief hoge snelheden kunnen er echter enkele beelden verloren gaan doordat er bij de gegevensoverdracht met en de respons van het externe opslagmedium enige vertraging kan optreden Controleer vooraf hoe dit werkt Maak geen gebruik van energiebeheerfunctie van exter...

Страница 108: ...parte de trás do painel do aparelho não esteja bloqueado LOCAIS NÃO APROPRIADOS A colocação do aparelho nos seguintes locais pode encurtar a vida útil do produto Locais extremamente frios como depósitos refrigerados e frigoríficos Locais onde se pode gerar quantidades excessivas de sulfito de hidrogênio como por exemplo áreas de estações hidrotermais Locais de atmosfera salina ESTE EQUIPAMENTO NÃO...

Страница 109: ...uir reproduzir os dados gravados Se o botão disjuntor for ligado e desligado todos os dias configure o temporizador de gravação para que isso seja feito apenas durante o período em que o botão disjuntor esteja ligado e não o desligue durante a gravação Esta unidade incorpora um disco rígido incorporado que é um dispositivo de precisão É portanto necessário ter bastante cuidado ao manusear a unidad...

Страница 110: ...ou para serem usados como dispositivo de cópia No entanto ao gravar ou reproduzir uma imagem a uma taxa elevada algumas imagens podem ser saltadas devido à baixa taxa de transferência ou resposta de dados do dispositivo externo ligado Verifique o funcionamento com antecedência Não use a função de controlo de potência do dispositivo externo que usa potência do barramento desta unidade O dispositivo...

Страница 111: ...V SKÅP Använd aldrig rengöringsmedel som innehåller petroleum Torka av skåpet med en mjuk tygtrasa som fuktats lätt med tvål och vatten Torka av PVC kablar och sladdar som inte bör tillåtas komma i kontakt med skåphöljet under längre perioder INSTALLATIONSPLATS För bästa prestanda och varaktig driftssäkerhet bör du installera enheten på en plats som 1 Är välventilerad och inte utsätts för direkt s...

Страница 112: ...eras till de andra apparaterna med jämna mellanrum Skador som uppstått på grund av felaktig användning drift av övervakningssystemet eller förlust av data eller andra skador som beror på funktionsstörningar hos den här enheten täcks ej Använd inte enhetens rapporteringsfunktion för livsviktiga avgöranden eller i syfte att rädda människoliv Om denna enhet inte kan detektera en extern enhet som anvä...

Страница 113: ... under in eller avspelning med hög hastighet på grund av den relativt långsamma överföringshastigheten eller svaret från den anslutna externenheten För bäst resultat uppmanas du att på förhand kontrollera in och avspelningsfunktionerna Använd inte den externa enhetens elkontroll eftersom den använder bussen på denna apparat Det kan hända att den externa enheten inte passar för den uppgift du vill ...

Отзывы: