background image


Mio Programs

 8-3 

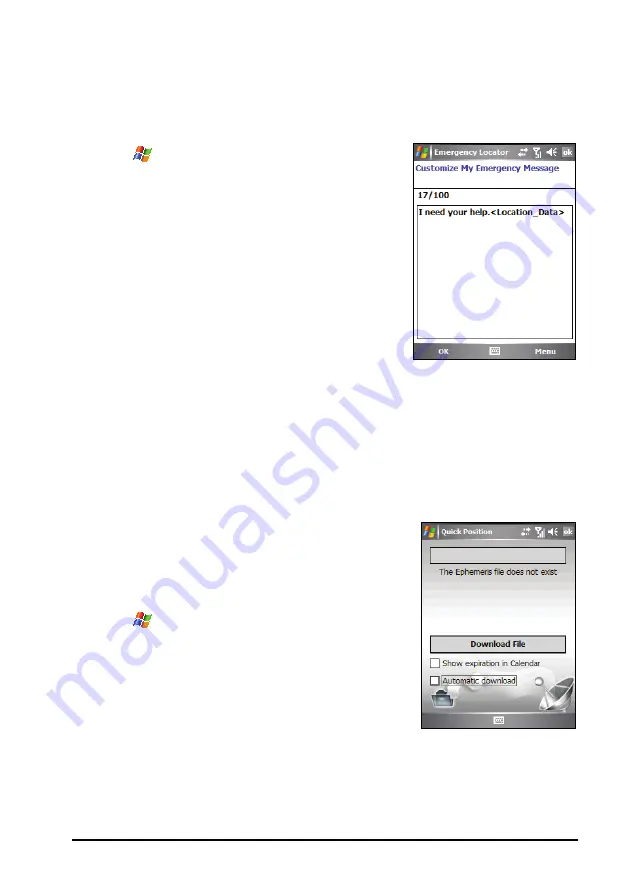
Customizing Your Emergency Message 

You can edit the text of the emergency message to suit your preference. 

1.


Tap 


Programs


Emergency Locator


to switch to the program. 

2.


Tap the 

Options

 soft key. 

3.


Enter the desired text. 

4.


You can also insert a coordinate tag into 
the text by tapping the 

Menu

 soft key   

Insert Location Data

5.


Tap the 

OK

 soft key to save the changes. 


8.2


Quick Position 

Updating the satellite calibration data (ephemeris) file is helpful for quick 
GPS positioning when using the optional navigation program. You can 
update the satellite calibration data from the GPS module manufacturer’s 
server using Quick Position. 
1.


You need to connect to the Internet to 
download the new satellite calibration data
file. (See section 10.1 for information on 
connections.)  

2.


Tap 


Settings


System


Quick 

Position

3.


Tap 

ok

 on the message that appears. 

4.


Tap 

Download File


Содержание DigiWalker A501

Страница 1: ...User s Manual...

Страница 2: ...ates and or other countries Microsoft products are licensed to OEMs by Microsoft Licensing Inc a wholly owned subsidiary of Microsoft Corporation The Bluetooth word mark and logos are owned by the Blu...

Страница 3: ...Installing the SIM Card and Battery 1 7 1 3 Charging the Battery 1 9 1 4 Turning the Device On and Off 1 10 Turning On for the First Time 1 10 Entering the Suspend Mode 1 10 Turning Off 1 11 1 5 Inst...

Страница 4: ...12 Securing Your Device 2 18 Locking the Keypad 2 18 Locking the Device 2 19 Locking the Phone 2 20 3 Using the Phone 3 1 3 1 About Your Phone 3 1 Before You Start 3 1 3 2 Turning On and Off the Phon...

Страница 5: ...Entry 3 18 Editing a Speed Dial Entry 3 19 Deleting a Speed Dial Entry 3 19 3 10 Managing Phone Numbers 3 20 Transferring from Microsoft Contacts 3 20 Transferring from SIM Card 3 20 3 11 Customizing...

Страница 6: ...Ideas 5 10 Creating a Note 5 11 5 5 Messaging Sending and Receiving E mail Messages 5 12 Downloading Messages 5 12 E mail Direct Push 5 15 Setting up an E mail Account 5 15 Composing and Sending an E...

Страница 7: ...tamp into the Picture 7 4 Camera Settings 7 6 7 3 Recording Video Clips 7 7 Video Settings 7 8 7 4 Viewing Mode 7 9 7 5 Editing Pictures 7 10 8 Mio Programs 8 1 8 1 Emergency Locator 8 1 Creating an S...

Страница 8: ...ed 10 1 10 1 Connection Settings 10 1 GPRS EDGE Connection 10 1 Modem Connection 10 2 Wireless Network Connection 10 3 10 2 Using the Bluetooth Function 10 5 Turning On and Off the Bluetooth Function...

Страница 9: ...oblems 11 6 Synchronization Problems 11 6 Cable Connection Problems 11 6 Modem Connection Problems 11 7 11 7 Taking Care of Your Device 11 8 General Guidelines 11 8 Phone Guidelines 11 9 Travel Guidel...

Страница 10: ......

Страница 11: ...e power of your device by allowing you to synchronize the information on your desktop computer or Microsoft Exchange Server with the device Your device is more than a Pocket PC and mobile phone It all...

Страница 12: ...source First time startup Quick Start Guide Using the phone function Chapter 3 of this manual Using the programs on the Bonus CD Chapter 9 of this manual Section 6 1 of this manual Microsoft ActiveSyn...

Страница 13: ...89 336 EEC and the Low Voltage Directive 73 23 EEC as amended by Directive 93 68 ECC issued by the Commission of the European Community Compliance with these directives implies conformity to the foll...

Страница 14: ...of AC adapter will result in malfunction and or danger This product is intended to be supplied by a LISTED Power Unit marked with LPS Limited Power Source and output rated 5 V dc 1 0 A maximum Do not...

Страница 15: ...quency RF signals Specific Absorption Rate SAR is the unit of measurement for the amount of radio frequency energy absorbed by the body The highest SAR value for this product when tested for use is 0...

Страница 16: ......

Страница 17: ...the external components of your device and guides you through the process of setting up your device for use 1 1 Identifying Hardware Components The illustrations below introduce you to the various bu...

Страница 18: ...on Indicator Flashing in blue indicates that the Bluetooth function is turned on Microphone Receives sound and voice to record voice Touch Screen Displays the output of your device Tap the screen with...

Страница 19: ...the distance and angle when taking a picture of yourself Flash Provides extra light when taking pictures Use the flash with special care see the Safety Precautions section on page xii for information...

Страница 20: ...era Button Starts the camera program to take pictures or record video clips Moves up down left or right on the screen by pushing the stick in the corresponding direction Navigation Stick Confirms your...

Страница 21: ...n Volume Control Silences the ring of an incoming call immediately SD MMC Slot Accepts an optional SD Secure Digital or MMC MultiMediaCard storage card for removable storage or SDIO wireless network c...

Страница 22: ...hen not in use Car Antenna Connector This connector under rubber dust cover allows use of an optional external antenna with magnetic mount which may be positioned on top of the car for better signal r...

Страница 23: ...red and any additional services to which you have subscribed You must install a SIM card before you can use the phone feature 1 Press the release button and remove the back cover 2 Push the SIM card h...

Страница 24: ...DO NOT use screwdrivers or metallic tool edges to extract the battery from the device as they may damage and irreversibly alter the battery s behavior 4 Replace the back cover direct the back cover t...

Страница 25: ...to the AC adapter and a power source Doing so keeps the battery charged NOTE Your device can also be charged when it is connected to a desktop computer via the USB cable CAUTION For optimal performan...

Страница 26: ...n tap Cancel to continue the startup procedure 5 You will then see the Today screen If a SIM card has been inserted the device will start to search the mobile phone network and the service provider s...

Страница 27: ...ce turns off ok The device will not enter the suspend mode when using the navigation program for selected models only In such cases the device s standby time will decrease without using external power...

Страница 28: ...Before installation make sure that you have Microsoft Outlook installed on your desktop computer Do not connect the device to the computer during ActiveSync installation Make the connection only when...

Страница 29: ...er 9 Follow the on screen instructions to establish a partnership and synchronize the device with your desktop computer 10 Click Next on the Program Installation Status screen 11 Click Finish After yo...

Страница 30: ...will apply the suction cup 3 Attach the suction cup to the windshield and push in the locking tab to secure the suction cup 4 Carefully fit the device into the bracket 5 Turn the rotate wheel at the t...

Страница 31: ...cup can harden and affect its suction Loosen the locking tab first before removing the car holder To retain adhesion of the suction cup detach and then re attach the suction cup at least once a month...

Страница 32: ...t no application is accessing the card Then slightly push the top edge of the card to release it and pull it out of the slot NOTE A storage card is also called a memory card Make sure that no foreign...

Страница 33: ...ing operations Press to answer an incoming call Press during a call to put the call on hold Press again to return to the talk mode Press twice quickly during a call to end the call When not during a c...

Страница 34: ......

Страница 35: ...lect objects on the screen Pull the stylus out of the slot and extend it for ease of use Store it in the slot when not in use Tap Touch the screen once with the stylus to open items and select options...

Страница 36: ...e Today screen shows your upcoming appointments active tasks and information about e mail messages Along the top of the Today screen you will see the volume icon the clock and connectivity indicators...

Страница 37: ...the following On the Today screen tap the icon on the lower right corner Tap Settings System Screen and select Landscape right handed or Landscape left handed Tap ok to save your setting 2 4 Navigati...

Страница 38: ...e Input panel button in between The right soft key is usually Menu while the left soft key varies with programs An example of the toolbar Tap to quickly select a program you have recently used Tap to...

Страница 39: ...ine web site by default See section 10 1 for information on connections On the Quick Launch Bar Mio Menu is not an adjustable item You can tap the button to customize up to 4 items to be displayed on...

Страница 40: ...The shortcut tray includes the following items from left to right Tap to deactivate or activate the Speed Voice Dial function via the Bluetooth earphone optional Tap to download a new satellite calib...

Страница 41: ...displays the program icons The selected program icon is highlighted When tapping an icon you can start a program or open a folder to access its content The table below explains the icons and their cor...

Страница 42: ...and Internet Explorer To exit the Mio Menu tap the Menu soft key Exit Customizing Program Icons In addition to the pre defined items on the Mio Menu main page you can also assign more programs in the...

Страница 43: ...us With shortcut menus you can quickly choose an action for an item For example you can use the shortcut menu in the contact list to quickly delete a contact make a copy of a contact or send an e mail...

Страница 44: ...ations 2 11 Entering Information You have several options for entering new information Use the Input panel to enter typed text either by using the on screen keyboard or other input methods Write direc...

Страница 45: ...e you use the device the more words it learns to anticipate NOTE To change word suggestion options such as the number of words suggested at one time tap Settings Personal Input Word Completion Block R...

Страница 46: ...2 Write a letter in the box When you write a letter it is converted to typed text that appears on the screen For specific instructions on using Letter Recognizer open Letter Recognizer and then tap t...

Страница 47: ...screen tap Menu Draw to switch to the drawing mode This action displays lines on the screen to help you write NOTE Not all programs support the drawing mode Converting Your Writing to Text 1 If you w...

Страница 48: ...nd hold the incorrect word tap one word at a time 2 On the shortcut menu tap Alternates A menu with a list of alternate words appears 3 Tap the word you want to use or tap the writing at the top of th...

Страница 49: ...ected drawings can be resized while writing cannot 1 Tap Menu Draw to enable drawing mode A check appears before the command 2 To create a drawing cross three ruled lines on your first stroke A drawin...

Страница 50: ...want to include the recording in a note open the note first In the Messaging program you can add a recording to an e mail message To create a recording 1 Hold the device s microphone near your mouth...

Страница 51: ...To insert a message tap Menu My Text and then tap a message NOTE After inserting a My Text message you can add text to it before you send the message To edit a My Text message tap Menu My Text Edit My...

Страница 52: ...ff the keypad functionality This is a helpful feature if for example the device is turned on and in your pocket and you want to prevent accidental keypresses and unintentional phone calls To lock the...

Страница 53: ...ssword you want to use to access the device when it is locked and then confirm the password 5 On the Hint tab enter a phrase that will help you remember your password but doesn t allow others to guess...

Страница 54: ...ion number Your first PIN will be given to you by your mobile phone service provider 1 Tap Phone Menu Options 2 On the Phone tab tap to select Require PIN when phone is use 3 Enter the PIN and tap Ent...

Страница 55: ...r work network over GPRS EDGE using Cellular Line or using the modem specified by your mobile phone service provider Before You Start To use the phone you need to first set up an account with a GSM GP...

Страница 56: ...Player Mobile etc Turning Off the Phone 1 Do one of the following Tap the Wireless Manager section on the Today screen Tap Wireless Manager when using any program 2 Tap Phone The Wireless Manager sec...

Страница 57: ...service provider s name indicating that the flight mode is turned off Starting Microsoft Phone Start Phone by tapping Phone or pressing the Talk button on the device The Phone keypad appears on the sc...

Страница 58: ...tch back to the Phone keypad if you are using other programs during a call Missed call Tap this icon to view the call s you missed Call on hold This icon indicates you are putting a call on hold GPRS...

Страница 59: ...ame and or number 1 Access the Phone keypad by tapping Phone or pressing the Talk button on the device 2 Tap the number on the Phone keypad Tap or press the Talk button on the device to make the call...

Страница 60: ...a Call Using a Recently Connected Number To make a call using a recently connected number When on the Phone keypad screen press the Talk button When using programs other than Phone press the Talk butt...

Страница 61: ...ialed number will display in the contact list For information on Contacts see section 5 2 Making a Call from the Call History List The Call History list displays the calls you made received and missed...

Страница 62: ...the Talk button or tap Phone NOTE There may be situations where you want to immediately silence the ring of an incoming call Simply press the Volume control and then proceed to answer the call If you...

Страница 63: ...Volume Adjusting the Phone Volume To adjust the volume during a call tap the icon on the navigation bar to select a volume level or use the Volume control on the side of the device CAUTION Never rais...

Страница 64: ...ion The will appear on the upper right corner To turn off the mute function tap Using Speakerphone You can turn on the speakerphone to use the device as a hands free solution On the Phone keypad tap t...

Страница 65: ...Call 1 If there is another incoming call when you are talking on the device a pop up window appears to notify you 2 Tap the Answer soft key to place the first call on hold and answer the second call 3...

Страница 66: ...eypad soft key 3 Dial a second number and tap or press the Talk button to connect Wait for it to be picked up 4 To end the second call and go back to the first tap or press the End button Swapping bet...

Страница 67: ...set up conference calling by tapping the Menu soft key Conference 2 To add additional people to your conference tap Keypad soft key Dial a second number and tap or press the Talk button to connect Wai...

Страница 68: ...arty Unmute Turns the microphone back on for the active call Turn Speakerphone On Sends out the caller s voice through the speaker Turn Speakerphone Off Turns off the speakerphone function Conference...

Страница 69: ...d during a call 1 Access the Phone keypad by tapping Phone or pressing the Talk button on the device 2 Tap Call History on the Phone keypad 3 The icon indicates that the phone call entry contains a no...

Страница 70: ...entire Call History tap the Menu soft key Delete All Calls Viewing Call History You can tap the Menu soft key Filter to change the Call History view All Calls by default All Calls displays all calls...

Страница 71: ...al time since last time the call history was reset To delete Call History items older than a specific amount of time select a time period under Delete call history items older than Adding an Entry to...

Страница 72: ...peed Dial Entry 1 Access the Phone keypad by tapping Phone or pressing the Talk button on the device 2 Tap the button on the Phone keypad 3 Tap and hold the desired speed dial number and then tap New...

Страница 73: ...the Talk button on the device 2 Tap the button on the Phone keypad 3 Tap and hold the entry you wish to edit and tap Edit on the shortcut menu 4 You can change the assigned phone number or picture fo...

Страница 74: ...en finished tap the ok soft key For more information on using Contacts see section 5 2 Transferring from SIM Card 1 Tap Contacts or tap the Contacts soft key on the Today screen 2 Tap the desired SIM...

Страница 75: ...n from the list You can tap the button to hear the tone Keypad determines the keypad tone to be used when entering phone numbers Set your keypad tone to Short tones or Off for enhanced privacy in publ...

Страница 76: ...our services settings tap a service and then tap Get Settings Call Barring blocks certain types of incoming and or outgoing calls Caller ID reveals your identity when you are calling people Call Forwa...

Страница 77: ...device to access them For example if your first preferred network is unavailable the device will try to access your second preferred network Tap Set Networks and follow the on screen instructions This...

Страница 78: ...on screen instructions to enter old and new PIN2 codes 3 12 Cell Broadcast NOTE Not all mobile phone operators are providing cell broadcast information Please consult your mobile phone operator for th...

Страница 79: ...Channel List 5 Select the language for the messages Only messages in the selected language will be shown You can also select to display messages in all languages 6 You can add delete or edit message...

Страница 80: ...wing Tap the button on the Phone keypad and tap the first position Tap and hold the number 1 on the Phone keypad Making an Emergency Call You can use the device to dial the international emergency num...

Страница 81: ...a number tap and hold the number 0 until the sign appears The sign replaces the international prefix 00 of the country from where you are calling Enter the full phone number you want to dial including...

Страница 82: ......

Страница 83: ...ely Replacing the battery needs to be finished in 5 minutes to make sure of the correct system time When you charge the battery upon a warning of low power you should charge for at least 30 minutes be...

Страница 84: ...f the following items based on your needs Keypad Backlight on SD slot powered off during sleep mode You can also select the events for waking up the device Application Buttons SD MMC Card insertion re...

Страница 85: ...n off functions not needed or adjust settings Lower the volume Do not enable sounds or light flashing except for the most necessary notifications Tap Settings Personal Sounds Notifications to set up R...

Страница 86: ...ed to the input methods and voice recording format Lock To set a password for security See Locking the Device in section 2 12 for more information Menus To customize what appears on the Start menu MSN...

Страница 87: ...puters such as servers with which you connect This helps prevent unauthorized users from accessing the device and information Clock Alarms To change the time and date and to set alarms Error Reporting...

Страница 88: ...lock function after waking the device from the suspend mode Quick Position To update the ephemeris file for a quicker GPS positioning See Quick Position in section 8 2 for more information Regional S...

Страница 89: ...information Connections To set up or change connection information See section 10 1 for more information Network Cards To configure the network card if installed See section 10 1 for more information...

Страница 90: ...d information that is taking up storage space on the device select Larger than 64 KB under Type You can also use the File Explorer to find files on the device and to organize these files into folders...

Страница 91: ...or type so that you know which version of the software to install Tap Settings System About and make a note of the information in Processor 2 Download the program to your desktop computer or if you ha...

Страница 92: ...ersonal Menus and tap the check box for the program If you do not see the program listed use any of the following two methods If you are using File Explorer on the device Tap Programs File Explorer an...

Страница 93: ...e 1 Tap Settings System Remove Programs 2 Select the program in the list and then tap Remove If the program does not appear in the list of installed programs use File Explorer on the device to locate...

Страница 94: ......

Страница 95: ...ssaging 5 1 Calendar Scheduling Appointments and Meetings Use Calendar to schedule appointments including meetings and other events You can check your appointments in one of several views Agenda Day W...

Страница 96: ...e Input panel tap first to select the field and then enter a description and a location See section 2 11 for information on entering text 4 Enter other desired information You will need to hide the In...

Страница 97: ...t Pocket Outlook 5 3 Using the Calendar Summary Screen When you tap an appointment in Calendar a summary screen is displayed To change the appointment tap the Edit soft key View appointment details Vi...

Страница 98: ...g for whether you are at home or on the road Tap Contacts or tap the Contacts soft key on the Today screen to switch to the program NOTE To change the way information is displayed in the list tap the...

Страница 99: ...mation You will need to scroll down to see all available fields See section 2 11 for information on entering text 3 Tap ok to save and return to the contact list For more information tap Help Tap to r...

Страница 100: ...ook Using the Contacts Summary Screen When you tap a contact in the contact list a summary screen is displayed To change the contact information tap the Menu soft key Edit View contact details Assigne...

Страница 101: ...Outlook 5 7 5 3 Tasks Keeping a To Do List Use Tasks to keep track of what you have to do Tap Programs Tasks to switch to the program Tap and hold to display the shortcut men Tap to display or edit t...

Страница 102: ...entering text 3 You can enter a start date and due date or enter other information by first tapping the field If the Input panel is open you will need to hide it to see all available fields 4 Tap ok t...

Страница 103: ...t Outlook 5 9 Using the Tasks Summary Screen When you tap a task in the task list a summary screen is displayed To change the task tap the Edit soft key Tap to show and hide additional summary informa...

Страница 104: ...s and phone numbers with Notes You can create a written note or an audio recording You can also include a recording in a note Tap Programs Notes to switch to the program Tap to change the sort order o...

Страница 105: ...writing drawing typing or recording For more information about using the Input panel writing and drawing on the screen and creating recordings see section 2 11 3 Tap ok to save and return to the note...

Страница 106: ...ice Provider ISP or that you access using a VPN server connection typically a work account download messages through a remote e mail server See the later section for information on connection settings...

Страница 107: ...e and not to sync file attachments NOTE You can also specify that subfolders of the Inbox folder are synchronized SMS messages are not received via synchronization Instead they are sent to the device...

Страница 108: ...Options You can customize the following download options for each e mail account that you have with an Internet Service Provider ISP or that you access using a VPN server connection typically a work a...

Страница 109: ...formation Setting up an E mail Account You need to set up an e mail account that you have with an Internet service provider ISP or an account that you access using a VPN server connection typically a...

Страница 110: ...message tap the Menu soft key Insert and tap the item you want to attach Picture Voice Note or File Then select the file you want to attach or record a voice note Embedded objects cannot be attached...

Страница 111: ...proper GPRS settings See section 10 1 for information on the GPRS connection 2 Tap Messaging 3 Verify your MMS settings Tap the Menu soft key Tools Options MMS Servers Make sure the MMS setting of yo...

Страница 112: ...r message To quickly add common messages tap and then tap a desired message from My Text To insert a smiley in the text tap to insert a Favorites link in the text tap 11 To add an audio file tap Inser...

Страница 113: ...he Menu soft key Slides Delete Slide 13 To insert an attachment tap the Menu soft key Attachment Menu soft key and select a type a contact card appointment or file Then select the desired item 14 Befo...

Страница 114: ...Change the setting in Sending size limitation and then tap the ok soft key to save the setting Some mobile operators limit the maximum upper size of an MMS message Please contact your mobile phone ope...

Страница 115: ...On the object list tap and hold the item to save Tap Save to save the picture video clip in the My Device My Documents My Pictures folder audio file in the My Device My Documents My Music folder and...

Страница 116: ...t time you send and receive e mail You can also download attachments automatically with your messages if you have an Outlook E mail or IMAP4 e mail account If you have an Outlook E mail account do the...

Страница 117: ...viewed as an attachment when using IMAP4 to receive e mail However this feature does not work if TNEF is enabled so that you can receive meeting requests To store attachments on a storage card rather...

Страница 118: ......

Страница 119: ...Mobile Center see the Windows Vista Help or documentation When you have established the connection between the device and your desktop computer you can synchronize the information between the two with...

Страница 120: ...ation from the device 1 Connect the device to your desktop computer See Step 7 of section 1 5 for connection procedures 2 On the device tap Programs ActiveSync 3 Tap the Sync soft key to begin synchro...

Страница 121: ...net See section 10 1 for information on installing GPRS settings using the GPRS Settings program 2 On the device tap Programs ActiveSync 3 Tap the Menu soft key Add Server Source 4 Enter the name of t...

Страница 122: ...nter the information See section 2 11 for information on entering text 3 When finished tap ok and the document is automatically saved and named according to the first characters of text entered in the...

Страница 123: ...you switch to Word Mobile you will see the document list Tap the desired document to open it You can open only one document at a time when you open a second document the first will be saved and close...

Страница 124: ...eating a Workbook 1 Tap the New soft key 2 To use Excel toolbar tap the View soft key Toolbar 3 You can use Excel Mobile much the same way you use Excel on your desktop computer You can enter formulas...

Страница 125: ...enever you switch to Excel Mobile you will see the workbook list Tap the desired workbook to open it You can open only one workbook at a time when you open a second workbook you will be asked to save...

Страница 126: ...ppt and pps format with PowerPoint 97 and later can be viewed on the device 1 Tap Programs PowerPoint Mobile to switch to the program 2 In the presentation list tap the slide show you want to view 3 T...

Страница 127: ...ey are online Options and settings you can use to create a custom Pocket MSN experience To use Pocket MSN you must have an Internet connection See section 10 1 for information on installing GPRS setti...

Страница 128: ...Tap Sign In The Pocket MSN items will display on the Today screen after you have signed in to Pocket MSN 4 Tap the MSN Messenger icon on the Today screen and tap the Sign In soft key Once you sign in...

Страница 129: ...or MP3 format including files with the extensions asf wma wmv and mp3 Tap Windows Media to switch to the program Library Screen Playback Screen Use Microsoft Windows Media Player on your desktop compu...

Страница 130: ...You can copy picture and video files from your desktop computer to the My Device My Documents My Pictures folder of the device For information on copying files to the device see ActiveSync Help on you...

Страница 131: ...bnails of pictures and video clips appear on the screen You can tap one of them to view in full screen For more information tap Help Select the sort order for the list Tap to open the file Tap to swit...

Страница 132: ...ltiplication and division 1 Tap Programs Calculator to switch to the program 2 Use the keypad to enter numbers and perform calculations 3 You can store a number in the calculator memory for later use...

Страница 133: ...ns For Windows Vista users please see the Windows Vista Help or documentation for proper procedures USB Connection 1 Make sure that the device is not connected to another device and that you have inst...

Страница 134: ...and Support For information on the Bluetooth function on the device see section 10 2 2 Make sure that the device is not connected to another device and that you have installed proper GPRS settings See...

Страница 135: ...ation refer to the documentation of the Bluetooth program on the computer or Windows Help and Support Now your computer connects to the Internet via the device 8 To end the connection tap the Disconne...

Страница 136: ......

Страница 137: ...ns to facilitate the operations or screen adjustment Button Description Adjusts the image brightness The brightness level is indicated on the screen and the adjustable range is 3 3 Zooms in or out the...

Страница 138: ...default the backlight is turned off after 30 seconds of inactivity in the standby mode To change the setting tap Settings System Backlight Advanced The on screen message will disappear You can tap any...

Страница 139: ...st and then press the Camera button fully to take the picture 5 The picture JPG format will be saved automatically If a storage card is inserted the file will be saved in the Storage Card My Pictures...

Страница 140: ...he Continuous mode supports the resolution of 800X600 and 640X480 only The flash is turned off automatically in this mode Adding the GPS Stamp into the Picture The program incorporates an additional G...

Страница 141: ...nce the system acquires the GPS positioning data the longitude and latitude information of your current location will display on the screen Take pictures according to the instructions described in the...

Страница 142: ...if you want to take continuous pictures See the Taking Continuous Pictures section for information Storage Location Sets if you want to save the pictures on the device or SD MMC card Effect Allows yo...

Страница 143: ...w You can rotate the device if necessary 3 To change the settings tap See Video Settings later in this chapter 4 When you are ready press the Camera button halfway to focus first and then press the Ca...

Страница 144: ...4 for information 7 To exit the program tap NOTE To play back on your desktop computer the 3GP video clips that you recorded using the device you need to install H 263 Decode on the desktop computer...

Страница 145: ...viewing mode When you view a picture the screen shows as follows When you view a video clip the screen shows as follows Button Icon Descriptio Switches to the Pictures Videos program Number of the cu...

Страница 146: ...diting Pictures When you are viewing a picture tap to enter the editing mode By default the brush function is enabled You can write or draw on the screen To undo your editing tap repeated tapping is a...

Страница 147: ...sed on the product you have For information on the GPRS Settings program see the GPRS EDGE Connection section in section 10 1 For information on using the Flashlight program see the System settings in...

Страница 148: ...ds to activate the program If you have not defined the recipient the program will display a notification message 4 The program will activate the GPS port of the device and search for the GPS data and...

Страница 149: ...5 Tap the OK soft key to save the changes 8 2 Quick Position Updating the satellite calibration data ephemeris file is helpful for quick GPS positioning when using the optional navigation program You...

Страница 150: ...day screen 7 If you want the device to automatically download the ephemeris file when the expiration date arrives select Automatic download 8 Tap ok 8 3 Voice Speed Dial You can record voice tags so t...

Страница 151: ...ght of the selected item indicates the voice tag has been created 6 To re new the voice tag tap the icon and repeat step 4 7 Tap ok to save the setting NOTE You can also create a voice tag in Contacts...

Страница 152: ...Managing Voice Tags 1 Tap Settings Personal Voice Speed Dial Voice Tag to display the voice tag list 2 Select an item and do the following Tap to re new the voice tag Tap to play back the voice tag Ta...

Страница 153: ...y NOTE You can use the navigation stick to change the color of the clock hands Changing the Clock Style World Time provides three different styles for you to select Standard default Fashion and Digita...

Страница 154: ...e five cities 4 To change the city tap the arrow next to the city name to open the drop down list and select a city from the list 5 Tap the OK soft key to save the setting Adjusting the Time 1 Tap Pro...

Страница 155: ...MT displays the Greenwich Mean Time GMT time Hour Minute Second Month Day Year Time Zone displays the time zone of the selected city 4 When completed tap the OK soft key to save the setting NOTE When...

Страница 156: ...Time is started This allows the device to connect to GPS and adjust time automatically every time World Time is started 5 Tap the Adjust soft key to synchronize the time NOTE To perform time calibrati...

Страница 157: ...ee the calculator screen To switch to the Currency or Metrology mode tap the corresponding button at the top of the screen To exit the program tap the button on the top right corner of the screen Usin...

Страница 158: ...ate the result Using the Calculator Memory The Calculator mode allows you to store a number value in the calculator memory for later use You can use the memory buttons to store display or change the v...

Страница 159: ...number When a number is stored in the memory you can also calculate a number and tap the Memory Plus button to add this number to the number already stored Memory Minus If the memory is empty you can...

Страница 160: ...open the currency list and select the currency to convert to target currency When a currency is selected the abbreviation of the currency will be displayed on the upper left corner of the output field...

Страница 161: ...to the most up to date one 1 Tap Programs MioCalc 2 Tap the button to switch to the Currency mode 3 Select the source and target currencies 4 Tap the button to display the exchange rate fields 5 Ente...

Страница 162: ...en the unit list and select the unit to convert from source unit When a unit is selected the abbreviation of the unit will be displayed on the upper left corner of the input field 5 Tap the down arrow...

Страница 163: ...an execute Java applications or games on the device Downloading Java applications may be charged or free of charge Install Java applications by doing one of the following Execute JAR files on the devi...

Страница 164: ......

Страница 165: ...n procedures However if you use Windows Vista you do not need Microsoft ActiveSync for the connection Windows Vista uses Windows Mobile Device Center to manage the connection For information on the Wi...

Страница 166: ...The installation progress will be displayed on the screen Follow the on screen instructions to complete the installation 11 On the device if prompted tap the Install soft key to start the installatio...

Страница 167: ...dia Player on your desktop computer to play back the 3GP video clips that you recorded using the device 1 During the installation procedure using the Bonus CD click Next on the welcome screen when pro...

Страница 168: ...on wizard window You are now ready to play back the 3GP files on your desktop computer using Windows Media Player NOTE If your desktop computer uses Windows 2000 then you need to have DirectX 9 0 or l...

Страница 169: ...uter using ActiveSync See section 1 5 for connection procedures Mobile Assistant does not support Windows 98 After installing Mobile Assistant a shortcut for Mobile Assistant appears on the desktop of...

Страница 170: ...elated information of the current file is displayed on the right of the screen You can use the on screen buttons for palyback operations 3 You can do the following To copy the current file from the co...

Страница 171: ...creen When viewing the picture you can click to zoom in to zoom out or to show the picture in its actual size 3 A red cropping frame appears on the screen You can crop the picture if needed for creati...

Страница 172: ...9 8 Add On Programs 4 Click Next 5 You can adjust the brightness and contrast of the picture by moving the knob Then click Next...

Страница 173: ...on the device and its filename comes with 1 for distinction To set the edited picture as the background picture of the device click Set as wallpaper The picture will be saved in the My Documents My P...

Страница 174: ...s on the SIM card 1 On the Mobile Assistant main screen click SIM Contacts The SIM card contact list appears on the right side of the screen 2 You can do the following To create a new SIM contact clic...

Страница 175: ...click Refresh to reload the SIM contacts 3 To return to the Mobile Assistant main screen click SMS Manager SMS Manager helps you send and manage SMS messages on the computer 1 On the Mobile Assistant...

Страница 176: ...he Mobile Assistant main screen click Data Backup Data Backup allows you to back up the data on the device to the computer as well as restore the data from the computer 1 On the Mobile Assistant main...

Страница 177: ...kup file on the right side of the screen and then click Restore on the lower right corner of the screen When prompted click Restore to proceed After the procedure is finished click OK To allow the cha...

Страница 178: ...e Explorer Network Settings Network Settings helps you quickly install the mobile phone network settings 1 On the Mobile Assistant main screen click Network Settings 2 Select your service provider fro...

Страница 179: ...ernet and My Work Network settings can be used to connect to any private network such as a corporate network you use at work Connections can be made using GPRS a modem or wireless network card After t...

Страница 180: ...connect Modem Connection With a modem you can dial in to your ISP or corporate network Before creating the connection you need to Have a modem SDIO card For installation information see the documentat...

Страница 181: ...network without physical cables Before creating the connection you need to Have a wireless network card SDIO card that is compatible with the device For driver and installation procedures see the doc...

Страница 182: ...eless Network Connection After you install the wireless network card and set up the wireless network use the desired program when you are within the range of wireless network For example switch to Int...

Страница 183: ...lities can exchange information over a distance of about 10 meters 30 feet without requiring a physical connection Turning On and Off the Bluetooth Function By default the Bluetooth function is turned...

Страница 184: ...eaving the Bluetooth function active will consume more power Sending Files via the Bluetooth Function 1 Turn on the Bluetooth function See Turning On and Off the Bluetooth Function previously in this...

Страница 185: ...ure that the two devices are turned on visible and within close range For information on turning on the Bluetooth function on the device see Turning On and Off the Bluetooth Function previously in thi...

Страница 186: ...ions During synchronization with your desktop computer download your favorite links that are stored in the Mobile Favorites subfolder in Internet Explorer on the desktop computer While you are connect...

Страница 187: ...o the Internet To visit web pages not included in Favorites in the address bar that appears at the top of the screen enter the web address you want to visit and then tap Or tap the arrow to choose fro...

Страница 188: ...ee ActiveSync Help 2 In Internet Explorer on your desktop computer save or move favorite links to the Mobile Favorites subfolder in the Favorites list For more information on using Internet Explorer s...

Страница 189: ...istance 11 1 Resetting Your Device CAUTION Resetting will cause unsaved data to be lost Resetting the device is similar to restarting your desktop computer It restarts the operating system but you wil...

Страница 190: ...to ROM at the factory are not affected CAUTION To ensure the integrity of your data should it be necessary to clear the memory you are advised to regularly back up your data Follow this procedure to...

Страница 191: ...free memory on the device CAUTION Be discreet when you delete files Deleting files of which the function is unknown can cause programs or features to malfunction It is appropriate to make a backup bef...

Страница 192: ...program to list view Then stop the program by tapping Stop or Stop All on the Running Programs tab Reset the device as described in section 11 1 and 11 2 If you have a storage card move data to the st...

Страница 193: ...ection 11 1 Screen freezes Reset the device as described in section 11 1 Screen is hard to read Make sure that the backlight of the display is on Move to a location with enough light If you re having...

Страница 194: ...ActiveSync on your desktop computer Install the version ActiveSync supplied with the device or from the Microsoft web site www microsoft com If you encounter problems when trying to connect to the In...

Страница 195: ...the network card is compatible with the device In the properties for your network card make sure that you have correctly configured the IP settings and the addresses of your DNS servers and or WINS s...

Страница 196: ...den and severe temperature changes This could cause moisture condensation inside the unit that could damage the device In the event of moisture condensation allow the device to dry out completely Take...

Страница 197: ...of the following Most RF devices are shielded from RF signals However the device may still interfere with or get interfered by nearby devices such as a TV set radio or computer Turn off the phone fea...

Страница 198: ...the AC adapter with you Use the AC adapter as the power source and as a battery recharger Keep the device inside its protective cover when you are not using it on the road Hand carry the device in a...

Страница 199: ...6 14 8 11 Calendar 5 1 5 4 5 7 Call History 3 16 Camera 7 1 Camera settings 7 6 Editing pictures 7 10 GPS Stamp 7 4 7 6 Recording video clips 7 7 Taking continuous pictures 7 4 Taking pictures 7 3 Tim...

Страница 200: ...RS connection 10 1 GPS Antenna 1 6 Car antenna 1 6 GPS button 1 2 H H 263 Decode 9 3 Hardware information 4 5 I Indicator Charge 1 2 Notification 1 2 Input panel button 2 4 2 10 International calls 3...

Страница 201: ...ifications 2 10 P Phone 3 1 Customizing 3 21 Turning off 3 2 Turning on 3 3 Phone guidelines 11 9 Pictures Videos 6 12 Pocket MSN Signing in 6 10 Portrait view 2 3 Power Checking remaining 4 1 Power b...

Страница 202: ...16 Removing 1 16 Stylus Dragging 2 1 Tapping 2 1 Tapping and holding 2 1 Using 2 1 Suspend 1 10 4 3 Synchronizing Outlook E mail 5 13 T Talk button 1 2 Today screen 2 2 Touch screen See Screen Transcr...

Отзывы: