EXPOSURE AND READOUT
ADJUSTMENTS
For many of the repairs in the XD-11,
you w o n 't have to disassemble the
camera any further than we've described.
The modular construction then makes the
camera fast to service. Let's say you've
replaced the fro n t-p la te /m irro r-c a g e
assembly. You're then ready to make the
adjustments.
Remember that you should avoid dis
turbing the tw o variable resistors for the
LED readout — Rx5 and Rx6, Fig. 48. Set
ting up the other adjustments should bring
in the accuracy of the LED display. But, if
the LED readout remains off by more than
1 EV, you can pull out the front-plate/-
mirror-cage assembly far enough to reach
the variable resistors. It's also possible —
though not recommended — to reach the
adjustments through the cutout on the
side of the lens mount. Using a curved tool
to turn the "blind” variable resistors could
do more harm than good.
Start by checking the MD common volt
age, Fig. 54. We described the test during
troubleshooting. As you'll recall, you
should measure from 1.1 to 2.2V w ithout a
lens installed. There's no adjustment on
the MD common voltage other than shift
ing
the
m inim um -aperture
resistor.
However, if you aren't getting the MD
common voltage, you w on 't be able to ad
just the LED readout in the S mode.
CALIBRATING THE MANUAL
SHUTTER SPEEDS
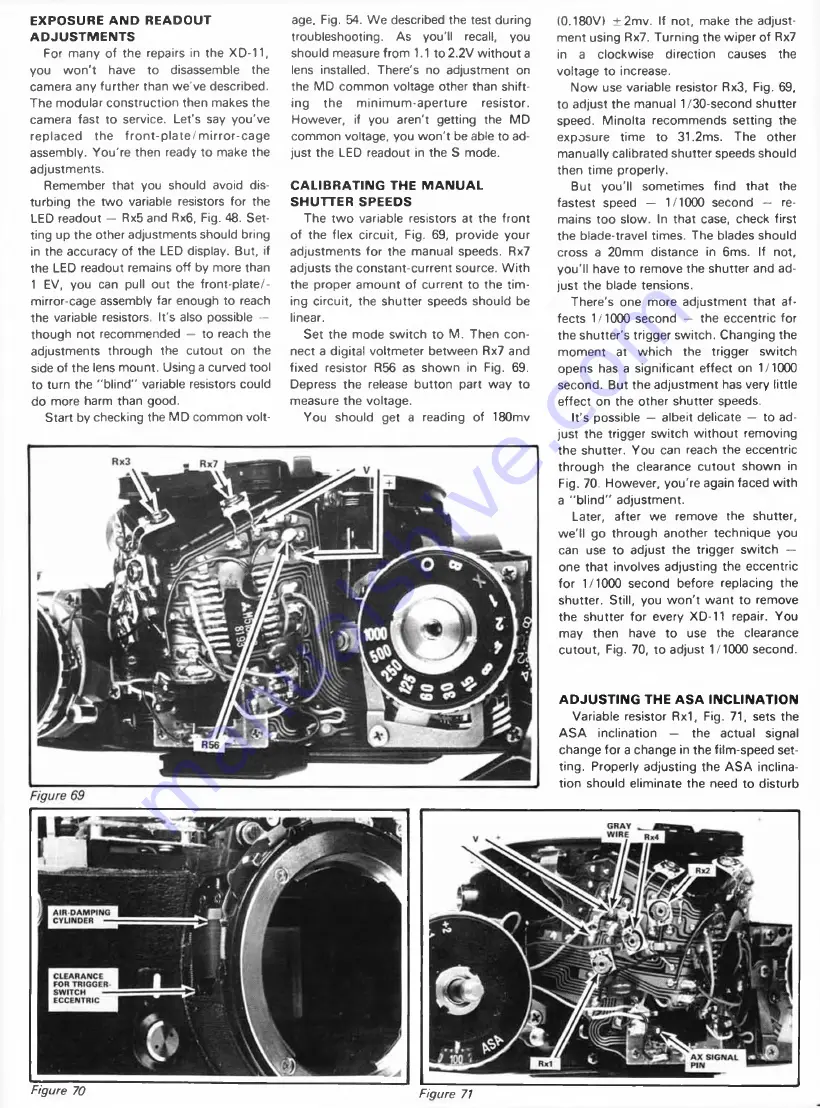
The tw o variable resistors at the front
of the flex circuit. Fig. 69, provide your
adjustments for the manual speeds. Rx7
adjusts the constant-current source. W ith
the proper amount of current to the tim
ing circuit, the shutter speeds should be
linear.
Set the mode switch to M. Then con
nect a digital voltmeter between Rx7 and
fixed resistor R56 as shown in Fig. 69.
Depress the release button part way to
measure the voltage.
You should get a reading of 180mv
(0.180V) ± 2 m v. If not, make the adjust
ment using Rx7. Turning the wiper of Rx7
in a clockwise direction causes the
voltage to increase.
Now use variable resistor Rx3, Fig. 69,
to adjust the manual 1/30-second shutter
speed. Minolta recommends setting the
exposure time to 31.2ms. The other
manually calibrated shutter speeds should
then time properly.
But you'll sometimes find that the
fastest speed — 1/1000 second — re
mains too slow. In that case, check first
the blade-travel times. The blades should
cross a 20mm distance in 6ms. If not,
you'll have to remove the shutter and ad
just the blade tensions.
There's one more adjustment that af
fects 1/1000 second — the eccentric for
the shutter's trigger switch. Changing the
moment at which the trigger switch
opens has a significant effect on 1/1000
second. But the adjustment has very little
effect on the other shutter speeds.
It’s possible — albeit delicate — to ad
just the trigger switch w itho u t removing
the shutter. You can reach the eccentric
through the clearance cutout shown in
Fig. 70, However, you're again faced with
a "b lin d " adjustment.
Later, after we remove the shutter,
we'll go through another technique you
can use to adjust the trigger switch —
one that involves adjusting the eccentric
for 1/1000 second before replacing the
shutter. Still, you w o n 't w ant to remove
the shutter for every XD-11 repair. You
may then have to use the clearance
cutout, Fig. 70, to adjust 1/1000 second.
ADJUSTING THE ASA INCLINATION
Variable resistor Rx1, Fig. 71, sets the
A S A inclination — the actual signal
change for a change in the film-speed set
ting. Properly adjusting the A SA inclina
tion should eliminate the need to disturb
Figure 69
Figure 70
Figure 71


