3. Using Your Camcorder
3.
Using the Camcorder
3.1 Video Recording
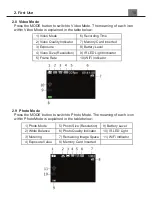
Power the camcorder on and it will be ready to record clips right away. You
may press the MODE button to switch to another mode. A camcorder icon
will appear in the top left hand corner of the screen when you are in Video
mode.
1. Line up your shot by looking at the LCD screen to see what is in view.
2. Hold the camcorder steady and press the RECORD button to begin recording.
3. When recording begins, a rolling timer will display in red in the top right hand
corner of the screen. This indicates the recorded video time elapsed.
4. Press the PHOTO button to pause and resume recording. Press the RECORD
button to stop recording.
5. The status LED will blink Red slowly while recording and will be solid Red if the
recording is paused.
6. The recorded video files will automatically save onto the inserted memory card.
3.1.1 Movie Size (Resolution)
Your camcorder has a number of preset resolutions and frames per second rates.
1. In Video Mode press the MENU button.
2. S
elect ‘
Movie Size’
using the UP or DOWN buttons and press the OK
button to enter the
‘
Movie Size’
submenu.
3. Press the UP or DOWN buttons to navigate the menu and press the OK
button to confirm your selected setting (
1080P 30fps, 720P 60fps, 720P
30fps, 480P 60fps
). A higher resolution and faster frames per second rate
will produce a higher quality and larger video file.
3.1.2 Video Quality
The Video Quality function determines the level of compression the camcorder
uses when saving videos to a memory card.
1. In Video Mode press the MENU button.
2. Select
‘Video Quality’
using the UP or DOWN buttons and press the OK
button to enter the ‘
Video
Quality’
submenu.
3. Press the UP or DOWN buttons to select the required quality option
(
Super Fine, Fine, Normal
), and press the OK button to confirm your
selected image option. Fine uses the least amount of compression for
saving, and as a result produces a higher video quality.
3.1.3 Loop Record
This function allows you to set a maximum duration for each video clip recorded.
1. In Video Mode press the MENU button.
Содержание MN200NV
Страница 1: ......
Страница 5: ...z 1 1 Camcorder Interface Top View Bottom View Side View Front View Rear View...
Страница 33: ......


