Please note before we proceed that MillRight CNC does NOT own, develop, or directly support
any of the drivers, firmware, or software packages referenced below. These are all provided for
free thanks to the generosity of their developers. Since we only hav
e a “user’s level” of
knowledge in these programs, we strongly recommend that you reach out to the development
community of any program that you may have trouble with or want to learn more about.
We have preloaded your Uno control board with “Grbl” motion control firmware. Windows 8,
Windows 10, and most Mac computers will auto-load the drivers when you plug it in with the
provided USB cable. No further configuration of the firmware that runs on the board is required.
All the firmware settings recommended for your machine are already set.
STEPPER DRIVERS, STEPPER CONNECTIONS, AND POWERING UP
Make sure the USB cable to the controller board is
disconnected from your computer. The general rule
here is that you should NEVER make connections
while anything is powered on. This step requires that
you pay very close attention. Ready?
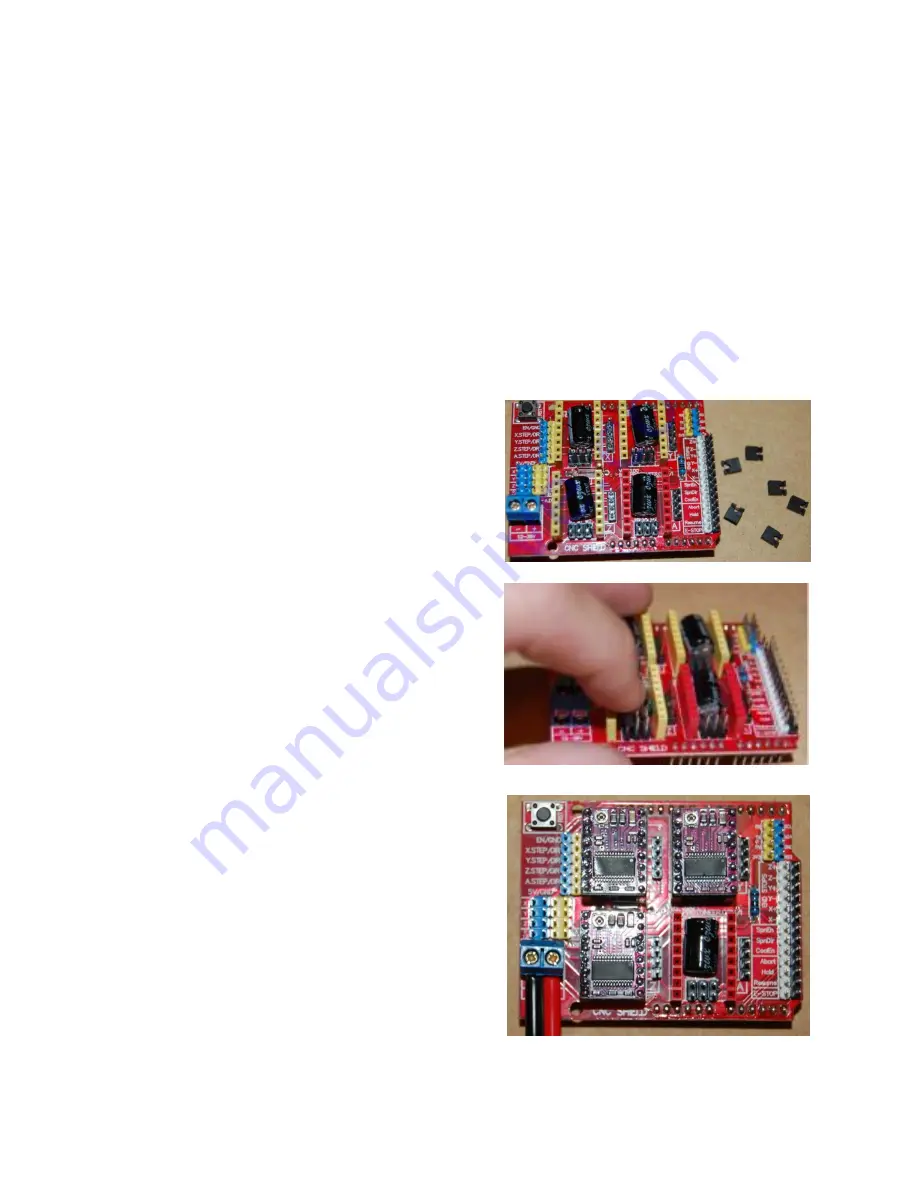
The CNC Shield uses a set of small jumper
connectors to configure the micro-stepping settings.
The jump points are labelled “M0” “M1” and “M2”
underneath where the drivers (small purple boards)
plug in. You will only need 6 jumpers total for this,
but 7 are in your kit.
You need to place jumpers on the “M0” and “M1”
jump points ONLY. Do NOT
put a jumper on “M2.”
Do this the same way on the X, Y, and Z. For those
who are curious, this places the board in “1/8
th
”
micro-stepping.
Now plug the purple stepper motor drivers into the
CNC Shield EXACTLY as you see it here. The position of
the “trim pot” (adjustment point) must be in this
orientation. If you get the orientation of these three
stepper driver boards wrong, you might destroy all of
your electronics when you power up. Adjustment point
on top, chip on bottom!
Don’t
install the fourth
dr
iver. That’s just a spare.
Page 29 of 35


