background image

Baking

58

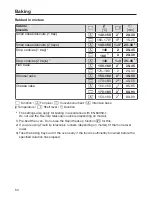
Whisked mixture

Cakes /
biscuits

[°C]

[min]

Tart / flan base (2 eggs)

160–170

2)

20–30

160–170


1)

2


2)

15–25

Sponge cake (4–6 eggs)

170–180

2)

20–35

150–160


1)

2


2)

30–45

Whisked sponge *

180


1)

2

20–30

150–170


1)

2

30–45

Swiss roll

170–180 

1)

2)

15–20

180–190


1)

2


2)

15–20

 Function / 

 Fan plus / 

 Conventional heat

 Temperature / 

 Shelf level / 

 Duration

*

The settings also apply for testing in accordance with EN 60350-1.
Do not use the FlexiClip telescopic runners (depending on model).

1) Pre-heat the oven. Do not use the Rapid heat-up function 

 for this.

2) If you are using FlexiClip telescopic runners (depending on model), fit them one level

lower.

Содержание H2265BP

Страница 1: ...g and installation instructions Oven To avoid the risk of accidents or damage to the appliance it is essential to read these instructions before it is installed and used for the first time en GB M Nr 10 634 330 ...

Страница 2: ...ailable to order 20 Side runners 21 Baking tray universal tray and rack with non tip notches 21 FlexiClip telescopic runners HFC 70 C 22 Oven controls 28 Safety features 28 System lock 28 Cooling fan 28 Vented oven door 28 Door lock Pyrolytic cleaning 28 PerfectClean treated surfaces 29 Using for the first time 30 Before using for the first time 30 Heating up the oven for the first time 31 Overvie...

Страница 3: ...ing duration and end of cooking duration 44 Changing the cooking duration 45 Deleting a cooking duration 46 Deleting the end of cooking duration 46 Changing the time of day 47 Changing settings 48 Baking 50 Notes on using the baking charts 51 Baking charts 52 Creamed mixture 52 Rubbed in mixture 54 Yeast mixtures and quark dough 56 Whisked mixture 58 Choux pastry puff pastry meringue 59 Roasting 6...

Страница 4: ...mme 83 At the end of pyrolytic cleaning 83 If pyrolytic cleaning is cancelled 84 Removing the door 85 Dismantling the door 86 Refitting the door 90 Removing the side runners with FlexiClip runners 91 Lowering the top heat grill element 92 Problem solving guide 93 After Sales Warranty 97 Electrical connection 98 Oven 98 Electrical connection Other countries 99 Building in diagrams 100 Appliance and...

Страница 5: ...and damage to the appliance please read these instructions carefully before using it for the first time They contain important notes on installation safety use and maintenance Miele cannot be held liable for damage or injury caused by non compliance with these instructions Keep these instructions in a safe place and ensure that new users are familiar with the contents Pass them on to any future ow...

Страница 6: ...le with reduced physical sensory or mental capabilities or lack of experience or knowledge who are not able to use the appli ance safely on their own must be supervised whilst using it They may only use it unsupervised if they have been shown how to use it safely and recognise and understand the consequences of in correct operation This oven is supplied with a special lamp to cope with particular ...

Страница 7: ...bies and children Whilst playing children could become entangled in packaging or pull it over their head and suffocate Danger of burning Children s skin is far more sensitive to high temperatures than that of adults External parts of the oven such as the door glass control panel and the vents become quite hot during use Do not let children touch the oven whilst it is in use Danger of burning Child...

Страница 8: ...ian To avoid the risk of damage to the oven make sure that the con nection data on the data plate voltage and frequency match the mains electricity supply before connecting the oven to the mains Consult a qualified electrician if in doubt Do not connect the appliance to the mains electricity supply by a multi socket unit or an extension lead These do not guarantee the required safety of the applia...

Страница 9: ...y supply e g if the oven lighting is faulty see Problem solving guide and Electrical connection In order to function correctly the oven requires an adequate sup ply of cool air Ensure that the supply of cool air is not impaired e g by heat insulation strips in the housing unit Please also ensure that the cool air supply is not unduly heated by other heat sources such as a solid fuel stove If the o...

Страница 10: ...ded when cooking with oil and fat If it does ignite do not put the flames out with water Switch the oven off immediately and then suffocate the flames by keeping the oven door closed Grilling food for an excessively long time can cause it to dry out with the risk of catching fire Do not exceed recommended grilling times Some types of food dry out quickly and can self ignite if high grill temperatu...

Страница 11: ...cause the enamel on the floor of the oven to crack or shatter Do not line the floor of the oven with anything e g aluminium foil or oven liners If you wish to place dishes on the floor of the oven during cooking or place crockery on the floor of the oven to heat it up you can do so but only with the Fan plus or Gentle bake function The enamelling on the oven floor can become damaged by items being...

Страница 12: ... structions on use Do not heat up food in closed containers e g tins or sealed jars in the oven as pressure will build up in the container causing it to ex plode You could injure yourself on the open oven door or trip over it Avoid leaving the door open unnecessarily The door can support a maximum weight of 15 kg Do not sit on or lean against an open door and do not place heavy objects on it Also ...

Страница 13: ... cir cuit Scratches on the door glass can result in the glass breaking Do not use abrasive cleaners hard sponges brushes or sharp metal tools to clean the door glass The side runners can be removed for cleaning see Cleaning and care Ensure that they are replaced correctly Coarse soiling should be removed before running the Pyrolytic cleaning programme If not removed coarse soiling can smoke and ca...

Страница 14: ...floor of the oven The very small gap between the bot tom of the dish and the oven floor would cause a build up of heat and could cause the enamel to crack or chip Never place a Miele oven dish on the top rail of Shelf level 1 as it will not be held securely in this position by the anti tip notches on the runners In general it is best to use Shelf level 2 Remove all accessories as well as the runne...

Страница 15: ...so contain specific materials com pounds and components which were essential for their correct function and safety These could be hazardous to hu man health and to the environment if disposed of with your domestic waste or if handled incorrectly Please do not therefore dispose of your old appliance with your household waste Please dispose of it at your local com munity waste collection recycling c...

Страница 16: ...Door lock Pyrolytic cleaning c Top heat grill element d Air inlet for the fan with ring heating element behind it e Side runners with 5 shelf levels f Oven floor with bottom heat element underneath it g Front frame with data plate h Door ...

Страница 17: ...nctions b Clock timer For displaying the time of day and settings c Temperature selector For setting the temperature d Button For modifying times and settings e OK button For selecting functions and confirming settings f Button For modifying times and settings ...

Страница 18: ...g pro cesses It can be turned clockwise until a resist ance is felt and then back again The temperature selector can be retracted when it is in the position by pressing it in The temperature settings are marked on the temperature selector and on the control panel with ovens Temperature indicator light The temperature indicator light on the display lights up whenever the oven is heating up As soon ...

Страница 19: ...f day or your settings It goes dark if settings are not being entered Please refer to Clock timer for more information Sensor controls The sensor controls respond to the touch of a fingertip Every touch on the sensors is confirmed by an audible tone The tone can be switched off by chan ging setting to status see Clock timer Changing settings ...

Страница 20: ...instruc tions for using the oven screws for securing your oven in the housing unit various accessories Accessories supplied and available to order Accessories will vary depending on model Your oven will be supplied with side runners a universal tray and a rack Depending on model your oven may also come supplied with some or sev eral of the accessories listed here All the accessories listed as well...

Страница 21: ...nners can be removed for cleaning see Cleaning and care Baking tray universal tray and rack with non tip notches Baking tray HBB 71 Universal tray HUBB 71 Rack HBBR 71 These accessories are inserted into the oven between the two rails of a side runner Always position the rack as illustrated The accessories have non tip safety notches half way along the short edges which prevent them from being pul...

Страница 22: ...the FlexiClip telescopic runners right into the oven cavity before pla cing accessories on them To prevent the risk of accessories slid ing off the telescopic runners Make sure that they are sitting se curely on their runners in between the stoppers at either end of each runner Always place the rack with the load ing surface in the lower position on the FlexiClip telescopic runners The FlexiClip t...

Страница 23: ...tray or rack at a time Place the baking tray universal tray or rack on the FlexiClip telescopic runners Leave at least one shelf level free between it and any baking tray uni versal tray or rack above it If you are using the universal tray with a rack on top of it Place the universal tray together with the rack on the FlexiClip telescopic runners The rack will automatically slide between the rails...

Страница 24: ...FlexiClip telescopic run ners are fitted on the upper rail of the two rails that make up a shelf level The FlexiClip telescopic runner with the Miele logo is fitted on the right When fitting the FlexiClip telescopic runners do not extend them If the FlexiClip telescopic runners are diffi cult to pull out after fitting you may need to pull firmly on them once to release them Hook the FlexiClip tele...

Страница 25: ...ith an audible click 4 Removing the FlexiClip telescopic runners Push the FlexiClip telescopic runner in all the way Push down on the tab at the front of the FlexiClip telescopic runner 1 Swing the FlexiClip telescopic runner towards the middle of the oven cavity 2 then pull it forwards along the top rail 3 Lift the FlexiClip telescopic runner off the rail and take it out of the oven ...

Страница 26: ...as been treated with PerfectClean The round perforated baking tray HBFP 27 1 can be used for the same things Baking stone HBS 60 The baking stone is ideal for items which need a well baked base such as pizza quiche bread bread rolls and sa voury snacks The baking stone is made from heat re taining fire brick and is glazed Place it directly on the rack A paddle made of untreated wood is supplied wi...

Страница 27: ...both Suitable lids are available separately Please quote the model number when ordering a lid Depth 22 cm Depth 35 cm HUB 5000 M HUB 5001 M HUB 5001 XL HBD 60 22 HBD 60 35 suitable for use on induction hobs Handle HEG The handle makes it easier to take the universal tray baking tray and rack out of the oven or to put them into it Miele microfibre cloth Light soiling and fingerprints can be easily ...

Страница 28: ...itchen through vents located between the ap pliance door and the control panel The cooling fan will continue to run for a while after the oven has been switched off to prevent any humidity building up in the oven on the control panel or in the oven housing unit This cooling fan will switch itself off automatically after a certain period of time Vented oven door The oven door glass panes have a hea...

Страница 29: ...can be sliced or cut up on PerfectClean surfaces Do not use ceramic knives as these will scratch the PerfectClean surface Surfaces treated with PerfectClean enamel can be cleaned as you would clean glass Read the instructions in Cleaning and care so that the benefits of the non stick properties and easy cleaning are retained The following have all been treated with PerfectClean Universal tray Baki...

Страница 30: ... is shown in 24 hour clock format After connecting the oven to the electri city supply will flash on the dis play The time of day is set in segments first the hours then the minutes Confirm with OK will light up and will flash While the symbol is flashing con firm with OK The hours will flash Use or to set the hours Confirm with OK The hours are saved and the minutes will flash Use or to set the m...

Страница 31: ...g the oven up wipe the interior with a damp cloth to remove any dust or bits of packaging that may have accumulated in the oven cavity during storage and unpacking Select Fan plus The oven heating lighting and cooling fan will switch on Set the maximum temperature 250 C Heat the empty oven for at least an hour After the heating up process has fin ished turn the function selector to 0 and the tempe...

Страница 32: ... If using an older recipe or cookbook set the oven tem perature for Conventional heat 10 C lower than that re commended This will not change cooking times Bottom heat Use this setting towards the end of cooking to brown the base of a cake quiche or pizza Grill For grilling thin cuts e g steak and browning baked dishes Rapid heat up For pre heating the oven quickly The oven function re quired must ...

Страница 33: ...s Intensive bake is not suitable for baking thin biscuits or for roasting as the juices will become too dark Fan grill For grilling thicker cuts of meat e g chicken Lower temperatures can be used than when using the Grill function as the fan distributes the heat around the oven compartment straight away Gentle bake For small amounts e g of frozen pizza bake off rolls cookies and for meat dishes an...

Страница 34: ...oking food Wherever possible set the cooking duration or use a food probe Fan plus can be used for cooking many types of food Because the fan distributes the heat to food straight away it allows you to use a lower temperature than you would with Conventional heat It also en ables you to cook on several shelf levels at the same time Gentle bake is an innovative function that makes optimum use of he...

Страница 35: ...e temper ature about 5 minutes before the end of cooking The residual heat in the oven is sufficient for cooking the food Do not switch the oven off see Warning and safety instructions If you wish to run the pyrolytic clean ing programme it is best to start it immediately after a cooking pro gramme The residual heat in the oven will help reduce the amount of energy required to run the pro gramme ...

Страница 36: ... The oven heating will switch on After cooking Turn the function selector to 0 and the temperature selector to Take the food out of the oven Cooling fan The cooling fan will continue to run for a while after the oven has been switched off to prevent any humidity building up in the oven on the control panel or in the oven housing unit This cooling fan will switch itself off automatically after a ce...

Страница 37: ...llet Conventional heat cakes and biscuits with a short bak ing time up to 30 minutes delicate mixtures e g sponges dark bread dough beef sirloin joints and fillet Rapid heat up With Rapid heat up the heating up phase can be shortened Do not use Rapid heat up to pre heat the oven when baking piz zas or biscuits and small cakes They will brown too quickly on top Select Rapid heat up Select a tempera...

Страница 38: ... symbols appear Symbol function Minute minder Any Duration Function End of cooking duration Temperature indicator light Clock display 0 Setting Setting status System lock You can only set or change a function if the function selector is in the correct position Sensors Senso r Use Highlight functions Reduce duration Access settings Change the status of a set ting Highlight functions Increase durati...

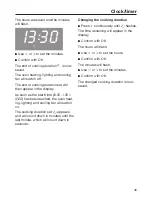
Страница 39: ...as elapsed and the numeric block is no longer flashing you have to access the function again Use or to set the time you want Confirm with OK The right hand numeric block will flash Use or to set the time you want Confirm with OK The time has now been saved Time display The symbols and or will show if you have set times If you are using the minute minder cooking duration and end of cooking duration...

Страница 40: ...e minder Example You want to boil some eggs and set a minute minder duration of 6 minutes and 20 seconds Press continuously until flashes Confirm with OK will appear and the minutes will start to flash If you press once two dashes will appear and then when you press again the maximum possible minutes will appear in the minute numeric block Use or to set the minutes Confirm with OK The minutes are ...

Страница 41: ...ed will appear Confirm with OK The minutes will flash Use or to set the minutes Confirm with OK The seconds will flash Use or to set the seconds Confirm with OK The changed minute minder duration is now saved and will count down in seconds To delete the minute minder duration Press continuously until flashes Confirm with OK The minutes will flash Reduce the minutes down to us ing or increase them ...

Страница 42: ... not delay the start for too long as the cake mixture or dough will dry out and the raising agents will lose their effectiveness Setting a cooking duration Example a cake needs to bake for 1 hour and 5 minutes Place the food in the oven Select the required oven function and the temperature The oven heating lighting and cooling fan will switch on Press continuously until flashes will appear Confirm...

Страница 43: ...e cooking duration At the end of the cooking duration will appear will flash The oven heating will switch off auto matically The cooling fan continues to run For approx 7 minutes a buzzer will sound if switched on see Clock timer Changing settings Confirm with OK The buzzer will stop and the symbols in the display will go out The time of day appears The oven heating will then switch on again Turn ...

Страница 44: ...ing lighting and cooling fan will switch on First set the cooking duration Press continuously until flashes Confirm with OK will appear and the hour numeric block will start to flash Use or to set the hours Confirm with OK The hours are saved and the minutes will flash Use or to set the minutes Confirm with OK The cooking duration is now saved The symbol indicates the cooking duration Then set the...

Страница 45: ...ime has been reached the oven heat ing lighting and cooling fan will switch on The cooking duration set appears and will count down in minutes until the last minute which will count down in seconds Changing the cooking duration Press continuously until flashes The time remaining will appear in the display Confirm with OK The hours will flash Use or to set the hours Confirm with OK The minutes will...

Страница 46: ...r to 0 and the temperature selector to Take the food out of the oven Deleting the end of cooking duration Press or continuously until flashes Confirm with OK The hours will flash Press or continuously until two dashes appear Confirm with OK Four dashes appear Confirm with OK The symbol appears and the cook ing duration set will count down in minutes until the last minute which will count down in s...

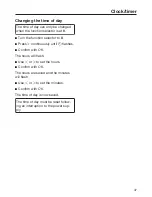
Страница 47: ...ction selector to 0 Press continuously until flashes Confirm with OK The hours will flash Use or to set the hours Confirm with OK The hours are saved and the minutes will flash Use or to set the minutes Confirm with OK The time of day is now saved The time of day must be reset follow ing an interruption to the power sup ply ...

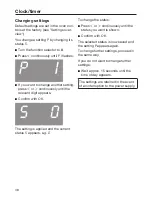
Страница 48: ...ntil the relevant digit appears Confirm with OK The setting is applied and the current status appears e g To change the status Press or continuously until the status you want is shown Confirm with OK The selected status is now saved and the setting appears again To change further settings proceed in the same way If you do not want to change further settings Wait approx 15 seconds until the time of...

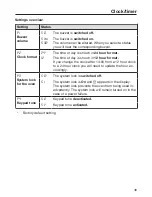
Страница 49: ...f day is shown in 12 hour format If you change the clock after 13 00 from a 12 hour clock to a 24 hour clock you will need to update the hour ac cordingly System lock for the oven The system lock is switched off The system lock is On and appears in the display The system lock prevents the oven from being used in advertently The system lock will remain turned on in the case of a power failure Keypa...

Страница 50: ...ys place baking tins on the rack Position rectangular tins with the longer side across the width of the rack for optimum heat distribution and even baking results When baking cakes with fresh fruit toppings and deep sponge cakes place the tin in the universal tray to catch any spillages Baking paper greasing the tin Miele accessories e g the universal tray are treated with PerfectClean enamel see ...

Страница 51: ...if the food is cooked at the end of the shortest time quoted To check if a cake is ready insert a wooden skewer into the centre It is ready if the skewer comes out clean without dough or crumbs sticking to it Shelf level The shelf level on which you place your food for baking depends on the oven function and number of trays being used Fan plus 1 tray level 2 2 trays levels 1 3 2 4 3 trays levels 1...

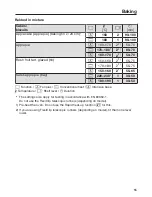
Страница 52: ...50 160 2 2 60 70 150 160 1 2 2 60 70 Ring cake 150 160 2 2 50 60 170 180 2 2 55 65 Function Fan plus Conventional heat Temperature Shelf level Duration The settings also apply for testing in accordance with EN 60350 1 Do not use the FlexiClip telescopic runners depending on model 1 Pre heat the oven Do not use the Rapid heat up function for this 2 If you are using FlexiClip telescopic runners depe...

Страница 53: ...40 50 170 180 2 2 45 55 Fresh fruit cake tray 150 160 2 2 35 45 160 170 2 2 35 55 Fresh fruit cake tin 150 160 2 2 55 65 170 180 1 1 35 45 Flan base 150 160 2 2 25 35 170 180 1 2 2 15 25 Function Fan plus Conventional heat Temperature Shelf level Duration 1 Pre heat the oven Do not use the Rapid heat up function for this 2 If you are using FlexiClip telescopic runners depending on model fit them o...

Страница 54: ...cake 150 160 2 2 85 95 170 180 2 2 80 90 150 160 2 2 80 90 Function Fan plus Conventional heat Intensive bake Temperature Shelf level Duration The settings also apply for testing in accordance with EN 60350 1 Do not use the FlexiClip telescopic runners depending on model 1 Pre heat the oven Do not use the Rapid heat up function for this 2 If you are using FlexiClip telescopic runners depending on ...

Страница 55: ...150 160 2 2 55 65 Swiss apple pie tray 220 230 1 1 30 50 180 190 1 30 50 Function Fan plus Conventional heat Intensive bake Temperature Shelf level Duration The settings also apply for testing in accordance with EN 60350 1 Do not use the FlexiClip telescopic runners depending on model 1 Pre heat the oven Do not use the Rapid heat up function for this 2 If you are using FlexiClip telescopic runners...

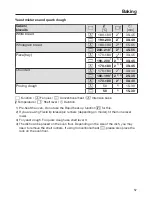
Страница 56: ...1 50 60 Apple turnovers 1 tray 150 160 2 1 25 30 160 170 2 1 2 25 30 Apple turnovers 2 trays 150 160 1 3 1 25 30 3 Function Fan plus Conventional heat Temperature Shelf level Duration 1 If you are using FlexiClip telescopic runners depending on model fit them one level lower 2 For yeast dough For quark dough use shelf level 3 3 Take the baking trays out of the oven early if the food is sufficientl...

Страница 57: ... dough 50 4 15 30 50 4 15 30 Function Fan plus Conventional heat Intensive bake Temperature Shelf level Duration 1 Pre heat the oven Do not use the Rapid heat up function for this 2 If you are using FlexiClip telescopic runners depending on model fit them one level lower 3 For yeast dough For quark dough use shelf level 3 4 The dish can be placed on the oven floor Depending on the size of the dish...

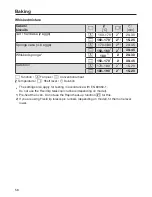
Страница 58: ... 45 Swiss roll 170 180 1 2 2 15 20 180 190 1 2 2 15 20 Function Fan plus Conventional heat Temperature Shelf level Duration The settings also apply for testing in accordance with EN 60350 1 Do not use the FlexiClip telescopic runners depending on model 1 Pre heat the oven Do not use the Rapid heat up function for this 2 If you are using FlexiClip telescopic runners depending on model fit them one ...

Страница 59: ...0 30 3 Macaroons 1 tray 120 130 2 2 25 50 120 130 1 3 2 25 45 Macaroons 2 trays 120 130 1 3 2 25 50 3 Function Fan plus Conventional heat Temperature Shelf level Duration 1 Pre heat the oven Do not use the Rapid heat up function for this 2 If you are using FlexiClip telescopic runners depending on model fit them one level lower 3 Take the baking trays out of the oven early if the food is sufficien...

Страница 60: ...in oven dishes as this ensures that sufficient stock re mains for making gravy The oven also stays cleaner than when roasting on the rack Tips Browning only occurs towards the end of the roasting time Remove the lid about halfway through the roasting time if a more intensive browning res ult is desired At the end of the programme take the roast out of the oven wrap in alu minium foil and leave to ...

Страница 61: ...will be more even When roasting on the rack set a tem perature approx 10 C lower than for roasting in an oven dish Pre heating Pre heating is generally only required when roasting beef sirloin joints and fil let Roasting duration The traditional British method for calcu lating the roasting time is to allow 15 to 20 minutes per lb 450 grammes ac cording to type of meat plus approx 20 minutes adjust...

Страница 62: ...e Shelf level Cooking duration Fan plus Conventional heat If you are using FlexiClip telescopic runners depending on model fit them one level lower 1 Use the universal tray Sear the meat on the hob first 2 Pre heat the oven Do not use the Rapid heat up function for this 3 Roast with the lid on first Then remove the lid three quarters of the way through roast ing and add approx 0 5 litre liquid 4 D...

Страница 63: ...180 2 80 100 2 Meat loaf approx 1 kg 170 180 2 60 70 2 200 210 2 70 80 2 Function Temperature Shelf level Cooking duration Fan plus Conventional heat If you are using FlexiClip telescopic runners depending on model fit them one level lower 1 Roast with the lid on first Remove the lid halfway through the cooking duration and add approx 0 5 litre of liquid 2 Add approx 0 5 litre liquid halfway throu...

Страница 64: ... 1 Function Temperature Shelf level Cooking duration Fan plus Conventional heat If you are using FlexiClip telescopic runners depending on model fit them one level lower 1 Roast with the lid on first Then remove the lid three quarters of the way through roast ing and add approx 0 5 litre liquid 2 Pre heat the oven Do not use the Rapid heat up function for this 3 Add approx 0 5 litre liquid halfway...

Страница 65: ...190 2 110 130 190 200 3 110 130 Poultry approx 4 kg 160 170 2 120 160 1 180 190 2 120 160 1 Fish whole approx 1 5 kg 160 170 2 45 55 180 190 2 45 55 Function Temperature Shelf level Cooking duration Fan plus Conventional heat If you are using FlexiClip telescopic runners depending on model fit them one level lower 1 Add approx 0 5 litre liquid halfway through roasting ...

Страница 66: ...er meat during cooking Cooking takes between 2 4 hours de pending on the size and weight of the meat and on how well cooked you want it as well as the level of browning required Procedure Use the universal tray with the rack placed on top of it Do not use the Rapid Heat up function to pre heat the oven Place the rack together with the uni versal tray on shelf level 2 Select Conventional heat and a...

Страница 67: ...re to eat straight away Serve on pre heated plates with very hot sauce or gravy to prevent it cooling down too quickly Cooking duration Core tem peratures Meat min C Fillet of beef 80 100 59 Sirloin joint Rare 50 70 48 Medium 100 130 57 Well done 160 190 69 Pork fillet 80 100 63 Gammon 140 170 68 Fillet of veal 80 100 60 Saddle of veal 100 130 63 Saddle of lamb 50 80 60 Duration Core temperature I...

Страница 68: ...e whole of the top heating grill ele ment will get hot and glow red Fan grill For grilling larger items e g rolled meat poultry The top heating grill element and the fan switch on and off alternately Trays and racks Use the universal tray with the rack or anti splash insert if available on top The juices from the food being cooked collect under the insert This prevents them from spitting and makin...

Страница 69: ...e a little lemon juice over the fish Grilling Place the rack or the anti splash in sert if available in the universal tray Place the food on top Select the required oven function and the temperature Pre heat the grill for approx 5 minutes with the door closed Danger of burning Wear oven gloves when placing hot food in the oven or removing it and when adjusting oven shelves etc in a hot oven Place ...

Страница 70: ...elf level 2 or 3 Grilling duration Thin pieces of fish and meat usually take 6 8 minutes per side Thicker pieces require more time for each side It is best to grill food of a similar thickness at the same time so that the grilling time for each item does not vary too greatly Turn the food halfway through grilling Testing to see if cooked One way of finding out how well a piece of meat has been coo...

Страница 71: ...Trout 4 1 220 15 25 220 15 25 Toast 3 2 5 8 Cheese toast 3 1 220 8 12 220 8 12 Tomatoes 4 1 220 6 10 220 8 12 Peaches 2 3 1 5 10 220 5 10 Thicker cuts Chicken approx 1 2 kg 1 220 60 70 190 55 65 Pork knuckle approx 1 kg 2 1 180 80 90 Grill Fan grill Shelf level Temperature Duration The settings also apply when using the Full grill function for testing in accordance with EN 60350 1 Do not use the F...

Страница 72: ...g and put the food to be defros ted on the universal tray or into a suit able dish When defrosting poultry put it on the rack over the universal tray to catch the defrosted liquid so that the meat is not lying in this liquid Fish does not need to be fully defros ted before cooking Defrost so that the surface is sufficiently thawed to take herbs and seasoning Defrosting durations The duration neede...

Страница 73: ...nergy savings would be achieved The temperature can be set between 100 and 250 C For optimum results keep the door shut whilst cooking Examples of use Food C min Biscuits 150 25 30 Ratatouille 180 40 60 Fish fillet in foil approx 500 g 200 25 35 Frozen pizza pre cooked 200 20 25 Ham roast ap prox 1 5 kg 160 130 160 Braised beef ap prox 1 5 kg 180 160 180 Temperature Duration Use shelf level 1 or 2...

Страница 74: ...e manufacturer s pack aging Oven chips croquettes or similar items Small items of frozen food such as oven chips can be cooked on the baking tray or universal tray Place baking parchment on the tray so that they cook gently Use the lowest temperature recom mended on the manufacturer s pack aging Turn several times during cooking Method Eating food which has been cooked correctly is important for g...

Страница 75: ... the food evenly over the universal tray Use the Gourmet perforated baking tray if you have one Select Fan plus or Conventional heat Select a temperature of 80 100 C Place the universal tray on shelf level 2 With Fan plus you can dry pro duce on levels 1 3 at the same time Food min Fruit 120 480 Vegetables 180 480 Herbs 50 60 Function Drying time Fan plus Conventional heat Reduce the temperature i...

Страница 76: ... crockery on it Depending on the size of the crockery you can also use the oven floor and also take the side runners out to make more room Select Fan plus Set the temperature to 50 80 C Danger of burning Wear oven gloves when removing the dishes from the oven Droplets of water may have accumulated under neath the dish Remove the heated crockery from the oven ...

Страница 77: ...agents To avoid damaging the surfaces do not use cleaning agents containing soda am monia acids or chlorides cleaning agents containing descaling agents on the oven front abrasive cleaning agents e g powder cleaners and cream cleaners solvent based cleaning agents stainless steel cleaning agents dishwasher cleaner glass cleaning agents cleaning agents for ceramic hobs hard abrasive brushes or spon...

Страница 78: ...Normal soiling The fibre glass seal around the front of the oven should be handled care fully Do not rub and scour it If possible you should avoid trying to clean it It is best to remove normal soiling im mediately using a clean sponge and a solution of hot water and washing up liquid or with a clean damp mi crofibre cloth After cleaning make sure all residual cleaning agent is thoroughly removed ...

Страница 79: ...glass scraper or with a non ab rasive stainless steel spiral pad warm water and washing up liquid Very stubborn soiling on PerfectClean surfaces can be cleaned using Miele Oven Cleaner This cleaner must only be applied to cold surfaces Follow the instructions on the packaging Non Miele oven cleaner must only be used in a cold oven and for no longer than a maximum of 10 minutes You can then also us...

Страница 80: ...oiling or if the bearings become sticky with spilled fruit juices proceed as follows Soak the FlexiClip runners for approx 10 minutes in a solution of hot water and washing up liquid If necessary use the back of a wash ing up sponge to remove the soiling The bearings can be carefully cleaned with a soft brush Cleaning may cause some discoloura tion or fading in places however this will not affect ...

Страница 81: ...y tariffs At the end of pyrolytic cleaning any residues such as ash from the pyrolytic process can be easily wiped away Setting up for pyrolytic cleaning Remove all accessories as well as the runners and any extra accessor ies such as FlexiClip runners from the oven interior before starting the Pyrolytic cleaning programme The high temperatures needed for pyrolysis will damage them Take the side r...

Страница 82: ...ed Then oven heating and temperature control switch on automatically even if the temperature selector is in the position If you wish to follow the progress of the pyrolytic cleaning programme you will need to call up the duration Confirm with OK Press continuously until flashes The time remaining of the pyrolytic cleaning programme will appear in the display You cannot alter the duration If you ha...

Страница 83: ...m with OK The end time set is now saved The oven heating switches off The end time can be changed at any time up to the start of the programme As soon as the start time has been reached the oven heating lighting and cooling fan will switch on and the dura tion will appear in the display At the end of pyrolytic cleaning First and appear As long as lights up the door is locked When flashes the door ...

Страница 84: ...f pyrolytic cleaning is cancelled the oven door will remain locked until the temperature inside the oven drops to below 280 C remains lit up until the temperature of the oven cavity has fallen below this temperature When flashes the door is unlocked The following will cause the pyrolytic cleaning programme to stop Turn the function selector to another function or to the 0 position Turn the functio...

Страница 85: ...lease the locking clamps by turn ing them as far as they will go Do not attempt to take the door off the retainers when it is in the hori zontal position as the retainers will spring back against the oven Do not use the handle to pull the door off the retainers as the handle could break Raise the door up till it rests open Holding the door securely at both sides lift it upwards off the retainers M...

Страница 86: ...not use abrasive cleaning agents hard sponges or brushes and do not use sharp metal tools or scrapers Please also read the general notes on cleaning the oven front before cleaning the glass panes The glass panes are coated in differ ent ways with a heat reflective coat ing on the sides facing into the oven cavity The glass panes must be fit ted the right way round after being cleaned Oven spray wi...

Страница 87: ...wards to pre vent it getting scratched The door handle should line up with the edge of the table so that the glass lies flat and does not get broken dur ing cleaning Flip the two glass pane retainers out wards to open them You can now remove the inner panes and the two middle panes one after the other Carefully lift the inner pane up and out of the plastic strip Remove the seal ...

Страница 88: ...hen reassemble the door carefully The two middle panes are identical To help you put them back in correctly the material number is printed on the panes Refit the lower of the two middle panes in such a way that the material number is legible not a mirror image Flip both the glass pane retainers in wards in such a way that they fit over the lower of the two middle panes Then refit the upper of the ...

Страница 89: ...h the inner pane with the matt printed side facing downwards into the plastic strip and place it between the retainers Flip both the glass pane retainers in wards to close them The door is now reassembled and is ready to fit back on the oven ...

Страница 90: ...hinge retainers Make sure that the door goes back on straight Open the door fully If the locking clamps are not locked the door could work loose resulting in damage Ensure that the locking clamps are locked after refitting the door Flip both locking clamps back up as far as they will go into a horizontal position ...

Страница 91: ...un ners separately beforehand please fol low the instructions in Features Fit ting and removing FlexiClip telescopic runners Danger of burning Make sure the oven heating ele ments are switched off and cool Pull the side runners out of holder 1 at the front of the oven and then pull them out of the oven 2 Refit in the reverse order Take care and ensure that all parts are correctly fitted ...

Страница 92: ...oven cavity is cool Remove the side runners Undo the wing nut Use caution not to damage the top heat grill element Do not use force when lowering the top heat grill element Carefully lower the top heat grill ele ment You can now clean the roof of the oven Raise the top heat grill element and tighten the wing nut securely Refit the side runners ...

Страница 93: ...and remedy The display is dark There is no power to the oven Check whether the mains fuse has tripped If it has contact a qualified electrician or Miele The oven does not heat up You have only selected an oven function or a temper ature Select both a function and a temperature The system lock has been activated Switch off the system lock see Clock timer Al tering settings There is no power to the ...

Страница 94: ...time and this has activated the safety switch off func tion Turn the function selector to 0 The oven is now ready to use again immediately appears in the dis play The door has not locked for the Pyrolytic cleaning programme Turn the function selector to the 0 position and se lect the Pyrolytic programme you want again If the problem persists contact Miele Service appears in the dis play The door l...

Страница 95: ...ness If the un evenness is pronounced check that the correct temperature and shelf level have been selected The material or colour of the baking tin is not suitable for the oven function When using Conventional heat use matt dark coloured tins Light coloured shiny pans will not produce as desirable results FlexiClip runners are not running smoothly The bearings in the FlexiClip runners are not suf...

Страница 96: ...its seal and turn clockwise to secure Reconnect the oven to the electricity supply The door cannot be opened at the end of a Pyrolytic cleaning pro gramme The door lock has not unlocked after the Pyrolytic cleaning programme Turn the function selector to 0 If the door lock still does not release itself call Miele Service There is soiling in the oven after the Pyrolytic cleaning programme The Pyrol...

Страница 97: ... as described in these instructions When contacting your Dealer or Miele please quote the model and serial num ber of your appliance This information is given on the data plate visible on the front frame of the oven with the door fully open Warranty UK The appliance is guaranteed for 2 years from the date of purchase In the UK you must activate your cover by calling 0330 160 6640 or registering on...

Страница 98: ...l means of disconnection must be provided for all poles When switched off there must be an all pole contact gap of 3 mm in the isolator switch including switch fuses and re lays according to EN 60335 Connection data The required connection data are given on the data plate located on the oven trim visible when the door is open Ensure that these match the mains sup ply When contacting Miele please q...

Страница 99: ...s The voltage and rated load are given on the data plate situated at the front of the oven interior Please ensure that these match the household mains sup ply For extra safety it is advisable to install a suitable residual current device RCD ground fault interrupter GFI Contact a qualified electrician for ad vice If the cord is damaged a new cord must be fitted by a Miele approved service technici...

Страница 100: ...are given in mm Installation in a base unit When building the appliance into a base unit underneath a hob please also ob serve the installation instructions for the hob as well as the building in depth re quired for the hob Ovens with glass front Ovens with metal front ...

Страница 101: ...Building in diagrams 101 Installation in a tall unit Ovens with glass front Ovens with metal front ...

Страница 102: ...Building in diagrams 102 Dimensions of oven front Dimensions are given in mm A H22xx 42 mm B Ovens with glass front 2 2 mm Ovens with metal front 1 2 mm ...

Страница 103: ... to the isolator switch or fused spur connection unit Building in Connect the mains cable from the oven to the isolator Do not carry the oven by the door handle The door can be damaged Use the handles on each side of the casing to carry it It is advisable to dismantle the door before installing the appliance see Cleaning and Care Dismantling the door and remove accessories from the oven cavity Thi...

Страница 104: ...Burgers Rack and univer sal tray 4 4 1st side 7 12 2nd side 5 12 Yes 5 minutes Function Temperature Shelf level Cooking duration Fan plus Conventional heat Grill Do not use the FlexiClip telescopic runners depending on model 1 Take the baking trays out of the oven early if the food is sufficiently browned before the specified duration has elapsed 2 Use a dark coloured matt tin and place it on the ...

Страница 105: ...xiClip runners or catalytic enamelled panels such as side panels or roof liners When calculating the Energy efficiency class it is important to keep the oven door firmly closed Depending on test instruments used the door seal function can be affected to a greater or lesser degree This can have a negative influence on test results This can be compensated for by pressing on the door Where necessary ...

Страница 106: ... Energy efficiency index cavity EEIcavity 81 9 Energy efficiency class cavity A most efficient to D least efficient A Energy consumption per cycle for each cavity in conventional mode 1 10 kWh Energy consumption per cycle for each cavity in fan forced convection mode 0 71 kWh Number of cavities 1 Heat source s per cavity electric Volume of cavity 76 l Mass of the appliance 46 kg ...

Страница 107: ...d Ltd 2024 Bianconi Avenue Citywest Business Campus Dublin 24 Tel 01 461 07 10 Fax 01 461 07 97 E Mail info miele ie Internet www miele ie Ireland Malaysia Miele Sdn Bhd Suite 12 2 Level 12 Menara Sapura Kencana Petroleum Solaris Dutamas No 1 Jalan Dutamas 1 50480 Kuala Lumpur Malaysia Phone 603 6209 0288 Fax 603 6205 3768 Miele New Zealand Limited IRD 98 463 631 Level 2 10 College Hill Freemans B...

Страница 108: ...M Nr 10 634 330 00 en GB H2265BP H2267BP ...

Отзывы: