Midland BTX2 FM Скачать руководство пользователя страница 12

UK

Midland BTX2 -

 21

20


 - Midland BTX2

UK

To redial the last number:

Press “Forward” button for 3 seconds in order to redial the last number (you will 
hear one audio confirmation tone).

To make a voice call:

Briefly press “Forward” button. If your mobile phone supports voice calls, you will 
be asked to speak the name of the contact you wish to call.

Priority

: Calls have a high priority, which means that all other communications are 

temporarily disabled when a call arrives and automatically re-enabled once the call 
ends.

Ending a call in both Phone/Intercom mode

There are several ways to end a call:


Wait for the called person to end the call.


Press the “Forward” button (you will hear an audio confirmation tone).


Press “End” button on the mobile phone. 

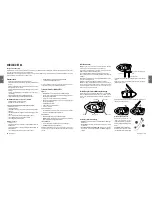
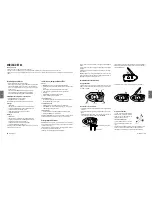
Using the MP3 player feature of the mobile phone only Phone mode

Many mobile phones are now designed to be used as stereo MP3 players. The 
BTX2 device fully supports the A2DP and AVRCP protocols that enable you to listen 
to stereo music and remotely control your mobile phone’s MP3 player. You can 
even use the buttons on the BTX2 unit to control the following play options: Play, 
Pause, Forward and Backward.

Available controls:


To play/pause music: click on the “Middle” button.


To skip forward to the next song: press the “Forward” button.


To skip backwards to the previous song: press the “Rear” button..

Priority

: the music listening mode has the lowest priority. Therefore, it will always 

be disabled when another type of communication is enabled.

How to pair the BTX2 to a GPS

In general is possible to pair the BTX2 to all the GPS for motorbike  that support 
Bluetooth headset connection. 
To pair the BTX2 to a GPS, you must first enter the setup mode:
1.  Turn off the unit
2.  Press and hold down the “Middle” button about 7 sec., until the Red light is 

on permanently.

3.  Now press firmly (3 sec) the “” button, the Blue and Red light will flash. 
4.  Enable the Bluetooth device search feature on your GPS
5.  After some seconds, “Midland BTX2” will be displayed on your GPS.
6.  Follow the pairing procedure of your GPS. If a pin code is requested you must 

enter “0000” (four times zero).

7.  When successfully paired, the Blue light of the unit will be on for one second 

and then the unit will exit the setup mode and switch to the working mode 
(the Blue light will start flashing). 

When you pair the GPS to the  button, you loose the possibility to pair 
the phone to the BTX2 unit. You can overcome this limit by pairing the phone 
directly to the GPS and then the GPS to the BTX2 unit. All the phone features are 
therefore managed by the GPS itself. 

GPS navigator always in background

To keep the intercom open while the GPS give the street indication you must have 
the “background” feature active.

How to pair PMR446 transceiver with integrated Bluetooth

If your PMR446 trasceiver has an integrated Bluetooth (like the G8BT), you must 
pair the trasceiver using the ““ button:


Turn off the unit


Press and hold down the “Middle” button about 7 sec., until the Red light is 
on permanently.


Now press firmly (3 sec) the “” button, the Blue and Red light will 
flash. 


Follow now the pairing procedure explained on the manual of the transceiver 
itself

Attention:

 If you are pairing to a G8BT transceiver, just when the BTX2 finish the 

pairing (only the Blu LED is flashing) you must follow this procedure to activate the 
Bluetooth connection:


Turn off and on the G8BT and then press for 3 sec. the “BT” button.


Follow the same procedure every time you need to reconnect the G8BT to the 
BTX2 (no need to make the pairing procedure again) 

Attention:

 remember to have the “background” feature active if you want to keep 

the two way radio communication together with the intercom.

How to use the wired audio input

Your Midland BTX2 is also supplied with a wired audio input (AUX), that can 
be used to connect an audio source, like an iPod (or any other MP3 Player) or a 
PMR446 transceiver for group communication or for a coverage increase. 

Listening to music

To listen to music from the wired input, connect the audio source using the op-
tional AUX cable. 
The volume buttons (Vol + and Vol -) cannot be used to adjust the volume of the 
wired audio source. The AGC system with automatically increase the volume on 
higher speed.

Attention

: never set the volume of the MP3 Player to the maximum possible. Nor-

mally the best level is about the 70% of the maximum.

Hint

: We recommend that you perform a few tests adjusting the volume of your 

iPod/MP3 player so at the normal speed the Headset volume is suited to your 
needs. The AGC system will automatically increase the volume on higher speed. 
Make a note to remember this setting for future trips.

Enabling/disabling the wired input

If needed the wired input can be enabled or disabled:
Enabling/Disabling: Make a Long press on the “Rear” button (you will hear one 
audio beep tone for enabling confirmation and two audio beep tone for disa-
bling). 

Using a PMR446 transceiver with the cable connection

In order to connect the transceiver to your Midland BTX2, you need to purchase 
the specific 2.5mm plug AUX cable, sold separately. S
ome manufacturers radios use a different pin configuration, so we recommend 
that you ask your dealer as to which cable is best suited to your needs 
The cable connected to the transceiver normally has also a PTT button that can 
be placed on the handlebar of your bike or held in your hand (If you are the pas-
sanger rider).
To communicate via the attached radio, press the PTT button to speak and release 
it to listen. It is not possible to talk and listen simultaneously. 
Adjust the volume of the transceiver to your needs, remembering that the volume 
adjustment is controlled by the automatic AGC system and that it will therefore 
be automatically increased in relation to background noise.
If you wish to use a PMR446 transceiver for group communications and simulta-
neously maintain the Intercom feature enabled between two or more BTX2 devi-
ces, you must remember that every time you talk to communicate with the PMR 
446 transceiver (pressing the PTT button), you will also activate the intercom of 
the BTX2 to the unit connected to the “Middle” button (thanks to the VOX feature).
To avoid the Intercom activation when you speak on the PMR446, you can decide 
to pair the BTX2 unit on the “Rear” or “Forward” (where the VOX is not active) or 
if you still want to use the “Middle” button, you must  disable the VOX feature, as 
explained in the previous section.

Attention! 

If you disable the VOX feature, you will only be able to answer incoming 

phone calls by pressing the “Forward” button.

Setup and special configurations

Resetting all paired devices

Sometimes you may find it necessary to delete all the pairing references stored in 
the BTX2 unit (reset operation).
To perform this operation you must first enter the setup mode:


Turn off the unit


Press and hold down the “Middle” button about 7 sec., until the Red light is 
on permanently. 


Than simultaneously press and hold down the “” and “Volume –“ 
buttons for 3 seconds. The Blue Light will be lit on for 1 sec and than back 
to steady RED.


Double click on the “Middle” button to exit the “Setup” mode and use the BTX2.

This procedure deletes all the paired Bluetooth devices stored in the memory and 
it is therefore possible to start a new “clean” pairing session.

Back to factory setting

Sometimes you may find it necessary to go back to the factory setting, to reset all 
the changes/setup already made and have a “clean” unit.
To perform this operation you must first enter the setup mode:


Turn off the unit


Press and hold down the “Middle” button about 7 sec., until the Red light is 
on permanently. 


Than simultaneously press and hold down all the three buttons  “Forward”-
“Middle”-“Rear” for 3 seconds. The Blue Light will be lit on for 1 sec and than 
back to steady RED.


Double click on the “Middle” button to exit the “Setup” mode and use the BTX2.

Adjusting/ Disabling the VOX feature  (Intercom and telephone)

The Intercom feature can be enabled both manually and vocally (VOX). The VOX 
activation is influenced by the background noise and therefore by the speed. 
For optimum results, it is possible to choose one of the following four microphone 
sensitivity levels: high, medium, low and very low. The default setting of BTX2 is 
“low”. It is also possible to disable the VOX feature in order to activate the Inter-
com and phone call answering features in manual mode only.

Adjusting the sensitivity of the microphone (VOX)

To perform this operation you must first enter the setup mode:
1.  Turn off the unit
2.  Press and hold down the “Middle” button about 7 sec., until the Red light is 

on permanently. 

3.  Your BTX2 is now in “Set up mode”.

Play/Pausa

Forward

Backward

Содержание BTX2 FM

Страница 1: ... MANUALE D USO INSTRUCTION GUIDE Bedieunungsanleitung MANUAL DE INSTRUCCIONES GUIDE D UTILISATION Advanced Intercom System ...

Страница 2: ...nare un altro dispositivo BTX2 5 Utilizzo dell Intercom con dispositivi della lina BT Midland 6 Abbinare tre dispositivi Intercom 6 Talk 2 All Abbinamento ad un dispositivo Intercom non Midland 6 Utilizzo di altri dispositivi Bluetooth 7 Utilizzo dell ingresso audio a filo 9 UtilizzodiunricetrasmettitorePMR446 con cavo 9 Configurazioni speciali 10 Configurazione e aggiornamento firmware 10 Garanzi...

Страница 3: ...stato progettato per essere resistente alla pioggia Verificatesemprecheigomminidiprotezionedellepresesianobenchiusiincaso dipioggia Ricarica delle batterie Assicuratevi che il dispositivo di comunicazione sia completamente carico prima di iniziare ad utilizzarlo La prima volta sono necessarie almeno 8 ore Successi vamente il tempo si riduce mediamente a 4 6 ore per una ricarica completa Per ragion...

Страница 4: ...un altro dispositivo Phone se è stato abbinato un telefono E possibile sapere in quale modalità si trova il dispositivo semplicemente pre mendoinsiemeipulsanti Volume e Volume Unannunciovocaleviindiche rà in quale modalità vi trovate Distanza La distanza massima di comunicazione tra due dispositivi Midland BTX2 è di cir ca 800mt in campo aperto con entrambe le antenne in posizione sollevata La mas...

Страница 5: ...con ferma Regolazione del volume Midland BTX2 è dotato della tecnologia AGC che regola automaticamente il volu mediascoltoinbasealrumoredifondo Potetecomunqueregolaremanualmen te il volume agendo sui pulsanti Volume e Volume Attenzione laregolazionedelvolumeavvienesolonelmomentoincuic èunaudio attivo Attenzione ipulsantidiregolazionevolume Volume e Volume noncontrol lanoilvolumedellasorgenteaudioa...

Страница 6: ...a modalità Setup Spegnete il BTX2 Tenere premuto il pulsante Centrale fino a che la luce non rimane di colore rosso fisso Premere il pulsante Volume fino a quando la luce lampeggia Rosso e Blu Attivate la modalità di abbinamento sul ricetrasmettitore PMR446 seguendo le istruzioni riportate sul manuale del ricetrasmettitore stesso Attenzione nel caso di abbinamento ad una radio G8BT appena il BTX2 ...

Страница 7: ...sta funzione è possibile mantenere aperta la sorgente audio via filo anchequandol Intercomoiltelefonosonoattivi Questafunzionepuòessereuti le quando si utilizza una ricetrasmittente collegata via filo Per default questa funzione è attiva Disattivazione Entrate in modalità setup luce rossa sempre accesa Premetecontemporaneamenteilpulsante Avanti e Centrale perunsecondo La luce Blu farà due lampeggi...

Страница 8: ... to pair two BTX2 17 How to pair the BTX2 to previous Midland BT Line unit 17 How to pair three intercom unit together 18 Talk 2 All Pairing to a different brand Intercom 18 Pairing the BTX2 to Bluetooth devices 18 How to use the wired audio input 20 Using a PMR446 transceiver with cable connection 21 Setup and special configurations 21 Setup and firmware update 22 Warranty 23 European CE Notice C...

Страница 9: ...h connection for group bike to bike communications Wire connections For stereo audio input like iPod MP3 player with optional cable For PMR446 transceivers with optional cable Attention Midland BTX2 is designed to withstand rain and water However if it is raining alwaysverifythattherubbercapsprotectingthesocketsarefullyfitted Charging batteries Attention Makesurethattheunitisfullychargedbeforeuse ...

Страница 10: ...ou need to know in which mode the unit currently is just press the Volume and Volume buttontogether Avoiceannouncementwilltellyouthecurrent mode Maximum Distance You can reach 800mt intercom distance if the flip up antenna is up and if you are in line of site without obstructions and interferences the riders must be always in sight How to pair two BTX2 unit ThetwounitssuppliedinthesameBTX2box area...

Страница 11: ...is open Enabling Disabling the Background feature Keep pressed for three second the Volume button a voice announcement will tell you the status The background feature is active by default Pairing to a phone The cellular phone can be paired only to the Volume when paired the phonemode isactive Inthiswayitispossibletomanageallthephonefunctio nalities and listen to the stereo music An incoming call t...

Страница 12: ... on higher speed Attention never set the volume of the MP3 Player to the maximum possible Nor mallythebestlevelisaboutthe70 ofthemaximum Hint We recommend that you perform a few tests adjusting the volume of your iPod MP3 player so at the normal speed the Headset volume is suited to your needs The AGC system will automatically increase the volume on higher speed Make a note to remember this settin...

Страница 13: ...cedure up described now the blue LED will flash once To exit the Setup mode double click the Middle button Setup and Firmware update It is possible to configure and update the firmware of your BTX2 using the USB connection to your PC On the Midland web site www midlandradio eu in the BTX2 page you can find the PC software and the new firmware updates if avai lable ATTENTION DO NOT CONNNECTTHE UNIT...

Страница 14: ...29 Koppeln Pairen von zwei BTX2 Geräten 29 Koppeln des BTX2 mit einem älteren bt line Gerät 30 Drei Intercom Geräte verbinden 30 Talk 2 All 30 Ein BTX2 mit einem anderen Bluetooth Gerät koppeln 31 Verwendung des Audiokabel Eingangs 33 Verwendung eines PMR446 Funkgeräts mit Kabelanschluss 33 Setup und spezielle Konfiguration 34 Setup und Firmware Aktualisierung 35 Gewährleistung 35 Europäische CE E...

Страница 15: ...r zu Sozius oder Bike zu Bike Intercom Sprechverbin dung mit einer maximalen Reichweite bis zu 800 mt Bluetooth Geräte Mobiltelefon mit MP3 Player Stereo A2DP Protokoll GPS PMR446 Funkgerät mit eingebauter oder externer Bluetooth Verbindung für Motorrad zu Motorrad Gruppenkommunikation Kabelverbindungen Für Stereo Audioeingang iPod MP3 Player mit optionalem Kabel Für PMR446 Funkgerät mit optionale...

Страница 16: ...ilt Ihnen den aktuellen Modus mit Die Modes schalten in folgender Reihenfolge um Gegensprech Modus wenneinanderesBTX2früherschongekoppeltwurde Telefon Modus wenn vorher schon ein Mobiltelefon gekoppelt wurde JedesMal wennSiedasBTX2einschalten wirdderStandardmodusIntercomein geschaltet wenn es zuvor mit einem anderen Gerät gekoppelt war andernfalls befindet es sich imTelefon Modus wenn es mit einem...

Страница 17: ...son wird über den versuchten Anruf informiert und hört eine Ansage mit der Nummer derTaste von der die Anfrage kommt Sobald das erste Gespräch beendet ist kann die Person auf dieseWeise einfach den Anrufer kontaktieren indem Sie das Intercom mit der entsprechenden Nummer per Sprachansage mitgeteilt aktiviert Ein BTX2 mit einem anderen Bluetooth Gerät koppeln Das BTX2 Gerät kann mit anderen Bluetoo...

Страница 18: ... Koppelns von der BTX2 Seite her auch noch die Bluetooth Sprechverbindung auf der G8E BTSeitestarten Schalten Sie das G8E BT aus und wieder ein Drücken Sie für etwa 3 sec lang den BT Knopf am G8BT Diese Prozedur müssen Sie jedes Mal ausführen wenn Sie die Sprechverbindung zwischen G8BT und BTX2 wieder einmal starten möchten Die Pairing Prozedur selbst ist nicht erforderlich Hinweis Um das PMR446 F...

Страница 19: ...BTX2 kann mittels einer USB Verbindung mit Ihrem PC konfi guriert und aktualisiert werden Auf der Website von Midland www midlandra dio eu finden Sie auf der BTX2 Seite die PC Software und die neuen Firmware Aktualisierungen falls verfügbar ACHTUNG DAS GERÄT NUR AN DEN PC ANSCHLIESSEN WENN DIE SOFTWARE HERUNTERGELADENUNDINSTALLIERTWURDE Benutzung auf eigene Gefahr Das Benutzen von beidseitigen Aud...

Страница 20: ... an technischen Informationen finden Kunden aus dem deutschsprachi gen Raum auch unter http hobbyradio de in der Rubrik Biker Sets wo Sie die jeweilsneuesteAusgabederGeräteunterlagenzumDownloadfindenInformatio nen für Kunden in Deutschland gibt es unter www alan electronics de Índice Características principales 38 Especificaciones técnicas del Midland BTX2 38 Carga de baterías 38 Descripción del d...

Страница 21: ...6 con cable BT312 opcional Atención MidlandBTX2sehadiseñadopararesistirlalluvia Verifiquesiempreque lasgomasdeprotecciónesténbiencerradas Carga de baterías Asegúrese de que las unidades están totalmente cargadas antes de su uso Antes de utilizar las unidades por primera vez efectúe una carga de al menos 8 ho ras Posteriormente el tiempo de carga se reduce a 4 6 horas para una recarga completa Por ...

Страница 22: ...izados Las dos unidades suministradas en la caja del BTX2 Twin están sincronizadas y listas para su uso lo que significa que no debe realizar este proceso Silasunidadesnosondelmismokitosehancompradoseparadamente necesita sincronizarlas para poder utilizarlas juntas Sincronización a otro BTX2 1 Apague ambas unidades Mantenga pulsada la tecla Central hasta que el LED rojo se encienda fijo Repita el ...

Страница 23: ...ndo termine de hablar el usuario llamado podrá contactar con la persona que quería hablar con él simplemente abriendo el Intercom usando la tecla correspondiente al aviso recibido Uso de otros dispositivos Bluetooth El BTX2 puede ser enlazado a otros dispositivos Bluetooth tales como un teléfono móvil navegador GPS o walkie talkie con Bluetooth integrado La sincronización debe efectuarse utilizand...

Страница 24: ...por cable AUX La entrada de cable se puede activar desactivar manteniendo pulsada la tecla Atrás tres segundos Escuchará un tono de confirmación al activarla y dos tonos al desactivarla Walkie talkie con conexión vía cable Para poder usar un walkie talkie es necesario comprar un cable específico BT312 quesevendeporseparado paraconectarloalMidlandBTX2 Normalmente junto alcablesesuministratambiénelp...

Страница 25: ... mismos Por favor utilice este dispositivo con un nivel de volumen seguro Garantía Limitada de ALAN COMMUNICATIONS Estagarantíanolimitalosderechosdelusuarioreconocidosenlanormativaesta tal aplicable en materia de venta de bienes de consumo Durante el periodo de garantía ALAN COMMUNICATIONS reparará en un perio do razonable de tiempo los defectos en materiales diseño y fabricación libre de cargos d...

Страница 26: ...ximale 53 Comment coupler deux modules BTX2 53 Comment connecter trois Intercom ensemble 54 Talk 2 All Connexion intercom à d autre marque 54 Connecter le BTX2 à des périphériques Bluetooth 54 Comment utiliser l entrée filaire 57 Utiliser une radio PMR446 avec câble de connexion 57 Installation et configuration speciale 57 Configuration et mise à jour logiciel 58 Garantie 59 Certification de notic...

Страница 27: ...dio PMR446 avec connexion Bluetooth intégrée ou externe pour une communication en groupe de moto à moto Connexions filaires Pour une entrée audio stéréo iPod Lecteur MP3 avec câble optionnel Pour une radio PMR446 avec câble optionnel Attention LeMidlandBTX2aétéconçupourrésisteràlapluie Cependant s ilpleut vérifiezquelescapuchonsencaoutchoucdesconnecteurssontbienenplace Rechargement des batteries A...

Страница 28: ...e a été connecté Si vous souhaitez savoir dans quel mode se trouve le module appuyez sur Volu me et Volume ensemble Unevoixannoncelemodeencoursd utilisation Distance maximale Vous pouvez atteindre une distance intercom de 800 mt si l antenne escamotable estenpositionhauteetets iln yapasd obstacleoud interférence Leconducteur doit être toujours à vue Comment coupler deux modules BTX2 Les deux modul...

Страница 29: ...mandé annoncé par la voix Connecter le BTX2 à des périphériques Bluetooth Le BTX2 peut être connecté à d autre périphériques Bluetooth tel qu un Pho ne un navigateur GPS Navigator ou une radio PMR446 avec Bluetooth intégré ou externe La procédure de connexion doit être effectuée à l aide de la touche Volume Connexion Bluetooth toujours en arrière plan Cette fonction vous permet de garder la connex...

Страница 30: ...églage du volume par les touches Volume et Volume ne peut pas être utilisé pour régler le volume de la source audio filaire ce qui signifie que vous avez seulement besoin d ajuster le volume de vo tre iPod lecteur MP3 à un niveau qui vous permettra d écouter de la musique à vitesse normale Attention NeréglerjamaislevolumedevotrelecteurMP3aumaximum Astuce Nous vous recommandons d effectuer quelques...

Страница 31: ...te peut en dommagervousetlesautres danscertainslieuxn estpasautorisé L utilisationà un volume élevé peut entraîner une perte auditive permanente Si vous entendez un sifflement dans l oreille ou toutes autres écoutes douloureu se associée réduisez le volume ou cessez d utiliser cet appareil Avec l utilisation continue à volume élevé vos oreilles s habituent au niveau sonore ce qui peu causer des do...

Страница 32: ...60 MidlandBTX2 F ...

Страница 33: ... C Cobalt 48 08940 Cornellà de Llobregat Barcelona España Tel 34 902 384878 Fax 34 933 779155 www midland es Lea atentamente las instrucciones antes de usar el equipo si el producto contiene pilas o baterías no las tire al fuego ni las disperse en el ambiente después de su uso utilice los contenedores apropiados para su reciclaje Vertrieb durch ALAN ELECTRONICS GmbH Daimlerstraße 1K D 63303 Dreiei...

Отзывы: