Figures
figure description . . . . . . . . . . . . . . . . . . . . . . . . . . . . . . . . . . . . . . . . . . . . . . . . .page
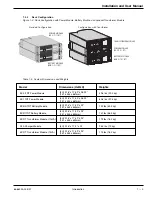
1-1:
Tower Configuration with Power Module, Battery Module,
and Optional Transformer Module. . . . . . . . . . . . . . . . . . . . . . . . . . . . . . .1 — 4
1-2:
Rack Configuration with Power Module, Battery Module,
and Optional Transformer Module. . . . . . . . . . . . . . . . . . . . . . . . . . . . . . .1 — 5
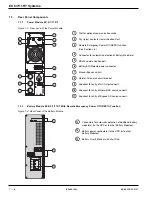
1-3:
Rear Panel of the Power Module. . . . . . . . . . . . . . . . . . . . . . . . . . . . . . .1 — 6
1-4:
Rear Panel of the Battery Module. . . . . . . . . . . . . . . . . . . . . . . . . . . . . . .1 — 6
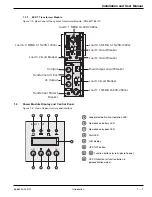
1-5:
Rear Panel of the Optional Transformer Module. (PN 86211) . . . . . . . . .1 — 7
1-6:
View of Typical Control Panel Interface. . . . . . . . . . . . . . . . . . . . . . . . . .1 — 7
1-7:
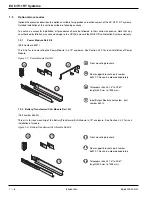
Power Module Rail Kit. . . . . . . . . . . . . . . . . . . . . . . . . . . . . . . . . . . . . . . .1 — 8
1-8:
Battery/Transformer/CLA Module Rail Kit. . . . . . . . . . . . . . . . . . . . . . . . .1 — 8
1-9:
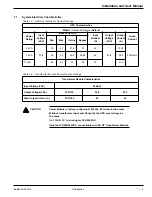
Typical Back-Up Time With Multiple EXBs at Full Load. . . . . . . . . . . . . .1 — 9
1-10: Typical Battery Integration Kit with Casters Setup. . . . . . . . . . . . . . . . .1 — 10
1-11: Typical Transformer Module Contents and Connections. . . . . . . . . . . . .1 — 11
1-12: CLA Module Contents and Connections. . . . . . . . . . . . . . . . . . . . . . . . .1 — 12
2-1:
Contents of EX 5/7/11 RT Power Module. . . . . . . . . . . . . . . . . . . . . . . . .2 — 2
2-2:
Contents of EXB 5/7/11RT Battery Module. . . . . . . . . . . . . . . . . . . . . . . .2 — 3
2-3:
Tower Configuration of Standard System and
Optional Transformer Module. . . . . . . . . . . . . . . . . . . . . . . . . . . . . . . . . .2 — 5
2-4:
Typical Orientation of the Logo and Control Panel.
(Power Module Shown) . . . . . . . . . . . . . . . . . . . . . . . . . . . . . . . . . . . . . .2 — 6
2-5:
Accessing Battery Pack. . . . . . . . . . . . . . . . . . . . . . . . . . . . . . . . . . . . . . .2 — 6
2-6:
Rack Mounting of the Power Module Onto the Rails. . . . . . . . . . . . . . . .2 — 7
2-7:
Input/Output Box Bracket System. . . . . . . . . . . . . . . . . . . . . . . . . . . . . . .2 — 8
2-8:
RS232 Communication Cable Connection. . . . . . . . . . . . . . . . . . . . . . . .2 — 9
2-9:
Relay Pin Connections for Communication Port. . . . . . . . . . . . . . . . . . .2 — 10
2-10: Communication Card Slot with Network
Management Card Installed. . . . . . . . . . . . . . . . . . . . . . . . . . . . . . . . . .2 — 10
2-10a: Activation of Remote Emergency Power Off Function
Using a Contact Normally Open Switch. . . . . . . . . . . . . . . . . . . . . . . . .2 — 12
2-10b: Activation of Remote Emergency Power Off Using a
Contact Normally Closed Switch. . . . . . . . . . . . . . . . . . . . . . . . . . . . . . .2 — 12
2-11: Power Module I/O Box Terminal Block Diagram. . . . . . . . . . . . . . . . . . .2 — 13
2-12: Normal AC Input and Output Cables Installation. . . . . . . . . . . . . . . . . .2 — 14
2-13: View of EX RT Transformer Module Connected Downstream
for 120/208/240 VAC Outputs (Shown With One EXB). . . . . . . . . . . . .2 — 15
2-14: Normal AC Input, Bypass AC, and Output Cables Installation,
and Simplified Connection Diagram. . . . . . . . . . . . . . . . . . . . . . . . . . . .2 — 16
2-15: Accessing Terminal Blocks for Input and Output Power Cables. . . . . .2 — 17
2-16: Rear View of Battery Module Cable Connections. . . . . . . . . . . . . . . . . .2 — 18
2-17: Rear View of CLA Module Cable Battery and AC Input Connections . .2 — 19
EX 5/7/11 RT Systems
Contents
c iv
86-86000-00 B01
Содержание 11+
Страница 1: ...w w w m g e o p s c o m EX 5 7 11 RT Systems Installation and User Manual ...
Страница 2: ......
Страница 4: ... This page left blank intentionally EX 5 7 11 RT Systems iv 86 86000 00 B01 ...
Страница 14: ... This page left blank intentionally EX 5 7 11 RT Systems c x 86 86000 00 B01 ...
Страница 46: ... This page left blank intentionally EX 5 7 11 RT Systems 2 20 86 86000 00 B01 ...
Страница 62: ... This page left blank intentionally EX 5 7 11 RT Systems 4 6 86 86000 00 B01 ...
Страница 68: ......
Страница 72: ...EX 5 7 11 RT Systems G 4 86 86000 00 B01 This page left blank intentionally ...
Страница 74: ......
Страница 75: ......


