background image

6

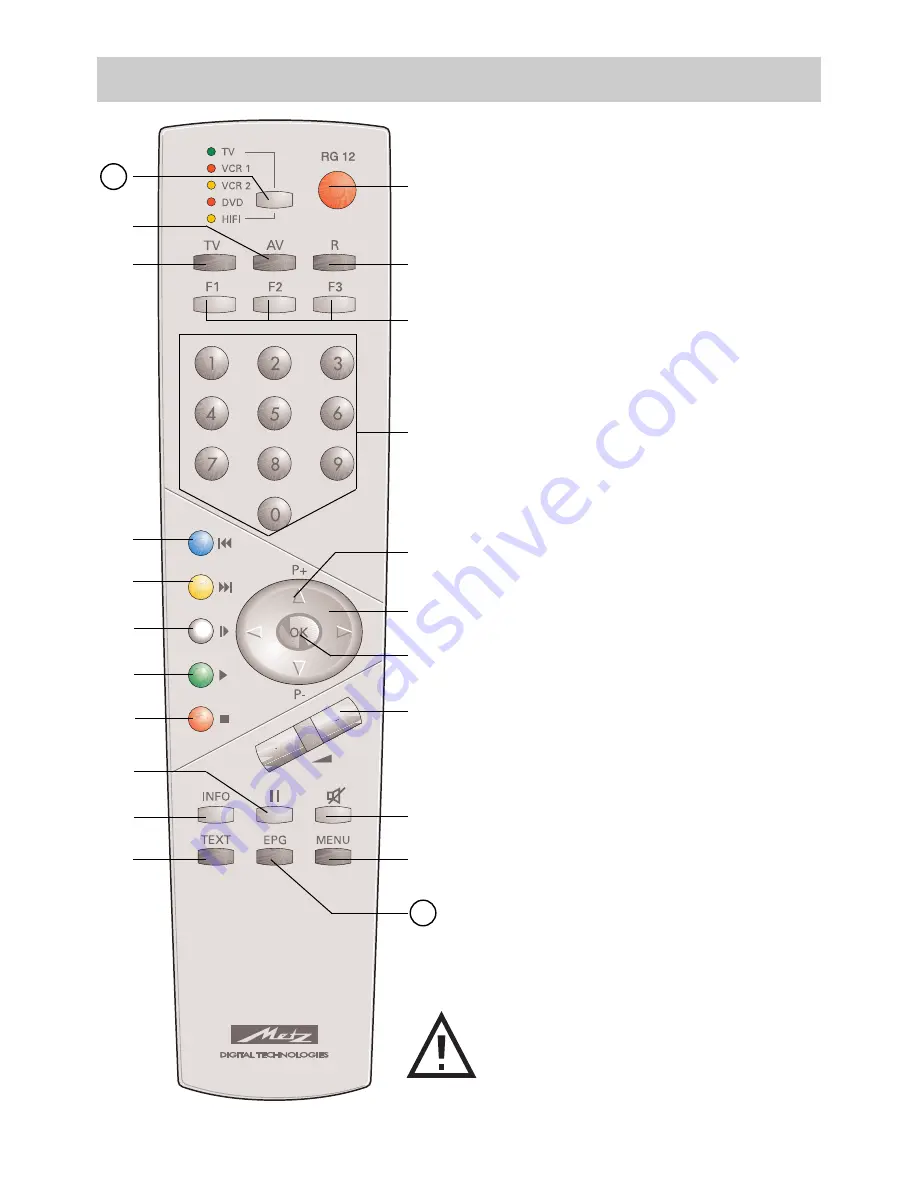
The Metz remote control unit RG 12 can
be used to remotely control all Metz TV
sets with the type designation "TH" (see
the Operating Instructions of the TV set
or look at the label on the back of the
set) or later models (such as TK, TL, ...)
as well as video recorders VCR1 and
VCR 2, DVD players and HiFi equip-
ment (such as radios, cassette players,
CD players, amplifiers, etc.) made by
Metz or various other manufacturers.
The remote control unit transmits com-
mands to the TV set with the aid of infra-
red light. You should always point the
remote control unit directly at the TV set.
The remote control unit may possibly inter-
fere with other infrared devices (such as
infrared headphones) within its range.

Sunlight falling directly on the TV
set may interfere with the operation
of the remote control unit, because
the TV set cannot detect the infra-
red signals from it. The TV set must
first be switched on with the main
switch before the remote control
unit can be used.

The remote control unit is programmed
as follows before it leaves the factory:

• 

TV

Metz TV sets with the type designation "TH" 

• 

VCR1

Metz video recorders with remote 
control unit RH51 

• 

VCR2

Metz video recorders with remote 
control unit RF52 

• 

DVD

Metz DVD players with remote 
control unit RG/RH374 

• 

HiFi

Metz HiFi CD receiver HE 11 with remote 
control unit F11

3. Remote control unit


21

22

Never load rechargeable batteries
into the battery compartment of the
remote control unit!

Only use two 1.5V LR03/AM4 batte-
ries, size AAA.

Содержание Astral-72 MF 72TK79

Страница 1: ...04 13 22 603 47 2021 A2 Spectral 72 MF 72TK80 Astral 72 MF 72TK81 Corum 72 MF 72TK86 Spectral 82 MF 82TK96 Astral 82 MF 82TK97 Spectral 84 MF 84TK89 Operating instruction ...

Страница 2: ...w 52 23 1 EPG Activating NexTView 53 23 2 Collecting NexTView Data 54 23 3 Using NexTView 55 24 Satellite system only if fitted 58 25 Automatic SAT station search 62 26 Specific SAT station search 63 27 One touch SAT recording 64 28 SAT timer recording 65 29 Initial programme position 66 30 Operation without the remote control unit 67 31 Technical Data 68 32 Options 69 33 Connecting headphones 70 ...

Страница 3: ...the wall and the TV set must comply with the European standard EN 60966 2 4 There may be no magnetic fields in the immedi ate vicinity of the TV set Keep loudspeaker boxes well away from the set The antenna cable used for connecting the TV set must have a screening attenuation of at least 75 dB The use of non approved cables will invalidate the operating permission for the TV set For details of ho...

Страница 4: ...slits in the bottom of the case are freely accessi ble so that the intake of the cooling air is not hindered If you place the TV set in a wall unit leave sufficient space on all sides for the circulation of cooling air Do not place the TV set close to a radia tor since this would effect adequate cooling Do not place burning candles or vessels containing liquids vases etc on top of the TV set since...

Страница 5: ... cleaning it Do not hold the remote control directly in front of your eyes and press a button The remote control emits infrared radiation Do not place rechargeable batteries in the bat tery compartment of the remote control Use only two 1 5 V dry batteries of the type LR03 AM4 AAA Micro The TV set is intended only for the reception and reproduction of picture and sound signals The TV set may be op...

Страница 6: ...red devices such as infrared headphones within its range Sunlight falling directly on the TV set may interfere with the operation of the remote control unit because the TV set cannot detect the infra red signals from it The TV set must first be switched on with the main switch before the remote control unit can be used The remote control unit is programmed as follows before it leaves the factory T...

Страница 7: ... menu return to the previous main menu item Call Teletext Call the Information In the Information return to the con tents Frame freeze Delete key in the menus Return to previously selected pro gramme position In the TV menu call Configuration Display date and time In the TV menu call Timer In the TV menu call the Station table or display station attributes Call the sound settings In the TV menu ca...

Страница 8: ... LED blinks twice c Enter the desired code see the code list with the numeric keys If this code is accepted the LED again blinks twi ce If the code does not exist in the table the LED lights for about two seconds 1 2 Programming the codes for CD Player Tuner and Tape When you select the steps a c you have about 15 seconds to continue with the next step If you do not do so within this time the unit...

Страница 9: ...ponding LED blinks five times 2 Determining which code is already programmed read out mode When you select the steps a e you have about 15 seconds to continue with the next step If you do not do so within this time the unit automatically returns to the TV level a In order to determine which code is programmed for a level first select the level as described in section 1 1 steps a and b b Enter on t...

Страница 10: ...preparation If the TV set is switched on the current operating level is indicated AV Link with Panasonic VCR Note The assignments of the operating levels to the device functions apply only for the AV devices preset in the factory If other AV devices in accor dance with the code table are used some of these assignments may differ or be restricted Station search Programme the code for VCR DVD CD tun...

Страница 11: ...ing level Select operating level 3 Remote control unit Station search key depending on the operating level see the table until the device stops running or switches off an OFF or STOP command is automatically transmitted every 1 5 seconds Release the Station search key and start the search with the Select key the code you entered is saved When the station search has been completed or all code numbe...

Страница 12: ...wards through the index Cursor up select the previous underli ned text or the arrow Cursor down select a line in the list Then press the OK key to display this information You can select any underlined words in the table of contents the index or the explanatory text with the cursor and press OK in order to display further information about them You can scroll back and forth through previously sele...

Страница 13: ...bjects and sections with the aid of the red triangular cursor which is moved with the oval key Pressing the OK key then moves you to the setting window below the file boxes The current setting is displayed here and you can change it with the key To save the new setting press the OK key This also returns you to the file of yellow section cards If you do not want to save the new setting press the ME...

Страница 14: ... to standby mode or press the main switch on the TV set to switch it off completely Station selection You can select a station programme position with the numeric keys with the rocker key P P or from the station table To call the station table press the white key Use the cursor control key to select the desired station and then press the OK key to confirm your selection Adjusting the volume You ca...

Страница 15: ...lect the desired operating scope with the key 15 Call the menu Call the menu 5 1 Setting the operating mode 5 2 Operating scope TV AV R The TV set can be switched on at the desired ope rating level with the keys TV AV and R These keys can also be used to switch between the operating levels When the TV set is switched on with one of these keys the station which was last selected at this operating l...

Страница 16: ...function keys Settings for the EURO sockets Special functions in the menu Operation The TV menu cannot be opened Only the stan dard functions of the remote control are availa ble Save the changed setting by pressing the OK key If you want to open a menu although only the ope rating scope with one asterisk is active then Press and hold the MENU key for at least five seconds to open the TV menu The ...

Страница 17: ... cursor control key to set the desired language or country Press the OK key to save the set tings Press the TV key to close the menu The menu language can also be set in the help function Information by selecting the appropriate natio nal flag Call the menu MENU OK Operation Function for AV Function for F3 Function for F1 EURO sockets Station search Country Language Selected country Australia sele...

Страница 18: ...l stations which are found is displayed on the left side of the screen At the end of the search all stations which were found are sorted and displayed To delete any unwanted stations select them with the cursor and press the II key To save the stations press the OK key and enter with the numeric keys the number of the programme position where the first station is to be saved The remaining stations...

Страница 19: ...the numeric keys you must of course know the channel number of the desired station Executing direct channel input Press the MENU key to display the TV menu Press the white key to display the station table Move the cursor to en empty programme posi tion or to a position containing a station you wish to replace with the new station Move the cursor to Frequency Channel Press the OK key 009 MDR 008 SW...

Страница 20: ...g Executing fine tuning Select the desired programme position Press the MENU key Press the white key to open the sta tion table Move the cursor to the subject card Frequency Channel Press the OK key to confirm your selection In the setting window select Frequen cy and use the key to change the frequency value until the picture is as clear as possible Save the new setting by pressing the OK key Pre...

Страница 21: ...ong as the red cursor is selected you can enter the desired letters and digits by pressing the numeric keys e g key J K L 5 If you make a mistake you can delete the characters before the red cursor one at a time with the red key To delete the entire logo press the ll key When you are finished press the OK key to save the new logo Press the TV key to close the menu Call the menu MENU OK OK 009 MDR ...

Страница 22: ... which the selected sta tion s is are to be inserted If these stations originally had a lower posi tion number than this position it they will be inserted before this programme position Stations which originally had a higher number will be inserted after this programme position Press the key to copy or shift the selected station s To delete a station press the ll key Press the F1 key to save the n...

Страница 23: ...automatically moves to the ones position After pressing any numeric key you have three seconds to enter further digits Selecting programmes from the station table In normal TV mode you can open the station table with the white key In the table which is then displayed you can select a station with the oval P P rocker key Then press the OK key to switch to this sta tion If more than 20 stations are ...

Страница 24: ... Press the TV key to close the menu If these standard settings are unsatisfactory for some programme positions you can define special individual settings for these positions as described on the next page 2 Rotation This function can be used to compensate for any tilting of the picture caused by the earth s magne tic field The function should be executed when the set is first installed and if the s...

Страница 25: ...to change the setting for Panorama Use the cursor control key to select the menu item Mode and use the key to select either linear or non linear Press the OK key to save your changes The picture shows the factory setting Press the TV key to close the TV menu The functions Panorama2 and Zoom can also be used together 2 Available only on TV sets which are equipped with this option The number of subj...

Страница 26: ... the TV menu Press the OK key to open the menu Picture and sound Use the cursor control key to select the item Picture settings for Pr xy Press the OK key and then select the setting you want to change Press the OK key to confirm your selection and then in the setting window use the key to change the setting Press the OK key to save the new setting Press the TV key to close the menu You can also d...

Страница 27: ...hange Press the OK key to confirm your selection and then in the setting window use the key to change the setting Press the OK key to save the new setting as the standard value Press the TV key to close the menu If these standard settings are unsatisfacto ry for some programme positions you can define special individual settings for these positions as described on the next page MENU OK OK OK Sound...

Страница 28: ... key to select General sound settings Press the OK key and then use the cursor control key to select Volume correction Press the OK key and then in the set ting window use the key to change the setting Press the OK key to save your changes Press the TV key to close the TV menu The Volume correction function in the menu General sound settings overrides the Volume correction function in the menu Sou...

Страница 29: ...e menu Picture and sound and press the OK key to open it Use the cursor control key to select the item Sound settings for Pr xy Press the OK key and then select the setting you want to change Press the OK key to confirm your selection and then in the setting window use the key to change the setting Press the OK key to save the new setting Press the TV key to close the menu You can also define and ...

Страница 30: ...Press the red key to open the Con figuration menu Use the cursor control key to select Operation and then HiFi output Press the OK key and then in the set ting window use the key to set the desired parameter Press the OK key to save your changes Press the TV key to close the TV menu In normal TV mode the setting Sound via can be changed with the yellow key and the key Call the menu Operation Funct...

Страница 31: ...options with the key loudspeakers HiFi or Surround Press the OK key to save the new set tings Press the TV key to close the TV menu In normal TV mode pressing the mute key once reduces the volu me by 12 points on the scale pressing it again within the next five seconds reduces the volume to 00 You can subsequently restore the volume to the default value by pressing the mute key again 31 Call the m...

Страница 32: ...n Centre loudspeaker Press the OK key and then in the set tings window use the key to set the desired volume Press the OK key to save the new set tings Press the TV key to close the TV menu In normal TV mode you select the Sound via options by pressing the yel low key and then using the key 32 MENU OK OK Call the menu Sound set prog po Sound settings gen Pict set prog posn Pict settings gen Centre...

Страница 33: ... the station table Move the cursor to Colour standard Press the OK key to confirm your selection and then in the setting win dow use the key to select the appropriate colour standard Press the OK key to save the new setting Press the TV key to close the menu 2 Available only on TV sets which are equipped with this option MENU OK OK 009 MDR 008 SW 3 007 N24 006 PRO 7 005 RTL 004 SAT 1 003 Bayern 3 ...

Страница 34: ...expanded automatically to fill the full height of the TV screen If the automatic zoom function is deactivated the picture will not be expanded automatically 2 Available only on TV sets which are equipped with this option OK OK MENU Operation Function for AV Function for F3 Function for F1 EURO sockets Station search Country Language Brightness of Display 3 Permanent display Time select OK go to se...

Страница 35: ...cursor control key to select Childlock and press the OK key In the setting window use the key to set the childlock to Active Press the OK key to save the new setting b Permitted programmes Activate the childlock as described in step a above Use the cursor control key to open the file card Permitted programmes and press the OK key In the setting window use the numeric keys to enter the numbers of t...

Страница 36: ...hildlock If the childlock is active this is indicated by the display of a message when you switch the TV set on If you then enter the correct code the child lock is temporarily deactivated and the TV set can be operated normally as long as it remains switched on If you wish to permanently deactiva te the childlock proceed as follows Press the MENU key to open the TV menu Press the green key to ope...

Страница 37: ...e setting window enter the desired time four digits with the numeric keys Press the OK key to save the new setting Press the TV key to close the menu At the specified time a box with the reminder appears on the screen of the TV set You can clear this display by pressing any key If you do not want the reminder to appear each day you must clear it in the menu by pressing the ll key Call the menu MEN...

Страница 38: ...o select Switch on time or Switch off time Press the OK key twice and then in the set ting window enter the desired time four digits with the numeric keys Press the OK key to save the new setting Press the TV key to close the menu At the specified switch on time the TV set switches from standby mode red LED on to normal TV mode If you do not press any key on the remote control unit within 10 minut...

Страница 39: ...e with the numeric keys The clock starts running from this time when you press the OK key Use the cursor control key to select the file card Current date Press the OK key In the setting window enter the current date with the numeric keys Press the OK key to save the new setting Press the TV key to close the menu The local time offset is the difference between the local time and Greenwich Mean Time...

Страница 40: ...he OK key and use the cursor control key to select one of the available functions Press the OK key and then in the setting win dow use the key to set the selected function to On Press the OK key to save your chan ges Press the TV key to close the TV menu Call the menu F1 Operation Function for AV Function for F3 Function for F1 EURO sockets Station search Country Language The function key can be p...

Страница 41: ...PIP frame to active red or inactive white The contents of the PIP picture can be changed only when the PIP frame is active red If this is the case you can use the numeric keys or the P P rocker key to select another pro gramme position for display in the PIP picture To display the picture from an AV device con nected to the TV set press the AV key and then select the AV device with the numeric key...

Страница 42: ...th the function 9x multipicture briefly press the F1 key otherwise hold the F1 key depressed until Special functions 1 is displayed and then press the key to display the 9x multipicture You can use the P P rocker key to select the previous or following nine programme positions To switch to one of the programmes displayed in this function simply press the corresponding numeric key to To terminate t...

Страница 43: ...the picture up or down on the screen so that for example the station logo or subtitles remain visible To do this press the F1 key and then the key and move the picture with the P P rocker key Standard 4 3 This is the standard setting for all programmes with the aspect ratio 4 3 Panorama With the Panorama function you can adjust the picture of a programme in 4 3 aspect ratio to fill the 16 9 format...

Страница 44: ... used to preselect the page selection function After pressing one of these preselection keys you can step through the subjects sections or pages with the rocker switch P P You can also move directly to a page by entering its number with the numeric keys If multiple sub pages exist for the selected page their numbers are displayed in black In the example on the left there are five sub pages You can...

Страница 45: ...om an index page such as page 100 200 etc When the cursor is positioned on the desired page number press the OK key to display this page Teletext setting marks3 You will probably have your favourite Teletext pages such as stock exchange reports news weather forecasts which you visit frequently To permit rapid access to such pages you can set so called marks on these pages To do this first go to th...

Страница 46: ... and press the red key Clear mark to delete the mark Teletext subtitles Your TV set can display subtitles transmitted on Teletext together with the programme If such sub titles are available the station normally displays a message at the beginning of the programme tel ling you where to find the subtitles Press the TEXT key to open Teletext In the case of TOP stations press the OK key to open any p...

Страница 47: ...he AV devices with the cursor control key and delete it by pressing the ll key Use the cursor control key to select the device you wish to connect to the TV set Press the OK key to confirm your selection and in the setting window set the parameters Signal OUT and Signal IN to match the AV device see the operating instructions for the AV device for details Press the OK key The newly connected devic...

Страница 48: ...logic Grundig SMARTLINK Sony Data Logic transferring the station table Press the MENU key to open the TV menu Press the red key to open the menu Configuration Use the cursor control key to select Automatic station search Press the OK key and then use the cursor con trol key to select Data Logic Press the OK key and then in the setting win dow select Start data transfer yes with the key Press the O...

Страница 49: ...uration Use the cursor control key to select EURO socket Use the cursor control key to select EURO 1 EURO 2 or EURO 3 Press the OK key and then in the setting win dow set Programme switching to ON with the key Press the OK key to save the new setting Press the TV key to close the TV menu When you subsequently start a playback opera tion on the connected AV device the TV set swit ches to playback m...

Страница 50: ...ture quality when playing back recordings from a tape machine such as a camcorder or video recorder Setting the VCR function Select the appropriate programme position Press the MENU key to open the TV menu Press the OK key to open the menu Picture and sound Use the cursor control key to select Picture set tings for Pr xy Press the OK key and then use the cursor control key to select VCR Press the ...

Страница 51: ... programme to the selected playback device Press the AV key again Then press the red key to select the recor ding device Press the green key to lock the selected signal connection If a Data Logic video recorder is connected it will immediately start to record providing there is a cassette with a protection tag inserted Start recording with the recording AV device Play back with the playback AV dev...

Страница 52: ...next page during normal operation of the TV set When the data have been collected the TV set stores the EPG in a special memory The EPG is updated regularly in this memory as long as the TV set is not switched off with the main switch On TV sets with only one tuner e g if your set has been converted and has only one satellite tuner the set must be left tuned to the NeexTView pro gramme position fo...

Страница 53: ...ving the NexTView data The message is then not displayed for other programme positions where NexTView data are received If you know the programme position for a NexTView station you can also enter its number directly on the numeric keys You can overwrite any existing programme posi tion number or delete the number by pressing the II key 23 1 Activating the EPG NexTView Call the menu OK OK Operatio...

Страница 54: ... also shown in the EPG Stations which carry two different programmes such as a children s programme in the daytime and another programme in the evening must be stored in two different program me positions The collection operation is interrupted or cancelled if you switch the programme position from terrestrial to SAT or vice versa you call the Picture in Picture func tion you open the Teletext fun...

Страница 55: ... user and their preferences white Set user preferences green Select a user father mother teenager child red Selected programme is ready for recor ding see Page 55 Selecting and viewing a programme setting a reminder In the EPG you can select a programme with the P P rocker key By pressing the OK key you can watch the programme if it is already running or set a reminder for it if it starts later In...

Страница 56: ...sing the OK key Save the selected preferences by pres sing the red key All programmes Selection Interest Users Record NexTView Interest Up to eight stations can be selected Music Education Children School Sport Leisure Shows Current affairs Feature film Station selection MDR PRO 7 RTL 2 RTL SAT 1 Bayern 3 ZDF ARD Display all stations motor sports sport magazine team sports special events tennis sq...

Страница 57: ...ess the red key on the remote control of the TV set the TV timer is programmed On the video recorder programme a timer with the date and time on the AV programme position so that the programme provided by the TV timer will be recorded If you want to record a programme from a terrestrial station received via antenna or cable you must programme the video recorder itself Heute 20 07 Mo Di Mi Do Fr Sa...

Страница 58: ... Use the cursor control key to select LNB sup ply and press OK to confirm your selection The cursor is now located before the entry LNB voltage H in the setting window You can now adjust the voltage slightly up or down with the key Press the OK key to save the new setting If your TV set is connected to a community satellite system the LNB supply voltage must always be set to Off 24 Sat system Poss...

Страница 59: ... the TV menu Press the red key to open the menu Configuration Use the cursor control key to select SAT system Use the cursor control key to select DiSEqC system and press OK to confirm your selection The cursor is now located before the entry DiSEqC system in the setting window Use the key to select Yes or No Press the OK key to save the new setting Press the TV key to close the TV menu i Possible...

Страница 60: ...irm your selection The cursor is now located before the entry 22 kHz signal in the setting window Use the key to switch this signal On or Off If you select On you must specify in the second line whether the 22 kHz signal is to be used for the Frequency band or the Position You can then programme the toneburst signal in a similar manner selecting the other function Press the OK key to save the new ...

Страница 61: ...A and press the OK key to confirm your selection The cur sor is now located before the entry Low band in the setting window Use the key to set the frequency to the correct value Use the cursor control key to switch to High band and use the key to set the frequency to the correct value Press the OK key to save the new settings OK Possible only if a satellite upgrade kit is installed Operation Funct...

Страница 62: ... in which the first station in this list is to be saved The other stations in the list will be saved in the programme posi tions following the selected position CAUTION This will overwrite any sta tions currently in the specified and fol lowing positions If you are not sure whether you want to save the stations you can cancel the operation by pressing the TV key If you want to save the stations in...

Страница 63: ...ception type Use the cursor control key to select Frequency Press the OK key use the cursor control key to select search and start the station search with the key Or select the various menu items with the cursor control key and then use the key or the numeric keys to set the individual parame ters Press the OK to save the new station Press the TV key to close the TV menu 26 Specific Sat station se...

Страница 64: ...n Press the green key to save the connection If you have a Data Logic video recor der recording starts automatically pro viding there is a cassette in the recor der If you have a standard video recorder switch to the AV programme position and start a one touch recording OTR Press the TV key to close the menu Do not switch your TV set to a dif ferent programme position while recording since this wi...

Страница 65: ...time If you have a standard video recorder you must also programme the recording on the video recorder In this case specify as the source the AV programme position e g AV1 to which your TV set is connected For VPS recordings the TV set switches to the recording state one hour before the specified start time so that it can react if the programme you want to record starts earlier than planned If you...

Страница 66: ... menu Press the red key to open the menu Configuration Use the cursor control key to select Operation and then Initial programme position Press the OK key and then in the setting win dow use the key to select Yes Press the OK key to save the new setting After this the AV programme position will be selected automatically if you switch your TV set on with the main switch and then press the key on th...

Страница 67: ... the set on with pro gramme position 1 selected press and hold the F key until the green display lights up You can also execute the following functions with the controls on the front of the TV set The prese lected function remains active for 10 seconds Changing programme positions Press the keys Volume Press the preselection key F until the bar display for volume appears on the screen Then press t...

Страница 68: ... Power consumption per hour See power consumption in Wh Standby mode approx 1 7 W 31 Technical data Power consumption to CENELEC TC 59 X Music output power to DIN 45324 into 4Ω at 1 kHz sinusoidal power Spectral 72 Corum 72 ca 140 W 2 x 20 40 W 2x12 24 W Astral 72 ca 140 W 2 x 20 40 W 2x12 24 W Spectral 82 ca 135 W 2 x 20 40 W 2x12 24 W Spectral 84 ca 170 W 2 x 20 40 W 2x12 24 W Artos 82 ca 135 W ...

Страница 69: ...adio stations which can be received with a rod antenna or a terrestrial house antenna without the need for an separate receiver TV HDR upgrade kit 010 NK 1014 This kit is for installation of a hard disk on which programmes can be recorded and managed The hard disk feature also permits time shift operation and the remote programming at extra charge of your TV set For other upgrade kits please consu...

Страница 70: ...hone volume can be saved as one of the standard settings In the case of dual langua ge programmes you can listen to either sound channel 1 or 2 on the headphones regardless of the channel selected for the loudspeakers Always switch off the TV set with the main switch before cleaning it Clean the case of the TV set only with a soft dry or slightly moistened cloth Do not use aggressi ve detergents o...

Страница 71: ...prove the stereo effect Code The settings for the childlock are protected by a 4 digit numerical code which you can set a desired Write down or remember the code you define If you forget the code ask your local dealer for assi stance CTI The CTI Colour Transient Improvement circuit is an electronic circuit which ensures precise transi tions between differently coloured parts of the pic ture preven...

Страница 72: ...d for mono transmissions Noise reduction This setting can be used to improve the quality of pictures with snow or other noise resulting from poor reception conditions Depending on the amount of interference various correction facilities are available and the noise reduction can be set individually for each programme position VCR The VCR function ensures optimum picture quality when playing back re...

Страница 73: ... when viewing black and white program mes and cinema films Moving objects are displayed more smoothly and the picture looks more plastic This function is set in the factory to Automatic For normal TV programmes the automatic setting switches the film mode off We also recommend setting film mode to Off when playing back noisy films from a video recorder Progressive Scan This function improves the s...

Страница 74: ... coloured spots per sist switch the TV set off with the mains switch wait a few seconds and then switch it on again After the TV set has been switched on the message Please enter code is displayed The childlock function has been programmed to prevent selection of any station Enter the code number with which the childlock function was pro grammed The TV set does not switch to the selected programme...

Страница 75: ...ted to the EURO socket see av Menu The Euro AV Scart cable being used does not have all 21 pins connected In the menu AV devi ces define the Data Logic video recorder as video recorder 1 with Datalogic ON Connect the Data Logic video recorder to the EURO socket with a Scart cable Use a Euro AV Scart cable with all 21 pins connected Problem Possible cause Remedy General problems with an external AV...

Страница 76: ...ct an HiFi amplifier Center in external Sur round set Service socket for service technician Speaker sockets for external speakers impedance 4Ohm f e Metz 10LH10 Video in component signal f e DVD player Audio in if cinch sockets are in use scart socket 1 is switched of ...

Страница 77: ... 35 Cleaning the TV set 72 Code for childlock 36 Colour standard 33 Connecting external devices 47 Copying recordings 51 Country 17 CTI 71 Cursor 12 13 Data Logic video recorder 47 48 57 65 Decoder connecting 47 Decoders see AV devices 47 De emphasis 72 DiSEqC system 59 Display configuration 34 DVD player connecting 47 EPG NexTView 52 EPG activating 53 EURO sockets 49 External devices playback 49 ...

Страница 78: ... Operating scope 15 Panorama 43 Peripheral devices see external devices 47 Picture format 43 Picture in Picture PIP 41 Picture quality for video recorder 50 Picture settings 14 24 25 Picture sharpness 24 25 Programming Sat stations 62 63 Recording Sat programmes 64 65 Recording a programme with NexTView 57 Reminder 37 Playing back from external devices 49 50 Riddle solution key 45 Sat programmes r...

Страница 79: ...mer time 40 Switching voltage devices with 49 Switching voltage devices without 50 Switch off time 38 Switch on time 38 Teletext 44 Teletext font size 45 Thunderstorm 5 Timer control 38 Timer menu 65 Timer recording 65 Toneburst 50 TV menu 13 Two stage muting 31 Variable zoom 43 VCR function 50 Video level 72 Video recorder programme position automatic selection 48 Video recorder connecting 47 48 ...

Страница 80: ...612 BEAUMARK 547 BELL HOWELL 468 BESTAR 466 616 BLACK PANTHER 616 BLAUPUNKT 491 496 502 507 508 527 530 532 607 609 610 612 614 621 BONDSTEC 466 487 BONDSTECBRANDT 505 BRANDT ELECTRONIQUE 503 504 505 524 574 BRAUN 570 BRIONVEGA 450 575 BROKSONIC 481 BRUNS 466 487 490 BUSH 588 590 593 CALIN 481 CALIX 481 CANDLE 481 CARRERA 547 CARVER 527 CGE 505 CIE 487 CIMLINE 487 481 487 547 CLARIVOX 606 CLASSIC ...

Страница 81: ...87 INTERDISCOUNT 575 INTERFUNK 468 527 565 575 600 601 603 604 INTERVIDEO 466 INTERVISION 487 IRRADIO 481 487 575 606 ITT 450 468 483 505 ITV 466 481 JENSEN 505 JETPOINT 575 JVC 503 504 505 519 520 545 JVC_LCD 515 521 KAISER 575 KAISUI 487 KAPSCH 600 601 603 KARCHER 575 KENDO 483 KENWOOD 468 505 KLH 481 487 KLIT 487 KODAK 481 KORPEL 487 KUBA 473 504 505 510 LEYCO 487 LG 578 LIESENKOTTER 575 565 LL...

Страница 82: ...E 565 575 QTY1 592 QUARTER 468 QUARTZ 481 547 QUASAR 507 527 QUELLE 450 459 461 464 470 471 474 477 QUELLE 478 484 487 491 496 497 503 504 505 508 509 510 512 513 519 528 529 541 565 575 599 604 606 609 610 611 612 614 616 621 QUESTAR 466 RADIALVA 481 487 527 RADIOLA 527 575 RADIONETTE 601 604 RADIX 497 RANDEX 481 RANDIU 481 RANK BUSH MURPHY 601 RCA 477 481 483 547 REALISTIC 468 481 547 REDIFFUSIO...

Страница 83: ...N 501 503 504 505 575 601 604 606 609 612 TOKAI 481 487 TOSHIBA 474 481 505 527 547 TOTEVISION 481 547 TOWADA 487 490 TOWIKA 487 TRIAD 575 TRIX 481 TVA 466 UHER 466 477 481 503 505 510 543 ULTRAVOX 450 616 UMA 565 575 601 604 UMA 606 609 612 614 UNITECH 547 UNITED 560 UNIVERSUM 481 483 491 527 530 547 571 575 606 609 612 621 UNIVOX 604 VICTOR 505 545 VIDEOMASTER 466 VIDEOPLUS 554 562 589 VIDEOSONI...

Страница 84: ... MEDION 955 MERIDIAN 908 MAGNAVOX 908 MICROMEGA 908 MINOWA 972 MISSION 908 909 MTC 955 NAD 947 NAIM 908 NAKAMICHI 930 NOKIA 938 NONAME 888 NSM 802 803 804 805 806 807 OKANO 869 871 ONKYO 819 827 861 881 PALLADIUM 810 851 866 870 PANASONIC 834 915 918 PHILIPS 833 908 909 911 965 PIONEER 824 825 826 850 862 863 864 922 923 PMG 906 PROTON 908 QUAD 908 965 RADIOTONE 958 RADMOR 911 REVOX 829 REVOX STUD...

Страница 85: ...887 922 999 NAD 903 904 905 906 NAKAMICHI 927 NOKIA 920 OKANO 948 949 ONKYO 846 847 856 901 902 ONKYO 959 960 PALLADIUM 944 PANASONIC 928 929 982 PHILIPS 921 976 980 999 PIONEER 853 854 855 912 938 939 941 942 943 988 RADMOR 978 REVOX 860 861 REVOX STUDER 977 SAMSUNG 883 885 886 896 897 SANY 985 SANYO 930 937 986 SCHNEIDER 866 867 868 869 872 873 874 878 918 919 947 964 976 SHARP 839 864 993 SHERW...

Страница 86: ...407 408 409 412 441 442 443 469 470 732 733 735 746 748 749 SHARP 373 446 SHERWOOD 413 456 457 SIEMENS 426 427 477 478 479 480 732 733 737 738 739 746 747 SINOTEC 749 SINOTEC PEPSI DOSE 749 SONY 389 416 420 421 422 SUPERTECH 466 T A 405 743 T A ELEKTROAKUSTIK 743 TECHNICS 387 430 431 462 TENSAI 406 THOMSON 382 UHER 375 UNIVERSUM 403 467 473 733 737 YAMAHA 385 415 435 454 992 Codes HIFI Amp AIWA 77...

Страница 87: ...L 983 984 SABA 811 SAMSUNG 828 837 844 846 SANYO 750 756 SCHNEIDER 763 764 768 779 782 783 784 785 786 794 812 813 814 815 827 840 842 951 953 956 961 962 963 964 965 966 967 968 969 970 971 972 973 978 SHARP 818 990 SHERWOOD 825 832 833 SIEMENS 762 763 766 767 768 769 770 775 779 780 781 784 785 794 800 947 948 950 SINOTEC 786 SINOTEC PEPSI DOSE 786 SONY 787 788 974 991 SUPERTECH 782 T A 774 959 ...

Страница 88: ...nce in the areas of electronics and plastics technology to form the basis of the excellent reputation of the Metz Werke that has been built up throughout the world over a period of many decades Metz offers quality made in Germany Consumer electronics mecablitz flash units plastics technology and industrial electronics Service Centre Training Centre Administration and development Storage Dispatch M...

Отзывы: