ADDENDUM A page
1
BGA WINDOWS PROGRAM
Hardware Requirement:
•
Personal computer with a 486 or higher processor running the Microsoft Windows 95 or Windows 3.1 or later operating system.
•
8 MB of memory or more
•
Hard-disk space required: 20MB.
•
A VGA or Higher resolution monitor (Super VGA recommended).
•
Microsoft Mouse or compatible point device.
•
A free RS232 port (com port). Note: Some Laptop PC’s have their com port disabled for power management.
(Ensure com port is enabled.)
Software Requirement:
OK BGA Windows program.
Installation:
•
Start Windows operating system.
•
Close all applications running except for Program Manager. (Hint: press Ctrl+ESC keys to end task of other applications)
•
For Windows 3.1 or later: From Program Manager, select File from menu and choose Run. On command line, type a:\setup.exe
then click OK.
•
For Windows 95: Click Start, select Settings, select Control Panel and choose Add/Remove Program. Then click Install.
Basic Operating Instructions:
•
Connect RS232 cable between computer and BGA unit then turn on power.
•
Start the program: Double click on BGA icon.
•
If BGA Unit Not Found error message appears on the screen, ensure that BGA-2000 unit is turned on, and RS-232 cable is firmly
connected from PC to back of BGA-3000 unit; click OK then select Options. Select Set Com Port and choose a com port
connected to BGA unit. Select File, choose Exit to quit and restart the program.
•
Enter password: Enter the same security number set in BGA unit only if this security number was set and click OK.
•
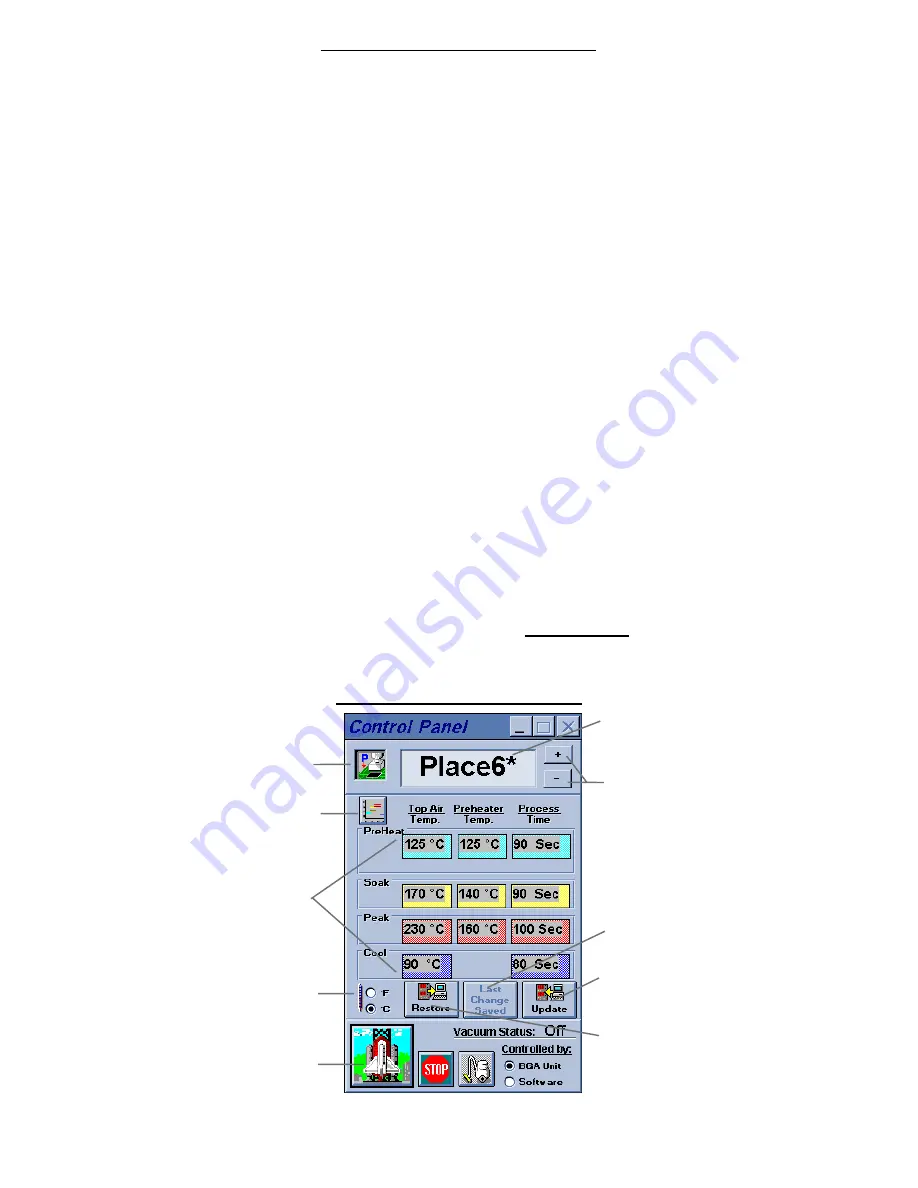
Select a profile: Click on Place or Lift icon on the top left corner of control panel shown on screen to choose a place or lift
profile. Click on ‘+’ or ‘-’ to increment or decrement the profile number.
•
Edit a profile: Ensure the ‘Lock’ icon is set to unlock. Click on Lock icon and it will toggle between lock and unlock. Click on the
desired editing field to edit (temperature or time)of control panel. Click on ‘Update’ icon to instantly save changes. (Note: The
first 5 lift and first 2 place profiles are the factory preset profiles and cannot be edited.)
•
Start the cycle: Click on the start cycle icon (see below).
•
Print the temperature curves: Click on a graphics display window, select File menu and choose Print.
The basic function of the control panel
Click here to increment or
decrement the profile number.
Click Update to down-load
the new settings to the BGA
module.
Click Restore to up-load the
original settings from the
BGA module.
Click here to Start the cycle.
Click here to change the
temperature scale.
Enter the desired settings in
the editing fields.
Click here to choose the
place or lift profile.
Indicate that the last change
has been saved.
Indicate that the content of this
profile has been changed.
Click here to display graphics
window.


