background image

EN

71

properly. Take it to an authorised service 
centre to be checked and repaired.

     FIG.   12

ICING PROTECTION FOR 
CARBURETTOR

Ice can build up in the carburettor at 
temperatures of 0 to 5°C and high humidity, 
which can reduce the power and constancy of 
the saw.

1.  Engine casing
2.  Sun symbol
3.  Snow symbol

a.  Normal run mode 
b.  Protection from icing

•  The chainsaw has an air control on the 

right side of the cylinder, which can direct 
hot air from the air outlet on the saw to 
prevent the formation of ice.

•  Run mode is normally used in normal 

conditions, which is the default mode.

•  Use the protection from icing mode at low 

temperatures when there is a risk of icing.

•  If the chainsaw is run in this mode at 

higher temperatures it might not work at 
normal speed. Always reset the chainsaw 
to normal run mode when there is no risk 
of the formation of ice.

SWITCHING BETWEEN MODES

1.  Engine casing
2.  Choke lever
3.  Air control

     FIG.   13

1.  Switch off the saw with the power switch.
2.  Remove the air filter cover and air filter, 

and then remove the choke lever from the 
engine casing.

3.  Undo the screws holding the engine 

casing (3 screws on the inside and 1 on 
the outside of the casing) and remove.

4.  Press down the air control on the right 

side of the engine to release it.

5.  Turn the air control so that the snow 

symbol is up and replace it.

6.  Replace the engine casing and other parts.

Switching off the saw

1.  Release the throttle control and allow the 

saw to idle for a few minutes.

2.  Put the engine switch in the O position 

(off).

1.  Engine switch

     FIG.   14

SAWING

     WARNING!   

•  Read all the instructions and safety 

instructions and familiarise yourself with 
the controls on the chainsaw and how to 
use them.

•  Failure to follow all the instructions and 

safety instructions can result in death, 
personal injury and/or material damage.

•  The chainsaw is intended for sawing 

wood. Never attempt to saw other 
materials, this increases the risk of 
kickback and/or vibration and can result 
in the risk of death, personal injury and/
or material damage. Do not use the 
chainsaw to bend, lift or move objects, 
or to split. Never mount the chainsaw on 
a stand. Never connect equipment to 
power outlets not recommended by the 
manufacturer.

•  Do not force the chainsaw. Run the saw 

at full throttle and apply a light pressure.

Содержание 006305

Страница 1: ...tigt L s bruksanvisningen noggrant innan anv ndning Spara den f r framtida behov MOTORS G SE EN CHAIN SAW Operating instructions Translation of the original instructions Important Read the user instru...

Страница 2: ...ce by zagro eniem dla rodowiska i dla zdrowia Produkt nale y odda do odpowiedniego punktu sk adowania lub przynie go do jednego ze sklep w gdzie przy zakupie nowego sprz tu bezp atnie przyjmiemy stary...

Страница 3: ...mocy akustycznej urz dzenia reprezentatywnego dla danego typu Guaranteed sound power level Garanterad ljudeffektniv Garantert lydeffektniv Gwarantowana moc akustyczna Conformity assessment procedure a...

Страница 4: ...1 1 3 2 5 4 6 7 8 9 10 11 12 13 14 15 16 17...

Страница 5: ...4 1 2 5 6 2 3 4 1 3 1 2 7 4 6 3 5...

Страница 6: ...5 1 2...

Страница 7: ...7 6 2 1 3 4 5...

Страница 8: ...11 8 1 2 9 1 2 3 10 1 2 3 4...

Страница 9: ...16 15 12 1 A 1 B 2 3 14 1 13 1 2 3...

Страница 10: ...17 3 18...

Страница 11: ...20 23 2 3 19 1 2 22 1 21...

Страница 12: ...26 27 28 24 25 1...

Страница 13: ...29 2 3 4 1...

Страница 14: ...nsas till vissa tidsperioder Vila ofta och arbetstiden kan beh va reduceras till ett minimum Anv ndaren ska ha h rselskydd vilket ven andra i omgivningen kan beh va anv nda VARNING Risk f r h rselska...

Страница 15: ...d St ng alltid av motorn innan du s tter ned s gen p marken Var mycket f rsiktig vid s gning av buskar och sly eftersom dessa kan fastna i s gkedjan och piska till dig eller f dig att tappa balansen O...

Страница 16: ...a att du helt tappar kontrollen ver s gen vilket kan orsaka allvarliga personskador F rlita dig aldrig uteslutande p de s kerhetsanordningar som finns inbyggda i s gen Den som anv nder en motors g m s...

Страница 17: ...p dessa symboler ppning f r p fyllning av br nsleblandning ppning f r p fyllning av kedjeolja Flytta str mbrytaren till l get 0 f r att stoppa motorn omedelbart Dra ut choken f r att st nga den tryck...

Страница 18: ...erhet KwA 3 dB A Vibration Fr mre handtag 6 7 m s2 Bakre handtag 9 8 m s2 Os kerhet 1 5 m s2 S GENHET S gsv rd Typ Noshjul M tt 14 Sk rl ngd 330 mm 14 S gkedja Typ Oregon 91P eller Sabre 91S eller Car...

Страница 19: ...gsv rdets spets och justera s gkedjans sp nning genom att vrida sp nnskruven tills sidol nkarna n tt och j mnt r r vid sv rdets undersida 6 Dra t sp nnskruven 1 Lossa 2 Dra t 3 Sidosp nning BILD 5 7 H...

Страница 20: ...ndomsskada ANV NDNING START AV MOTOR 1 Skruva av tanklocket och oljep fyllningslocket och placera locken p dammfritt st lle 2 Fyll br nsletanken med oljeblandad bensin och fyll oljetanken till 80 med...

Страница 21: ...h nt JUSTERING AV F RGASARE F rgasaren r justerad fr n fabrik men kan beh va finjusteras beroende p driftf rh llandena Innan f rgasaren justeras kontrollera att luft och br nslefilter r rena och att l...

Страница 22: ...och eller g r oj mnt 1 Motork pa 2 Solsymbol 3 Sn symbol a Normalt driftl ge b Skydd mot isbildning D rf r har motors gen en luftstyrning p cylinderns h gra sida som kan styra varm luft mot motorns l...

Страница 23: ...n skada kopplingen F rs k inte dra loss kedjan om den fastnat i snittet ppna snittet med kil eller h vst ng f r att frig ra kedjan BILD 15 Se upp f r kast Motors gen har ett kastskydd som ans tter ked...

Страница 24: ...llera f rst hur grenen r b jbelastad G r sedan ett grunt sk r fr n den komprimerade sidan f r att f rhindra att grenen trasas s nder Kapa sedan grenen fr n motsatt sida BILD 19 VARNING Grenar som r i...

Страница 25: ...na tills de klickar p plats BILD 21 Sm rjh l Demontera s gsv rdet och kontrollera att inte sm rjh let r igensatt 1 Sm rjh l BILD 22 S gsv rd Demontera s gsv rdet och avl gsna damm och sp n fr n sm rh...

Страница 26: ...erar annars finns risk f r personskada och eller egendomsskada UNDERH LL AV SV RD OCH S GKEDJA Se till att s gkedjan alltid r skarp f r j mn och s ker funktion S gkedjan ska filas n r n got av nedanst...

Страница 27: ...ngsvinkel Eggvinkel St tvinkel 55 H jd f r under st llningsklack Filklovens vridningsvinkel Filklovens lutningsvinkel Sidovinkel 91P 5 32 4 0 mm 30 0 80 0 025 91VG 5 32 30 0 80 0 025 N1C BL 5 32 35 0...

Страница 28: ...palt 4 Kedjan lutar BILD 29 Anv nd endast s gsv rd och s gkedja som anges i tabellen nedan Andra kombinationer medf r risk f r d dsfall allvarlig personskada och eller egendomsskada Tabellen nedan inn...

Страница 29: ...t t ndstiftet Motorn r svag varvar inte upp oj mn tomg ng Ol mplig br nsleblandning eller vatten i br nslet Byt ut mot rent f rskt br nsle av r tt typ Luftfilter och eller br nslefilter igensatt Reng...

Страница 30: ...sperioder Ta hyppige pauser og vurder redusere arbeidstiden til et minimum Brukeren skal ha h rselvern Dette kan ogs v re aktuelt for andre i omgivelsene ADVARSEL Fare for h rselskade Bruk h rselvern...

Страница 31: ...orlige ulykker og til at motorsagen blir delagt Skru alltid av motoren f r du setter sagen ned p bakken V r sv rt forsiktig ved saging av busker og skudd siden disse kan sette seg fast i sagkjedet og...

Страница 32: ...rdt presses bakover mot brukeren Begge disse tilfellene kan f re til at du mister kontrollen over sagen noe som kan f re til alvorlige personskader Stol aldri utelukkende p de verneinnretninger som er...

Страница 33: ...ikker bruk og vedlikehold V r oppmerksom p disse symbolene pning for p fylling av drivstoffblanding pning for p fylling av kjedeolje Flytt str mbryteren til posisjon 0 for stoppe motoren umiddelbart T...

Страница 34: ...n sagsverd sagkjede drivstoff eller olje 4 5 kg Lydtrykkniv ved arbeidsposisjon LpA 97 9 dB A Usikkerhet KpA 3 dB A Lydeffektniv LwA 107 7 dB A Usikkerhet KwA 3 dB A Vibrasjon Fremre h ndtak 6 24 m s2...

Страница 35: ...g BILDE 4 5 Hold opp sagsverdets tupp og juster sagkjedets stramming ved vri spennskruen til sideleddene lett og jevnt ber rer sverdets underside 6 Stram spennskruen 1 L sne 2 Stram 3 Sidespenning BIL...

Страница 36: ...lokket og oljep fyllingslokket og plasser lokkene p et st vfritt sted 2 Fyll drivstofftanken med oljeblandet bensin og fyll oljetanken til 80 med sagkjedeolje 3 Skru p tanklokket og oljep fyllingslokk...

Страница 37: ...ng avhengig av driftsforholdene F r forgasseren justeres kontroller at luft og drivstoffilter er rene og at du bruker riktig drivstoffblanding F lg anvisningene nedenfor for justere 1 Skuene H og L ka...

Страница 38: ...or har motorsagen en luftstyring p sylinderens h yre side som kan styre varm luft mot motorens luftinntak for forhindre isdannelse Under normale forhold brukes normal driftmodus det vil si den modusen...

Страница 39: ...ast i snittet pne snittet med kile eller vektstang for frigj re kjedet BILDE 15 Se opp for kast Motorsagen har en kastbeskyttelse som setter p kjedebremsen og stopper kjedet ved eventuelle kast Kontro...

Страница 40: ...t hvordan grenen ligger i spenn Gj r s et grunt skj r fra trykksiden for forhindre at grenen spj res Kapp deretter grenen fra motsatt side BILDE 19 ADVARSEL Grener som st r i spenn kan spj re og sl ut...

Страница 41: ...er p plass BILDE 21 Sm rehull Demonter sagsverdet og kontroller at ikke sm rehullet er tett 1 Sm rehull BILDE 22 Sagsverd Demonter sagsverdet og fjern st v og spon fra sm rehullet og sporet i sverdet...

Страница 42: ...VEDLIKEHOLD AV SVERD OG SAGKJEDE S rg for at sagkjedet alltid er skarpt for jevn og sikker funksjon Sagkjedet m files hvis noe av det f lgende inntreffer Sagsponen blir pulveraktig Det krevers mer kr...

Страница 43: ...vinkel Eggvinkel St tvinkel 55 H yde for understillings rytter Filklemmens spredningsvinkel Filklemmens helningsvinkel Sidevinkel 91P 5 32 4 mm 30 0 80 0 025 91VG 5 32 30 0 80 0 025 N1C BL 5 32 35 0 8...

Страница 44: ...36 cm 0 050 1 3 mm Kangxin PO14 50SR Sabre 91S053T 3 8 14 36 cm 0 050 1 3 mm Qirui PO14 50SR Oregon 91P053X Lengde tommer cm Sporet bredde tommer mm Betegnelse Betegnelse YD KU06 38J Deling Sagsverd...

Страница 45: ...t tennpluggen Motoren er svak kan ikke ruses ujevn tomgang Uegnet drivstoffblanding eller vann i drivstoffet Erstatt med rent nytt drivstoff av riktig type Luftfilter og eller drivstoffilter er tett R...

Страница 46: ...wej mo e by nara ony na poziom ha asu wynosz cy 80 db A lub wi cej Nie mo na unikn pewnego poziomu ha asu emitowanego przez pilark Prace generuj ce du y ha as wykonuj tylko w okre lonych godzinach Cz...

Страница 47: ...bluzowanych lub zmodyfikowanych cz ci Nigdy nie u ywaj pilarki gdy jest uszkodzona b dnie ustawiona lub nie zosta a ca kowicie i bezpiecznie zmontowana Upewnij si e a cuch tn cy przestaje si porusza j...

Страница 48: ...drewna Pilarka z obluzowanymi cz ciami lub uszkodzonymi zu ytymi t umikami drga emituje te zwykle wi ksz ilo drga Nie u ywaj pilarki przez zbyt d ugi czas bez przerwy RODKI OSTRO NO CI ABY UNIKN ODBI...

Страница 49: ...dno z obowi zuj cymi dyrektywami UE Przy segregacji mieci traktowa jako z om elektryczny OSTRZE ENIE Ryzyko wyst pienia odbicia Zachowaj ostro no i unikaj odbicia pilarki Nigdy nie tnij szczytem prowa...

Страница 50: ...ojemno zbiornika oleju 190 ml Ga nik Rodzaj membrany Zu ycie paliwa przy maksymalnej mocy silnika 500 g kWh Pr dko obrotowa bez obci enia 3000 400 obr min Maks pr dko obrotowa prowadnicy i a cucha tn...

Страница 51: ...i zdejmij os on przy czeniow 2 i tulej dystansow 1 3 Dopasuj a cuch wok ko a a cuchowego i umie go wok prowadnicy Zamontuj prowadnic na module silnika Dopasuj nakr tk napinacza a cucha 3 do dolnego ot...

Страница 52: ...dzonych wod Tego typu olej mo e zanieczy ci wiec zap onow lub wylot b d by przyczyn przerw w pracy silnika OSTRZE ENIE Benzyna jest skrajnie atwopalna i w niekt rych przypadkach mo e wybuchn Unikaj r...

Страница 53: ...zu OSTRZE ENIE Podczas w czania pilarki upewnij si czy a cuch nie styka si z pod o em lub jakimkolwiek przedmiotem Przed ka dym uruchomieniem sprawd czy hamulec a cucha jest zaci gni ty KONTROLA OLEJU...

Страница 54: ...ieczenia 1 Uchwyt przedni 2 Zwalnianie 3 Zaci ganie 4 Zabezpieczenie przed odbiciem RYS 10 Aby zwolni hamulec a cucha przyci gnij zabezpieczenie przed odbiciem do uchwytu przedniego a us yszysz klikni...

Страница 55: ...ej strony silnika aby je od czy 5 Obr sterowanie powietrzem aby symbol niegu by zwr cony w g r i zamontuj je z powrotem 6 Za z powrotem os on silnika i pozosta e elementy Wy czanie silnika 1 Zwolnij d...

Страница 56: ...e zdejmuj ani nie blokuj adnej cz ci zabezpiecze pilarki ze wzgl du na ryzyko mierci i lub ci kich obra e cia a na skutek odbicia R wnie niedostateczna konserwacja oraz nieprawid owy monta prowadnicy...

Страница 57: ...zpocz ciem pracy Doci nij przypor szponow do pnia przyciskaj c uchwyt tylny Doci nij uchwyt przedni w kierunku rzazu Przytrzymaj przypor szponow doci ni t do drewna aby kierowa prowadnic Zastosowanie...

Страница 58: ...nicy Przed ponownym u yciem oddaj pilark do kontroli i naprawy OSTRZE ENIE Nie u ywaj uszkodzonej pilarki PUNKTY KONTROLNE Radiator silnika Py i zanieczyszczenia w radiatorze utrudniaj ch odzenie i mo...

Страница 59: ...nia K t zaostrzania K t g wny 55 Wysoko ogranicznika g boko ci ci cia K t obrotu pilnika K t pochylenia pilnika K t powierzchni bocznej 91P 5 32 30 0 80 0 025 91VG 5 32 30 0 80 0 025 N1C BL 5 32 35 0...

Страница 60: ...stabilnie zamontowany Wy cz silnik poczekaj a wszystkie ruchome cz ci si zatrzymaj i od cz przew d wiecy zap onowej od wiecy U yj okr g ego pilnika o rednicy odpowiedniej do danego a cucha Typ a cucha...

Страница 61: ...oleju Wyczy pilark Pilark nale y przechowywa w miejscu suchym i niedost pnym dla dzieci POST POWANIE Z ODPADAMI Pozosta e lub zu yte paliwo i rodki smarne nale y zutylizowa zgodnie z obowi zuj cymi pr...

Страница 62: ...ap onow Silnik nie ma mocy nie pracuje lub bieg ja owy jest nier wny Nieodpowiednia mieszanka paliwa lub woda w paliwie Wymie paliwo na czyste wie e i w a ciwego rodzaju Filtr powietrza i lub paliwa j...

Страница 63: ...y reduce working hours to a minimum The user must have ear protection which also others in the vicinity can need to use WARNING Risk of hearing impairment Wear ear protection VIBRATION The actual vibr...

Страница 64: ...brushwood because they can fasten in the chain and whip you or cause you to lose your balance When sawing a branch under tension be careful to avoid the branch hitting you when it is completely sawn...

Страница 65: ...lind trust in the safety devices built into the saw A person using a chainsaw must take several precautions to avoid accidents If you learn how kickback happens you can avoid being taken unawares when...

Страница 66: ...illing fuel Opening for filling chain oil Move the power switch to the 0 position to immediately stop the saw Pull out the choke to close it press in the choke to open it Use a screwdriver to turn the...

Страница 67: ...sure level in working position LpA 97 9 dB A Uncertainty factor KpA 3 dB A Sound power level LwA 107 7 dB A Uncertainty factor KwA 3 dB A Vibration Front handle 6 24 mps2 Back handle 6 79 mps2 Uncerta...

Страница 68: ...e clutch cover and readjust if necessary WARNING The chain is very sharp Wear safety gloves IMPORTANT It is very important that the chain is correctly tensioned otherwise it wears out quickly and can...

Страница 69: ...e the choke open if the saw is started shortly after it has been switched off Used oil and engine oil or equivalent do not provide sufficient lubrication and can result in material damage 7 Press the...

Страница 70: ...FIG 9 IMPORTANT The bar should be fitted when adjusting the carburettor CHAIN BRAKE The chain brake stops the chainsaw immediately in the event of kickback The chain brake is applied automatically dur...

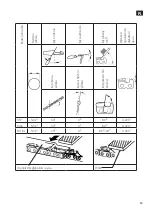
Страница 71: ...lever from the engine casing 3 Undo the screws holding the engine casing 3 screws on the inside and 1 on the outside of the casing and remove 4 Press down the air control on the right side of the engi...

Страница 72: ...the chainsaw Make sure that the chain is sharp to reduce the risk of kickback Never remove or bypass any of the safety devices on the chainsaw risk of death and or serious personal injury as a result...

Страница 73: ...ng on the back handle Press the front handle in the direction of the cut Keep the bumper spike pressed against the wood to guide the bar The bumper spike improves safety reduces vibrations and means t...

Страница 74: ...g fins reduce the cooling and can cause the saw to overheat 1 Remove the air filter and casing at regular intervals and clean the cooling fins when necessary 2 When refitting the casing check that the...

Страница 75: ...the chain is correctly and firmly fitted Switch off the saw wait until all moving parts have completely stopped and release the spark plug lead from the spark plug Use a round file with a suitable di...

Страница 76: ...le Edge angle Thrust angle 55 Height for depth gauge Filing vise turning angle Filing vise tilt angle Side angle 91P 5 32 4 mm 30 0 80 0 025 91VG 5 32 30 0 80 0 025 N1C BL 5 32 35 0 85 90 0 025 Depth...

Страница 77: ...chains Those that can be used for the chainsaw are marked with 3 8 14 36 cm 0 050 1 3 mm Oregon 140SDEA041 Oregon 91P053X 3 8 14 36 cm 0 050 1 3 mm Kangxin PO14 50SR Sabre 91S053T 3 8 14 36 cm 0 050...

Страница 78: ...Replace spark plug The engine is weak does not rev up and idles irregularly Unsuitable fuel mix or water in the fuel Replace with clean fresh fuel of the right type Air filter and or fuel filter clogg...

Отзывы: