MR
100
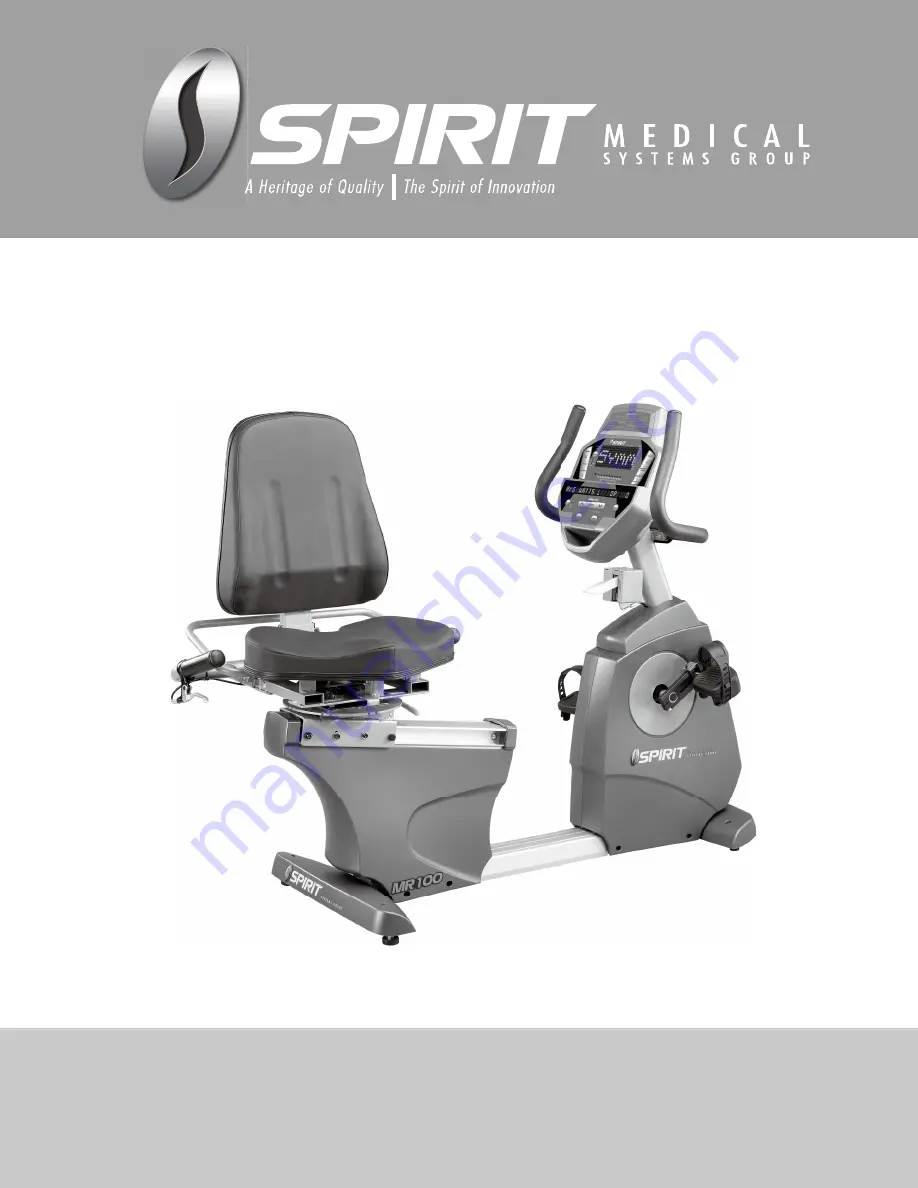
Rehabilitation Recumbent Bike
USER’S MANUAL
PLEASE READ THIS ENTIRE MANUAL CAREFULLY BEFORE OPERATING YOUR NEW LOWER
BODY ERGOMETER AND SAVE IT FOR FUTURE USE.
Страница 1: ...MR100 Rehabilitation Recumbent Bike USER S MANUAL PLEASE READ THIS ENTIRE MANUAL CAREFULLY BEFORE OPERATING YOUR NEW LOWER BODY ERGOMETER AND SAVE IT FOR FUTURE USE...
Страница 2: ...rtant Electrical Information 4 Important Operation Instructions 4 Features 6 Operation of Your New Bike 8 MR100 Assembly Instructions 21 MR100 Exploded View Drawing 31 MR100 Parts List 32 Maintenance...
Страница 3: ...rience more informed and resolution of any difficulties easier to remedy Two components of the Spirit Medical Systems Group s mission statement are enhancing patient outcomes and improving effectivene...
Страница 4: ...l devices Various factors including the user s movement may affect the accuracy of heart rate readings The pulse sensors are intended only as exercise aids in determining heart rate trends in general...
Страница 5: ...n equipment grounding plug The plug must be plugged into an appropriate outlet that is properly installed and grounded in accordance with all local codes and ordinances DANGER Improper connection of t...
Страница 6: ...dback display motivates patients to maintain even power symmetry between left and right legs Other features of the MR100 Work range up to 750 watts 60 rpm when level settings are at 15 watts per level...
Страница 7: ...asy product to set up and use from the adjustments to the intuitive interface This section explains how to set up adjust and operate your MR100 from Spirit Medical Systems Group Leveling the MR100 Onc...
Страница 8: ...n the right side handle bar and move the seat back to the desired position There is a numbered scale located just below the seat back cushion for repeatable settings Rotating the swivel seat Lift the...
Страница 9: ...he display will look like this ODO 123 MI 123 HRS The odometer will remain displayed for only a few seconds then the console will go to the start up display also known as Idle Mode The dot matrix disp...
Страница 10: ...osition is assumed to be in the center of the adjustment range The six knee angle options are 1 R Min Right leg minimum flexion L Min Left leg minimum flexion 2 R Max Right leg maximum flexion L Max L...
Страница 11: ...uctions and relevant measurements during a program The measurement data shown varies depending on the program Measurements include Time and Segment Time RPM Pulse Work level Watts and Average Watts Le...
Страница 12: ...press the Stop key to go back one level or screen 5 During the Manual program you will be able to scroll through the data in the message window by pressing the Display key You may also switch between...
Страница 13: ...by depleting your oxygen level followed by periods of recovery to replenish oxygen Your cardio vascular system gets programmed to use oxygen more efficiently this way Programming Preset Programs 1 Se...
Страница 14: ...name and continue to the next step If you want to enter a name use the Up and or the Down key to change the first letter then press Enter to save the first letter and continue to the next letter When...
Страница 15: ...protocol will be used during the test as shown in the charts below The only caveat is if you are a very de conditioned male you may need to choose option Female If you are a very conditioned female yo...
Страница 16: ...eine before the test During the test The console must be receiving a steady heart rate for the test to begin You may use the hand pulse sensors or wear a heart rate chest strap transmitter although ch...
Страница 17: ...46 40 42 35 38 32 35 30 31 26 28 below average 37 41 35 39 31 34 29 31 26 29 22 25 poor 30 36 30 34 26 30 25 28 22 25 20 21 very poor 30 30 26 25 22 20 VO2max Chart for females and de conditioned male...
Страница 18: ...the instructions in the message window Isokinetic The Isokinetic program provides accommodating resistance at a fixed speed level The user controls the resistance at the pedals by pushing harder or l...
Страница 19: ...ify your settings by pressing the Enter key For Best Results The Symmetry program starts at level 1 and the resistance needs to be increased manually by pressing the Up arrow Make sure to set the resi...
Страница 20: ...le to maintain good strong reliable readings Wearing the transmitter immediately against bare skin assures you of proper operation If you wish you may wear the transmitter over a shirt To do so moiste...
Страница 21: ...e Heart rate Level This is the heart rate level you will experience during the program Adjust the level and then press enter 6 Now you are finished editing the settings and can begin your workout by p...
Страница 22: ...ada Inc 2015 Email customerservice dyaco ca 21 ASSEMBLY INSTRUCTIONS FOR MR100 1 Hardware 65 3 8 2 1 4 4PCS 71 3 8 2 4PCS 175 3 8 2 3 4 2PCS 208 5 16 1 1 4 1PC STEP 1 77 3 8 3 4 6PCS 84 3 8 1 4PCS 205...
Страница 23: ...vice 1 888 707 1880 Dyaco Canada Inc 2015 Email customerservice dyaco ca 22 STEP 2 216 M6 P1 0 2PCS 221 M6 P1 0 40L 2PCS 83 5 16 3 4 4PCS STEP 3 136 M5 20L 4PCS 220 3 8 1 3 4 2PCS 215 3 8 2PCS 206 10m...
Страница 24: ...ice 1 888 707 1880 Dyaco Canada Inc 2015 Email customerservice dyaco ca 23 STEP 4 68 5 16 5 8 8PCS 82 5 16 2PCS 76 5 16 3 4 6PCS 83 5 16 3 4 2PCS 187 M4 5L 4PCS 98 M6 15L 2PCS STEP 5 99 M5 12L 8PCS 22...
Страница 25: ...Service 1 888 707 1880 Dyaco Canada Inc 2015 Email customerservice dyaco ca 24 2 Tools 112 12 14m m Open wrench 1PC 114 Phillips Head Screw Driver 1PC 132 14 15m m Open wrench 1PC 200 5m m L Allen Wr...
Страница 26: ...r Service 1 888 707 1880 Dyaco Canada Inc 2015 Email customerservice dyaco ca 25 283 8m m L Allen Wrench 1PC 201 Short Phillips Head Screw Driver 1PC 284 13 14m m Open wrench 1PC 280 10m m Wrench_sing...
Страница 27: ...eceiving tubes of the seat frame 38 Secure the handle bar assembly starting with the two 3 8 x 2 3 4 bolts 175 install from the inside hole of the receiving tube two flat washers 77 and nuts 89 Do not...
Страница 28: ...ail customerservice dyaco ca 27 STEP 2 SWIVEL SEAT RELEASE HANDLE ASSEMBLY 1 Install the swivel seat release handle 40 onto the mating flat area of the solid round bars and secure with the two M6 x 40...
Страница 29: ...STEP 3 SEAT BACK AND COVER ASSEMBLY 1 Slide the seat back assembly 5 into the seat back angle adjustment bracket and secure with the two 3 8 x 1 3 4 bolts 220 3 8 washers 206 and 3 8 nuts 215 2 Insta...
Страница 30: ...d gently keeping tension on the cables at the top of the mast with the other install the Console Mast 2 into the Main Frame receiving tube under the cover 31 Keeping tension on the cables will ensure...
Страница 31: ...d right 117 pedals onto the crank arms Remember that the left pedal has a reverse thread and will be screwed into the crank in the opposite rotation from normal threads There is an L stamped into the...
Страница 32: ...Customer Service 1 888 707 1880 Dyaco Canada Inc 2015 Email customerservice dyaco ca 31 MR100 Exploded View Drawing...
Страница 33: ...60067 R4 Seat Assembly Stop 2 17 P060256 A1 Rubber Foot Leveler 2 18 P050014 A1 Transportation Wheel 2 19 ZSB006 02 Console Assembly 1 20 RP060090E A1 Drive Pulley 1 21 F090250 01 Hand pulse Sensor W...
Страница 34: ...8 Z1 3 8 2 Hex Head Bolt 4 72 J210016 Z1 1 4 1 2 Flat Washer 5 73 J210017 Z1 1 4 x 3 4 Flat Washer 4 76 J210005 Z1 5 16 3 4 Flat Washer 6 77 J210003 Z1 3 8 3 4 Flat Washer 8 78 J210020 Z1 3 16 19 32 F...
Страница 35: ...4 Z1 M5 20mm Phillips Head Screw 4 141 P060191 A1 Handle Bar Cover 1 143 B020003 Z3 Seat Position Scale For Aft 1 148 P280004 A1 Dummy Plug 1 160 J210032 Z1 5 16 5 8 Flat Washer 6 161 J602501 Y9 M6 10...
Страница 36: ...Z1 3 8 UNC16 7T mm Nyloc Nut 2 216 J139601 Z1 M6 P1 0 Nylon Nut 2 217 J139311 Z1 M12 P1 75 Nylon Nut 1 220 J031007U Z1 3 8 UNC16 1 3 4 Socket Head Cap Bolt 2 221 J032508W Z1 M6 P1 0 40 mm Socket Head...
Страница 37: ...0m m Hand Pulse Extension Cable 1 274 E030401 01 800m m Hand Pulse Wire 1 275 B130227 R4 Cover Mech Brake 2 276 J082514 Z1 M6 P1 0 57L Eye Bolt 1 277 J210063 Z1 1 2 26 2 0T mm Flat Washer 1 278 RC1200...
Страница 38: ...Customer Service 1 888 707 1880 Dyaco Canada Inc 2015 Email customerservice dyaco ca 37 299 P040071 A1 HGP Wire Grommet 2 300 J260008 Z2 Split Washer 2 301 E040200 Ground Wire 450mm 14AWG 1...
Страница 39: ...nd hold down the Start Stop and Enter keys Keep holding the keys down for about 5 seconds and the message window will display Engineering mode Press the enter button to access the menu below a Key tes...
Страница 40: ...45cm Width 30 77cm Height 51 130cm Weight 185 9 lbs 84 5 kg Patient weight capacity 440 lb 200 kg Power 90 240V 50 60 Hz 1 76 0 71A Fuse Rating Replace with only 5A 250V glass fuse Resistance Constant...
Страница 41: ...turer and d is the recommended separation distance in meters m Field strengths from fixed RF transmitters as determined by an electromagnetic site survey a should be less than the compliance level in...
Страница 42: ...01 test level Compliance level Electromagnetic environment guidance Electrical fast transient burst IEC 61000 4 4 2 kV for power supply lines 1 kV for input output lines 2 kV for power supply lines 1...
Страница 43: ...rranty provided herein is lieu of all other express warranties any implied warranties including any implied warranties of merchantability of fitness for particular purpose are limited in duration to t...
Страница 44: ...tion about our other brands and products manufactured and distributed by Dyaco Canada Inc www spiritfitnesscanada ca www dyaco ca www spiritfitnesscanada ca www dyaco ca www solefitness ca www dyaco c...