


48
KOMAC00607-09EN
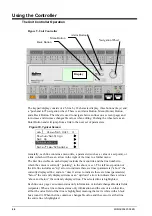
previous line (up) on the page. The faster the wheel is turned the faster the cursor moves.
Pushing the wheel acts as an “Enter” button.
Three types of lines exist:
•
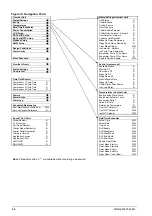
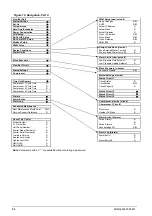
Menu title, displayed in the first line as in
Figure 12
.
•
Link (also called Jump) having an arrow (
>
)
in the right of the line and used to link
to the next menu.
•
Parameters with a value or adjustable setpoint.
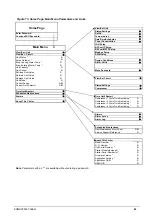
For example, “Time Until Restart” jumps from level 1 to level 2 and stops there.
When the Back Button is pressed the display reverts back to the previously displayed
page. If the Back button is repeated pressed the display continues to revert one page back
along the current navigation path until the “main menu” is reached.
When the Menu (Home) Button is pressed the display reverts to the “main page.”
When the Alarm Button is depressed, the Alarm Lists menu is displayed.
Edit Mode
The Editing Mode is entered by pressing the navigation wheel while the cursor is
pointing to a line containing an editable field. Once in the edit mode pressing the wheel
again causes the editable field to be highlighted. Turning the wheel clockwise while the
editable field is highlighted causes the value to be increased. Turning the wheel counter-
clockwise while the editable field is highlighted causes the value to be decreased. The
faster the wheel is turned the faster the value is increased or decreased. Pressing the
wheel again cause the new value to be saved and the keypad/display to leave the edit
mode and return to the navigation mode.
A parameter with an “R” is read only; it is giving a value or description of a condition.
An “R/W indicates a read and/or write opportunity; a value can be read or changed
(providing the proper password has been entered).
Example 1
:
Check Status,
for example
-
is the unit being controlled locally or by an external
network? We are looking for the Unit Control Source Since this a unit status parameter, start at
Main Menu and select View/Set Unit and press the wheel to jump to the next set of menus. There
will be an arrow at the right side of the box, indicating that a jump to the next level is required.
Press the wheel to execute the jump.
You will arrive at the Status/ Settings link. There is an arrow indicating that this line is a link to a
further menu. Press the wheel again to jump to the next menu, Unit Status/Settings.
Rotate the wheel to scroll down to Control Source and read the result.
Example 2; Change a Setpoint,
the chilled water setpoint for example. This parameter is
designated as Cool LWT Setpoint 1 and is a unit set parameter. From the Main Menu select
View/Set Unit. The arrow indicated that this is link to a further menu.
Press the wheel and jump to the next menu View/Set Unit and use the wheel to scroll down to
Temperatures. This again has an arrow and is a link to a further menu. Press the wheel and jump
to the Temperatures menu, which contains six lines of temperatures setpoints. The first line is
Evap LWT, XXXXX to do next—password expired??
Example 3; Clear an Alarm,
. HOW DO YOU KNOW THERE IS AN ALARM????. From the
Main Menu scroll down to the Alarms line. Note the arrow indicating this line is a link. Press
the wheel to jump to the next menu Alarms There are two lines here; Alarm Active and Alarm
Log. Alarms are cleared from the Active Alarm link. Press the wheel to jump to the next screen
Содержание AWS
Страница 8: ...8 KOMAC00607 09EN Figure 5 Piping Schematic with Economizer Circuit One Circuit ...
Страница 12: ...12 KOMAC00607 09EN ...
Страница 54: ...54 KOMAC00607 09EN ...
Страница 67: ......


