33
The MX136 has twelve Analog Audio Inputs numbered 0
through 11, six Digital Audio Inputs lettered A through F
and five Component Video Inputs numbered 1 through 5.
There are also four HDMI (Digital Video) Inputs numbered
1 through 4. These inputs already have assigned titles and
associations that will allow for immediate hookup, opera-
tion and enjoyment.
If these starting assignments and associations do not match
up with components in your system, they may be reassigned
from the default settings. The following example will illus-
trate how to rename the TAPE2 Input to DVD2 and assign
it the LV Digital Input. When the Zone A or B Input Selec-
tor is rotated to select what was originally the TAPE2 Input,
DVD2 will now appear on the Front Panel Alphanumeric
Display. The Surround Mode, Video Power Control, HDMI
Video and Component Video can also be set for each Input.
Notes: 1. The very first time the INPUT SETUP is accessed,
the default settings will be indicated.
2. Unused Inputs may be switched Off so that they will
not appear when rotating through the input source
choices using the Zone A or Zone B Input Selector
and also will not be available when using the Remote
Control or Keypad.
1. Press and hold the Front Panel SETUP Push-button ap-
proximately three seconds to enter the Setup Mode. The
word SETUP will appear on the MX136 Front Panel
Display and the MAIN SYSTEM SETUP Menu will
appear on the Monitor/TV screen. Refer to figure 6 on
page 26.
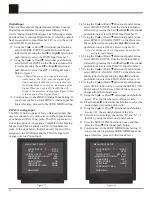
2. Using the Up
or Down
directional push-buttons on
the Remote Control, select INPUT SETUP on the On-
Screen Menu, followed by the SELECT/OK Push-but-
ton. Refer to figure 6 on page 26.
3. Using the Up
or Down
directional push-buttons,
select SOURCE INPUT from the On-Screen Menu, fol-
lowed by pressing the Left or Right directional
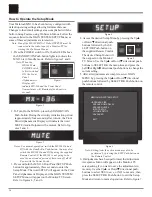
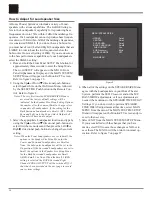
push-buttons to select Input Number 5 - IR-TP2. Refer
to figure 15.
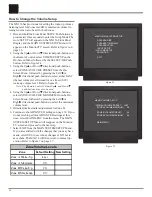
Note: The information displayed after the Source Input
Number indicates which IR Remote Control
Command selects the input.
Analog Audio/Video Input Title
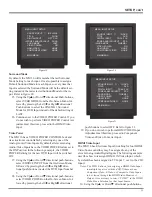
4. Using the Up
or Down
directional push-buttons,
select TITLE, followed by pressing the SELECT/OK
Push-button. The On-Screen Menu Title can now be
changed from the default name. Refer to figure 16.
5. Using the Up
or Down
directional push-buttons,
select “D” as the first character of the new title.
Note: The TITLE may be up to 4 characters in length
including (0 thru 9) and (A thru Z).
How to Change the Input Setup
6. Press the Right directional push-button to select the
second character position of the title.
7. Using the Up
or Down
directional push-buttons to
select “V” the second character of the title.
8. Select the two remaining characters “D” and “2” of the
title by using the directional push-buttons.
9. Press the SELECT/OK Push-button once and then
press the Down
directional push-button.
10. Proceed to the Digital Input Setting. If you do not wish
to perform Digital Input Setting at this time, proceed
to the ZONE A Analog Input Setting.
SETUP, con’t
MENU: INPUT SETUP
Æ
SOURCE INPUT
5
-
IR-TP2
TITLE
TAPE2
DIGITAL INPUT
NONE
ZONE A ANALOG INPUT
RCA
SURR MODE
LAST
VIDEO POWER
ON
HDMI VIDEO
NONE
COMPONENT VIDEO
NONE
MAIN MENU
Figure 15
Figure 16
MENU: INPUT SETUP
SOURCE INPUT
5
-
IR-TP2
Æ
TITLE
A
DIGITAL INPUT
NONE
ZONE A ANALOG INPUT
RCA
SURR MODE
LAST
VIDEO POWER
ON
HDMI VIDEO
NONE
COMPONENT VIDEO
NONE
MAIN MENU
Содержание MX136
Страница 23: ...23 Notes ...

