


14
1030658 Rev.A 09/05
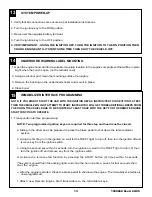
FUNCTION TEST
16
Car Find
1. Press and hold START button - Horn should beep five times and parking lights should flash five times.
Remote Engine Start Functions
1. REMOTE ENGINE START; Make sure the key is removed from the ignition switch and the engine hood is
closed. Press the START button twice within 3 seconds - The parking lights should flash one time, the horn
should beep once then the vehicle should crank and start. Once started the parking lights will turn on and stay
on signifying the vehicle is started.
2. RUNNING WITH IGNITION KEY - While the vehicle is running on the remote engine start, confirm that all
function operate properly on the FACTORY transmitter/retractable key. Once FACTORY transmitter functionality
is confirmed, press the UNLOCK button on FACTORY transmitter and enter the vehicle, insert the ignition key
and turn the ignition to the run position, press the brake pedal - At this time the vehicle should be running on the
ignition key and the remote engine start was shut down when the brake pedal was pressed. Turn off the ignition
switch and the vehicle should shut off.
3. BRAKE PEDAL SAFETY - Restart the vehicle using the remote engine start, enter the vehicle, press the brake
pedal - The vehicle should shut off.
4. KEY-IN-SENSE - Insert the ignition key into the ignition switch but keep in off position, activate the remote
engine start function - the vehicle should flash the lights as if it is going to start but then the horn should beep
twice and the remote engine starter does not attempt to start the vehicle since it senses the key in the ignition.
5. HOOD SAFETY SWITCH - Open the engine hood and activate the remote engine start function - The horn
should beep two additional times signifying that hood safety switch is tripped and the vehicle will not start.
(reference section 18 if adjustment is needed)
FUNCTIONAL TESTING IS NOW COMPLETE.
SYSTEM PROGRAMMING
17
NOTE: THE FOLLOWING STEPS ARE ONLY NECESSARY IF YOU NEED TO PROGRAM ADDITIONAL
TRANSMITTERS.
1. Transmitter Programming
NOTE: The transmitters shipped with the remote start system are pre-programmed to the DNA
card, and do not need to be reprogrammed.
a. Turn the ignition key to the ON or RUN position.
b. Press and hold the programming button.
After 10 seconds the horn will beep 3 times, indicating that the system is now in transmitter learn
mode.
c. Release the programming button.
d. If programming transmitters at this time, press the START button once on each transmitter to be
programmed.
The horn will beep 1 time to indicate that the transmitter has been learned.
NOTE: Up to a total of 8 transmitter can be programmed at this time.
Содержание MAZDA5 2006
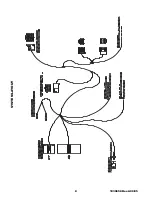
Страница 8: ...8 1030658 Rev A 09 05 SYSTEM LAYOUT...