Quick Start Guide
HOW TO LIGHT (225
°
F)
HOW TO LIGHT (230
°
F - 270
°
F)
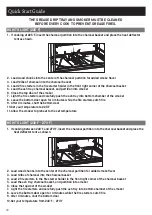
1. If cooking between 230
°
F and 270
°
F, insert the charcoal partition into the charcoal basket and place the
heat deflector tent as shown.
2. Load wood chunks into the center of the charcoal partition for added smoke flavor
3. Load 12lbs of charcoal into the charcoal basket
4. Load 2 fire starters in the fire starter holder in the front right corner of the charcoal basket
5. Load the ash tray, charcoal basket, and partition into smoker
6. Close the top door of the smoker
7. Light the fire starters and carefully push the ash tray into bottom chamber of the smoker
8. Leave the bottom door open for 3 minutes while the fire starters catch fire
9. After 3 minutes, shut the bottom door
10. Set your temperature from 230
°
F – 270
°
F
1. If cooking at 225
°
F, insert the charcoal partition into the charcoal basket and place the heat deflector
tent as shown.
2. Load wood chunks into the center of the charcoal partition for added smoke flavor
3. Load 12lbs of charcoal into the charcoal basket
4. Load 2 fire starters in the fire starter holder in the front right corner of the charcoal basket
5. Load the ash tray, charcoal basket, and partition into smoker
6. Close the top door of the smoker
7. Light the fire starters and carefully push the ash tray into bottom chamber of the smoker
8. Leave the bottom door open for 3 minutes while the fire starters catch fire
9. After 3 minutes, shut the bottom door
10. Set your temperature to 225
°
F
11. Allow the smoker to preheat to the set temperature
THE GREASE DRIP TRAY AND SMOKER MUST BE CLEANED
BEFORE EVERY COOK TO PREVENT GREASE FIRES.
18
Содержание MB20060321
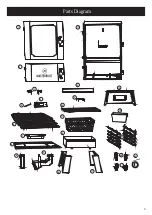
Страница 5: ...Parts Diagram 1 2 3 4 5 6 7 8 9 10 11 12 13 14 15 16 17 18 19 20 21 23 3 3 15 22 5...
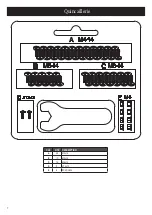
Страница 7: ...Hardware KEY QTY DESCRIPTION A 24 M4X14 B 10 M5X14 C 14 M6X14 D 2 ST3X12 E 8 M4 NUT 7...
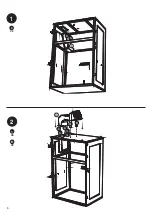
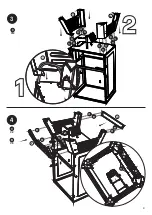
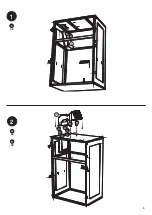
Страница 8: ...1 A X2 9 A A 2 A X6 10 A A A A B B A A B X2 8...
Страница 9: ...4 19 12 C X2 B X8 B B B B C B B B B C C B B B B 18 17 3 C X12 C C C C C C C C C C C C 17 9...
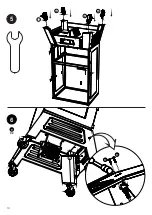
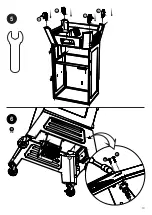
Страница 10: ...5 21 22 21 22 6 D X2 4 D D 10...
Страница 11: ...7 8 13 14 11...
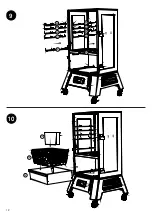
Страница 12: ...9 20 20 20 20 20 20 20 20 20 20 10 15 16 15 12...
Страница 13: ...11 7 8 12 6 6 6 6 13...
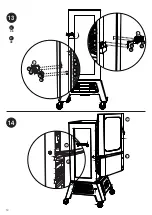
Страница 14: ...13 14 A X8 E X8 1 2 3 A E E E E A A A A A A A E E E E 1 2 3 14...
Страница 26: ...Sch ma des pi ces 1 2 3 4 5 6 7 8 9 10 11 12 13 14 15 16 17 18 19 20 21 23 3 3 15 22 5...
Страница 28: ...Quincaillerie CL QT DESCRIPTION A 24 M4 14 B 10 M5 14 C 14 M6 14 D 2 ST3 12 E 8 CROU M4 7...
Страница 29: ...1 A X2 9 A A 2 A X6 10 A A A A B B A A B X2 8...
Страница 30: ...4 19 12 C X2 B X8 B B B B C B B B B C C B B B B 18 17 3 C X12 C C C C C C C C C C C C 17 9...
Страница 31: ...5 21 22 21 22 6 D X2 4 D D 10...
Страница 32: ...7 8 13 14 11...
Страница 33: ...9 20 20 20 20 20 20 20 20 20 20 10 15 16 15 12...
Страница 34: ...11 7 8 12 6 6 6 6 13...
Страница 35: ...13 14 A X8 E X8 1 2 3 A E E E E A A A A A A A E E E E 1 2 3 14...
Страница 47: ...Diagrama de partes 1 2 3 4 5 6 7 8 9 10 11 12 13 14 15 16 17 18 19 20 21 23 3 3 15 22 5...
Страница 49: ...Accesorios CLAVE CANT DESCRIPCI N A 24 M4X14 B 10 M5X14 C 14 M6X14 D 2 ST3X12 E 8 TUERCA M4 7...
Страница 50: ...1 A X2 9 A A 2 A X6 10 A A A A B B A A B X2 8...
Страница 51: ...4 19 12 C X2 B X8 B B B B C B B B B C C B B B B 18 17 3 C X12 C C C C C C C C C C C C 17 9...
Страница 52: ...5 21 22 21 22 6 D X2 4 D D 10...
Страница 53: ...7 8 13 14 11...
Страница 54: ...9 20 20 20 20 20 20 20 20 20 20 10 15 16 15 12...
Страница 55: ...11 7 8 12 6 6 6 6 13...
Страница 56: ...13 14 A X8 E X8 1 2 3 A E E E E A A A A A A A E E E E 1 2 3 14...
Страница 63: ......

