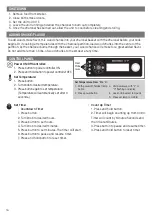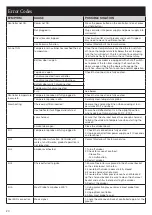
Error Codes
SYMPTOM
CAUSE
POSSIBLE SOLUTION
Controller not ON.
Power not ON.
Press the power button on the controller. (do not press
and hold button)
Not plugged in.
Plug controller into power supply and power supply into
wall outlet.
Circuit breaker tripped.
Check wall outlet circuit breaker and reset if tripped.
May need to move to a different outlet.
Controller malfunction.
Contact Masterbuilt Customer Service.
Fan not ON.
Temperature in cabinet has reached the set
temperature.
Once the set temperature is reached the fan will turn
off. Once the temperature falls below the set tempera-
ture the fan will restart. The fan will continue adjusting
itself automatically to maintain the set temperature.
Bottom door is open.
For safety, the smoker is equipped with shut off switch-
es to prevent the fan from stoking the fire when the
doors are open. Closing the doors will engage the
switches, allowing the fan to continue normal operation.
Top door is open
Check that connection is fully seated.
Fan disconnected from controller.
Fan disconnected from wiring harness.
Bottom door switch disconnected.
Top door switch disconnected.
Err 3
See below.
Controller temperature
inaccurate.
Temperature probe not fully plugged in.
Check that connection is fully seated.
Temperature probe is dirty.
Carefully clean temperature probe.
Slow heating.
Charcoal partition inserted.
Remove the charcoal partition when cooking at tem-
peratures 275ºF and above.
Heat deflector tent flipped and rotated.
Ensure heat deflector tent is in the upright position
when cooking at temperatures 230ºF - 400ºF.
Low charcoal.
Ensure that the charcoal basket has enough charcoal
to bring the smoker to temperature when starting the
smoker.
Smoker door open.
Close the smoker doors.
Err 1
Temperature probe not fully plugged in.
1. Check that connection is fully seated.
2. Unplug controller from power supply, wait 10 seconds
and reconnect.
Err 2
Meat probe malfunction. Controller still
works, fan still works, product operation is
not impacted.
Contact Masterbuilt Customer Service.
Err 3
Smoker overheated.
1. Turn off smoker.
2. Check for cause of overheat.
• Grease fire.
• Fan malfunction.
3. Restart smoker.
Err 4
Charcoal failed to ignite.
1. Ensure firestarter was placed in the charcoal basket
on the side closest to the fan.
2. Ensure both smoker doors are fully closed.
3. Ensure charcoal is not empty.
4. Ensure old ash from previous use has not blocked
up the charcoal basket. Be sure to clean the charcoal
basket and ash tray before starting the smoker.
5. Restart the smoker.
Err 5
Meat Probe Temp above 300°F.
1. Using protective gloves, remove meat probe from
smoker.
2. Unplug from controller.
3. Allow meat probe to cool.
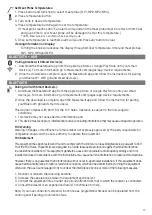
Poor WIFI connection
Weak signal.
1. Angle the antenna on back of controller to point at the
ground
20
Содержание MB20060321
Страница 5: ...Parts Diagram 1 2 3 4 5 6 7 8 9 10 11 12 13 14 15 16 17 18 19 20 21 23 3 3 15 22 5...
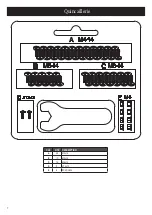
Страница 7: ...Hardware KEY QTY DESCRIPTION A 24 M4X14 B 10 M5X14 C 14 M6X14 D 2 ST3X12 E 8 M4 NUT 7...
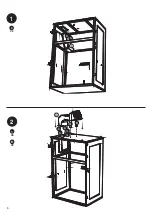
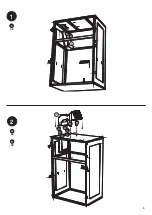
Страница 8: ...1 A X2 9 A A 2 A X6 10 A A A A B B A A B X2 8...
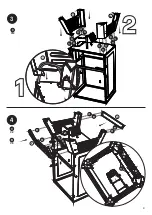
Страница 9: ...4 19 12 C X2 B X8 B B B B C B B B B C C B B B B 18 17 3 C X12 C C C C C C C C C C C C 17 9...
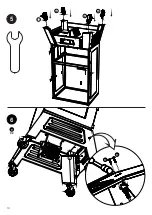
Страница 10: ...5 21 22 21 22 6 D X2 4 D D 10...
Страница 11: ...7 8 13 14 11...
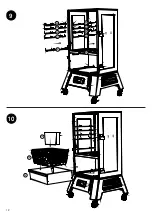
Страница 12: ...9 20 20 20 20 20 20 20 20 20 20 10 15 16 15 12...
Страница 13: ...11 7 8 12 6 6 6 6 13...
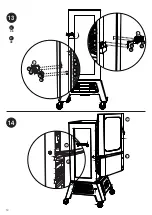
Страница 14: ...13 14 A X8 E X8 1 2 3 A E E E E A A A A A A A E E E E 1 2 3 14...
Страница 26: ...Sch ma des pi ces 1 2 3 4 5 6 7 8 9 10 11 12 13 14 15 16 17 18 19 20 21 23 3 3 15 22 5...
Страница 28: ...Quincaillerie CL QT DESCRIPTION A 24 M4 14 B 10 M5 14 C 14 M6 14 D 2 ST3 12 E 8 CROU M4 7...
Страница 29: ...1 A X2 9 A A 2 A X6 10 A A A A B B A A B X2 8...
Страница 30: ...4 19 12 C X2 B X8 B B B B C B B B B C C B B B B 18 17 3 C X12 C C C C C C C C C C C C 17 9...
Страница 31: ...5 21 22 21 22 6 D X2 4 D D 10...
Страница 32: ...7 8 13 14 11...
Страница 33: ...9 20 20 20 20 20 20 20 20 20 20 10 15 16 15 12...
Страница 34: ...11 7 8 12 6 6 6 6 13...
Страница 35: ...13 14 A X8 E X8 1 2 3 A E E E E A A A A A A A E E E E 1 2 3 14...
Страница 47: ...Diagrama de partes 1 2 3 4 5 6 7 8 9 10 11 12 13 14 15 16 17 18 19 20 21 23 3 3 15 22 5...
Страница 49: ...Accesorios CLAVE CANT DESCRIPCI N A 24 M4X14 B 10 M5X14 C 14 M6X14 D 2 ST3X12 E 8 TUERCA M4 7...
Страница 50: ...1 A X2 9 A A 2 A X6 10 A A A A B B A A B X2 8...
Страница 51: ...4 19 12 C X2 B X8 B B B B C B B B B C C B B B B 18 17 3 C X12 C C C C C C C C C C C C 17 9...
Страница 52: ...5 21 22 21 22 6 D X2 4 D D 10...
Страница 53: ...7 8 13 14 11...
Страница 54: ...9 20 20 20 20 20 20 20 20 20 20 10 15 16 15 12...
Страница 55: ...11 7 8 12 6 6 6 6 13...
Страница 56: ...13 14 A X8 E X8 1 2 3 A E E E E A A A A A A A E E E E 1 2 3 14...
Страница 63: ......

