background image

WARNINGS AND IMPORTANT SAFEGUARDS

and liquids.

•  Do not leave smoker unattended.

•  Keep children and pets away from smoker at all times. Do NOT allow children to use smoker. Close 

supervision is necessary when children or pets are in the area where smoker is being used.

•  Do NOT allow anyone to conduct activities around smoker during or following its use until it has 

cooled.

•  Never use glass, plastic, or ceramic cookware in smoker. Never place empty cookware in smoker 

while in use.

•  Never move smoker when in use. Allow smoker to cool completely (below 115°F (45°C)) before 

moving or storing.

•  Do not store smoker with hot ashes or charcoal inside smoker/hopper. Store only when fire is 

completely out and all surfaces are cold.

•  Never use smoker as a heater (READ CARBON MONOXIDE HAZARD).

•  The smoker is HOT while in use and will remain HOT for a period of time afterwards and during cooling 

process. Use CAUTION. Wear protective gloves/mitts.

•  Be careful when removing food from smoker. All surfaces are HOT and may cause burns. Use 

protective gloves/mitts or long, sturdy, cooking tools for protection from hot surfaces or splatter from 

cooking liquids.

•  DO NOT bump or impact the smoker to prevent personal harm, damage to smoker, or spillage/

splashing of hot cooking liquid.

•  Do not touch HOT surfaces

•  Smoker is hot during use. To avoid burns, keep face and body away from door(s) and vents. Steam and 

hot air are expelled during use.

•  Smoker has an open flame. Keep hands, hair, and face away from flame. Do NOT lean over smoker 

when lighting. Loose hair and clothing may catch fire.

•  DO NOT obstruct flow of combustion and ventilation.

•  Do not cover cooking racks with metal foil. This will trap heat and may cause damage to the smoker.

•  Never leave HOT coals or ashes unattended.

•  Do not remove ashes while ashes and charcoal are HOT.

•  Keep hands, hair, and face away from the burning charcoal. Be careful of loose hair and clothing 

during operation as they could catch fire.

•  Use protective gloves when handling this smoker or working with fire. Use protective gloves or long, 

sturdy fireplace tools when adding wood or charcoal.

•  Never use charcoal lighting fluid, gasoline, alcohol or other highly volatile fluids to ignite charcoal. 

These fluids can explode causing injury or death. Always follow specific lighting instructions for this 

smoker.

•  Never overfill charcoal basket. This can cause serious injury as well as damage to the smoker.

•  Dispose of cold ashes by placing them in aluminum foil, soaking with water, and discarding in a 

   non-combustible container.

•  When using electrical appliances, basic safety precautions should always be followed including 

the following:  1) Do not plug in the appliance until fully assembled and ready for use.  2) Use only 

approved grounded electrical outlet.  3) Do not use during an electrical storm.  4) Do not expose 

appliance to rain or water at any time.

•  To protect against electrical shock do not immerse cord, plug or control panel in water or other liquid.

•  Do not operate any appliance with a damaged cord or plug, or after appliance malfunctions or has  

    been damaged in any manner. 

•  Extension cords may be used if care is exercised in their use.•  If an extension cord is used: 1) The 

marked electrical rating of the extension cord should be at least as great as the electrical rating of 

the appliance; and 2) the cord should be arranged so that it will not drape over the counter top or 

tabletop where it can be pulled by children or tripped over unintentionally.

•  The extension cord must be a grounding-type 3-wire cord.

•  Outdoor extension cords must be used with outdoor use products and are marked with suffix “W” and 

with the statement “Suitable for Use with Outdoor Appliances.”

•  CAUTION - To reduce the risk of electric shock, keep extension cord connection dry and off the 

ground.

•  Do not let cord hang on or touch hot surfaces.

•  Do not place cord on or near a gas or electric burner or in a heated oven.

•  To disconnect, turn controller “OFF” then remove plug from outlet.

•  Unplug from outlet when not in use and before cleaning. Allow appliance to cool completely before

  adding/removing internal components.

3

Содержание MB20060321

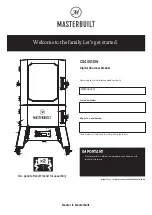
Страница 1: ...model number s Two people Recommend for assembly These numbers are located on the rating label of the smoker Mfg Date Serial Number Your model number MB20060321 Please record this information immediat...

Страница 2: ...ide enclosed areas such as patios garages buildings or tents Never use inside or on recreational vehicles or boats Maintain a minimum distance of 10ft 3m from overhead construction walls rails or othe...

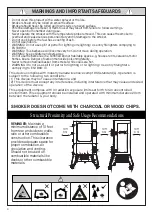
Страница 3: ...protective gloves when handling this smoker or working with fire Use protective gloves or long sturdy fireplace tools when adding wood or charcoal Never use charcoal lighting fluid gasoline alcohol or...

Страница 4: ...arcoal basket from smoker while coals are hot WARNING Do not use spirit or petrol for lighting or re lighting Use only firelighters complying to EN 1860 3 This device complies with Industry Canada lic...

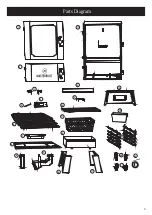
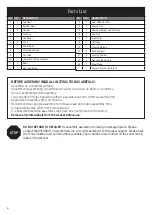
Страница 5: ...Parts Diagram 1 2 3 4 5 6 7 8 9 10 11 12 13 14 15 16 17 18 19 20 21 23 3 3 15 22 5...

Страница 6: ...ease contact MASTERBUILT Customer Service at www masterbuilt com pages support Please have the model number and serial number available These numbers are located on the silver rating label on the smok...

Страница 7: ...Hardware KEY QTY DESCRIPTION A 24 M4X14 B 10 M5X14 C 14 M6X14 D 2 ST3X12 E 8 M4 NUT 7...

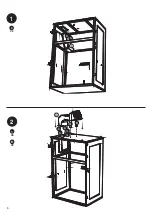
Страница 8: ...1 A X2 9 A A 2 A X6 10 A A A A B B A A B X2 8...

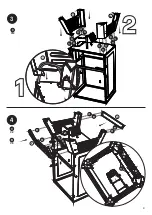
Страница 9: ...4 19 12 C X2 B X8 B B B B C B B B B C C B B B B 18 17 3 C X12 C C C C C C C C C C C C 17 9...

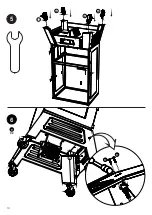
Страница 10: ...5 21 22 21 22 6 D X2 4 D D 10...

Страница 11: ...7 8 13 14 11...

Страница 12: ...9 20 20 20 20 20 20 20 20 20 20 10 15 16 15 12...

Страница 13: ...11 7 8 12 6 6 6 6 13...

Страница 14: ...13 14 A X8 E X8 1 2 3 A E E E E A A A A A A A E E E E 1 2 3 14...

Страница 15: ...START UP instructions and set the temperature to 275 F for 120 minutes 4 After 120 minutes set the temperature to 400 F allow the smoker to burn out the remaining charcoal 5 Allow the smoker to cool...

Страница 16: ...bs of wood chunks to the smoker at any time CONTROL PANEL Meat Probe Jacks Set Temperature 1 Press button 2 Turn knob to desired temperature 3 Press button again to set temperature Temperature will au...

Страница 17: ...and smart device s This device complies with Part 15 of the FCC Rules Operation is subject to the following two conditions 1 This device may not cause harmful interference and 2 Thisdevicemustacceptan...

Страница 18: ...inutes shut the bottom door 10 Set your temperature from 230 F 270 F 1 If cooking at 225 F insert the charcoal partition into the charcoal basket and place the heat deflector tent as shown 2 Load wood...

Страница 19: ...during a cook If you set the temperature to 300 F and allow it to preheat you cannot lower the temperature to 225 F during the cook 3 If you have the charcoal partition inserted into the charcoal bas...

Страница 20: ...efully clean temperature probe Slow heating Charcoal partition inserted Remove the charcoal partition when cooking at tem peratures 275 F and above Heat deflector tent flipped and rotated Ensure heat...

Страница 21: ...Rest assured we re here to help Customer Service masterbuilt masterbuilt com masterbuilt com contact us masterbuilt com warranty masterbuilt com collections parts...

Страница 22: ...recommand es pour l assemblage Ces num ros se trouvent sur l tiquette signal tique situ e sur le fumoir Date de fabrication Num ro de s rie Votre num ro de mod le MB20060321 Veuillez consigner ces inf...

Страница 23: ...amais utiliser l appareil dans un lieu ferm comme un patio un garage un difice ou une tente Ne jamais utiliser l appareil l int rieur ou dans un v hicule r cr atif ou un bateau Gardez une distance min...

Страница 24: ...ez garde vos cheveux et v tements pendant la cuisson car ils pourraient prendre feu Portez des gants de protection lorsque vous manipulez ce fumoir ou que vous travaillez avec du feu Utilisez des gant...

Страница 25: ...dans un espace clos ou habitable par exemple une maison une tente une roulotte une maison mobile ou un bateau Danger de d c s caus par l empoisonnement au monoxyde de carbone AVERTISSEMENT Ne pas uti...

Страница 26: ...Sch ma des pi ces 1 2 3 4 5 6 7 8 9 10 11 12 13 14 15 16 17 18 19 20 21 23 3 3 15 22 5...

Страница 27: ...ASTERBUILT au 1 800 489 1581 ou www masterbuilt com pages support Veuillez avoir le num ro de mod le et le num ro de s rie port e de main Ces num ros se trouvent sur l tiquette argent e situ e sur le...

Страница 28: ...Quincaillerie CL QT DESCRIPTION A 24 M4 14 B 10 M5 14 C 14 M6 14 D 2 ST3 12 E 8 CROU M4 7...

Страница 29: ...1 A X2 9 A A 2 A X6 10 A A A A B B A A B X2 8...

Страница 30: ...4 19 12 C X2 B X8 B B B B C B B B B C C B B B B 18 17 3 C X12 C C C C C C C C C C C C 17 9...

Страница 31: ...5 21 22 21 22 6 D X2 4 D D 10...

Страница 32: ...7 8 13 14 11...

Страница 33: ...9 20 20 20 20 20 20 20 20 20 20 10 15 16 15 12...

Страница 34: ...11 7 8 12 6 6 6 6 13...

Страница 35: ...13 14 A X8 E X8 1 2 3 A E E E E A A A A A A A E E E E 1 2 3 14...

Страница 36: ...glez la temp rature 135 C pendant 120 minutes 4 Au bout de 120 minutes r glez la temp rature 205 C et laissez le fumoir br ler le reste du charbon 5 Laissez le fumoir refroidir COMPL TEMENT 6 Lorsque...

Страница 37: ...emp rature voulue 3 Appuyez de nouveau sur le bouton pour r gler la temp rature La temp rature se r gle automatiquement au bout de 3 secondes 1 Avec l appareil teint tenez enfonc le bouton de r glage...

Страница 38: ...appareils intelligents Cet appareil est conforme la partie 15 du r glement de la FCC Le fonctionnement est soumis aux deux conditions suivantes 1 cet appareil ne doit pas causer d interf rences nuisi...

Страница 39: ...ure 10 R glez la temp rature entre 110 C et 130 C 11 Laissez le fumoir pr chauffer jusqu la temp rature r gl e 1 Si vous cuisinez 105 C ins rez la cloison charbon dans le panier charbon et installez l...

Страница 40: ...toute cendre accumul e dans la chambre de combustion au moyen d un aspirateur Essuyez et nettoyez les grilles de cuisson et la cuvette d eau les deux vont au lave vaisselle Retirez le cordon d alimen...

Страница 41: ...ature Chauffage lent Cloison charbon ins r e Retirez la cloison charbon lorsque vous cuisinez des temp ratures de 135 C ou plus Le d flecteur de chaleur est invers et retourn Assurez vous que le d fle...

Страница 42: ...Soyez certain que nous sommes ici pour aider Service la client le masterbuilt masterbuilt com masterbuilt com contact us masterbuilt com warranty masterbuilt com collections parts...

Страница 43: ...los Se recomiendan dos personas para el ensamblaje Estos n meros se encuentran en la etiqueta de clasificaci n del ahumador Fecha de fabricaci n N mero de serie Su n mero de modelo MB20060321 Conserve...

Страница 44: ...arajes edificios o tiendas Nunca use dentro o sobre botes o veh culos recreativos Mantenga una distancia m nima de 3 m de construcciones a reas paredes rieles u otras estructuras Mantenga un m nimo de...

Страница 45: ...raci n ya que pueden incendiarse Use guantes protectores cuando manipule este ahumador o cuando trabaje con fuego Use guantes protectores o herramientas de cocina largas y robustas cuando agregue made...

Страница 46: ...No use la parrilla en un espacio confinado y o habitable p ej en casas tiendas remolques casas rodantes botes Peligro Muerte por envenenamiento por mon xido de carbono ADVERTENCIA No use licores o pe...

Страница 47: ...Diagrama de partes 1 2 3 4 5 6 7 8 9 10 11 12 13 14 15 16 17 18 19 20 21 23 3 3 15 22 5...

Страница 48: ...antes o da adas Contacte al Servicio al cliente de MASTERBUILT al 1 800 489 1581 o en www masterbuilt com pages support Tenga a la mano el n mero de modelo y el n mero de serie Estos n meros se encuen...

Страница 49: ...Accesorios CLAVE CANT DESCRIPCI N A 24 M4X14 B 10 M5X14 C 14 M6X14 D 2 ST3X12 E 8 TUERCA M4 7...

Страница 50: ...1 A X2 9 A A 2 A X6 10 A A A A B B A A B X2 8...

Страница 51: ...4 19 12 C X2 B X8 B B B B C B B B B C C B B B B 18 17 3 C X12 C C C C C C C C C C C C 17 9...

Страница 52: ...5 21 22 21 22 6 D X2 4 D D 10...

Страница 53: ...7 8 13 14 11...

Страница 54: ...9 20 20 20 20 20 20 20 20 20 20 10 15 16 15 12...

Страница 55: ...11 7 8 12 6 6 6 6 13...

Страница 56: ...13 14 A X8 E X8 1 2 3 A E E E E A A A A A A A E E E E 1 2 3 14...

Страница 57: ...siguiendo las instrucciones de ARRANQUE y configure la temperatura a 135 C por 120 minutos 4 Luego de 120 minutos configure la temperatura a 205 C deje que el ahumador siga ardiendo el carb n restante...

Страница 58: ...e el bot n 2 Gire la perilla a la temperatura deseada 3 Presione el bot n nuevamente para configurar la temperatura La temperatura se configura autom ticamente despu s de 3 segundos Configurar tiempo...

Страница 59: ...la con Bluetooth y su s dispositivo s inteligente s Este dispositivo cumple con la Parte 15 de las Reglas de la FCC La operaci n est sujeta a las siguientes dos condiciones 1 Este dispositivo no puede...

Страница 60: ...dor se precaliente a la temperatura configurada C MO ENCENDER 110 C 130 C 1 Si est cocinando entre 110 C y 130 C inserte el divisor de carb n en el cesto de carb n y coloque la cubierta del deflector...

Страница 61: ...ad se haya enfriado por completo retire la bandeja de cenizas del ahumador Retire todas las cenizas y el carb n vegetal de la bandeja de cenizas Limpie el interior del ahumador Aspire cualquier acumul...

Страница 62: ...sonda de temperatura Calentamiento lento Divisi n para el carb n insertada Retire la divisi n para el carb n cuando cocine a temperatu ras de 135 C y superiores La cubierta del deflector de calor se...

Страница 63: ......
Страница 64: ...Tenga por seguro que estamos aqu para ayudarle Servicio de atenci n al cliente masterbuilt masterbuilt com masterbuilt com contact us masterbuilt com warranty masterbuilt com collections parts...

Отзывы: