8
ASSEMBLY INSTRUCTIONS
Lowes.com/masterforge
INITIAL USE INSTRUCTIONS
D
H
7
A
D
6
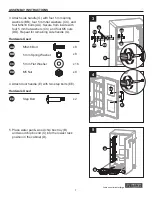
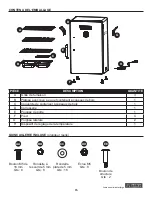
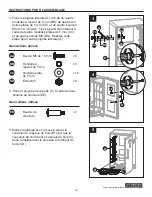
6. Insert each smoking rack (A) into the associated
rack positions in the cabinet (D).
NOTE: It is recommended to keep these racks
inside the smoker when NOT in use.
For use, only use the number of racks required
to hold the meat.
7. Insert temperature controller (H) into the controller plug
on the right side of the cabinet (D).
NOTE:
The rubber translucent white wrap on the
temperature controller (H) is designed to protect the
temperature controller in the event of rain during
operation.
NOTE:
This wrap is only water-resistant and is not
meant to be waterproof.
NOTE:
DO NOT operate this smoker during rain or
storms. If possible, disconnect from electrical source and
move smoker to dry and protected location.
Before you cook food in the smoker, it is important to prepare the smoker. The below procedure is
designed to clean and prepare the smoker for its initial smoking.
1. Set the temperature of the smoker to MED and the time to run to two hours.
2. For first hour, remove water/wood chip box tray.
DO NOT
place any food in the smoker during this
procedure.
3. For second hour, place water/wood chip box tray in its position and only add wood to the wood chip
box. Allow the wood to burn for the remaining hour.
4. When this procedure is completed, allow the smoker to cool and remove the wood ashes and
residue from a cool or cold wood chip box. Also make sure the adjacent water pan is also cool or
cold when performing this clean out.


