background image

5

Lowes.com/masterforge

smoker has cooled sufficiently. It will contain hot liquid, hot ashes and hot grease that may cause 

serious injury. If you must move these components, 

ALWAYS

 use protective oven mitts or heat-

resistant gloves.

•  Dispose of cold ashes by wrapping them in heavy aluminum foil and putting them in a non-combustible 

container. Be sure there are no other combustible materials in or near the container. If you must 

dispose of ashes in less time than it takes for them to completely cool, remove the ashes from 

the smoker, keeping them in heavy aluminum foil and soaking them completely with water before 

disposing of them in a non-combustible container.

•  

DO NOT

 obstruct the flow of combustion air and/or ventilation air for the smoker.

•  Use 

CAUTION

 when operating. Tie back long hair while operating the smoker. 

ALWAYS

 wear  

fully-covering shoes while operating the smoker.

• 

NEVER

 use glassware, plastic or ceramic cookware on or in the smoker.

•  

NEVER

 operate the smoker without water in the water pan. 

NEVER

 allow the water to completely 

evaporate. 

DO NOT

 clean this product with a water spray or similar cleaner.

•  Check the water level at least every two hours. A sizzling sound may indicate a low water level or 

billowing smoke may indicate no water in the water pan (grease from the meat will be falling on a 

hot, dry water pan). Use caution and follow the instructions in this manual for adding water while 

smoker is operating, as hot water may splash up and cause serious injury.

•  When using flavoring wood, add a sufficient amount prior to operation to avoid having to add wood 

while smoker is operating.

•  The use of accessory attachments is not recommended by the manufacturer and may cause injuries.

•  While the smoker is not in use, the electrical cord should be unplugged and stored in a safe, dry location.

•  A short power-supply cord (or detachable power-supply cord) should be used to reduce the risk 

resulting from becoming entangled in or tripping over a longer cord. Longer detachable power 

supply cords or extension cords are available and may be used if care is exercised in their use. If a 

longer detachable power-supply cord or extension cord is used: 

    1.  The marked electrical rating of the cord set or extension cord should be at least as great as the 

electrical rating of the appliance.

    2.  The cord should be arranged so that it will not drape over the countertop or tabletop where it can 

be pulled on by children or tripped over unintentionally. Connection to an extension cord should 

be kept dry and off the ground.

•  Outdoor extension cords should be used with outdoor use products and are surface marked with the 

suffix letter “W” and with a tag stating “Suitable for use with outdoor appliances”.

•  

DO NOT

 use the smoker if the heating element fails to heat up. Under such conditions, the smoker 

should be turned to the 

OFF

 position and the electrical cord should be disconnected. Refer to 

"Troubleshooting" guide in this manual.

•  

DO NOT

 use the smoker if the power indicator light in the electrical controller fails to function. Refer 

to "Troubleshooting" guide in this manual.

•  Alternative fuels such as charcoal and wood pellets should 

NOT

 be used with this smoker or any of 

its accessories.

•  Fuel, such as charcoal briquettes, is not to be used with appliance.

•  

DO NOT

 place on or near a hot gas or electric burner or in a heated oven.

•  

DO NOT

 place smoker cover on the smoker if it is still hot from use.

•  All installations are to conform to local, state and federal fire codes.

•  

KEEP

 fire extinguisher accessible at all times.

•  Burning wood gives off carbon monoxide which can cause death.

•  

DO NOT

 burn wood chips inside homes, vehicles, tents, garages or any enclosed areas.

SAVE THESE INSTRUCTIONS

SAFETY INFORMATION

Содержание 0416469

Страница 1: ...p 13 ELECTRIC SMOKER ITEM 0416469 MODEL 32938 Master Forge M Design are registered trademarks of LF LLC All rights reserved Questions problems missing parts Before returning to your retailer call our...

Страница 2: ...e Contents 3 Hardware Contents 3 Safety Information 4 Preparation 6 Assembly Instructions 6 Initial Use Instructions 8 Operating Instructions 9 Cooking Instructions 9 Care and Maintenance 10 Troublesh...

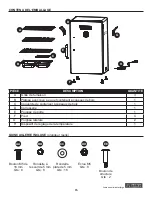
Страница 3: ...3 B Water Pan Wood Chip Box Tray 1 C Wood Chip Box Lid 1 D Cabinet 1 E Door Handle 1 F Foot 4 G Side Handle 2 H Temperature Controller 1 PACKAGE CONTENTS HARDWARE CONTENTS M5x16 Bolt Qty 8 5 mm Sprin...

Страница 4: ...and scrapes from rough or sharp edges Use caution when lifting and or moving the smoker to avoid strains or back injury Two 2 people are recommended to lift the smoker DO NOT move the smoker while it...

Страница 5: ...ord should be unplugged and stored in a safe dry location A short power supply cord or detachable power supply cord should be used to reduce the risk resulting from becoming entangled in or tripping o...

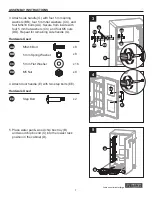
Страница 6: ...the product Estimated Assembly Time 15 20 minutes Tools Required for Assembly not included Phillips screwdriver adjustable wrench Helpful Tools not included Level 2 Carefully stand the cabinet D upri...

Страница 7: ...G D DD AA CC BB 3 CC Hardware Used Hardware Used M5x16 Bolt Step Bolt 5 mm Spring Washer 5 mm Flat Washer M5 Nut x 8 x 2 x 8 x 16 x 8 AA EE BB CC DD M5x16 Bolt Qty 8 5 mm Spring Washer Qty 8 5 mm Was...

Страница 8: ...ate this smoker during rain or storms If possible disconnect from electrical source and move smoker to dry and protected location Before you cook food in the smoker it is important to prepare the smok...

Страница 9: ...binet or door Again using an oven mitt or other heat protection glove CAREFULLY reposition the wood chip box lid to its correct position Then SLOWLY and CAREFULLY close the smoker door IMPORTANT Befor...

Страница 10: ...care and maintenance procedures are to be performed only while the smoker is turned off completely cooled and unplugged from the electrical source To clean remove the water pan wood chip box tray and...

Страница 11: ...has been tripped 3 Temperature controller has malfunctioned 1 Check outlet connection 2 Check house fuses Do not operate other appliances on same electrical circuit 3 Do not use the smoker and contac...

Страница 12: ...ate ES0156 7 Left support frame ES0157 8 Right support frame ES0158 9 Door magnet ES0159 10 Side handle ES0160 11 Cabinet ES0161 12 Rear vent tube ES0162 PART DESCRIPTION PART 13 Temperature controlle...

Страница 13: ...mmerce d pos es de LF LLC Tous droits r serv s Des questions des probl mes des pi ces manquantes Avant de retourner l article au d taillant appelez notre service la client le au 1 800 963 0211 entre 8...

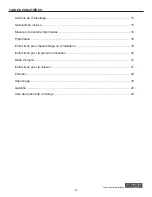
Страница 14: ...rie incluse 15 Mesures de s curit importantes 16 Pr paration 18 Instructions pour l assemblage ou l installation 18 Instructions pour la premi re utilisation 20 Mode d emploi 21 Instructions pour la c...

Страница 15: ...Couvercle de contenant copeaux de bois 1 D Carrosserie 1 E Poign e de porte 1 F Pied 4 G Poign e lat rale 2 H Dispositif de r glage de la temp rature 1 CONTENU DE L EMBALLAGE Quincaillerie incluse gr...

Страница 16: ...es coupures et les gratignures que peuvent causer les rebords rugueux ou les ar tes vives Faites preuve de prudence lorsque vous soulevez ou d placez le fumoir afin d viter les blessures provoqu es pa...

Страница 17: ...droit s r au sec Utilisez un cordon d alimentation court ou une rallonge lectrique d tachable pour viter de vous emp trer les pieds dans un long cordon ou de tr bucher Des cordons d alimentation ou de...

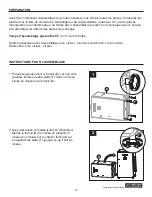
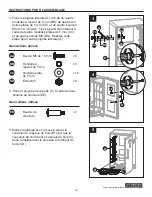
Страница 18: ...ice la client le pour obtenir des pi ces de rechange Temps d assemblage approximatif de 15 20 minutes Outils n cessaires pour l assemblage non inclus tournevis cruciforme cl molette Outils utiles non...

Страница 19: ...R p tez cette tape pour l autre poign e lat rale G D B C 5 1 2 EE E 4 1 2 G D DD AA CC BB 3 CC Quincaillerie utilis e Quincaillerie utilis e Boulon M5 de 16 mm Boulon de structure Rondelle ressort de...

Страница 20: ...ni pendant un orage Si possible d branchez le fumoir de la prise de courant et mettez le l abri dans un endroit sec et prot g Avant de cuire des aliments dans votre fumoir vous devez pr parer celui c...

Страница 21: ...de l int rieur du fumoir ou la porte Toujours l aide d un gant de cuisine ou de tout autre gant de protection anti chaleur remettez SOIGNEUSEMENT le couvercle du contenant copeaux de bois dans la bonn...

Страница 22: ...te obtenir une saveur de fum e tr s prononc e MISE EN GARDE Les op rations d entretien ne doivent tre effectu es que lorsque le fumoir est teint s est compl tement refroidi et a t d branch de la sourc...

Страница 23: ...anchement sur la prise 2 V rifiez les fusibles ou le disjoncteur Ne branchez PAS d autres appareils sur le m me circuit lectrique 3 Ne vous servez PAS du fumoir et communiquez avec le fabricant Dur e...

Страница 24: ...du cadre gauche ES0157 8 Support du cadre droit ES0158 9 Aimant de porte ES0159 10 Poign e lat rale ES0160 11 Armoire ES0161 12 Tube d vacuation arri re ES0162 13 Dispositif de r glage de la temp rat...

Страница 25: ...C Todos los derechos reservados Preguntas problemas piezas faltantes Antes de volver a la tienda llame a nuestro Departamento de Servicio al Cliente al 1 800 963 0211 de lunes a jueves de 8 00 a m a 6...

Страница 26: ...27 Medidas de seguridad importantes 28 Preparaci n 30 Instrucciones de ensamblaje 30 Instrucciones de uso inicial 32 Instrucciones operativas 33 Instrucciones de cocina 33 Cuidado y mantenimiento 34...

Страница 27: ...apa de la bandeja para astillas de madera 1 D Gabinete 1 E Manija de la puerta 1 F Pata 4 G Manija lateral 2 H Controlador de temperatura 1 CONTENIDO DEL PAQUETE ADITAMENTOS se muestran en tama o real...

Страница 28: ...ventilados NO utilice el ahumador en lugares cerrados cocheras o bajo construcciones a reas Tenga cuidado al ensamblar y al utilizar el ahumador para evitar cortes y rasgu os con los bordes speros o f...

Страница 29: ...ante del electrodom stico podr a provocar lesiones Desconecte el cable el ctrico y gu rdelo en un lugar seco y seguro cuando no utilice el ahumador Electricidad corto o cable de suministro de electric...

Страница 30: ...o de Servicio al Cliente para obtener piezas de repuesto Tiempo estimado de ensamble 15 a 20 minutos Herramientas necesarias para el ensamblaje no se incluyen Destornillador Phillips llave ajustable H...

Страница 31: ...a lateral restante G D B C 5 1 2 EE E 4 1 2 G D DD AA CC BB 3 CC Aditamentos utilizados Aditamentos utilizados Perno corto M5 de 16 mm Perno de cuello cuadrado Arandela de resorte 5 mm Arandela plana...

Страница 32: ...el ahumador de la alimentaci n el ctrica y despl celo a un lugar seco y protegido Es importante que prepare el ahumador antes de utilizarlo para cocinar Siga el procedimiento a continuaci n para limp...

Страница 33: ...UIDADO DE NO tocar ninguna parte del interior del gabinete o de la puerta Nuevamente con un guante para horno u otro guante que proteja del calor CON CUIDADO vuelva a colocar la tapa de la bandeja par...

Страница 34: ...instrucciones del fabricante de las astillas de madera Gran parte del sabor ahumado se obtiene dentro de las primeras horas de cocci n Generalmente no es necesario agregar PRECAUCI N Todas las accione...

Страница 35: ...ador de temperatura no funcion bien 1 Revise la conexi n del tomacorriente 2 Verifique los fusibles de la casa NO haga funcionar otros electrodom sticos en el mismo circuito el ctrico 3 NO use el ahum...

Страница 36: ...ura de soporte izquierdo ES0157 8 Estructura de soporte derecho ES0158 9 Im n de la puerta ES0159 10 Manija lateral ES0160 11 Gabinete ES0161 12 Tubo de ventilaci n pos terior ES0162 13 Controlador de...

Отзывы: