


8
Stagebar 54 user manual
Physical installation
WARNING! Use either the supplied adjustable floorstand/mounting bracket or an omega bracket
and rigging clamp to install each Stagebar 54. With all methods of installation:
1. Check that all structures, equipment or surfaces used for support can bear at least 10 times the
weight of all the fixtures, clamps, cables, auxiliary equipment, etc. that they will support.
2. Check that there are no combustible materials within 0.5 m (20 in.) of the fixtures when installed,
and that there are no flammable materials nearby.
3. Do not hang fixtures from each other – every fixture must be installed with its own bracket
and/or clamp.
4. Secure each fixture with an approved safety cable that can hold at least 10 times the weight of
the fixture and hardware attached to it, looping the cable through the attachment point labelled
on the fixture and over or through the supporting structure. Do not use the mounting bracket as
a secondary attachment point, as this will leave the fixture unsecured.
5. If the diffuser front is not installed, make sure that it is impossible for LEDs to be viewed from a
distance of less than 40 cm (16 inches).
If the diffuser front is installed, there is no eye hazard at any distance.
important! Make sure that there will be at least 0.1 m (4 in.) of free space and unrestricted airflow to
and around the air vents in the back of the fixtures.
The Stagebar 54 can be installed in a standing position or suspended in any orientation from a truss or
supporting structure. The supplied mounting bracket can be fitted with a rigging clamp or bolted to a
surface. Alternatively, the mounting bracket can be replaced with an omega bracket and rigging clamp.
Adjustable mounting bracket
The adjustable mounting bracket supplied with the fixture can either be folded around the fixture and used
as a floorstand, fastened directly to a surface or fitted with a rigging clamp for flying installation. Use at least
two bolts, grade 8.8 minimum, if fastening to a surface. A drilling template is provided on the inside back
cover of this manual.
Standing installation
If you install fixtures in a standing position:
1. Install fixtures on a level, stable surface where they do not
present a hazard of tripping or falling.
2. Stack a maximum of four fixtures vertically and secure stacked
fixtures so that they cannot fall over.
Flying from a truss, bar or other structure
To fly a fixture from a rig or other structure:
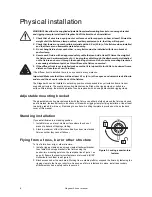
1. Install a rigging clamp on an omega clamp attachment bracket,
then fasten the omega bracket to the fixture using the
quarter-turn mounting points on the rear panel (see Figure 1 on
page 6). Ensure that quarter-turn fasteners are turned a full 90°
clockwise to lock them (see Figure 2).
2. Block access under the work area. Working from a stable platform, suspend the fixture by fastening the
rigging clamp to the truss or structure.As soon as a fixture is fastened in place, install a secondary
attachment such as a safety cable to secure it.
Figure 2: Locking a quarter-turn
fastener
Содержание Stagebar 54
Страница 1: ...Stagebar 54 user manual TM ...
Страница 30: ...30 Stagebar 54 user manual ...
Страница 31: ...Ø7 Ø9 5 Ø13 5 Ø9 5 Drilling template ...
Страница 32: ......


