Martin p Xciter Скачать руководство пользователя страница 31

Multiple shows 

 Xciter 

user 

manual 

31


Chapter 7.


Multiple shows 

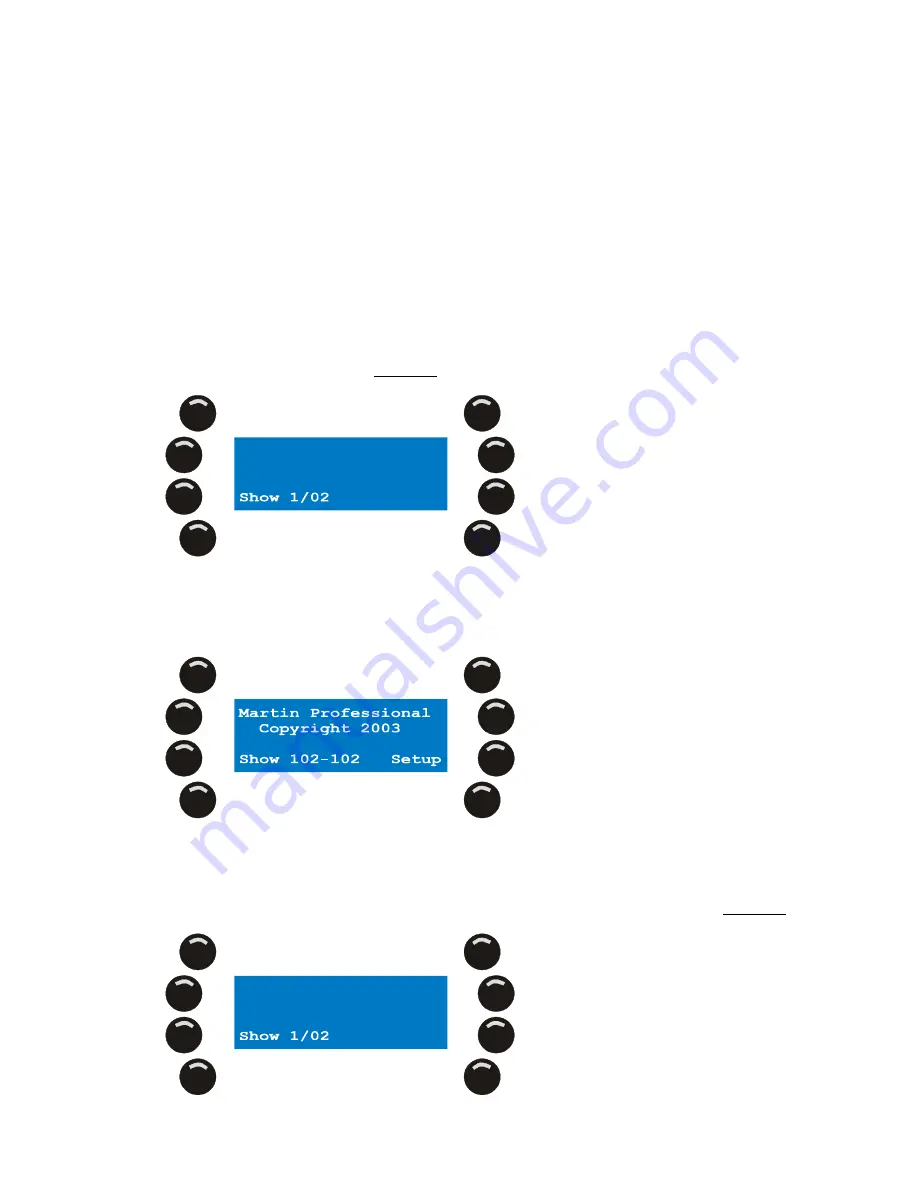
In theory, Xciter can store up to 160 shows. The number of shows Xciter can actually store depends on the 
content of each show. So in fact it depends on how much you program in each show. When you use the 
Xciter for the first time, it loads show 101 after startup. You can see the current show number in the intro 
screen. The second number next to the show number indicates the current patch that is attached to the 
show. Later you will see that you can attach another patch to the current show. 

7.1


Select show 

1.


Press {Show} in the intro screen. 

2.


Select a show by using page keys 1-8 for the first digit and general-purpose keys 1-20 for the second and 
third digits in the show’s number. Example: 102 


3.


Press [ENT] to confirm or [ESC] if you wish to cancel and return to the original show. 

4.


Upon confirmation, Xciter loads the selected show and returns to the intro screen. 
If you have not selected another patch for the show before, Xciter uses the same patch number as the show 
number that you have just selected. 


7.2


Remove show 

1.


Press {Show} in the intro screen. 

2.


Use page keys 1-8 and general-purpose keys 1-20 to select the show you wish to delete. Example: 102. 


Содержание Xciter

Страница 1: ...Xciter user manual ...

Страница 2: ... without permission in writing from Martin Professional A S Denmark The information contained in this document is subject to change without notice Martin Professional AS makes no warranty of any kind with regard to this material including but not limited to the implied warranties of fitness for a particular purpose Martin Profession AS shall not be liable for errors contained herein or for inciden...

Страница 3: ... 1 2 Sequence 17 3 2 Ways of running show elements 18 3 2 1 Cue 18 3 2 2 Playback 18 3 2 3 Cue list 19 3 3 Tools for flexible shows 20 3 3 1 Effect generator 20 3 3 2 Effect Macros 20 3 3 3 Preset 20 3 4 Behavior of show elements 21 3 4 1 Process priority 21 3 4 2 Dimmer channels are HTP 22 3 4 3 Transparency 22 3 4 4 Default 22 3 4 5 Background scene 23 3 5 Sequence transparency across cues 23 Ch...

Страница 4: ...sword 55 8 5 File manager 56 8 5 1 Defrag 56 8 5 2 Format flash 56 8 6 Advanced setup 57 8 6 1 DMX Config 57 8 6 2 MIDI Key association 57 8 6 3 Midi PB behavior 58 8 7 Joystick calibration 60 8 8 Test 61 8 8 1 Key Fader test 61 8 8 1 1 Key test 61 8 8 1 2 Fader and Joystick test 61 8 8 1 3 DMX test 61 8 8 2 Other tests 62 Chapter 9 Program features 63 9 1 Select deselect device 63 9 2 Select dese...

Страница 5: ...ate a color chase 87 Chapter 12 Effect macros 89 12 1 Create an effect macro 89 12 2 Recall an effect macro 89 12 3 Important to know 89 Chapter 13 Storing to memory 91 13 1 Store as sequence 91 13 1 1 Assign directly to cue 91 13 1 2 Assign directly to playback fader 91 13 1 3 Store to list assign later 92 13 2 Store as background scene 92 13 2 1 Assign directly to cue 92 13 2 2 Store to list ass...

Страница 6: ...04 15 4 3 Capturing the value 104 15 4 4 Auto lock 104 15 5 Cue lists 104 15 5 1 Cue list selection 104 15 5 2 Create a new cue list 105 15 5 3 Run cue list 106 15 5 4 Clear cue list 106 15 5 5 Edit an existing cue list 106 Chapter 16 Direct access features 109 16 1 Pitch control and freeze 109 16 2 Master Master Flash and Black Out 109 16 3 DA buttons SMK STRB EXT1 and EXT2 109 Chapter 17 PC soft...

Страница 7: ...A total of 512 channels are available in the Xciter s DMX universe You have access to 160 cues each containing 4 sequences which can run simultaneously Sequences can be triggered via an internal clock via audio or BPM or manually Up to 6 manual override scenes can be accessed during playback Also incorporated are 20 general purpose buttons so that operators can select cues or fixtures directly Xci...

Страница 8: ...tall other than genuine Martin parts The Xciter is not for domestic use Use the device only as described Do not operate the device if any cover is removed damaged or deformed Immediately repair or replace damaged power cords There are no user serviceable parts inside refer all service to a qualified technician To reduce the risk of electric shock do not remove the cover or back RISK OF ELECTRIC SH...

Страница 9: ... the power cord from being walked on or pinched particularly at plugs sockets and the point where they exit from the apparatus 10 Only use attachments accessories specified by the manufacturer 11 Unplug this apparatus during lightning storms or when unused for long periods of time 12 Refer all servicing to qualified service personnel Servicing is required when the apparatus has been damaged in any...

Страница 10: ......

Страница 11: ...plug is attached the unit is connected to the mains power circuit The mains input plug must remain accessible so that the mains circuit can be disconnected from the fixture Important Verify that power cables are undamaged and rated for the current requirements of all connected devices before use The fixture s power cable requires an approved grounding type cord cap earthed mains plug that fits you...

Страница 12: ...any key on the front panel except the power key If you press a cue or bump button with a MIDI command assigned to them Xciter also sends that command through MIDI OUT This way you can also use MIDI for master slave connection of multiple consoles without the need for DMX splitters Remember however that Xciter only accepts the MIDI commands noted above which are only useful for on off actions not l...

Страница 13: ...iter 2 1 7 Desk light or Littlite The USB A connector on the front panel must only be used to supply power to a desk light Attention you can draw a maximum of 315 mA from this port Check the specification of your desk light before using it 2 2 Software Before Xciter can communicate with your PC or laptop you need to install the USB drivers and applications on your PC You can find them on the CD su...

Страница 14: ...tallation 14 Xciter user manual 4 Specify an install directory or use the one suggested Click next 5 Check whether or not you would like setup to create a desktop icon Click next 6 Click install to confirm ...

Страница 15: ...a previous upgrade has failed the displays may remain dark However even if this happens you should still be able to perform a new upgrade 10 Use the USB cable to attach the Xciter to the PC Warning Only use the USB B connector center top of the front panel on the Xciter to connect to the PC The USB A connector top right corner of the front panel only serves to supply 5V power to a USB desk light 1...

Страница 16: ... 12 The wizard will install the software automatically by default Keep this option and press next If the PC software was installed successfully the wizard will install and register all the necessary files Press finish to exit the wizard ...

Страница 17: ...on from the previous scene to the current scene If you are not using cue lists the scene time is of no consequence So if you are calling up the scene manually with a cue button the fade time will determine the transition rate from the previous scene to the scene you just selected Xciter can hold as many scenes as its memory allows The maximum number of scenes will vary because memory usage depends...

Страница 18: ...nce A Sequence B Sequence C Sequence D Background scene highest priority lowest priority trigger run mode trigger run mode trigger run mode trigger run mode The cue serves as a container to combine several show elements in order to launch and run them simultaneously in parallel Xciter allows you to combine one scene called the background scene and four sequences into a cue With 8 page buttons and ...

Страница 19: ... covered later in this chapter under process priority and cue run mode Visible bank 3 2 3 Cue list Cue List Step 1 Cue Step 2 Cue Step 99 Cue Step options Step options Step options The purpose of a cue list is to make playback of a show automatic or semi automatic depending on whether there is an operator or not Cue lists are ideal when somebody with little knowledge about lighting operates the co...

Страница 20: ...x effect quickly The effect macros allow you to store effect parameters in a kind of effect preset so you can recall it later Example You have created an effect in a background scene before and want to reuse it Without effect macros you would either have to recall the scene you made before and start building from there or you would have to remember all the parameters to recreate the effect from sc...

Страница 21: ...e programmer inactive override playbacks sequences background scene default direct access highest priority lowest priority Lamp on Lamp off Lamp reset smoke strobe extra1 extra2 active channels in scene editor stored temporary active channels in editor not stored sequences activated with faders during show sequences A B C D in the cue background scene in the cue default scene when no other process...

Страница 22: ...active channels When you run that scene or sequence in the show the process can only apply those same channels to the output unless a higher process uses the same channels see Process priority The other channels remain transparent the process is not using them Transparency has an important consequence The transparent channels of a process will not override channels of a lower priority process Exam...

Страница 23: ...E 1 BG Scene Result on DMX CUE 2 BG Scene CUE 4 BG Scene 128 255 0 110 Result on DMX 128 0 0 110 35 CUE 3 BG Scene Result on DMX 128 255 35 110 Result on DMX 128 255 68 110 128 0 0 128 Default layer DMX 128 0 0 128 3 5 Sequence transparency across cues When you are putting sequences behind cue buttons you have to keep in mind that Xciter has sequence transparency When there is no sequence in the n...

Страница 24: ...PT pan tilt on the wall Cue2 dimmer with effect green color and pan tilt on the centre of the dance floor Cue 1 followed by Cue2 results in the following look The dimmer effect is there because it has been placed in the background scene in both cues The PT centre is there because the PAN and TILT information has been put in sequence D in both cues There is no sequence running at a higher level tha...

Страница 25: ...Make sure the Xciter is connected to mains power and press the power button in the top left corner of the console Xciter scans the internal file system and restores the database The intro screens appear on the main and fader LCD displays 4 2 Power off Hold the power button pressed for at least 2 seconds until the displays and LED s go dark to power off ...

Страница 26: ......

Страница 27: ...imes the individual fixtures of a group are positioned differently so the beams all move in different directions when you manipulate the joystick You can solve this in the patch with PAN inverse TILT inverse and PT swap Press PAN and TILT to activate deactivate the joystick in the programmer You can also use these buttons to lock the pan or tilt action of the joystick Use C F to toggle between coa...

Страница 28: ......

Страница 29: ...Desk light operation Xciter user manual 29 Chapter 6 Desk light operation If you have a desk light installed you can adjust its intensity by holding down SHIFT while you turn the top right jog wheel ...

Страница 30: ......

Страница 31: ... can attach another patch to the current show 7 1 Select show 1 Press Show in the intro screen 2 Select a show by using page keys 1 8 for the first digit and general purpose keys 1 20 for the second and third digits in the show s number Example 102 3 Press ENT to confirm or ESC if you wish to cancel and return to the original show 4 Upon confirmation Xciter loads the selected show and returns to t...

Страница 32: ...Multiple shows 32 Xciter user manual 3 Press CLEAR 4 Press Yes to confirm No to cancel 5 Press ESC to return to the intro screen ...

Страница 33: ...enu The setup menu is only accessible from the start up screen If the Xciter is not in programmer mode it will ask for the password X512 to go to programmer mode You have to provide this password to enter the setup menu Press Setup in the intro screens ...

Страница 34: ... needs Example To put a default value on the focus 1 Press Library in the setup menu 2 Select a fixture category Example moving mirror 3 Select a manufacturer Example Martin 8 1 1 Create a new fixture definition First you have to select the category and manufacturer subfolders where you want to create your definition 1 Press LOAD to add a fixture definition 2 Xciter calls the fixture definition ed...

Страница 35: ...ell the Xciter whether or not to invert the value before sending it out on DMX Example Your fixture s dimmer opens at 0 and closes at 255 instead of the other way round If you invert the channel it will be inverted twice which results in normal control over the channel a Use the arrow keys or the top right scroll wheel to select a control channel b Press EDIT to set the parameters of the selected ...

Страница 36: ... channels in the current step Use the top center jog wheel to scroll through the channels in case there are more than 6 To fine tune a value you can hold the bump button of the corresponding channel while you turn the top center jog wheel b Press Step time to adjust the duration of the step followed by ENT to confirm or ESC to leave unchanged c Press LOAD if you want to add another step to the pro...

Страница 37: ...ou have to locate the definition in the category and manufacturer subfolders 1 Select the definition you wish to edit 2 Press EDIT to edit the selected fixture definition Use the same procedure as described in 8 1 1 to edit the definition Xciter will not allow you to edit critical parameters like channel cnt of a fixture definition if this definition is used in the patch 8 1 3 Remove fixture defin...

Страница 38: ... This means that when you select another patch number Xciter uses the patch for the current show The default patch number is the same as the show number in the intro screen If you use the same lighting rig in multiple shows you will want to use the same patch in those shows Xciter lets you reuse one patch in multiple shows by reassigning it to those shows Example Show 102 is the current show By de...

Страница 39: ...imilar patch to patch 101 but with minor changes 1 Press Patch in the patch menu Again the patch has the same number as the selected show default 2 Use page keys 1 8 and general purpose number keys 1 20 to select patch 101 In our example patch 101 already has content 3 Press Copy to copy the content of patch 101 into the clipboard 4 Use page keys 1 8 and general purpose number keys 1 20 to select ...

Страница 40: ...ess For reasons of convenience when this manual mentions channels it generally refers to the logical channels you use to control a selected device If there is a danger of confusion this manual specifies which type of channel is referred to Example CH001 dimmer channel 1 is on channel 480 Example Use fader 1 to set the value of CH001 to 128 In the above examples the fixture s logical channel CH001 ...

Страница 41: ...l no longer appear in the show To move a fixture to another address you need to unpatch and repatch the fixture using another DMX address You can re address fixtures without corrupting the show provided you use the same number key and re address the device on your rig accordingly Example If you patch a fixture two channels higher up in the Xciter you also need to configure the fixture in the light...

Страница 42: ...on off TILT inverse PAN inverse PAN TILT swap 6 You can choose to exclude a device from master and or blackout Exclude from master means the dimmer or shutter of the fixture is not affected by the master fader Exclude from blackout means the blackout button does not affect the dimmer or shutter of the fixture Press the softkey next to the options to toggle them on off You can see the status of eve...

Страница 43: ...dress it you have to clear the unit key first If you remove a fixture from the patch permanently that fixture will no longer take part in the show 1 Hold down CLEAR as you press the general purpose number key s you wish to clear 2 Release CLEAR to stop deleting fixtures from the patch 3 If you want to delete another fixture repeat steps 1 2 4 Press STORE to store your changes If Xciter has detecte...

Страница 44: ...value You can also press CLEAR to clear the current value and input a new value using the general purpose number keys 1 10 use key 10 to enter a zero Example 6 Press ENT to confirm the value or ESC to return without inputting a value We press ENT Upon pressing ENT Xciter generates 6 default channel names for the logical channels 4 Press DMX Use the top right scroll wheel to adjust the current valu...

Страница 45: ... correctly dimmer unit 1 should still have the 6 logical channels patched to physical channels 101 to 106 with the default channel names CH01 CH06 3 Press the bump button under the channel name you wish to change Example CH01 A cursor will appear under the first character of the channel name Use the top right scroll wheel or the arrow keys to move the cursor Use CLEAR to clear the character under ...

Страница 46: ...mer unit has more than 6 logical channels or faders you can scroll to other pages of channels with the centre top scroll wheel As you press the bump buttons underneath the channel names note that the main display on the right shows a list of the physical channels attached to the selected logical channel If you have not used the soft patch before there should be only one physical channel in the lis...

Страница 47: ...ll through the physical channels of the DMX chain in pages of 6 Example scroll until you see channel 111 c To add a physical channel to the logical channel press the bump button under its DMX address Example 111 Xciter puts a default test value of 128 on DMX address 111 In our example both physical channels on address 101 and 111 should now have a value of 128 If you want to unpatch the physical c...

Страница 48: ...u press the bump buttons underneath the channel names note that the main display on the right shows a list of the physical channels attached to the selected logical channel If you have not used the soft patch before there should be only one physical channel in the list each time If there are more than 6 physical channels attached to the fader use the top right jog wheel to scroll up and down throu...

Страница 49: ... bump button under the physical channel Example Do this for channel 101 Channel not patched Channel patched in default fade mode Channel patched in default snap mode The default fade snap mode is global for all physical channels inside the selected logical channel so you only need to do this action on one of the physical channels All other DMX channels inside the selected logical channel will be s...

Страница 50: ... limits of the patched channels are currently displayed in the fader LCD b Use the fader to adjust the values Example Set the low limit of channel 101 to 30 8 There are some additional tools to in the dialog to accommodate easy navigation and display additional information on the fader LCD With Next used you can jump directly to all the physical channels that are currently patched to the selected ...

Страница 51: ...o different sets of physical channels to each DA button On set of values is put on the DMX output when you press the button down and the other is output when you release the button If you wish to use a strobe in the show you need to patch it as a fixture or dimmer device but you can no longer use it under a DA button because of the restriction mentioned above However you can still make it direct a...

Страница 52: ...ne a value you can hold the bump button while you turn the centre top scroll wheel 6 There are two operating modes for the DA button toggle and flash The default mode is flash When the button is in flash mode the ON values appear as long as you hold the DA button The OFF values appear when you release the DA button When the button is in toggle mode you can swap between the ON and OFF values each t...

Страница 53: ... that contains a step with lamp on to do this 1 Press Auto Start in the setup menu to call the auto start dialog 2 Use page keys 1 8 and general purpose number keys 1 20 to select the cue list you wish to auto start The page and number of the selected cue list appears on the bottom line 3 Press ENT to confirm or ESC to cancel Upon ENT Xciter shows the message Auto start settings stored Press any k...

Страница 54: ...8 4 1 3 Dummy mode You have limited access to playback functions and cannot edit or store The following functions are disabled EDIT You cannot edit anything STORE You cannot store anything limited You can only modify the audio triggers from cue CLEAR You cannot clear anything LOAD limited You can only load a cue list FIX DIM You cannot access fixtures and dimmers Example At an exhibition you want ...

Страница 55: ...sor Use general purpose keys 1 10 to input numbers use 10 to enter a zero and 11 20 to input letters Use SHIFT to switch between uppercase and lowercase Use CLEAR to delete the character under the cursor Use LOAD to insert a character before the cursor j Press ENT to confirm ESC to cancel k If you have entered the correct password the setup menu appears l Press Access level in the setup menu m Pre...

Страница 56: ...lean up of the file system yourself 1 Press File mngr in the setup menu Xciter scans the file system When finished it shows the following dialog 2 Press Defrag to clear dirty space and create free memory 3 Press ESC to leave this menu 8 5 2 Format flash The format flash function allows you to delete all files in the Xciter including the fixture library and global setup Of course the dedicated oper...

Страница 57: ...revious value 4 Press MAB to adjust the Mark After Break length Use the arrow keys or the top right jog wheel to modify the value Press ENT to keep the new value ESC to decline and return to the previous value 5 Press CHSPACE to adjust the space between channels Use the arrow keys or the top right jog wheel to modify the value Press ENT to keep the new value ESC to decline and return to the previo...

Страница 58: ...w value using the general purpose number keys 1 10 10 being the 0 Press ENT to confirm or ESC to cancel Note if you leave the midi channel on 0 the associated key will react to the specified note coming from all MIDI channels 3 Press Record followed by a front panel key Once pressed that front panel key is associated with the MIDI note on the top line 4 Press Show note followed by a front panel ke...

Страница 59: ...mber key will be blinking If the midi channel is in toggle mode on the other hand the backlight is constantly on Example Press the general purpose number keys until keys 1 5 are blinking and 6 16 are constantly on 3 Press ESC to exit this dialog If you have made any changes Xciter asks whether you want to save them Press Yes to save and exit or No to exit without saving changes Xciter returns to t...

Страница 60: ...the components The joystick calibration tool will solve this problem for you 1 Press Joystick in the setup menu to access the calibration tool 2 Move the joystick to all extremes in a circular motion a couple of times 3 Press STORE to store the calibration data Xciter confirms with Limits saved Press any key 4 Press any button to continue Xciter returns to the setup menu ...

Страница 61: ...also produce two different key codes when you turn them clock and counterclockwise 8 8 1 2 Fader and Joystick test Move all faders to their extremes completely up and down at least once Their values are displayed in the fader LCD A normally working fader should bring the corresponding value in the LCD to 0 when it is completely down and 255 when it is completely up A fader should only modify its c...

Страница 62: ...good or bad This feature only works for 5 pin DMX cables that are not crossed over If you wish to test other cables you need to make yourself some converters 8 8 2 Other tests The other tests are for debugging purposes They are not covered in this manual ...

Страница 63: ...ecting each device separately you can also select a range This feature is only useful if you have patched devices of the same type behind neighbouring number buttons 1 Press FIX to select fixtures intelligent lights or DIM to select dimmers generic lights 2 Use FIX to swap between fixture pages If FIX is lit you are in page one fixtures 1 20 If it is blinking you are in page two fixtures 21 40 3 H...

Страница 64: ...elease Xciter displays the order of selection on the main LCD It also lights up the number keys that have a fixture patched to them 2 Press one of the lit number keys to view information about the fixture dimmer that is patched to it 3 Release ESC to exit information mode 9 6 The programmer When at least one device is selected the programmer pops up on LCD2 Use the programmer to create scenes and ...

Страница 65: ...he programmer but may also be used for other parameters like effects and fan control In the programmer or the patch simply press the top left softkey of the main LCD The fader LCD will toggle its display of values When displaying percentages the symbol will appear in the top corners of the fader LCD 9 6 4 Channel status indicators With the indicators it is very easy to see the status of all logica...

Страница 66: ...ld like to use DIM COLW1 fixture 1 fixture 2 fixture 3 fixture 4 DIM COLW1 DIM COLW1 DIM COLW1 DIM COLW1 DIM COLW1 DIM COLW1 DIM COLW1 Active channels stored Active channels NOT stored Active layer Inactive layer 2 You want to see the colors while you are programming so you put the dimmers open 255 DIM COLW1 fixture 1 fixture 2 fixture 3 fixture 4 COLW1 COLW1 COLW1 COLW1 COLW1 COLW1 COLW1 Active c...

Страница 67: ...u select a preset that does not have anything programmed for the logical channel it applies the value 0 to the channel If you wish to get rid of the preset on a certain channel you need to press the corresponding bump button until the channel is transparent indicator reads Then you just touch the fader again to reactivate it as a normal channel without preset To get rid of all the preset modes in ...

Страница 68: ... programmer between DMX and percentage display of values When the programmer displays percentage values the symbol appears in the top corners of the fader LCD 9 7 2 Add Insert and modify scenes When you start from scratch there are no scenes present in the editor The scene counter is at 00 00 1 Create your first scene in the programmer If you have not learned how to use the programmer now is the t...

Страница 69: ...ing steps Of course you can continue editing as much as you like Example If you have previewed the sequence and are not entirely satisfied with it 1 Use the arrow keys or top right jog wheel to scroll to the step you wish to edit Once found you can do several things with the current step When scrolling through the steps of a sequence those steps are also output on DMX even if you are programming w...

Страница 70: ...el getting its default mode from the fixture definition 1 Press ST 1 0 S to change the scene time 2 Use the top right jog wheel to increment decrement the value Or press CLEAR until the value reads 0 and input a new value using general purpose number keys 1 10 3 Press ENT to confirm ESC to cancel and return to the previous value 4 Press FT 1 0 S to change the fade time 5 Use the top right jog whee...

Страница 71: ...econd softkey on the left To step through the sequence manually press Manual step Some of the trigger modes have extra options When the audio trigger is active the top left jog wheel serves to select the 4 band pass filters When the BPM trigger is active the top left jog wheel adjusts the number of beats per trigger 9 7 6 Lamp procedures In the lamp procedures you find the lamp on lamp off and lam...

Страница 72: ...ue The odd numbered fixtures should pan in the opposite direction to the even numbered fixtures The example above demonstrates the main purpose of the invert function to make a crossing effect on pan in only a few seconds This feature obviously works on all channels and fully supports 16 bit fixtures as well 9 7 8 Fan control As with the invert function outlined above fan control is another useful...

Страница 73: ...e satisfied with the look you press ESC to leave the dialog and return to the scene sequence editor Note Like the invert function we discussed in the previous section this feature will enable you to create cross over sequences in a matter of seconds If you want to make a cross over sequence you need to escape the dialog to add the first step of the sequence return to the dialog to invert the sprea...

Страница 74: ...e current look with the effect parameters of the clipboard look Press Clear to get rid of the channel values from the clipboard look inside the programmer The effect parameters will remain This is useful if you want to get rid of all channels but want to reactivate some and keep the same effect running Press Clr eff if you want to clear all the effect parameters that were present in the clipboard ...

Страница 75: ... apply an effect to a transparent channel because it is simply not listed 4 You can select deselect logical channels with the softkeys next to their labels A selected channel is indicated with the symbol If there are more than 3 use the arrow keys or the top right jog wheel to scroll through the list 5 Press EDIT to assign a generator number to the selected channel s Xciter prompts you to select a...

Страница 76: ...meters is a circle on two or more fixtures Make the circle from Effect generator examples on page 85 We recommend using moving mirror fixtures scanners If you have already made all the examples you probably have a good feel of the effect generator already In this section we will have a more theoretical approach to the effect parameters Shape The basic shape to create a circle is the sine The shape...

Страница 77: ...ll moving in a diagonal line The effect of Coffs becomes clearly visible when you slowly bring up Cdlay from 0 to 90 You will notice the line getting wider until it finally becomes a circle at 90 degrees This because you create delay between PAN and TILT 0 255 1 time frame PAN TILT Coffs 90 or PAN TILT Cdlay 90 TILT Note Most moving mirrors do not produce perfect circles because they generate more...

Страница 78: ... Before you can start experimenting with the shapes you need to assign an effect generator to a logical channel Take the PAN TILT example from the section How to apply effects to logical channels on page 75 to get started Make sure you have both the PAN and TILT selected 1 The sine shape is put on a channel by default Simply press the left softkey next to the shape name to bring up the list of ava...

Страница 79: ...mple from the section How to apply effects to logical channels on page 75 to get started Make sure you have both the PAN and TILT selected 1 Hold SHIFT while pressing the softkey next to the shape name sine by default This will toggle the effect generator on that channel to a different mode The current mode is indicated by means of the following symbols No symbol The effect generator is running in...

Страница 80: ...nger be a circle Another example is a dimmer fall where the DIM channel needs to be perfectly delayed with the TILT In such cases you must assign the same generator number to all the channels involved in the effect to keep them synchronized 10 6 How to use the modulating generators generators 1 5 Generators 1 5 are special generators that can be applied on top of any other generator 6 250 They hav...

Страница 81: ...nerator on the dimmer chase example as well The trick is to select the BPM generator 251 255 that follows your recorded BPM best You will notice that this also depends on the effect shape you are using 10 8 How to use the audio feature Xciter s effect generator allows you to put the audio signal itself on a fixture channel Since audio changes fast we recommend you use a fast fixture channel like t...

Страница 82: ...1 Select at least 2 fixtures of the same type 2 Open the dimmer DIM and shutter SHUT or STROB 3 Set the dimmer DIM to 50 but leave the shutter SHUT or STROB open 4 Access the effects dialog from the advanced menu of the scene editor 5 Select the DIM and SHUT or STROB channel and assign generator number 11 to it 6 Press the softkey to the left of either channel to access the shape list 7 Select Mas...

Страница 83: ...ou have instantly got a modulating generator that has a BPM dependent speed Here is how the speed of the different BPM shapes is set Bpm 2 recorded BPM rate divided by 2 Bpm 4 recorded BPM rate divided by 4 Bpm 8 recorded BPM rate divided by 8 Bpm 16 recorded BPM rate divided by 16 ...

Страница 84: ......

Страница 85: ...We also recommend using moving mirror fixtures instead of moving heads Moving heads produce a figure 8 shape when they tilt past their vertical position 5 Access the effects dialog from the advanced menu of the scene editor 6 Select the PAN and TILT channels and assign generator number 10 to them If you assign the same generator number to a group of channels like PAN and TILT in this example these...

Страница 86: ...annel This is sine by default Press the softkey next to it Xciter shows the list of available shapes 7 Use SCR1 to scroll through the list until you see Sqr25 Select it by pressing the corresponding softkey on the right side 8 Set the Speed value to 40 and the Swing value to 255 This will make the dimmers flash on and off The parameter Speed determines the rate of flashing The parameter Swing dete...

Страница 87: ...nt Select it by pressing the corresponding softkey on the right side This shape is a saw tooth wave Put the generator in bounce to make it a triangle wave 7 Set the Speed value to 20 and the Swing value to 40 This will make the fixtures chase through some colors on their color wheels The parameter Speed determines the velocity of the chase The higher the value the faster the chase The parameter Sw...

Страница 88: ......

Страница 89: ...side Selections are indicated with 4 Hold SHIFT while you press STORE Xciter prompts you to input a name for the macro 5 Use the arrow keys or top right jog wheel to move the cursor Use general purpose number keys 11 20 to input letters and 1 10 to input numbers 10 being the 0 Use CLEAR and LOAD to delete characters and insert blanks respectively 6 Press ENT to store the macro ESC to cancel 12 2 R...

Страница 90: ...els without effect parameters You only need to select them in the effect dialog before storing This is a useful extra to make programming even quicker Example When you include the dimmer shutter in the macro you don t need to open the dimmer shutter before recalling the macro ...

Страница 91: ...C or D to select an empty sequence slot 4 Press ENT to confirm Xciter suggests a default name If you agree to this name press ENT again to confirm Or hold CLEAR until all characters are deleted Use the general purpose number keys to input the new name Press ENT to confirm your new name Upon confirmation Xciter stores all the scenes in the editor to the sequence in memory and assigns it to the sele...

Страница 92: ...to store the background scene Xciter shows the current BG scene if there is any in the fader LCD and the current sequences in the main LCD 3 Press ENT to confirm Xciter suggests a default name If you agree to this name press ENT again to confirm Or hold CLEAR until all characters are deleted Use the general purpose number keys to input the new name Press ENT to confirm your new name Upon confirmat...

Страница 93: ...ed buttons already have presets in them 3 Press ENT to confirm storage or ESC to cancel Upon confirmation Xciter stores all the values in the current scene as a preset to memory 13 4 Update When you are editing scenes or sequences you may only want to update them not store them as new elements Press Update in the store dialog to update the scene sequence or preset that you have just edited This op...

Страница 94: ......

Страница 95: ...t 3 Press EDIT to edit the sequence Xciter will take a clone of the sequence and place it in the sequence editor Press CLEAR to delete the sequence Xciter will ask for confirmation 14 1 2 Edit background scene 1 Press BG scene Xciter shows the internal list of background scenes 2 Use the top right jog wheel to scroll through the list and locate the scene you wish to edit Press the softkey next to ...

Страница 96: ...extended dialog where the background scene is visible Hold EDIT while you press the softkey on the left of the background scene This is the softkey you normally use to activate deactivate the background scene see Extended cue dialog in Run mode features on page 99 14 2 3 Edit playback sequence Scroll through the playback banks until you see the playback you wish to edit Hold EDIT while you press t...

Страница 97: ...at are currently assigned to the selected cue This dialog also gives you the controls you need to manipulate sequences live 3 Press CUE again if you wish to exit cue mode To prevent you from accidentally leaving the cue dialog Xciter asks for a confirmation Press Yes to leave cue or No to stay Upon leaving cue Xciter kills all running processes BG scene sequences and override playbacks and goes ba...

Страница 98: ...Example Default you see I which means internal forward You can change the trigger and step mode for each sequence live 1 Press the softkey to the right of the sequence you wish to change Xciter displays the trigger and step mode dialog 2 Select another trigger with the softkeys on the left The second softkey on the left toggles between trigger Manual and None 3 Select another step mode with the so...

Страница 99: ... trigger the sequence will react to beats from the four band audio filter The audio levels are set globally in the advanced cue dialog 1 Use general purpose number keys 1 15 to set a beat count This number determines how many beats it takes before a trigger occurs In this case it actually divides the beats from the audio filter to create a slower rate 2 Use general purpose keys 17 20 to select des...

Страница 100: ...s When you select other cues with the page keys and general purpose number keys you can see the current cue changing in the top left corner 15 2 1 Add replace background scene In normal circumstances you store scenes and assign them directly to a cue button In such cases this option is not so relevant But it may still be useful if you wish to assign an existing background scene to multiple cues 1 ...

Страница 101: ...tomatically stored to the cue 15 2 4 Assign sequences to faders In normal circumstances you store sequences and assign them directly to a fader In such cases this option is not so relevant But it may still be useful if you wish to assign an existing sequence to multiple faders 1 Press Seq fader in the extended dialog Xciter displays the current playback page on the top line of the main LCD The oth...

Страница 102: ...nother bank is already linked you need to press the softkey twice Warning This is another setting that you need to store to the cue because otherwise the setting will be gone the next time you enter cue mode Press STORE to save the playback link to the cue 15 2 5 1 Audio settings The audio settings are global meaning that they are the same for all cues All sequences you set on the audio trigger in...

Страница 103: ...t things that catch the eye are the labels These are actually the PB sequence names Although you can give a name of 15 characters they are chopped off at 10 characters when they are displayed above the faders So we recommend you give maningful names of 10 characters to them 15 4 1 Activate deactivate and bump override playbacks With the six faders under the fader LCD you can cross fade up to six s...

Страница 104: ...B it is unlocked again 15 5 Cue lists The main purpose of cue lists is to automatically run cues Cue lists are especially useful if you use the console as a stand alone unit The cue list uses the same cues that you normally launch with the cue buttons You can use the following options to control the progress of your automated show A cue list can have up to 99 steps WAIT with WT x S Xciter waits x ...

Страница 105: ...le select cue list 1 01 2 Press EDIT to call the cue list editor 3 Press LOAD to add a step behind the last one Xciter adds an empty step in the list with the default WAIT option 4 Press a page key followed by a general purpose number key to select the cue you wish to attach to this step Example Select cue 1 01 5 Use the second softkey on the right hand side to toggle between the step options WAIT...

Страница 106: ...The right arrow button starts blinking Press this button to proceed to the next step 4 Press CL at any time to stop the automated show and return to the cue list selection to launch another one Note that playbacks are also available during the automated show As the cues are launched in the list the linked playback pages will also be brought up Use the general purpose number keys or centre top scro...

Страница 107: ...OFF and GO Example Select the WAIT option 7 Depending on the step option you choose you have to set different parameters Example WAIT comes the parameter wait time WT 8 Press the softkey next to the parameter value to adjust it Example Press WT 0 0 S Use the top right jog wheel to increment decrement the value If you want to input a completely new value hold CLEAR until the value reads 0 0 Use gen...

Страница 108: ......

Страница 109: ...e value see library This value is sent to those particular fixtures when you pull the master intensity below 3 Press the MI bounce button master flash to momentarily drive fixtures and dimmers to their full intensity Press BO to blackout all devices and dimmers BO is a toggle button so you need to press it again to come out of blackout Remember that you can exclude certain fixtures from master and...

Страница 110: ......

Страница 111: ...he PC 2 Make sure Xciter is booted 3 Select the utilities section 4 Remain in the tab page Firmware 5 Press the button Upload The PC application will start checking the memory for differences If the firmware you are uploading is the same as the one inside the Xciter the console will not update Otherwise It will start uploading firmware to the console 6 Do not unplug the console unless the PC appli...

Страница 112: ...source library 2 Select fixture definition s in the source library list 3 Press Add to add the selected fixture definition s to the Xciter library at the next update If the fixture definition already exists in the library a warning will pop up with four options Press No if you wish to skip the definition mentioned in the message Press Yes if you wish to replace the definition mentioned in the mess...

Страница 113: ...s Update to start actually removing the definitions from the Xciter When the update is successful Xciter will download the library list again 17 3 3 Export to lib You can export your own made fixture definitions from Xciter s internal library to the source library on PC 1 Select category and manufacturer from the Xciter library 2 Select fixture definition s in the Xciter library list 3 Press Expor...

Страница 114: ...rked with 2 Press the button Restore If the show you selected already has content the application will ask whether you want to replace it 3 Press Yes to confirm or No to stop there 4 A file dialog appears The contents of the last used folder were you made a backup is displayed Select the backup file you wish to restore 5 Press Open to use this file or Cancel to stop there If the backup file was ma...

Страница 115: ...xpansion port DIN5 female Controls Soft power button with 2 sec switch off security Master fader to adjust general light intensity Master flash button Black out button Pitch fader with center click to adjust sequence timing during playback Freeze button 6 faders and flash buttons for parameter control and direct access scenes during playback Programmable smoke strobe extra 1 and extra 2 buttons 40...

Страница 116: ...s Built in Martin fixture library other libraries can be updated via USB Library editor to create your own fixture definitions Up to 160 cues 1 background scene 4 sequences can run simultaneously per cue Up to 160 cue lists automated shows with go chase and wait functionality Up to 160 presets on all channels 16 bit possible on all channels Effect generator with adjustable speed swing and delay Ef...

Страница 117: ...oftware 5 meter 16 ft 3 pin XLR cable P N 11820008 USB touch table P N 11840066 DMX termination plug XLR male P N 91613017 3 wire 1 5 meter 5 ft IEC mains cable P N 11501012 Gooseneck Lamp with USB connector P N 06220003 Ordering information Xciter ctrl 90 250V 50 60Hz P N 90736000 ...

Страница 118: ......

Страница 119: ......

Страница 120: ......

Отзывы: