6
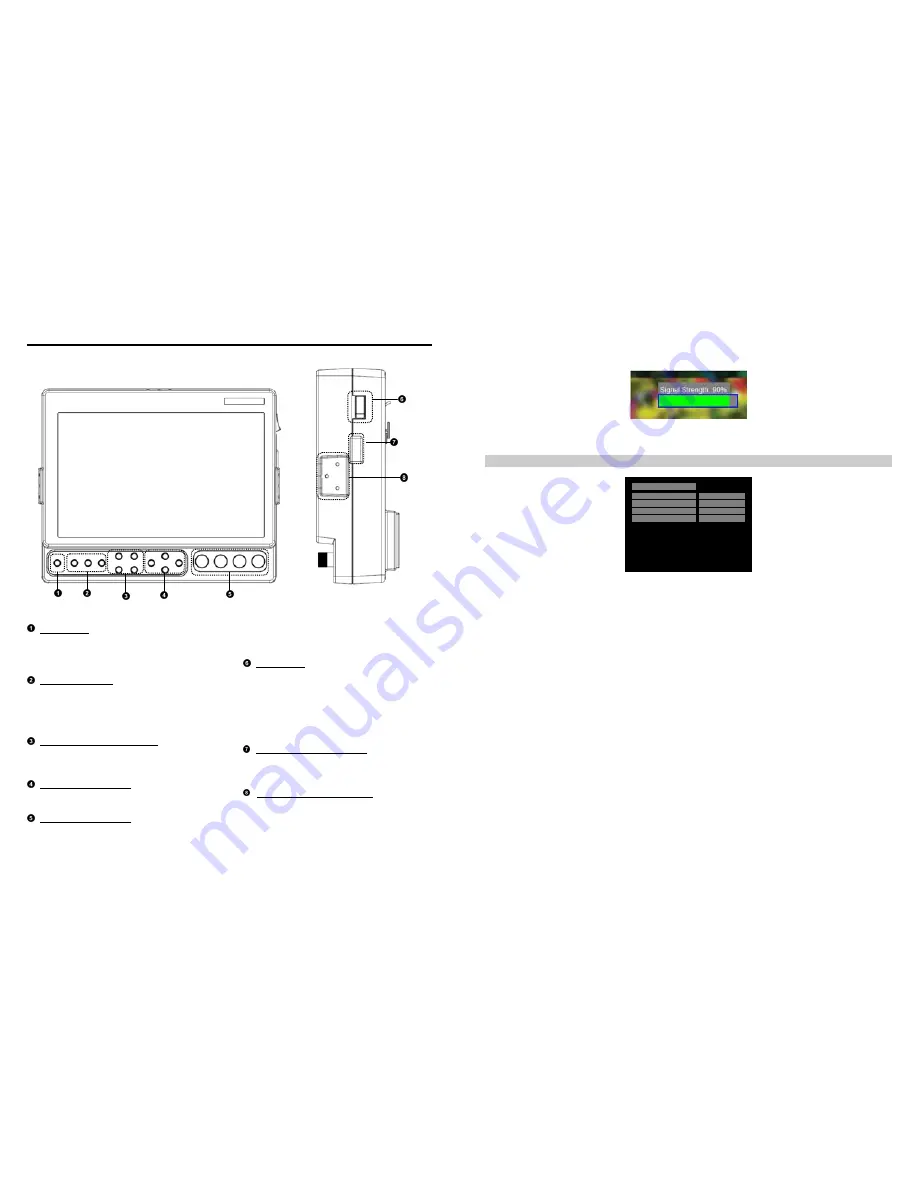
Front and Side Monitor Features
Power Button
Use the power button to toggle between ON and
STANDBY modes. In the STANDBY state, the LED
on the button will illuminate bright green. In the ON
state, the LED will dimly illuminate green.
Input Select Buttons
Use the Input select buttons to select VIDEO,
YPbPr, and HDMI or 3GSDI inputs. In the case of
the V-LCD70XHB-HDA monitor, the third button will
not be available. Video standards and formats
(NTSC/PAL, etc.) are automatically detected.
User-Definable Function Buttons
Four user-definable function buttons can be used for
direct access to various settings. Functions are
assigned using the on-screen menu.
Menu Navigation Buttons
Use the Menu,
▲
,
▼
, and Select buttons to display
and navigate the on-screen menu.
Image Adjustment Knobs
Use the image adjustment knobs to adjust
brightness, color saturation, and contrast of the
image. The status of each image adjustment
parameter is shown on the bottom left of the screen,
with values ranging from 0 to 100. Default value is
50. Tint will adjust the hue of Composite inputs only.
Power Switch
Use the hard power switch to supply power to the
monitor, and choose the input from which the
monitor draws power. The upper switch position
uses the battery adapter, the lower switch position
uses the 4-Pin XLR input, and the center position is
OFF. Battery life can be preserved by setting this
switch to the OFF position when the monitor is not in
use.
Accessory / Service Connector
This connector is for Marshall Electronics’ line of V-
LCD accessories and for monitor service. Please
contact Marshall Electronics for more information.
Mounting Plate Attachment Area
Use the Mounting Plate Attachment area to attach
mounting brackets with ¼-20 mounting holes. This
attachment area is available on the top and sides of
the monitor as well.
23
■
SDI Signal Strength
(V-LCD70XHB-3GSDI Model Only with 3GSDI-CLI module)
Use this setting to enable an on screen indicator of your current SDI signal strength. Although this is not meant to be an
absolute measurement of your SDI Signal Strength, this feature can be useful in determining the stability of the digital
data along your cable run.
Function Presets Submenu
Function Presets
Function on F1
Function on F2
Function on F3
Function on F4
Ratio
Center Marker
Pixel-to-Pixel
Aspect Markers
■
User-Definable Function Buttons
Use the Function on F1, F2, F3 and F4 menu items to define each function button on the front panel of the monitor.
The following options are available for each button:
•
Ratio
•
Check Field
•
HDMI DSL Ratio
•
Horizon Indicator*
•
Image Flip
•
Mosquito Filter
•
Peaking Filter
•
False Colors
•
Freeze Input
•
Aspect Markers
•
Center Marker
•
Marker Enable
•
Underscan
•
H/V Delay
•
Pixel-to-Pixel
.
Function Presets Submenu


