background image

IT

ALIANO

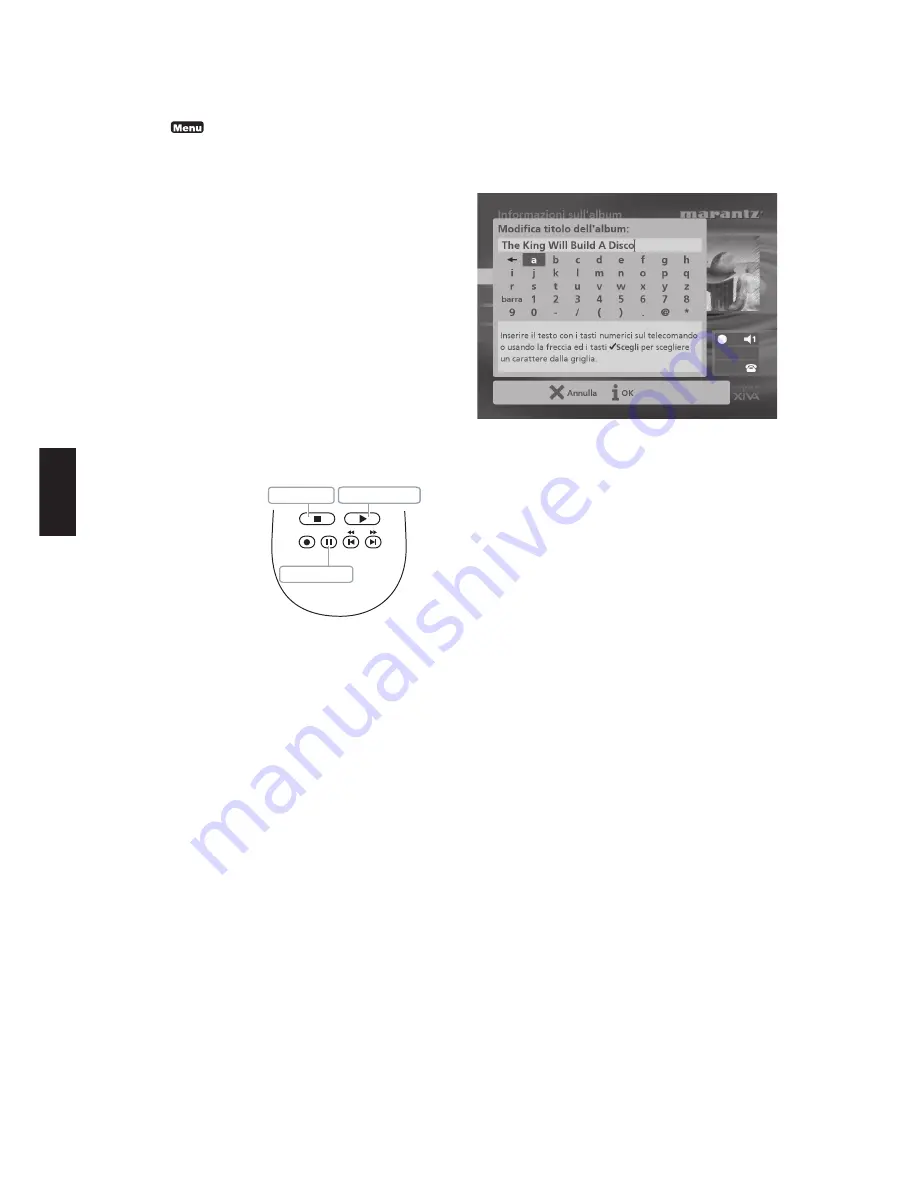
Per selezionare le lettere da una griglia

In alternativa, l’opzione 

Grid

 offre un modo comodo di

selezionare le lettere da una griglia:

Premere il tasto 

8

 per spostare il cursore nell’area

della griglia.

Si evidenzia la lettera selezionata attualmente:

Usare i tasti 

7

,

6

,

9

 oppure 

8

 per spostare il

cursore e premere il tasto d’azione 

5

Scegli 

per

inserire ciascuna lettera.

Usare il tasto 

CAPS 

sul pannello anteriore o sul

telecomando del Music Server per passare dalle
lettere maiuscole alle minuscole e viceversa.

Se in qualsiasi momento occorre inserire del testo in una
parte diversa del campo di testo, o se si desidera tornare ad
inserire del testo usando la tastiera alfanumerica:

Premere ripetutamente il tasto 

9

 fino a che il

cursore non torni al campo di testo.

Infine, quando si è terminato di inserire il nome:

Premere il tasto d’azione 

3

OK

.

ACCENSIONE E SPEGNIMENTO

Per commutare sul modo standby

Occorre usare il modo

 Standby

 quando non si intende

usare il Music Server per un periodo di tempo breve. 

Non

togliere

 l’alimentazione dal Music Server in questo modo!

Premere il tasto 

POWER/Standby 

sul pannello

anteriore o il tasto 

L


Standby 

sul telecomando.

Premere il tasto d’azione 

5

Standby 

per entrare in

standby.

Per commutare sul modo spento

Occorre usare il modo

 Spento

 quando non si intende usare

il Music Server durante la notte (o per diversi giorni).
Quando l’unità è in modo off


consuma pochissima

alimentazione.  In questo modo è possibile togliere
l’alimentazione dal Music Server in sicurezza.

Premere il tasto 

POWER/Standby 

sul pannello

anteriore o il tasto 

L


Standby 

sul telecomando.

Premere il tasto d’azione 

3

Spento 

(Off)

 per entrare

in modo off.

Per accendere dal modo standby

Premere il tasto 

POWER/Standby

 sul pannello

anteriore o  il tasto 

L


Standby 

sul telecomando.

SUONARE MUSICA

Visualizzare il 

Menu Principale

 digitando il tasto

1

 sul telecomando del Music Server, o il

tasto d’azione 

Menu 

sul pannello anteriore.

Viene visualizzato il 

Menu Principale

.

Digitare i tasti 

9

 e 

8

 per evidenziare 

Libreria

.

Digitare il tasto d’azione 

5

Scegli

.

Il menu 

Libreria 

permette di scegliere come si vuole

sfogliare la propria collezione di brani musicali.  Si possono
sfogliare le voci secondo l’album, l’artista, il genere o
l’ordine in cui diversi brani saranno suonati.

Digitare i tasti 

9

8

 per passare da una categoria

all’altra.

Ad esempio, se si seleziona 

Album 

si può vedere un elenco

in ordine alfabetico dei titoli degli album disponibili


.

Per suonare musica

Usare i tasti 

9

 ed 

8

 per evidenziare la voce che si

desidera riprodurre.

Premere il tasto 

7

 per visualizzare i contenuti della

voce selezionata.

Digitare il tasto d’azione 

5

Ripro. 

(Play)

Per cessare di suonare
musica

Digitare il tasto 

B

sul pannello
anteriore o sul
telecomando del
Music Server.

Per arrestare la
riproduzione

Digitare il tasto 

C

sul pannello anteriore o sul telecomando del Music
Server.

Per ignorare la pista successive o precedentePer
ignorare la pista successive o precedente

Premere il tasto 

G

oppure 

F

 sul pannello anteriore

o sul telecomando del Music Server.

Per operare una ricerca all’interno di una pistaPer
operare una ricerca all’interno di una pista

Tenere premuto il tasto 

E

 oppure 

D

 sul pannello

anteriore o sul telecomando del Music Server.

La riproduzione riprende dalla nuova posizione al rilascio
del tasto.

INSERIMENTO DI TESTO

Per inserire del testo usando la tastiera alfanumerica

Premere i tasti 

7

 oppure 

6

 per spostare il cursore

nella posizione desiderata.

Usare i tasti sulla tastiera alfanumerica per inserire
una lettera.

Ad esempio, per inserire S premere il tasto 

per quattro

volte, poichè la S è la quarta lettera sul tasto 

7

.

Premere il tasto 

DELETE 

sul telecomando del

Music Server per cancellare le lettere.

Premere il tasto 

CAPS

 sul pannello anteriore o sul

telecomando del Music Server per passare dalle
lettere maiuscole alle minuscole e viceversa.

Tasto per suonare

Tasto d'arresto

Tasto per pausa

Содержание DH9500

Страница 1: ...Model DH9500 User Guide MUSIC SERVER CLASS 1 LASER PRODUCT LUOKAN 1 LASERLAITE KLASS 1 LASERAPPARAT...

Страница 2: ...a appliance is powered by XiVA ENGLISH WARRANTY For warranty information contact your local Marantz distributor RETAIN YOUR PURCHASE RECEIPT Your purchase receipt is your permanent record of a valuabl...

Страница 3: ...ption which can be determined by turning the equipment off and on the user is encouraged to try to correct the interference by one or more of the following measures Reorient or relocate the receiving...

Страница 4: ...ROTECTION Power supply cords should be protected from being walked on or pinched particularly at plugs convenience receptacles and the point where they exit from the product OUTDOOR ANTENNA GROUNDING...

Страница 5: ...cts on the equipment If a foreign object or water does enter the equipment contact your nearest dealer or service center Do not pull out the plug by pulling on the mains lead grasp the plug It is advi...

Страница 6: ...e Press the 2 key whenever this symbol is displayed on the TV screen or on the front panel to cancel exit or delete the current operation according to the information on screen Press the 3 key wheneve...

Страница 7: ...ont panel or the L Standby key on the remote control PLAYING MUSIC Display the Main Menu by pressing the 1 key on your Music Server remote control or the Menu action key on the front panel The Main Me...

Страница 8: ...to the occasion or mood Instant access irrespective of your music collection Whether you select a track by title album artist or genre your Music Server locates it instantly and plays it at the press...

Страница 9: ...7 ENGLISH FRONT VIEW REAR VIEW...

Страница 10: ...u can use this button to begin a recording either from the CD inside the unit or from the input connectors When managing playlists this button is also used to create new playlists or add tracks to an...

Страница 11: ...the device to be controlled TV button Selects the TV as the device to be controlled For more information on configuring this remote to control your television see the chapter called Configuring your r...

Страница 12: ...music library In TV mode this button selects the blue text service option ARTIST button The artist button can be used to jump to the artist list in the music library If the TV device is selected this...

Страница 13: ...s switched on during the configuration process entering the correct code will cause the amplifier to go into standby Reassigning volume control when using the Music Server If the volume setting of the...

Страница 14: ...not required SWITCHING ON AND OFF There are two power saving modes available from the POWER Standby button on the Music Server front panel and the L button on the remote control If you are not using...

Страница 15: ...s available again A yellow circle indicates that infrared is being received and no update is required on the TV user interface For information on using your Music Server in a multiroom environment see...

Страница 16: ...pported 4 Do not connect You should use this option if you do not presently have access to a telephone line you may set up a connection later Press the 5 action key on the front panel or the key on th...

Страница 17: ...hernet connection ensure that you have connected your Music Server to the appropriate network device using a shielded Ethernet cable If you are not using an Ethernet connection check that you have con...

Страница 18: ...a CD in the tray select the CD option from the Main Menu to display the contents of the disc press the KRec CD to begin recording The following display then allows you to choose whether to do an auto...

Страница 19: ...y to confirm your selection CD information The CD information screen allows you to choose how to enter the album name artist name genre and tracks If you select Enter Information Later you can downloa...

Страница 20: ...cting CD from the Main Menu Note During the recording process the update of the TV display may be slightly slower RECORDING FROM AN ANALOGUE OR DIGITAL INPUT Using the line in connectors on the back o...

Страница 21: ...ess the 5Select action key to confirm your settings and return to the Line In Record screen Note If you have selected either the coaxial or optical digital input as your line in source the gain settin...

Страница 22: ...y To record additional tracks Use the 9 or 8 keys if necessary to highlight the track name option and press the 5New action key A new track named Session Track 2 will begin recording The 5New option w...

Страница 23: ...the item in the list beginning with that letter Option Description Albums Display a list of albums in the library sorted alphabetically by album title Artists Display your music library grouped by ar...

Страница 24: ...ee the chapter called Storing a preset p 26 Use the 9 or 8 keys if necessary to highlight the Presets option in the Library menu Press the 5Select action key to confirm your selection To play all albu...

Страница 25: ...the first letter of its title using the alphanumeric keypad on your Music Server remote control To select an album artist genre or playlist by name Display the appropriate library menu for the item yo...

Страница 26: ...e playing music from the library or directly from the CD you can pause stop and resume playback as well as seek and skip tracks at any time To pause play Press the C key on the front panel or your Mus...

Страница 27: ...help you organise the music in your music library including information about creating playlists of your favourite tracks deleting albums or tracks you no longer want to store and naming albums tracks...

Страница 28: ...the track up or down as required Press the 5Store key to confirm the new track position PRESETS Presets are simple playlists that can be used in the same way as a preset station on your radio tuner fo...

Страница 29: ...ter called Entering and editing names p 28 Press the 3OK action key to confirm the name you have entered ALBUMS Your Music Server labels the albums artists and tracks in your music library with names...

Страница 30: ...e 2Clear action key Press the 5Clear action key to confirm your choice You will receive confirmation once the operation is complete Press the 5OK action key to continue ENTERING AND EDITING NAMES You...

Страница 31: ...ill be given the opportunity to re transmit your updated registration information Internet Access Displays your Internet account details and allows you to edit them If you chose the Use Built in Inter...

Страница 32: ...has been set correctly the assigned IP address IP Mask Gateway DNS 1 and DNS 2 will be displayed as well as the MAC address of the unit Server Access Allows you to configure options for accessing the...

Страница 33: ...te control can be configured so that every button press indicates to the system which output is to be controlled This means that whenever infrared is received by the Music Server the TV display will a...

Страница 34: ...to it when it was recorded onto the unit Album 5 will play album number five Example 2 selecting an artist by its location in an alphabetical list Artist 7 7 will play all the tracks by artist number...

Страница 35: ...en the Opus MCU CONTROLLING THE MUSIC SERVER The music collection on your Marantz DH9500 may be accessed through the Opus Multiroom System in one of the following two ways 1 Using the Music Server rem...

Страница 36: ...the music library by genre Press the R and Q buttons to step through the genres in alphabetical order Press the A button to commence playing the highlighted genre Alternatively press the G and F butt...

Страница 37: ...on the wall panel Press the A button to commence playback ADJUSTING THE VOLUME The volume in each individual room is adjusted independently To adjust the volume use the 9 and 8 keys on the Opus wall p...

Страница 38: ...etwork from your computer If you are using a Macintosh computer you can create a new network connection as follows Select Go from the Finder menu and click Connect to Server Click on the Browse button...

Страница 39: ...abel then holding down the Shift key click the last track Press the Delete key to remove these tracks from the iTunes Library Click Yes to confirm your choice Repeat the import process described above...

Страница 40: ...avily soiled Dilute some washing up liquid in water in a ratio of one part detergent to six parts water Dip a soft lint free cloth in the solution and wring the cloth out until it is damp Wipe the equ...

Страница 41: ...or a charge if the equipment can be restored to normal operation In the event of difficulty consult your dealer or write directly to the nearest location to you that is listed on the Marantz Authorise...

Страница 42: ...30 F FRONT PANEL 7 Controls 8 Display 12 G GENRE BUTTON 10 22 GENRES PLAYING 22 GRID 14 28 H HDD AUDIO BUTTON 9 HOME BUTTON 10 I INFO BUTTON 10 INTERNET CONNECTION 14 29 IPOD COMPATIBILITY 36 L LANGUA...

Страница 43: ...op 10 TV 9 Volume 10 11 REPEAT 13 24 REPEAT BUTTON 10 S S VIDEO OUT CONNECTION 8 SELECT BUTTON 8 SETTINGS 29 SKIP BACK 8 10 SKIP FORWARD 8 10 SPECIFICATIONS 6 STANDBY BUTTON 8 9 12 STANDBY MODE 12 STA...

Страница 44: ...42 ENGLISH...

Страница 45: ...itt raire et artistique L enregistrement de disques ou de programmers radio est autoris en respectant la l gislation sur les droits d auteur coute dans un lieu priv Extrait de la loi du 11 mars 1957 a...

Страница 46: ...es dommages l appareil De plus ce disque sera peut tre impossible retirer N introduisez aucun disque de forme sp ciale N essayez pas d utiliser un disque de forme sp ciale par exemple en forme de c ur...

Страница 47: ...er une liste de lecture 5 Bouton HDD Audio Appuyez sur ce bouton pour contr ler votre Music Server 6 Touches d action de la t l commande Appuyez sur la touche 1 pour afficher le menu principal tout mo...

Страница 48: ...Affichez le Menu principal en appuyant sur la touche 1 de la t l commande de votre Music Server ou bien sur Menu touche d action du panneau avant Le Menu principal s affiche Appuyez sur les touches 9...

Страница 49: ...embre de la famille des occasions ou encore de vos humeurs Acc s instantan quelle que soit la collection musicale Que vous choisissiez une piste par titre album artiste ou genre Music Server la rep re...

Страница 50: ...6 FRAN AIS VUE ARRIERE VUE AVANT...

Страница 51: ...un dispositif adapt tel que Minidisc ou DAT COMMANDES ET CONNEXIONS Cette section fournit des informations sur les commandes et les connexions disponibles sur le dispositif DH9500 Music Server PANNEAU...

Страница 52: ...ations consultez le chapitre Utilisation de Music Server dans un environnement multipi ce la page 30 ALIMENTATION SECTEUR Branchez le cordon d alimentation secteur fourni sur ce connecteur pour pouvoi...

Страница 53: ...tes de lecture de la m diath que En mode TV cette touche s lectionne l option de service de texte bleu Touche ARTIST La touche Artist permet de passer directement la liste d artistes de la m diath que...

Страница 54: ...la configuration la saisie du bon code le met en veille R affectation de la commande de volume lors de l utilisation de Music Server Si le param tre de volume de Music Server est r gl sur fixe les tou...

Страница 55: ...jour l autre ou pendant plusieurs jours L activation de ce mode n cessite plus de temps Il est possible que vous deviez attendre quelques minutes pour que l unit s allume partir de ce mode Lorsque l u...

Страница 56: ...t qu aucune mise jour n est n cessaire sur l interface utilisateur TV Ces donn es seront rejet es jusqu ce que l interface redevienne disponible Pour plus d informations sur l utilisation de Music Ser...

Страница 57: ...ser un modem le compte par d faut Music Server se connectera l aide du compte Internet pr install correspondant votre pays Remarque il n existe peut tre aucun compte Internet par d faut pour votre pay...

Страница 58: ...envoyer vos d tails d inscription Marantz Si vous utilisez une connexion Ethernet assurez vous d avoir connect le serveur musical au dispositif r seau appropri l aide d un c ble Ethernet blind Si vou...

Страница 59: ...tient d j un CD s lectionnez l option CD dans le Menu principal pour afficher le contenu du disque Appuyez sur KEnr CD Rec CD pour commencer l enregistrement L cran suivant propose deux options l enre...

Страница 60: ...5S lect pour confirmer la s lection Informations sur le CD L cran Informations sur le CD permet de choisir le mode de saisie du nom de l album et de l artiste ainsi que du genre et du titre des morce...

Страница 61: ...rafra chissement de l cran de t l vision ENREGISTREMENT A PARTIR D UNE ENTREE ANALOGIQUE OU NUMERIQUE Les connecteurs d entr e haut niveau situ s l arri re du serveur musical permettent de r aliser d...

Страница 62: ...9 ou 8 A l aide des touches 6 ou 7 r glez l option de gain afin que les cr tes les plus bruyantes apparaissent dans la zone jaune des indicateurs du niveau de signal Vous pouvez appuyer sur la touche...

Страница 63: ...ur la touche d action 3Modifier Edit Editez le nom de la piste l aide des touches alphanum riques situ es sur la t l commande du serveur musical ou de la grille de texte situ e sur le panneau avant du...

Страница 64: ...n pour ouvrir l album et afficher son contenu Utilisez les touches 9 ou 8 pour faire d filer les pistes ou appuyez sur l une des touches du pav alphanum rique pour passer directement au num ro de pist...

Страница 65: ...Appuyez sur la touche 6 pour retourner au d filement par genre Pour parcourir la m diath que par liste de lecture Les listes de lecture permettent de compiler vos propres s lections musicales et de le...

Страница 66: ...usieurs artistes ont un nom commen ant par S appuyez sur la touche 8 pour faire d filer les noms jusqu ce qu apparaisse celui de l artiste que vous recherchez Pour s lectionner une piste ou une pr s l...

Страница 67: ...cher ou ignorer certaines pistes Pour interrompre la lecture momentan ment Appuyez sur la touche C du panneau avant ou de la t l commande de Music Server Pour arr ter la lecture Appuyez sur la touche...

Страница 68: ...la touche KNouvelle New pour cr er une liste Le menu suivant permet ensuite d attribuer un nom la nouvelle liste de lecture Attribuez un nom la liste de lecture l aide du pav alphanum rique de la t l...

Страница 69: ...ste modifier Appuyez sur la touche d action key 3D placer Move pour placer la piste un autre endroit Appuyez sur la touche 9 ou 8 pour d placer la piste vers le haut ou vers le bas Appuyez sur 3Stocke...

Страница 70: ...s alphanum riques de la t l commande du serveur musical Pour plus d informations sur la saisie de noms reportez vous au chapitre Saisie et modification de noms la page 27 Appuyez sur la touche d actio...

Страница 71: ...e d action 5S lect Mettez en surbrillance la pr s lection effacer et appuyez sur la touche d action 2Effacer Clear Appuyez sur la touche d action 5Effacer Clear pour confirmer votre s lection Le syst...

Страница 72: ...s tes invit transmettre nouveau les donn es d inscription mises jour Acc s Internet Affiche les informations relatives votre compte Internet Vous permet de les modifier Si vous avez s lectionn l optio...

Страница 73: ...ochaine session d enregistrement de CD Langue Vous permet de s lectionner la langue de l interface utilisa teur TV allemand anglais espagnol fran ais ou italien Informations sur le syst me Indique le...

Страница 74: ...nnect es l entr e st r o d un amplificateur Utilisation de la t l commande multipi ce Interface de t l vision Vous pouvez configurer la t l commande du serveur musical de sorte que chaque pression sur...

Страница 75: ...emple 1 s lection d un album en fonction du num ro affect au moment de l enregistrement sur l unit Album 5 lance la lecture de l album num ro 5 Exemple 2 s lection d un artiste en fonction de sa posit...

Страница 76: ...ous que le Music Server est activ avant de la rallumer CONTR LE DU SERVEUR MUSICAL Vous pouvez acc der la collection musicale du Marantz DH9500 via le syst me multipi ce d Opus en suivant l une des pr...

Страница 77: ...e autres cat gories ARTIST GENRE PLAYLIST et PRESET Si vous parcourez la m diath que par titre d album ou nom d artiste Appuyez sur les touches R et Q pour s lectionner une lettre de l alphabet et res...

Страница 78: ...pour d marrer la lecture REGLAGE DU VOLUME Vous pouvez r gler individuellement le volume de chaque pi ce l aide des touches 9 et 8 du panneau mural Opus Le niveau du volume compris entre VOL 0 et VOL...

Страница 79: ...Macintosh S lectionnez Go dans le menu Finder puis cliquez sur Connect to Server Cliquez sur la touche Browse dans la fen tre Connect to Server Localisez le serveur musical sur le r seau et double cl...

Страница 80: ...primer ces pistes de l audioth que d iTunes Cliquez sur Oui pour confirmer votre choix R p tez la proc dure d importation d crite ci dessus afin d ajouter les informations du serveur musical Transfert...

Страница 81: ...es comp tences et des ressources mat rielles n cessaires pour la r paration et l talonnage de votre quipement de pointe A expiration de la p riode de garantie un service de r paration payant sera prop...

Страница 82: ...O TOUCHE 9 INSCRIPTION 12 INTERNET CONNECTER 13 L LECTEURS MP3 35 LECTEURS PORTABLES 35 LECTUREDEMUSIQUE 20 Depuis un CD 22 Parcourir par album 20 Parcourir par artiste 20 Parcourir par genre 21 Parco...

Страница 83: ...nulation 9 Default o p 8 Disc Ch 9 Enregistrement 9 Genre 9 HDD audio 8 Home 9 Info 9 Lecture 9 Menu 9 Multipi ce 12 30 Mute 9 10 Navigation 9 Pause 9 Playlist 9 Random Delete 9 Repeat Caps 9 Retour 9...

Страница 84: ...40 FRAN AIS...

Страница 85: ...rga licencia para incumplir las leyes de copyright por la venta de este equipo Es probable que para efectuar la grabaci n o reproducci n de cualquier material sea necesario obtener el debido consentim...

Страница 86: ...puede producir da os en el equipo Incluso puede que sea imposible sacar el disco No utilice discos con formas especiales No utilice discos con formas de coraz n u octogonal Puede que el sistema deje d...

Страница 87: ...e men s para comenzar la grabaci n o modificar una lista de reproducci n 5 Bot n HDD Audio pulse este bot n para controlar Music Server 6 Botones de acci n del mando a distancia Pulse el bot n 1 para...

Страница 88: ...la tecla de 1 del mando a distancia del Music Server o Menu tecla de acci n del panel fronto Se visualizar el Men Principal Pulse las teclas 9 y 8 para resalta Fonoteca Pulse 5Selecc tecla de acci n...

Страница 89: ...ceso instant neo con cualquier colecci n musical Al seleccionar una pista ya sea por t tulo lbum artista o g nero Music Server la localiza inmediatamente y la reproduce con s lo pulsar un bot n La ope...

Страница 90: ...6 ESPA OL PANEL POSTERIOR PANEL FRONTAL...

Страница 91: ...los cables y aislamiento total del bucle a trav s de tierra que ofrece una salida sin ruido digital Esta salida no puede utilizarse para hacer una copia digital del soporte CONTROLES Y CONEXIONES Est...

Страница 92: ...e alimentaci n a este conector para suministrar corriente a la unidad USO DEL MANDO A DISTANCIA El mando a distancia suministrado con Music Server es de tipo universal puede usarse para controlar otro...

Страница 93: ...pci n del bot n azul de servicio de texto Bot n ARTIST El bot n Artist puede usarse para abrir la lista de artistas de la fonoteca Si se ha seleccionado el televisor este bot n selecciona la opci n de...

Страница 94: ...el proceso de configuraci n al introducir el c digo correcto se activar el modo de espera Reasignaci n del control de volumen al usar Music Server Si el volumen de Music Server est configurado como f...

Страница 95: ...o Music Server Modo de espera El modo de espera deber a usarse cuando se interrumpa brevemente el uso de Music Server La activaci n del modo de espera tarda s lo unos segundos lo mismo que la reactiva...

Страница 96: ...de Music Server ICONOS DE ESTADO DE MUSIC SERVER La pantalla de TV refleja el estado actual de Music Server mediante los iconos detallados a continuaci n 1 Indica la ubicaci n remota que controla actu...

Страница 97: ...colocar el cursor sobre la malla y use los botones 6 7 8 y 9 para resaltar caracteres y el bot n para seleccionarlos Pulse varias veces el bot n 9 para volver a situar el cursor en el cuadro de texto...

Страница 98: ...ulse el bot n de acci n 5 del panel frontal o el bot n del mando a distancia para seleccionar la opci n deseada Si ha seleccionado la opci n Mediante Ethernet siga las instrucciones en pantalla para e...

Страница 99: ...scar Esta opci n le permite recuperar cualquier informaci n del CD ausente desde Internet Desconectar Interrumpe cualquier proceso en l nea utilizando la conexi n del m dem y libera la l nea MEN PRINC...

Страница 100: ...o en la bandeja seleccione la opci n CD en el Men principal para mostrar el contenido del disco pulse bot n KGrab CD Rec CD para comenzar la grabaci n En la siguiente pantalla podr elegir si desea una...

Страница 101: ...otal seg n la calidad de grabaci n especificada Pulse la tecla 5Selecc para confirmar la selecci n Informaci n de CD La pantalla de Introducir informaci n de CD permite elegir c mo introducir el t tul...

Страница 102: ...ta GRABACI N DESDE UNA ENTRADA ANAL GICA O DIGITAL Utilizando los conectores de entrada de l nea en la parte posterior del Servidor musical podr realizar grabaciones desde fuentes como por ejemplo min...

Страница 103: ...8 para resaltar la opci n de ganancia correcta Utilice las teclas 6 o 7 para ajustar la ganancia y asegurar que los picos m s altos de volumen est n dentro de la regi n amarilla en los medidores de n...

Страница 104: ...ng y pulse la tecla de acci n 3Editar Edit Edite el nombre de la canci n utilizando las teclas alfanum ricas del mando a distancia del Servidor musical o utilizando la rejilla de texto del panel front...

Страница 105: ...ara comenzar la reproducci n Para seleccionar una pista concreta en este lbum Pulse el bot n 7Abrir Open para ver las pistas que contiene el lbum Use los botones 9 o 8 para pasar de una pista a otra o...

Страница 106: ...y para reproducir el lbum seleccionado actualmente O Vuelva a pulsar el bot n 7Abrir Open para seleccionar una pista dentro de este lbum O Pulse el bot n 6 para volver a examinar la fonoteca por g ner...

Страница 107: ...letra asignada al bot n 7 En el panel frontal y la pantalla de TV aparecer el primer artista disponible cuyo nombre empieza por S Si hay varios artistas con esta inicial pulse el bot n 8 para llegar...

Страница 108: ...as u omitir las que no se desea escuchar Para hacer una pausa Pulse el bot n C en el panel frontal o en el mando a distancia de Music Server Para detener la reproducci n Pulse el bot n B en el panel f...

Страница 109: ...sta de reproducci n Pulse el bot n K Nuevo New para crear una lista de reproducci n En el siguiente men podr introducir un nombre para la lista Para introducir el nombre use los botones alfanum ricos...

Страница 110: ...ones 9 o 8 para resaltar el t tulo de pista cuya posici n va a cambiar Pulse el bot n de acci n 3Mover Move para mover la pista Use los botones 9 o 8 para llevar la pista a una posici n superior o inf...

Страница 111: ...a de acci n 3Editar Edit para introducir un nombre nuevo Ponga un nombre para la presinton a utilizando las teclas alfanum ricas del mando a distancia del Servidor musical o utilizando la rejilla Para...

Страница 112: ...lse la tecla de acci n 5Selecc Resalte la preselecci n que desee borrar y pulse la tecla de acci n 2Borrar Pulse la tecla de acci n 5Borrar para confirmar la opci n elegida Recibir la confirmaci n una...

Страница 113: ...tunidad de retransmitir la informaci n de registro actualizada Accesso a Internet Muestra los detalles de su cuenta de Internet y permite editarlos Si se ha seleccionado Usar cuenta de Internet integr...

Страница 114: ...lquier cambio en estos ajustes tendr efecto la siguiente vez que grabe un CD Idioma Permite seleccionar el idioma de la interfaz de usuario de TV los idiomas disponibles son ingl s franc s alem n ital...

Страница 115: ...mando a distancia multi habitaci n Interfaz de televisi n El mando a distancia del Servidor musical se puede configurar de modo que cada pulsaci n del bot n indique al sistema qu salida va a controlar...

Страница 116: ...todo Ejemplo 1 selecci n de un lbum mediante el n mero que se le asign cuando se grab en el equipo lbum 5 reproducir el lbum n mero cinco Ejemplo 2 selecci n de un artista por su ubicaci n en una lis...

Страница 117: ...ncender la MCU Opus C MO CONTROLAR EL SERVIDOR MUSICAL Se puede acceder a la colecci n musical de equipo Marantz DH9500 mediante el sistema multi habitaci n de Opus por alguna de las dos siguientes ma...

Страница 118: ...ro PLAYLIST Lista de reproducci n y PRESET Preselecciones Si est examinando la biblioteca musical por t tulo de lbum o nombre de artista Pulse los botones R y Q para seleccionar una letra del alfabeto...

Страница 119: ...botones R y Q para pasar por la lista de lbunes de Faith Hill hasta que se muestre la palabra Greatest en el panel de pared Pulse el bot n A para comenzar la reproducci n AJUSTANDO EL VOLUMEN El volu...

Страница 120: ...ervidor musical est conectado correctamente ahora deber a estar accesible desde el ordenador de la red Si est utilizando un ordenador Macintosh podr crear una nueva conexi n de red de la forma siguien...

Страница 121: ...ervidor musical se agrupar n utilizando la etiqueta MUSICSERVER_NAME por ejemplo DH9500_000123 Haga clic en la primera canci n de la lista con esta etiqueta de agrupamiento a continuaci n mantenga pul...

Страница 122: ...das INTERFAZ OPUS El panel de pared Opus no responde a las pulsaciones de los botones Debe conectar en cada una de las unidades en su sistema en un orden espec fico primero el Music Server y despu s l...

Страница 123: ...puede devolverse a su funcionamiento normal En caso de dificultades consulte con el vendedor o escriba directamente al establecimiento m s cercano de los que aparecen en la lista de centros de servici...

Страница 124: ...I N 7 30 F FORMATOS DE GRABACI N 17 29 FUENTEENTRADADEL NEA 18 G G NEROS REPRODUCCI NPOR 22 GENRE BOT N 9 22 GRABACI N BOT N 7 9 GRABACI N DE ENTRADA DE L NEA 18 GRABACI N DE M SICA Comprobaci n de pr...

Страница 125: ...e m sica 27 R REGISTRO 13 29 REPETIR 12 24 25 REPETIR BOT N 9 REPRODUCCI N BOT NDE 7 9 REPRODUCCI NDEM SICA 21 desde un CD 23 Navegar por lbum 21 Navegar por Artistas 21 Navegar por g neros 22 Navegar...

Страница 126: ...42 ESPA OL...

Страница 127: ...rechtlich gesch tzt sind verwendet werden Durch den Verkauf dieses Ger ts wird keine Lizenz zur Aufhebung dieses Urheberrechts gew hrt Das berspielen und Wiedergeben urheberrechtlich gesch tzter Werke...

Страница 128: ...s die CD nicht mehr aus dem Ger t herausgenommen werden kann Verwenden Sie keine CD besonderer Form Versuchen Sie in keinem Fall eine CD besonderer Form wie z B eine herzf rmige oder achteckige CD zu...

Страница 129: ...6 Aktionstasten auf der Fernbedienung Mit der 1 Taste k nnen Sie jederzeit das Hauptmen anzeigen Dr cken Sie die 2 Taste wenn dieses Symbol auf dem Fernsehbildschirm oder auf der Anzeige auf der Vorde...

Страница 130: ...Hauptmen aufrufen indem Sie die Taste 1 auf der Fernbedienung Ihres Music Servers oder die Taste Menu Aktionstaste auf der Frontblende Das Hauptmen wird angezeigt Die Tasten 9 und 8 bet tigen um Musik...

Страница 131: ...d bzw f r jede Gelegenheit oder jeden Gem tszustand eine eigene Playliste erstellen Sofortiger Zugriff unabh ngig von der Musiksammlung Egal ob Sie einen Titel ein Album einen K nstler oder ein Genre...

Страница 132: ...6 DEUTSCH R CKANSICHT VORDERANSICHT...

Страница 133: ...fnahmen auf der Festplatte des Music Server vornehmen BEDIENELEMENTE UND ANSCHL SSE In diesem Abschnitt werden die Bedienelemente und Anschl sse des DH9500 Music Server beschrieben VORDERSEITE POWER S...

Страница 134: ...ie im Kapitel Verwenden des Music Server in einem Mehrraumsystem auf Seite 31 NETZANSCHLUSS Schlie en Sie hier das im Lieferumfang enthaltene Netzkabel zur Stromversorgung des Ger ts an DIE FERNBEDIEN...

Страница 135: ...blaue Textoption ausgew hlt ARTIST TASTE Mit der Artist Taste k nnen Sie die K nstlerliste der Musikbibliothek aufrufen Ist der Fernseher ausgew hlt wird mit dieser Taste die gr ne Textoption ausgew...

Страница 136: ...wird er in den Standby Modus geschaltet wenn Sie den richtigen Code eingeben Erneutes Zuweisen der Lautst rkeregelung beim Verwenden des Music Server Ist die Lautst rke des Music Server auf fest eing...

Страница 137: ...n Standby Modus Den Standby Modus sollten Sie aktivieren wenn Sie den Music Server k rzere Zeit nicht nutzen Das Aktivieren und Deaktivieren des Standby Modus dauert jeweils nur ein paar Sekunden Tren...

Страница 138: ...Auf dem Fernsehbildschirm wird der Status des Music Server anhand einer Reihe von Symbolen angezeigt siehe Abbildung 1 Zeigt an welcher Raum gerade die TV Benutzerober fl che steuert Anhand der Leist...

Страница 139: ...rsor in das Raster zu setzen markieren Sie mit den Tasten 6 7 8 oder 9 das gew nschte Zeichen und dr cken Sie die Taste um es auszuw hlen Dr cken Sie die 9 Taste wiederholt um den Cursor in das Textei...

Страница 140: ...ktionstaste 5 bzw die Taste auf der Fernbedienung um die ausgew hlte Option zu aktivieren Wenn Sie Ethernet verwenden ausgew hlt haben befolgen Sie die Anweisungen auf dem Bildschirm um festzulegen wi...

Страница 141: ...olgenden Kapiteln Option Beschreibung Anmelden Stellt eine Internetverbindung her und meldet den Music Server bei Marantz an Diese Option ist nur verf gbar wenn Ihr Music Server nicht registriert ist...

Страница 142: ...ie bereits eine CD eingelegt haben w hlen Sie im Hauptmen die Option CD um den Inhalt der CD anzuzeigen Dr cken Sie dann die Taste KCD Aufz Rec CD Danach k nnen Sie ausw hlen ob Sie eine automatische...

Страница 143: ...lit t f hrt zu erh htem Speicherplatzbedarf auf der Festplatte des Music Server d h Sie k nnen weniger CDs aufnehmen Die Anzeige zeigt die verf gbare Aufnahmezeit f r Aufnahmen in der gew hlten Qualit...

Страница 144: ...eben von Musik auf Seite 21 Sie k nnen jederzeit den Fortschritt der Aufnahme anzeigen indem Sie im Hauptmen den Befehl CD w hlen Hinweis W hrend einer Aufnahme kann die Anzeige auf dem Fernsehbildsch...

Страница 145: ...len Sie mit der Taste 6 oder 7 die Signalpegeloption so ein dass die Lautst rkespitzen im gelben Bereich der Pegelmessger te liegen Dr cken Sie die Aktionstaste 3L schen wenn Sie den Spitzenpegelmarki...

Страница 146: ...Option Aufnehmen und dr cken Sie dieAktionstaste 3Bearb Edit ndern Sie die Trackbezeichnung mit Hilfe der alphanumerischen Tasten auf der Fernbedienung Ihres Music Servers oder ber das raster an der...

Страница 147: ...e 7 ffnen Taste Open um das Album zu ffnen und den Inhalt anzuzeigen W hlen Sie mit den Tasten 9 bzw 8 einen Titel aus oder dr cken Sie die entsprechende Zifferntaste auf der Fernbedienung um zu einer...

Страница 148: ...ken Sie die 6 Taste um das Genre erneut zu durchsuchen So durchsuchen Sie die Bibliothek nach Playlisten In Playlisten k nnen Sie eigene Auswahlen von Titeln sammeln und unter einem beliebigen Namen z...

Страница 149: ...tler der mit dem Buchstaben S beginnt Wenn mehrere K nstler mit dem Buchstaben S beginnen k nnen Sie den gew nschten mit der Taste 8 ausw hlen So w hlen Sie einen Track oder Voreinstellung anhand der...

Страница 150: ...Sie die Wiedergabe an Dr cken Sie auf der Fernbedienung oder auf der Vorderseite des Music Server die Taste C So stoppen Sie die Wiedergabe Dr cken Sie auf der Fernbedienung oder auf der Vorderseite d...

Страница 151: ...arauf folgenden Men k nnen Sie die Playliste benennen Geben Sie den Namen ber die alphanumerischen Tasten der Fernbedienung des Music Server ein oder verwenden Sie das Raster Weitere Informationen zum...

Страница 152: ...en Dr cken Sie die Aktionstaste 3Verschie Move um den Titel zu verschieben Dr cken Sie die Tasten 9 bzw 8 um den Titel nach oben bzw unten zu verschieben Dr cken Sie die 3Speicher Taste Store um die n...

Страница 153: ...arb Edit um eine neue Bezeichnung einzugeben Geben Sie die Bezeichnung f r den Voreinstellung ber die alphanumerischen Tasten auf der Fernbedienung Ihres Music Servers ein oder verwenden Sie das Raste...

Страница 154: ...ung den Sie l schen m chten und dr cken Sie die Aktionstaste 2L schen Dr cken Sie die Taste 5L schen um Ihre Auswahl zu best tigen Sie erhalten eine Best tigung sobald der Vorgang abgeschlossen ist Dr...

Страница 155: ...ieser Optionen ndern werden die ge nderten Anmeldedetails automatisch bei der n chsten Verbindung zum Internet ber Music Server erneut bertragen Internetzugriff Hier k nnen Sie Ihre Internetkontodetai...

Страница 156: ...itere Hinweise zu diesem Thema finden Sie in dem Kapitel Betrieb Ihres Music Servers mit einem tragbaren Wiedergabeger t p 36 Proxyserver Einstellungen Mit dieser Option k nnen Sie sich die aktuellen...

Страница 157: ...ienung Ihres Music Servers kann so eingestellt werden dass jeder Tastendruck dem System anzeigt welcher Ausgang gesteuert wird Immer wenn ein Infrarotsignal vom Music Server empfangen wird schaltet di...

Страница 158: ...nn Beispiel 1 Auswahl eines Albums mit der w hrend der Aufnahme auf dem Ger t zugeordneten Nummer Album 5 Album Nummer 5 wird abgespielt Beispiel 2 Auswahl eines K nstlers durch Suchen seiner Position...

Страница 159: ...s MCU ausschalten achten Sie darauf dass der Music Server eingeschaltet ist bevor Sie den Opus MCU wieder einschalten STEUERN DES MUSIC SERVERS Sie k nnen folgenderma en auf die Musiksammlung auf Ihre...

Страница 160: ...einzugrenzen die mit diesem Buchstaben beginnen Dr cken Sie die Tasten G und F um die Alben und K nstler die mit dem ausgew hlten Buchstaben beginnen zu durchlaufen Dr cken Sie die Taste A um die Wie...

Страница 161: ...ezeigt wird Dr cken Sie die Taste A um die Wiedergabe zu starten REGELN DER LAUTST RKE Sie k nnen die Lautst rke in jedem Raum individuell regeln Dr cken Sie dazu die 9 and 8 Tasten am Opus Wandger t...

Страница 162: ...von Ihrem Computer aus darauf zugreifen k nnen Wenn Sie einen Macintosh verwenden k nnen Sie folgenderma en eine neue Netzwerkverbindung herstellen W hlen Sie im Finder den Men punkt Gehe zu und klick...

Страница 163: ...der Liste mit dieser Gruppenbezeichnung und klicken Sie dann w hrend Sie die Umschalttaste gedr ckt halten auf den letzten Track Dr cken Sie die Taste Entf um diese Tracks aus der iTunes Bibliothek z...

Страница 164: ...en Sind die fehlerhaften Titel g ltige Audiotitel OPUS Das Opus Wandger t reagiert nicht auf Bet tigung der Tasten Sie m ssen die Ger te des System in einer bestimmten Reihenfolge einschalten zuerst d...

Страница 165: ...itraums werden Reparaturen gegen Geb hr vorgenommen wenn der normale Betrieb der Ger te wiederhergestellt werden kann Falls Schwierigkeiten auftreten wenden Sie sich an Ihren H ndler oder schreiben Si...

Страница 166: ...8 DIGITAL IN ANSCHLUSS KOAXIAL 8 DIGITALOPTICALIN ANSCHLUSS 7 DIGITALOPTICALOUT ANSCHLUSS 8 DIGITALOUT ANSCHLUSS KOAXIAL 8 DURCHSUCHEN Alben 21 Genres 22 K nstler 21 Playlisten 22 Voreinstellungen 22...

Страница 167: ...STANDBY MODUS 11 STANDBY TASTE 7 8 11 STOPP TASTE 7 9 SUCHEN 17 SYSTEMEINSTELLUNGEN 30 SYSTEMINFORMATIONEN 30 T TECHNISCHEDATEN 5 TEXTEINGABE 13 TITELWIEDERGEBEN 21 TITELLEISTE 17 CD Text 18 Informati...

Страница 168: ...42 DEUTSCH...

Страница 169: ...o Premere questo pulsante per controllare il Music Server 6 Tasti d azione del telecomando Premere il tasto 1 per visualizzare il menu principale in qualsiasi momento Premere il tasto 2 ogniqualvolta...

Страница 170: ...l telecomando del Music Server o il tasto d azione Menu sul pannello anteriore Viene visualizzato il Menu Principale Digitare i tasti 9 e 8 per evidenziare Libreria Digitare il tasto d azione 5Scegli...

Страница 171: ...E 138 024 010 048 158 097 077 CIE 098 001 002 003 004 005 006 007 009 013 014 015 016 079 CIHAN 009 CLARIVOX 108 033 047 CLATRNIC 017 CLATRONIC 001 002 003 004 005 006 007 008 009 119 013 014 015 016...

Страница 172: ...1 002 003 004 005 006 007 008 009 017 013 014 015 016 018 151 IMPERIAL 001 002 003 004 034 138 143 005 006 007 146 008 024 081 009 154 119 010 013 014 015 016 121 048 158 125 097 018 077 086 114 INGEL...

Страница 173: ...021 PANASONIC 080 137 144 150 145 081 082 083 207 131 PATHECINEMA 031 119 033 158 PATHEMARCONI 135 139 042 PERDIO 043 PHILCO 001 002 003 004 080 138 005 006 146 024 081 009 010 013 014 015 016 048 158...

Страница 174: ...TEKON 018 084 TELEAVIA 135 107 139 042 040 TELEFUNKEN 034 035 106 138 136 140 037 042 040 050 TELETENT 005 TELETECH 018 TELETON 088 041 109 081 010 TELEUNKEN 138 TELEVIDEON 031 021 081 119 206 TENSAI...

Страница 175: ...122 129 106 124 031 KRELL 067 063 KYOCERA 020 LEXICON 006 LINN 057 LUXMAN 042 028 008 LXI 036 MAGNAVOX 064 MARANTZ 053 011 012 116 055 032 059 MERIDIAN 060 061 MITSUBISHI 130 131 MONDIAL 068 062 NAKA...

Страница 176: ...merge or its employees or agents are advised of the possibility of such damages losses or expenses Limitations of Imerge s Liability In no event will Imerge or its suppliers be liable to you or any th...

Страница 177: ...statistics will not include any information that could personally identify you unless we have your consent Imerge reserves the right to access and disclose individually identifiable information to com...

Страница 178: ...ous sont accord s en licence EN L TAT Gracenote ne fait aucune d claration ni garanties explicites ou implicites concernant l exactitude de quelque Donn e Gracenote que ce soit Gracenote se r serve le...

Страница 179: ...E GRACENOTE NO SER RESPONSABLE EN NING N CASO DE CUALESQUIERA DA OS Y PERJUICIOS INDIRECTOS O INCIDENTALES NI POR CUALQUIER P RDIDA DE BENEFICIOS O INGRESOS ITALIANO Condizioni della licenza Gracenote...

Страница 180: ...ity 6 1 You are fully responsible for all activities which occur under your Calling Line Identification CLID Other users of your CLID shall be bound by these terms and conditions as if they were you Y...

Страница 181: ...conditions g n rales tout moment en en avisant le client sur la section annonces du site Web de Claranet www claranet net 8 5 Claranet se r serve le droit de publier sur son site Web les d tails des...

Страница 182: ...t daran hindern Schadensersatz von Ihnen im Zusammenhang mit einem solchen Ereignisses zu fordern im Falle dass Sie gegen diese Gesch ftsbedingungen versto en 5 Anrufnummernerkennung 5 1 Sie m ssen si...

Страница 183: ......

Отзывы: