background image

P

22

 / 

29


3

Operation procedures 

Procedure 1

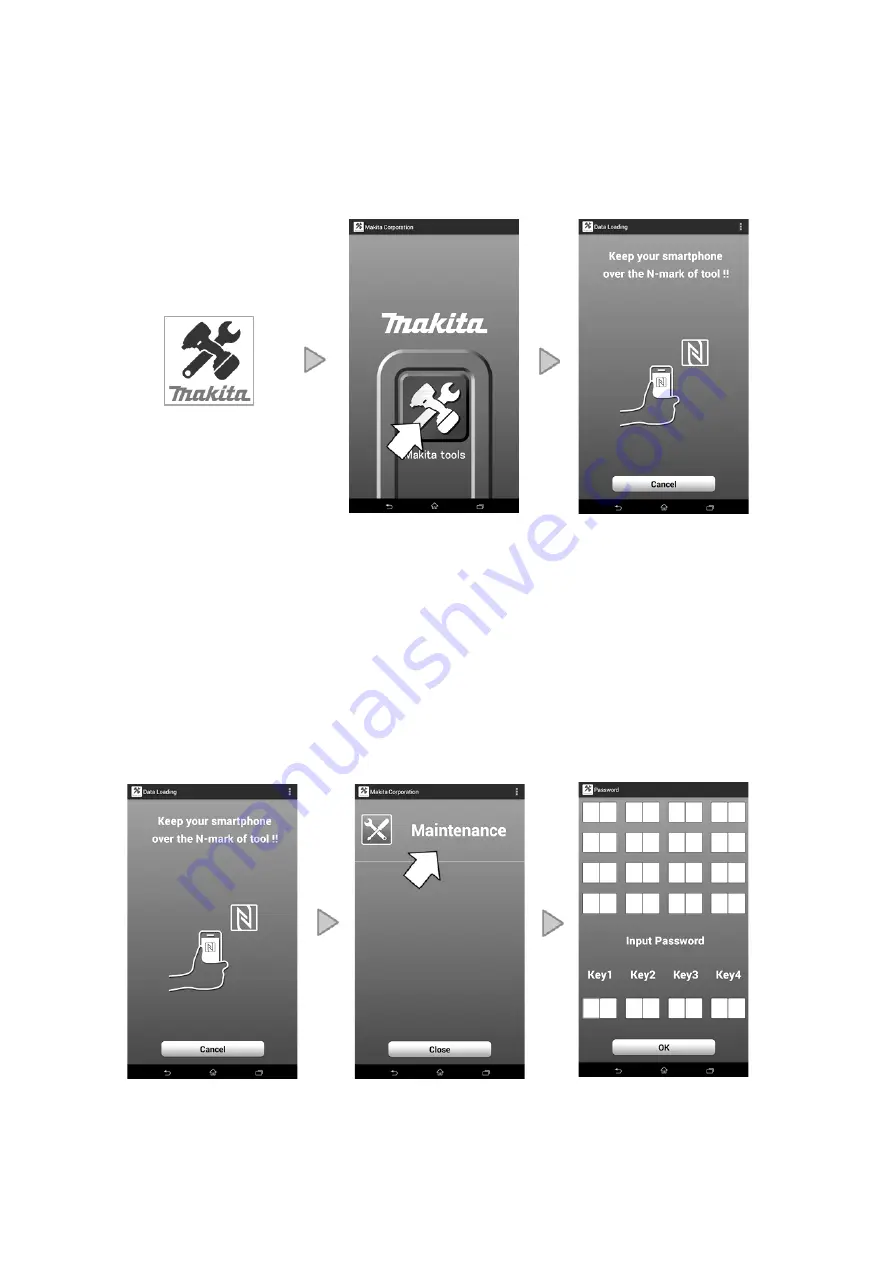
Starting of the apps 

Please tap an icon of the "Makita Tools" apps which you installed. 

Procedure 2

Password input of the application (only as for the first time) 

In password acquisition screen, please acquire a password.


When Menu screen was displayed, 

tap "Maintenance".(See P.2 1-6 “Preparation of your terminal”.) 

When password input screen is displayed, input password according to input example of P5. 

<

 Attention

 > 

The displayed password changes whenever acquired a password. 

If you fail   

to input the password successively 3 times, you cannot input for five minutes. 

Password acquisition screen 

Menu screen 

Password input screen 

Password acquisition screen 

Top screen 

Apps

Makita Tools


Содержание DUP361

Страница 1: ...asured Max blade opening mm Value in catalog 54 2 1 8 Actual measured Movement of shear blade Trigger ON Interlocked with Trigger Trigger OFF Blade opening adjustment Yes 2 stages Electronic current l...

Страница 2: ...quantity of extra Battery Note The standard equipment may vary by country of model variation Shear blade U set Shear blade L set Shear blade U set for thin branches Shear blade L set for thin branche...

Страница 3: ...escription Tightening torque N m 1 Ball nut cover A Ball nut cover B Pan head screw 2 10 0 15 0 25 2 Ball nut cover A Base Pan head screw 2 10 0 30 0 50 3 Shear blade L Upper housing Hex bolt M5 14 5...

Страница 4: ...NG 1 In case Shear blade U is closed completely 1 1 2 Loosen two Pan head screws M3 16 36 4 Slide Front housing complete 37 until it touches Trigger Trigger 37 3 Hold up the edge of Front housing comp...

Страница 5: ...ousing complete 37 8 Loosen two Pan head screws M3x16 36 36 9 Uphold the tip side of Front housing complete 37 37 Protrusion of Front housing complete 37 35 10 Remove the Protrusion of Front housing c...

Страница 6: ...ogether with Motor 33 19 Remove two Receptacles from Motor 1 7 Receptacle 1 8 27 There is one more on the other side 20 Loosen two C H screw M3x10 1 9 21 Pull out Motor from Ball screw ass y Do not be...

Страница 7: ...crew M3x10 27 27 There is one more on the other side 1 13 35 Red mark Storage space of Earth terminal 6 Set Motor ass y so as Red mark to face the storage space of Earth terminal 5 Fit the groove of B...

Страница 8: ...al here 1 17 10 Put two receptacles here Face the opening outside 11 Put Connector as drawn Be careful to the position of mark Connector mark 1 18 1 19 12 Make sure that Flexible board fits in the gro...

Страница 9: ...k arm 15 by pulling out Flat fillister HD pin 5 16 16 15 58 2 3 Board 4 Remove Board by loosening Pan head tapping screw 2x10 58 Be careful not to bend Flexible board Flexible board 5 Peel off Flexibl...

Страница 10: ...er A B 25 13 by loosening Pan head tapping screws 2x10 12 25 13 2 13 Protrusion of Ball nut cover A 25 Groove of Ball screw ass y 26 2 Fit the protrusion of Ball nut cover A 25 to the groove of Ball s...

Страница 11: ...y Note You do not need to care about the position of Red mark and Flat surface Flat face 2 17 27 There is one more on the other side 7 Tighten C H screws M3x10 27 2 18 25 23 21 8 Insert Magnet 21 Comp...

Страница 12: ...in a line Note Put Washing agent for cleaning oils from metals on a waste cloth and remove fat from the flat surface Do not put Washing agent directly on the flat surface of Bearing box because it da...

Страница 13: ...272 because it is an anti loosening thread locking nut 2 Assemble Trigger ass y 24 according to 2 20 18 The built in image of Flexible board is as below 2 24 16 15 19 Set Link arm 15 to Shear blade as...

Страница 14: ...Terminal Connector Connector Connector Connection cord Connector Controller Terminal Straight receptacle with lock 187 t 0 8mm Connector Sub controller Sensor plate Flexible board DC Motor Choke coil...

Страница 15: ...on the flat portion of Ball screw assembly 2 Aligning the white line of Flexible board to the edge of Ball screw assembly stick it to Ball screw assembly Ball screw assembly Ball screw assembly Wiring...

Страница 16: ...DC Motor DC Motor DC Motor Connect receptacle to DC motor facing its opening portion outside Opening portion of Receptacle Receptacle Red marking Facing the red marking to the side of place for stora...

Страница 17: ...ng Lead wires are connected to this place Lead wire orange Lead wire blue Lead wire white Put Controller s lead wires which are connected to each connectors in this groove Put the Terminal to which th...

Страница 18: ...iring in Switch Housing Set L Switch 54 Rib B Rib A Strain relief 52 is fastened to Switch housing L 50 Assemble Connector A facing its triangle mark to the Switch housing 50 side 50 50 52 52 Put lead...

Страница 19: ...quotation 5 Please contact directly to each manufacturer about the detail of NFC mounting position of your terminal 6 The N mark is the registered trademark of Near Field Communication Forum Inc in U...

Страница 20: ...e no sound 1 5 DUP361 Battery holder Position to be held your terminal over Battery holder Bring antenna of your terminal to NFC mark closer at Battery holder of UP361D 1 6 Preparation of UP361D Prepa...

Страница 21: ...phone line please insert an SIM card When you connect by Wi Fi please turn on Wi Fi of your set up terminal Be sure to set up under Wi Fi environment When you create Google account please identify a...

Страница 22: ...d When Menu screen was displayed tap Maintenance See P 2 1 6 Preparation of your terminal When password input screen is displayed input password according to input example of P5 Attention The displaye...

Страница 23: ...ters enclosed with outer frames into Key1 Key4 When the input of the password is performed correctly Success is displayed and then product information acquisition screen is displayed Input into Key1 I...

Страница 24: ...formation Number of Lock Number of times Load distribution Load variation Menu screen Product information acquisition screen Use history information screen Terms of Use In the product information acqu...

Страница 25: ...s not displayed confirm that ID has been written correctly Letters and characters can be inputted by tapping Note When you tap a diagrammatic chart of the histogram Load distribution you can check the...

Страница 26: ...ntary explanation When you write repairing information to the machine in Send to Tool screen Trip and Error on the Use history information screen will be cancelled If you tap Part1 Part14 on the Servi...

Страница 27: ...you tap Check the record button If you tap Save Data you can save the displayed data on your terminal Saved data can be read from View stored Data If you push Check button right to ID you can get asso...

Страница 28: ...s When you tap build number in set up About phone 7 times optional set up for developers will be enabled Validate USB debugging in set up option for developers Preparations 2 Installation of the drive...

Страница 29: ...P29 29 Saved Use history information...

Отзывы: