


MIDI and CV/Gate Controllers
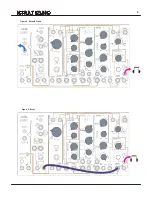
Once powered up, set all Panel Controls to “Default Sound” positions as indicated in
Figure 8 on Page 8.
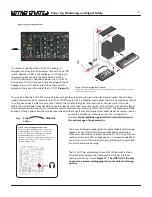
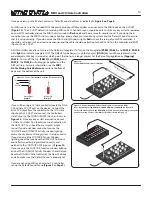
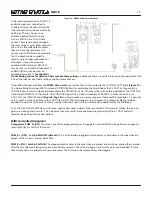
For MIDI control, use the included MIDI Adapter to plug your MIDI controller or sequencer to the MIDI Input on the 0-COAST
(Figure 13)
. The 0-COAST defaults to receiving MIDI on ALL Channels, so you should be able to strike any key or start a sequence
on your MIDI controller and see the MIDI Activity window
<flash red>
and hear a smooth, simple sound. If you do not hear
sound but you see the MIDI Activity windows lighting, please check your monitoring system and the “Default Sound” to ensure
that it is setup correctly. If you do not see the MIDI Activity Windows light
<Red>,
check the setup of your MIDI controller. It
should be set to transmit on at least one channel, and the cable should be attached to the MIDI OUT on the controller and MIDI
INput on the 0-COAST.
A MIDI controller also allows for use of the On Board Arpegiator. To Turn on the Arpegiator
[PRESS]
PGM_A
and
PGM_B
.
PGM_B
will
<light>
to indicate Arpegiator ON. The Default Arp behavior is such that you just
[HOLD]
Keys and they are played in the
order played until a key is released at which point, that note is no longer played. Set the Rate of Arpeggiation by
[Tapping]
PGM_B
. To turn off the Arp,
[PRESS]
both
PGM_A
and
PGM_B
. The
PGM_B
will no longer be lighted and the
ARP will stop. For more information, see the
MIDI
ProGraMming Quick Reference
section at bottom of
page or at the bottom of the unit.
If you will be using a CV/Gate controller, locate the Pitch
CV and Gate CV OUTputs on this device. Connect the
Pitch CV Output from the controller to the 1V/Octave
INput on the 0-COAST and connect the Controller’s
Gate Output to the CONTOUR GATE INput, as shown in
Figure 16
. Strike any key or start a sequence on your
CV/Gate Controller. You should see visual indication of
the GATE OUT. You should hear a smooth, simple
sound. If you do not hear sound, but you see the
CONTOUR and DYNAMICS Activity window lighting,
please check your monitoring system is setup correctly.
If you do not see the CONTOUR Activity Window
lighting, check that you have the GATE OUT from your
controller turned on, programmed correctly, and
patched to the CONTOUR GATE Input, as in
Figure 16.
If you see only the CONTOUR Function window lighting,
and not the DYNAMICS Activity Window, check that you
have the DYNAMIC Panel control set to at least 3 o’clock
and also make sure the “Default Sound” is properly set.
If you are not using MIDI or an external CV Controller,
set-up the Default Sound Drone
(Figure 9
on
Page 9).
10
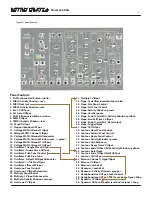
Figure 14:
Typical MIDI Connecctions via Adapter
To MIDI OUT on
MIDI C
ontr
oller
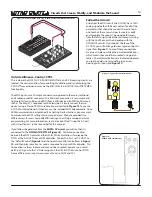
Stereo (TRS)
Minijack
Mono (TS)
Minijack
Tip
Ring
Sleeve
Figure 13: Stereo (TRS) Minijack vs. Mono (TS) Connections
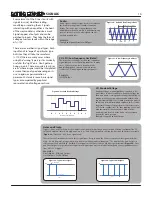
Figure 15: Connecting the 0-Coast to the Korg SQ-1 Sequencer via MIDI
Note: if you will be using MIDI from a KORG MIDI device with MIDI on Mini-Jack
such as the SQ1 Sequencer, the MIDI Adapter Cable is not needed. Simply connect the
two devices using a Stereo (TRS) Mini-Jack cable as shown in Figure 13.
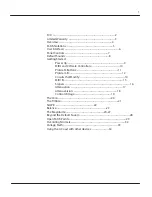
Содержание 0-Coast
Страница 1: ...5 19 16 REV 7 v 1 16...
Страница 9: ...8 Figure 8 Default Sound Figure 9 Drone...


