background image

61

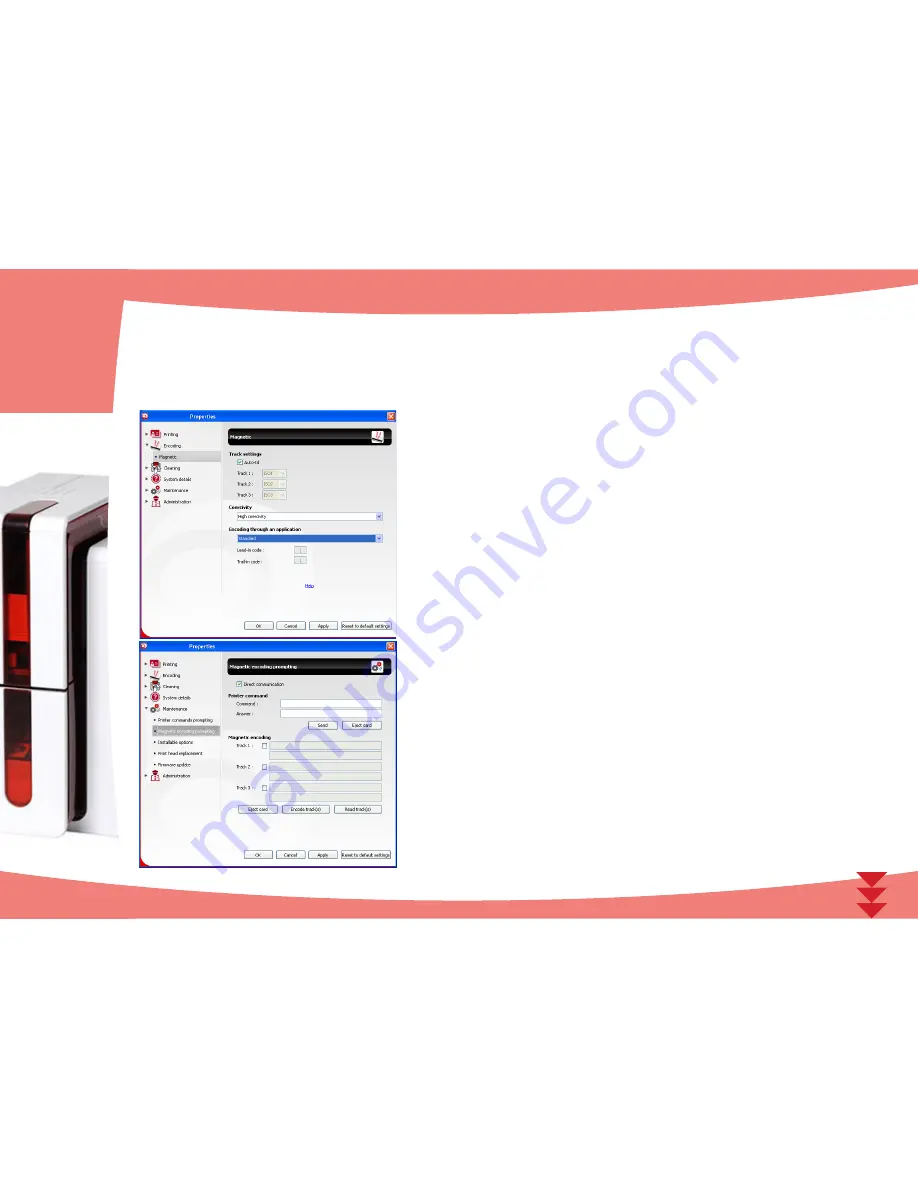
Configuring the MagTek Print Driver

When first installing the MagTek Print Driver, the magnetic encoder functions need to be configured. The magnetic encoder functions may be 

accessed from the MagTek Print Driver Properties by right-clicking the name of the device.

Magnetic Encoder dialogue box

The Magnetic Encoding dialogue box is opened by clicking Encoding followed by Magnetic.

Configure stripes allows you to select the desired format for each stripe. See the table in 

this Appendix for information regarding ISO 7811 standards.

Coercivity sets the magnetic encoding to high (HiCo) or low (LoCo) coercivity. A magnetic 

stripe that is encoded with high coercivity is more resistant to external disturbance than a 

magnetic stripe encoded using low coercivity.

Encoding via an application is used to encode magnetic stripe cards from applications 

under  Windows  (such  as  Word  for  example).  A  text  field  enclosed  within  “|”  and  “|” 

characters (or some other character which the user can define) will be interpreted as an 

encoding command by print driver.

Selecting Maintenance then Dialog with the magnetic encoder, Magnetic encoding allows 

one or more magnetic stripes to be directly encoded from this window simply by selecting 

them and entering the data to be encoded. Click on the Encode stripe(s) button to run the 

encoding cycle.

B

Содержание ExpressCard 500p

Страница 1: ...Installation and Operation Manual MagTek 2015 All rights reserved August 2015 Ref D998200035 rev 20...

Страница 2: ...use or recycle most of the materials in your end of life equipment The crossed out bin symbol on your device is a reminder to use these systems About MagTek Since 1972 MagTek has been a leading manuf...

Страница 3: ...works Contents As with all MagTek products a great deal of care has been taken over this manual Should you find an error however please let us know by emailing us at marketing MagTek com Icons The fol...

Страница 4: ...r be covered by the warranty You will be charged for new packaging for shipping the device back to you Accessories supplied with your device Power supply unit SWITCHBOX Type F10723 A or CWT Type KPL 0...

Страница 5: ...feeder B Card output hopper C Control panel D USB connector type A E USB connector type B F Ethernet connector G Power cable socket H Place for Kensington lock security anchor I Place for card rejecti...

Страница 6: ...erienced users The device should always be disconnected from the power supply unplugged before carrying out any work on it 1 J Thermal print head K Card cleaning roller L Card thickness adjustment gau...

Страница 7: ...ction procedure see the section on Connecting the Device Follow the installation procedure scrupulously All versions of Windows and Macintosh require the user to have administrator rights to install t...

Страница 8: ...o continue installation Accept the default installation location Press NEXT to continue installation Accept the default standard installation Select NEXT to continue Select Start Menu Folder Accept de...

Страница 9: ...ed installation this screen is shown Don t check the Ethernet settings DHCP check box Press the Next button Assemble the printer cables ribbon cards and ready it for connection to an available USB con...

Страница 10: ...e print settings 2 Close the test page dialog screen and press OK on the printer properties page This concludes the printer setup step Change the default settings to the values shown at the left Note...

Страница 11: ...evice select Properties to access the settings or double left click the name of the device Pay attention to the settings defined under the print driver Properties and do not hesitate to contact MagTek...

Страница 12: ...CD in the folder Disk1 Resources ExpressCard 500p Fonts Highlight all of the TTF files in Windows Explorer right click and select Install from the menu Note If using Windows XP highlight all of the T...

Страница 13: ...tly or the device is not working properly Check the installation Before attempting any maintenance ensure that the power cable is always unplugged For your personal safety ensure that the cable and po...

Страница 14: ...manufacturer s warranty for the device For optimum print quality MagTek recommends fully cleaning the device every time the ribbon is changed See the Servicing and Maintenance section of this manual...

Страница 15: ...ce of the cards in order to preserve print quality Do not use cards that have been damaged folded embossed or dropped on the floor Keep your cards protected from dust Loading the cards 1 Open the card...

Страница 16: ...rinted and or encoded cards The device is equipped with an card output hopper with a maximum capacity of 100 x 0 76 mm cards Adjusting card thickness The device is equipped with a manual card thicknes...

Страница 17: ...7 To adjust card thickness 1 Open the card feeder on the device 2 Adjust the thickness of the cards used by moving the gauge from right to left to the desired card thickness 3 Close the feeder 3 1 3 2...

Страница 18: ...itted with a removable card rejection bin which is positioned behind it The card rejection bin can hold 30 cards To empty it just remove the cards in it MagTek recommends that you empty this bin regul...

Страница 19: ...led uninstall it before running the QwickCards com Device Controller setup program 2 Request an EC500p Client Certificate from Support This is the same procedure you followed for the IS380 You have to...

Страница 20: ...Libraries This screen is used to indicate the location where the QC Device Controller is to be installed Leave the defaults as is press the NEXT button to continue This screen indicates the start of t...

Страница 21: ...s You need to have the serialized pfx certificate file for each device before you can use them In addition you need to install your IS380 EC500p device on QwickCards com before you send jobs to them N...

Страница 22: ...Controller shortcut is used to start the QC Device Controller it should detect the EC500p Device get its Serial Number and compare it to the EC500p Client Certificate that was previously set up with t...

Страница 23: ...ller continually polls the QwickCards com Jobs Server for jobs queued to it The IS380 Device Controller waits for a card to be inserted and then queries the QwickCards com Job Server to determine whet...

Страница 24: ...ates that the Device Controller has reported back to the Job Server that the card was successfully created It then returns to the System Idle message as shown in point 1 3 After the job has been recei...

Страница 25: ...not poll the QwickCards com Job Server for jobs The cause of the printer error being off line out of cards ribbon problem must be corrected before new jobs are requested After correcting the error con...

Страница 26: ...printing upgrade by contacting MagTek Support Services The kit comprises an activation key which must be inserted into the device This operation is quick and easy to do Follow the procedure below 1 Tu...

Страница 27: ...l start flashing one after the other for between 5 and 10 seconds Activation has completed successfully when the 3 LEDs remain lit for several seconds then turn off 2 Open the access door 1 and remove...

Страница 28: ...d with a cleaning warning system which is triggered after a certain number of cards have been inserted You should proceed with the routine cleaning of your device as soon as the warning is triggered I...

Страница 29: ...e card through the device cleans the cleaning roller in order to maintain print quality and increases the service life of the print head Open the device access door Remove the ribbon as shown on the d...

Страница 30: ...e card 3 and insert the cleaning card into the feeder as shown adhesive side up 4 Cleaning starts 4 The used cleaning card is ejected automatically into the card output hopper Routine cleaning may als...

Страница 31: ...enever the ribbon is changed and during the routine cleaning using the cotton buds supplied by MagTek You must also protect the print head and its components from any discharge of static electricity U...

Страница 32: ...ton bud is impregnated with alcohol 2 Unplug the power supply cable open the access door then find the print head 3 Gently rub the cotton bud from left to right along the print head for a few seconds...

Страница 33: ...to clean the card feed rollers and the magnetic encoder head To ensure advanced cleaning is carried out properly the procedure given below must be followed 5 2 1 Device Cleaning Recommended cleaning...

Страница 34: ...to the MAX position 6 Remove any cards present in the feeder 7 Double click the cleaning button on the control panel before inserting the cleaning card 8 Take the T shaped cleaning card and insert it...

Страница 35: ...sive card is ejected automatically into the card output hopper Routine cleaning may also be carried out from the Print Driver by clicking on Start cleaning Warning the T shaped card must be used immed...

Страница 36: ...print head directly with your fingers as this could affect print quality or permanently damage the print head The cleaning pen can be used up to 8 times for cleaning the print head Follow the procedur...

Страница 37: ...access door Locate the dust filter 2 Remove the filter by pulling it upwards and slide it out to release it completely 3 After the filter is removed from its slot obtain a cleaning wipe supplied by M...

Страница 38: ...rt Services 6 1 Warnings and Troubleshooting Although the MagTek device was designed to work independently keeping user involvement to a minimum it may nonetheless prove useful to gain some familiarit...

Страница 39: ...gnized Check the condition of the ribbon in the device If you have a print job in progress this restarts with a new card The device is receiving data No cards in the card feeder Put cards back into th...

Страница 40: ...e details refer to section 4 3b If the problem persists contact MagTek Support Services for assistance MECHANICAL ERROR The device requires advanced cleaning See section 3 Maintenance ADVANCED CLEANIN...

Страница 41: ...ating its Firmware The device restarts following the update COOLING MODE WAITING FOR A CARD TO BE INSERTED OR REMOVED FIRMWARE UPDATE The device is waiting for a card to be inserted or removed Insert...

Страница 42: ...er button light comes on Release the pushbutton after the light flashes The test card is printed in color if a color ribbon is fitted in the device or monochrome if the ribbon is monochrome and on bot...

Страница 43: ...Identifying Installed Software Versions You can identify directly the system versions installed print driver set etc In the MagTek Print Driver double click the name of the device to display its Prop...

Страница 44: ...sure you are using the power supply unit supplied with the device Check the USB cable Check that the USB cable is connecting the device to your computer Check the ribbon Check that the ribbon is fitt...

Страница 45: ...damaged Clean or replace the print head Blurred image The ribbon is not correctly fitted Check that the ribbon is correctly positioned in the device Poor ribbon synchronization Open and close the dev...

Страница 46: ...er and the device Try using another cable of the same type Check that the device is clean Clean the device especially the cleaning roller See the maintenance section Check that the cards are clean Sto...

Страница 47: ...e output If there is more than one card always push the top one first Replace the ribbon then close the device access door To prevent card jams Check that the card thickness gauge is correctly adjuste...

Страница 48: ...es ensure a lengthy useful life Nonetheless the print head may sometimes need to be replaced The EC500ps unique design enables users to undertake such replacement with no tools needed simply by follow...

Страница 49: ...ccess door 2 Locate the print head 3 Press on the plastic part behind the head pressure plate and pull on the head with the other hand as shown in the diagram in order to free the lugs from the holdin...

Страница 50: ...he two guides so as to trap the lugs of the fork in their slots Then lower it by pressing on the two forks a click will be heard 3 Connect the cable into its socket making sure it is the right way rou...

Страница 51: ...click Confirm If the print head kit number is not entered correctly device malfunctions may occur and the warranty may be voided Step 4 Cleaning the device On your device s control panel the CLEANING...

Страница 52: ...4 Then double click on the file in the directory in order to run the firmware installation program 5 When requested by the program follow the instructions in order to select the device and start the...

Страница 53: ...www MagTek com 1 Go to the Support Drivers menu then select your device model and click on the Print drivers and Firmware link 2 Then click on the file for the corresponding print driver 3 Accept the...

Страница 54: ...at has occurred A description of the steps that you have taken to resolve the problem In addition to enable you to find answers to your questions 24 7 the www MagTek com website includes a number of a...

Страница 55: ...m speed under special conditions Color up to 210 cards hour single side Monochrome up to 850 cards per hour single side Card management and technical data Automatic or manual feeder Feeder capacity 10...

Страница 56: ...pecific conditions Ports connectivity USB 1 1 compatible 3 0 Optional 802 11b g wireless connection Display LEDs Graphic device notifications1 Feeder empty Cleaning alerts Ribbon nearly finished finis...

Страница 57: ...d noise level Security Place for Kensington lock Data encryption for magnetic encoding Eco design and certifications Standby mode and reduced power consumption Device meets the Energy Related Products...

Страница 58: ...n request Certifications and declaration of conformity CE FCC IEC VCCI CCC KC ErP 2009 125 CE RoHS 13 56 MHz PLL ASK semi duplex operation Power supply Power supply module 100 240 Volts AC 50 60 Hz 1...

Страница 59: ...Co or low coercivity LoCo by a simple click in MagTek Print Driver MagTek magnetic encoders come factory set for high coercivity HiCo Location of the magnetic encoder The magnetic encoder is a module...

Страница 60: ...the card feeder so that the magnetic stripe is facing downward as shown below 1 Open the device card feeder as shown 2 Insert a maximum of 50 cards of thickness 0 76 mm Hold the cards as shown in the...

Страница 61: ...netic encoding to high HiCo or low LoCo coercivity A magnetic stripe that is encoded with high coercivity is more resistant to external disturbance than a magnetic stripe encoded using low coercivity...

Страница 62: ...encoder read write head If inbetweentworoutinedevicecleaningruns every1000cardsinserted theread writeprocessfailswithmorethanonecard itisrecommended to run an advanced device cleaning sequence manuall...

Страница 63: ...The contact station is a module installed either in the factory or on site by a MagTek Authorized Service Provider It is located over the path taken by the cards and after the print head To contact t...

Страница 64: ...that the chip contact is facing upwards as shown below 1 Open the device card feeder as shown 2 Insert a maximum of 50 cards of thickness 0 76 mm smartcard contact upwards Ensure the cards are positi...

Страница 65: ...ted to the contact station inside the device is also connected to an external coupler to program the chip A sequence of commands must be sent via the device s interface to insert a card into the devic...

Страница 66: ...ard is moved from the feeder to the contact station and stops underneath it l The contact station is pushed downwards to make contact with the card l The device connects the contact station to the DB...

Страница 67: ...he encoder including an antenna By means of a specific command the card is positioned close to the antenna such that the card lies within its radio range Reading data from or writing data to the card...

Страница 68: ...gs into the device s female DB 9 socket and into a COM port on the computer A sequence of commands must be sent via the device s interface to insert a card in the device then position it close to the...

Отзывы: